Table Of Contents
Cisco Unified CallManager AutoAttendant
Understanding Cisco Unified CallManager AutoAttendant
Cisco Unified CallManager AutoAttendant Overview
Components of Cisco Unified CallManager AutoAttendant
Installing and Upgrading the Customer Response Solutions (CRS) Engine
Hardware and Software Requirements
Installing or Upgrading Cisco Unified CallManager AutoAttendant
Installing Cisco Unified CallManager AutoAttendant
Configuring Cisco Unified CallManager AutoAttendant and the CRS Engine
Configuration Checklist for Cisco Unified CallManager AutoAttendant
Configuring Cisco Unified CallManager
Configuring a Cisco Unified CallManager User for Cisco Unified CallManager AutoAttendant
Configuring the Cisco Customer Response Solutions Engine
Cluster Setup
Server Setup
Adding a JTAPI Call Control Group
Provisioning Cisco Media Termination Subsystem
Adding a New Cisco Unified CallManager AutoAttendant
Configuring a JTAPI Trigger
Customizing Cisco Unified CallManager AutoAttendant
Modifying an Instance of Cisco Unified CallManager AutoAttendant
Configuring Prompts
Managing Cisco Unified CallManager AutoAttendant
Related Topics
Cisco Unified CallManager AutoAttendant
Cisco Unified CallManager AutoAttendant, a simple automated attendant, allows callers to locate people in your organization without talking to a receptionist. You can customize the prompts that are played for the caller, but you cannot customize how the software interacts with the customer.
Cisco Unified CallManager AutoAttendant comes bundled with Cisco Unified CallManager on the Cisco Unified CallManager 5 agent Cisco Unified Contact Center Express bundle.
This chapter describes Cisco Unified CallManager AutoAttendant that is running on Cisco CRS 4.5.
Note
For information about supported versions of Cisco CRS with Cisco Unified CallManager, see the Cisco Unified CallManager Compatibility Matrix at the following URL: http://www.cisco.com/univercd/cc/td/doc/product/voice/c_callmg/ccmcomp.htm#CompatibleApplications
Use the following topics to understand, install, configure, and manage Cisco Unified CallManager AutoAttendant:
•
Understanding Cisco Unified CallManager AutoAttendant
•
Installing and Upgrading the Customer Response Solutions (CRS) Engine
•
Configuring Cisco Unified CallManager AutoAttendant and the CRS Engine
•
Managing Cisco Unified CallManager AutoAttendant
Understanding Cisco Unified CallManager AutoAttendant
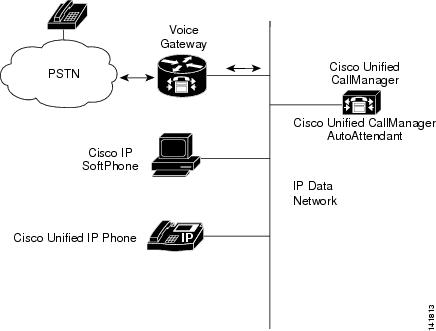
Cisco Unified CallManager AutoAttendant (see Figure 7-1) works with Cisco Unified CallManager to receive calls on specific telephone extensions. The software interacts with the caller and allows the caller to search for and select the extension of the party (in your organization) that the caller is trying to reach.
This section provides an introduction to Cisco Unified CallManager AutoAttendant:
•
Cisco Unified CallManager AutoAttendant Overview
•
Components of Cisco Unified CallManager AutoAttendant
Figure 7-1 Using Cisco Unified CallManager AutoAttendant
Cisco Unified CallManager AutoAttendant Overview
Cisco Unified CallManager AutoAttendant provides the following script:
•
Answers a call
•
Plays a user-configurable welcome prompt
•
Plays a main menu prompt that asks the caller to perform one of three actions:
–
Press 0 for the operator.
–
Press 1 to enter an extension number.
–
Press 2 to spell by name.
•
If the caller chooses to spell by name (by pressing 2), the system compares the letters that are entered with the names that are configured to the available extensions.
–
If a match exists, the system announces a transfer to the matched user and waits for up to 2 seconds for the caller to press any DTMF key to stop the transfer. If the caller does not stop the transfer, the system performs an explicit confirmation: it prompts the user for confirmation of the name and transfers the call to that user's primary extension.
–
If more than one match occurs, the system prompts the caller to choose the correct extension.
–
If too many matches occur, the system prompts the caller to enter more characters.
•
When the caller has specified the destination, the system transfers the call.
–
If the line is busy or not in service, the system informs the caller accordingly and replays the main menu prompt.
Additional Information
See the "Related Topics" section
Components of Cisco Unified CallManager AutoAttendant
The Cisco Customer Response Solutions Platform provides the components that are required to run Cisco Unified CallManager AutoAttendant. The platform provides a multimedia (voice/data/web) IP-enabled customer care application environment.
Note
Cisco Customer Response Solutions (CRS) gets marketed under the names IPCC Express and IP IVR which are products on the Cisco CRS platform.
Cisco Unified CallManager AutoAttendant uses three main components of the Cisco Customer Response Solutions Platform:
•
Gateway—Connects the enterprise IP telephony network to the Public Switched Telephone Network (PSTN) and to other private telephone systems such as Public Branch Exchange (PBX). You must purchase gateways separately.
•
Cisco Unified CallManager Server—Provides the features that are required to implement IP phones, manage gateways, provides failover and redundancy service for the telephony system, and directs voice over IP traffic to the Cisco Customer Response Solutions (Cisco CRS) system. You must purchase Cisco Unified CallManager separately.
•
Cisco CRS Server—Contains the Cisco CRS Engine that runs Cisco Unified CallManager AutoAttendant. The Cisco Unified CallManager AutoAttendant package includes the Cisco CRS Server and Engine.
For more information about the Cisco Customer Response Solutions Platform, refer to the following URL.
http://www.cisco.com/en/US/products/ps5883/index.html
Additional Information
See the "Related Topics" section
Installing and Upgrading the Customer Response Solutions (CRS) Engine
Use these topics to install or upgrade CRS:
•
Hardware and Software Requirements.
•
Installing or Upgrading Cisco Unified CallManager AutoAttendant.
Hardware and Software Requirements
Before you install this version of CRS, you must have a functioning voice over IP system. You must have installed and configured Cisco Unified CallManager 5.0. This software manages the telephony system.
Cisco Unified CallManager AutoAttendant runs on the Cisco Media Convergence Server (Cisco MCS) platform or on a Cisco-certified server.
Ensure that the Cisco Unified CallManager server is running on an appliance based system.
Installing or Upgrading Cisco Unified CallManager AutoAttendant
Install Cisco Unified CallManager on an appliance based system before you install Cisco Unified CallManager AutoAttendant on the CRS server. For information, refer to the following documents:
•
Cisco Unified CallManager installation documentation at
http://www.cisco.com/univercd/cc/td/doc/product/voice/c_callmg/5_0/install/instcall/index.htm
•
Cisco Unified Communications Operating System at
http://www.cisco.com/univercd/cc/td/doc/product/voice/iptel_os/index.htm
You must configure proxy settings for Internet Explorer and verify that you can browse to internal and external web sites. For details on configuring your proxy settings, contact your network administrator.
Before You Begin
Ensure that you have met all preinstallation requirements that are described in Hardware and Software Requirements
This topic describes how to install Cisco Unified CallManager AutoAttendant:
•
Installing or Upgrading Cisco Unified CallManager AutoAttendant.
Installing Cisco Unified CallManager AutoAttendant
The following procedure describes how to install Cisco Unified Contact Center Express 5 Seat Bundle for the first time. Complete the following steps only once after a fresh install.
Procedure 1
Step 1
Download the Cisco Unified CallManager AutoAttendant software package from CCO to an MCS server.
Step 2
To start the installation program, click the .exe file and follow the on-screen instructions.
Additional Information
See the "Related Topics" section
Configuring Cisco Unified CallManager AutoAttendant and the CRS Engine
These topics describe how to configure Cisco Unified CallManager and the Cisco Customer Response Solutions (CRS) Engine in preparation for deploying Cisco Unified CallManager AutoAttendant.
Configuration Checklist for Cisco Unified CallManager AutoAttendant
Table 7-1 describes the procedures that you perform to configure Cisco Unified CallManager AutoAttendant.
Table 7-1 Configuration Checklist for Cisco Unified CallManager AutoAttendant
Configuration Steps
|
Related Procedures and Topics
|
Step 1
|
Configure the Cisco Customer Response Solutions (CRS) Engine. You must install and configure Cisco CRS before you can use Cisco Unified CallManager AutoAttendant. The Cisco CRS Engine controls the software and its connection to the telephony system
|
See "Configuring the Cisco Customer Response Solutions Engine" section.
See also Cisco CRS Installation Guide.
|
Step 2
|
Customize Cisco Unified CallManager AutoAttendant, so its prompts are meaningful to the way that you are using the automated attendant.
|
See the "Customizing Cisco Unified CallManager AutoAttendant" section.
|
Configuring Cisco Unified CallManager
Before you can use Cisco Unified CallManager AutoAttendant, you must configure Cisco Unified CallManager.
These topics assume that you know how to use Cisco Unified CallManager. For more information about Cisco Unified CallManager, refer to the Cisco Unified CallManager Administration Guide and the Cisco Unified CallManager System Guide.
Configuring a Cisco Unified CallManager User for Cisco Unified CallManager AutoAttendant
Create user to log in as a CRS administrator on the AutoAttendant.
Procedure
Step 1
In Cisco Unified CallManager, choose User Management > End User.
Step 2
Cisco Unified CallManager opens the Find and List Users window. Click Add New.
The End User Configuration window displays. Complete the fields as described in Table 7-2.
Step 3
To create the user, click Save.
Cisco Unified CallManager adds the user.
Table 7-2 Configuring a Cisco Unified CallManager User for Cisco Unified CallManager AutoAttendant
Field
|
Description
|
LDAP Sync Status
|
This field displays the LDAP synchronization status, which is set with the System > LDAP > LDAP System menu option.
|
User ID
|
Enter the end user identification name. Cisco Unified CallManager does not permit modifying the user ID after it is created. You may use the following special characters: =, +, <, >, #, ;, \, , "", and blank spaces.
|
Password
|
Enter five or more alphanumeric or special characters for the end user password. You may use the following special characters: =, +, <, >, #, ;, \, , "", and blank spaces.
|
Confirm Password
|
Enter the user password again.
|
PIN
|
Enter five or more numeric characters for the Personal Identification Number.
|
Confirm PIN
|
Enter the PIN again.
|
Last Name
|
Enter the end user last name. You may use the following special characters: =, +, <, >, #, ;, \, , "", and blank spaces.
|
Middle Name
|
Enter the end user middle name. You may use the following special characters: =, +, <, >, #, ;, \, , "", and blank spaces.
|
First Name
|
Enter the end user first name. You may use the following special characters: =, +, <, >, #, ;, \, , "", and blank spaces.
|
Telephone Number
|
Enter the end user telephone number. You may use the following special characters: (, ) and - .
|
Mail ID
|
Enter the end user's mail ID.
|
Manager User ID
|
Enter the name of the end user manager ID. The manager user ID that you enter must already exist in the directory as an end user.
|
Department
|
Enter the end user department information (for example, the department number or name).
|
User Locale
|
From the drop-down list box, choose the locale that is associated with the end user. The user locale identifies a set of detailed information to support end users, including language and font.
Cisco Unified CallManager uses this locale for extension mobility and the Cisco Unified IP Phone User Options. For Cisco Extension Mobility log on, the locale that is specified here takes precedence over the device and device profile settings. For Cisco Extension Mobility log off, Cisco Unified CallManager uses the end user locale that the default device profile specifies.
Note If you do not choose an end user locale, the locale that is specified in the Cisco CallManager service parameters as Default User Locale applies.
|
Associated PC
|
Use this required field for Cisco SoftPhone and Cisco Unified CallManager Attendant Console users.
|
Digest Credentials
|
When you configure digest authentication for SIP phones, Cisco Unified CallManager challenges the identity of the phone every time that the phone sends a SIP request to Cisco Unified CallManager. The digest credentials that you enter in this field get associated with the phone when you choose a digest user in the Phone Configuration window.
Enter a string of alphanumeric characters.
Note For more information on digest authentication, refer to the Cisco Unified CallManager Security Guide.
|
Confirm Digest Credentials
|
To confirm that you entered the digest credentials correctly, enter the credentials in this field.
|
Device Associations
|
Available Devices
|
This list box displays the devices that are available for association with this end user.
To associate a device with this end user, select the device and click the Down Arrow below this list box.
If the device that you want to associate with this end user does not display in this pane, click one of these buttons to search for other devices:
• Find more Phones-Click this button to find more phones to associate with this end user. The Find and List Phones window displays to enable a phone search
• Find more Route Points-Click this button to find more route points to associate with this end user. The Find and List CTI Route Points window displays to enable a CTI route point search.
|
Controlled Devices
|
After the device is associated, this field displays the description information (for example, the MAC address) that the end user controls.
|
Extension Mobility
|
Available Profiles
|
This list box displays the extension mobility profiles that are available for association with this end user.
To associate an extension mobility profile with this end user, select the profile and click the Down Arrow below this list box.
|
Controlled Profiles
|
This field displays a list of controlled device profiles that are associated with an end user who is configured for Cisco Extension Mobility.
|
Default Profile
|
From the drop-down list box, choose a default extension mobility profile for this end user.
|
Presence Group
|
From the drop-down list box, choose the presence group that watches the status of the directory number, the presence entity.
|
SUBSCRIBE Calling Search Space
|
All calling search spaces that you configure in Cisco Unified CallManager Administration display in the SUBSCRIBE Calling Search Space drop-down list box.
The SUBSCRIBE Calling Search Space determines how Cisco Unified CallManager routes the Presence subscription requests that come from the end user. To configure a calling search space specifically for this purpose, you configure a calling search space as you do all calling search spaces (Call Routing > Class Control > Calling Search Space).
|
Allow Control of Device from CTI
|
The system checks this box by default. Leave it checked if you want to allow control of the device from the CTI.
|
Directory Number Associations
|
Primary Extension
|
This field represents the primary directory number for the end user. You choose no primary line when you associate devices to the end user. End users can have multiple lines on their phones.
From the drop-down list box, choose a primary extension for this end user.
If the system is configured for Unity Integration, the Create Voice Mailbox link displays.
|
Additional Information
See the "Related Topics" section
Configuring the Cisco Customer Response Solutions Engine
Configure the Cisco Customer Response Solutions (CRS) Engine to communicate with Cisco Unified CallManager and the Cisco Unified Communications Directory. Perform the configuration steps that are shown in the following sections:
•
Cluster Setup
•
Server Setup
•
Adding a JTAPI Call Control Group
•
Provisioning Cisco Media Termination Subsystem
•
Adding a New Cisco Unified CallManager AutoAttendant
•
Configuring a JTAPI Trigger
•
Modifying an Instance of Cisco Unified CallManager AutoAttendant
These topics only cover the basics of using and configuring Cisco CRS. See the Cisco CRS online help for more detailed information.
Additional Information
See the "Related Topics" section
Tip
To start Cisco CRS Administration, open http://servername/AppAdmin in your web browser, where servername specifies the DNS name or IP address of the application server. Click Help for detailed information about using the interface.
Cluster Setup
Perform the following steps to set up the cluster.
Step 1
Log in to the CRS server by using Administrator as the UserID and ciscocisco as the password.
Step 2
The Cisco CRS Administrator Setup window displays. Click Setup.
Step 3
The License Information window displays. Click Browse to locate the free Cisco Unified Contact Center Express license that you downloaded from CCO. Highlight the license and click Next. The same window may appear again if so, click Next.
Step 4
The CallManager Configuration window displays.
•
Under AXL Service Provider Configuration, you will see the available AXL Service Providers in the field on the right. Select your service provider and click the triangular shaped button that points toward the left. The selected AXL Service Provider appears under Selected AXL Service Providers.
In the User Name and Password fields, enter the username and password that you used to access information through AXL on the Cisco Unified CallManager side.
•
Under JTAPI Subsystem - JTAPI Provider Configuration, in the Available CTI Managers, select the appropriate CTI Manager and click the triangular shaped button that points toward the left. The selected CTI Manager appears under Selected CTI Managers.
In the User Prefix and Password fields, create a User Prefix and Password.
Note
Do nothing in the RmCm Subsystem section of the CallManager Configuration window.
•
Click Next.
Step 5
The User Management window displays. The Cisco CallManager users appear in the CMUsers field. Select the user that was created on the Cisco Unified CallManager, see Configuring a Cisco Unified CallManager User for Cisco Unified CallManager AutoAttendant
•
Click the triangular shaped button that points toward the left. The selected user appears in the CRS Administrator / Supervisor field.
Note
If you click Search, the system will search the Cisco Unified CallManager side for users.
•
Click Next.
Step 6
The Directory Setup window displays. Close your browser.
You have completed cluster setup.
Note
After you set up the username and password in cluster setup, you will need to use that username and password for Server Setup.
Server Setup
Now that you have completed the cluster setup, you must set up the server.
Step 1
From the CRS server, click Start >Programs >Administrator Tools >Services.
Step 2
In the window that displays, highlight the Cisco CRS Node Manager and click the Restart Service button at the top of the window.
Step 3
Launch CRS Administration.
Step 4
Log in to the CRS server by using the user name that you chose on the User Management window in Cluster Setup.
Step 5
The Cisco CRS Administrator Setup window displays. Click Setup.
Step 6
The Component Activation window displays. Check the check boxes next to CRS Agent Datastore, CRS Config Datastore, CRS Engine, CRS Historical Datastore, CRS Node Manager, and CRS Repository Datastore and click Next.
Step 7
The Publisher Activation window displays. Choose your CRS server for each Datastore and click Activate Publisher.
Step 8
The Server Setup window displays and shows that server setup is complete.
Note
Do update the HR session license as shown on the Server Setup window if you are using the CRS Historical Reporting Client.
Note
Now that the server has been setup, you will need to use the new username and password that you created.
Additional Information
See the "Related Topics" section
Adding a JTAPI Call Control Group
Perform the following steps to add a JTAPI call control group.
Step 1
Go to Subsystems > JTAPI. The JTAPI Call Control Configuration window displays.
Step 2
Click Add a New JTAPI Call Control Group. Enter the required information as shown in Table 7-3.
Step 3
Click Add.
Table 7-3 Configuring a JTAPI Call Control Group
Field
|
Description
|
Group Information
|
Group ID
|
This field corresponds to the trunk group number that was reported to Cisco Intelligent Contact Management when the CRS server is part of the Cisco Intelligent Contact Management/Cisco Unified Contact Center Enterprise solution.
Accept the automatic Group ID or enter a unique description.
|
Description
|
Press the Tab key to automatically populate the description field.
|
Number of CTI Ports
|
Enter the number of CTI ports that are assigned to the group.
Note If this field is set to <n>, the system will create <n> ports for each CRS engine node (node in which CRS engine component is enabled).
|
Directory Number
|
Starting Directory Number
|
This field specifies a unique phone number. The value can include numeric characters and special characters # and *.
The specified number of ports get created starting from the value that is specified in this field.
The directory number that you enter can appear in more than one partition.
Note When a pattern is used as a directory number, the phone display and the caller ID display on the dialed phone will contain characters of the digits. To avoid this situation, provide a value for Display (Internal Call ID), Line Text Label, and External Phone Number Mask.
|
Device Name Prefix
|
The system uses the device name prefix (DNP) in the name that will be given all the CTI ports in this group.
The CTI ports for this port group will have the device name of the format:
<deviceprefix>_<directoryno>
For example, if the device name prefix is
CTIP and the starting directory number is
7000, the CTI port that is created in
Cisco Unified CallManager will have the
device name CTIP_7000 and will use the line
7000.
Note The system restricts the device name prefix to 5 characters.
|
Device Pool
|
This field specifies the device pool (sets of common characteristics for devices such as region, date/time group, softkey template, and MLPP information) to which you want to assign this phone.
|
DN Calling Search Space
|
This field specifies a collection of partitions that are searched to determine how a dialed number should be routed, the calling search space for the device and the calling search space for the directory number get used together. The directory number CSS takes precedence over the device CSS.
|
Redirect Calling Search Space
|
This field specifies a collection of partitions that are searched to determine how a redirected call should be routed.
|
Media Resource Group List
|
A prioritized grouping of media resource groups. An application chooses the required media resource, such as a Music On hold server, from the available media resources according to the propriety order that is defined in a Media Resource Group List.
If you choose None, Cisco Unified CallManager uses the Media Resource Group that is defined in the device pool.
|
Location
|
The Cisco Unified IP Phone location setting specifies the total bandwidth that is available for calls to and from this location. A location setting of None means that the location feature does not keep track of the bandwidth that this Cisco Unified IP Phone consumes.
|
Partition
|
This field specifies the partition to which the directory number belongs. The directory number field value is unique within the partition that you choose.
If you do not want to restrict access to the directory number, select None as the partition setting.
|
Directory Number Setting
|
Voice Mail Profile
|
From the drop-down list, choose None, NoVoiceMail or Default.
|
AAR Group
|
From the drop-down list, choose the automated alternate routing (AAR) group for this device. The AAR group provides the prefix digits that are used to route calls that are otherwise blocked due to insufficient bandwidth. An AAR group setting of None specifies that no rerouting of blocked calls will be attempted.
|
User Hold Audio Source
|
From the drop-down list, choose the audio source that will play when a user initiates a hold action.
|
Network Hold Audio Source
|
From the drop-down list, choose the audio source that will play when a user initiates a hold action.
|
Call Pickup Group
|
From the drop-down list, choose the number that can be dialed to answer calls to this directory number in the specified partition.
|
Display
|
Enter a maximum of 40 alphanumeric characters. Typically, use the user name or the directory number (if the directory number is used, the receiving phone may not show the proper identity of the caller).
Leave this field blank to have the system display the extension.
|
External Phone Number Mask
|
Enter a maximum of 30 numbers and "X" characters to indicate the phone number (or mask) that is used to send Caller ID information when a call is placed from this line.
The Xs represent the directory number and must appear at the end of the pattern.
If you specify a mask of 972813XXXX, an
internal call form extension 1234 displays
a caller ID number of 9728131234.
|
Provisioning Cisco Media Termination Subsystem
You can choose different types of media, from a simple type of media that is capable of supporting prompts and DTMF (Cisco Media Termination) to a more complex and rich type of media that is capable of supporting speech recognition in addition to prompts and DTMFs. You can even provision calls without media. Because of these capabilities, you must provision media manually. Each call requires both a CTI port and a media channel for the system to be backward compatible or to support media interactions.
Furthermore, because media resources are licensed and sold as IVR ports, you can provision more channels than you are licensed for and, at run-time, licensing will be enforced to prevent the system from accepting calls, as this would violate your licensing agreements.
You can provision Call Control groups, multiple CMT Dialog groups, and Nuance ASR Dialog groups to allow for the sharing of resources between different applications. In addition, you can provision special applications to primarily use specific sets of resources. You can do this, for example, when you configure a JTAPI Trigger. For more information, see the Cisco Customer Response Solutions Administration Guide.
Provisioning CMT Dialog Groups
The Cisco CRS server uses the Real-Time Transport Protocol (RTP) to send and receive media packets over the IP network. To ensure that the CRS Engine can communicate with your Cisco Unified Communications system, you need to configure the RTP ports that the CRS Engine will use to send and receive RTP data.
To configure a CMT Dialog, perform the following steps:
Procedure
Step 1
Connect to Cisco CRS Administration.
Step 2
From the CRS Administration main menu, choose Subsystems > Cisco Media.
The Cisco Media Termination Dialog Group Configuration window displays.
Step 3
Click the Add a New CMT Dialog Group hyperlink.
The second Cisco Media Termination Dialog Group Configuration window displays.
Step 4
Accept the automatic group ID or enter a group ID in the Group ID field.
Note
Ensure this Group ID is unique within all media group identifiers, including ASR.
Step 5
To automatically populate the Description field, press the Tab key.
Step 6
Enter a maximum number of channels that are available for the group in the Maximum Number Of Channels field.
Step 7
Click Add.
The Cisco Media Termination Dialog Group Configuration window displays.
Adding a New Cisco Unified CallManager AutoAttendant
After you have configured the JTAPI subsystem on the Cisco CRS Engine, you can use one of the sample scripts to create an application and start the Cisco CRS Engine. To add a new Cisco Unified CallManager AutoAttendant, use this procedure.
Tip
To start Cisco CRS Administration, open http://servername/AppAdmin in your web browser, where servername specifies the DNS name or IP address of the application server. Click Help for detailed information on using the interface.
Procedure
Step 1
From the CRS Administration main menu, choose Applications > Application Management.
Cisco CRS Administration opens Application Configuration window.
Step 2
Click the Add New Application link on the Application Configuration window.
The Add a New Application window displays.
Step 3
Click Next.
The Cisco Script Application window displays.
Step 4
In the Name field, enter the name of the application.
Step 5
To automatically populate the Description field, press the Tab key.
Step 6
In the ID field, enter a unique ID. The ID gets reported in Historical Reporting to identify this application.
Note
The system automatically generates an ID; therefore, you can use the ID that the field contains or erase the value and enter a new one.
Step 7
In the Maximum Number of Sessions field, enter the maximum number of sessions that can be running this application simultaneously.
Note
Depending on the Script and Default Script selection, the window may refresh and provide additional fields and drop-down menu options.
Step 8
From the Script drop-down arrow, choose the script that will be running the application. The script for Cisco Unified CallManager AutoAttendant specifies aa.aef.
Step 9
From the Default Script drop-down menu, accept System Default. The default script executes when an error occurs with the configured application script.
Step 10
Click Add.
The following message displays:
"The operation has been executed successfully"
Step 11
To close the dialog box, click OK.
Additional Information
See the "Related Topics" section
Configuring a JTAPI Trigger
Perform the following steps to configure a JTAPI trigger.
Step 1
Choose Subsystems > JTAPI. The JTAPI Call Control Group Configuration window displays.
Step 2
In the left column, click JTAPI Triggers. The JTAPI Trigger Configuration window displays.
Step 3
Click the Add a New JTAPI Trigger link. The second JTAPI Trigger Configuration window displays.
Step 4
Enter the required information as shown in Table 7-4.
Step 5
Click Add.
Step 6
Choose Systems > Control Center, check CRS Engine - JTAPI to ensure it is running. If it is not, click radio button and click restart.
Table 7-4 Configuring a JTAPI Trigger
Field
|
Description
|
Directory Number
|
Directory Number
|
Enter a unique telephone number. The value includes numeric characters, preceded or appended by special characters (# or *).
Examples of valid directory numbers:
Example of an invalid directory number:
|
Partition
|
Enter the partition of the directory to which the directory number belongs. Ensure the directory number field value is unique within the chosen partition.
If you do not want to restrict access to the directory number, select None as the partition setting.
|
Trigger Information
|
Language
|
From the drop-down list choose the preferred language.
If your preferred language does not appear in the drop-down box, click Edit.
• The Employer User Prompt dialog box opens. Enter a locale string value.
• Click OK. The locale string value now will appear in the drop-down list.
• Choose the preferred language.
|
Application Name
|
From the drop-down list, choose the application to associate with the trigger.
|
Maximum Number of Sessions
|
Enter the maximum number of simultaneous calls that this trigger can handle.
|
Idle Timeout (in ms)
|
Enter the number of milliseconds that the system should wait before rejecting the JTAPI request for this trigger.
|
Enabled
|
To enable the trigger, choose Yes.
To disable the trigger, choose No.
|
Call Control Group
|
From the drop-down list, choose the call control group to associate with the trigger.
|
Primary Dialog Group
|
From the drop-down list, choose the dialog group to associate with the trigger (if media is required by the associated application).
|
Secondary Dialog Group
|
From the drop-down list, choose a backup dialog group to associate with the trigger if the primary dialog group does not have enough resources to provide for an incoming call on this trigger.
|
CTI Route Point Information
|
Device Name
|
Enter a unique identifier for this device, consisting of alphanumeric characters, dots, dashes, or underscores.
|
Description
|
Enter a descriptive name for the CTI route point.
|
Device Pool
|
From the drop-down list choose the device pool to which you want to assign this route point. A device pool defines sets of common characteristics for devices, such as region, date/time group, softkey template, and MLPP information.
|
Location
|
From the drop-down list choose the total bandwidth that is available for calls to and from this location. A location setting of Hub_None means that the locations feature does not keep track of the bandwidth that this route point uses.
|
Directory Number Settings
|
Voice Mail Profile
|
From the drop-down list of voice mail profiles that are configured in the Voice Mail Profile configuration, choose the profile to which you want to associate this directory number.
The default specifies None.
|
Calling Search Space
|
From the drop-down list of partitions that are searched for numbers that are called from this directory number, choose the value to apply to all devices that use this directory number.
|
Call Forward and Pickup Settings
|
Forward Busy
|
You have several options:
• Voice Mail - Check this check box to use settings in the Voice Mail Profile Configuration.
Note When this check box is checked, Cisco Unified CallManager ignores the setting in the Destination box and Calling Search Space.
• Destination - Enter the destination to which the call should be forwarded.
• Calling Search Space - From the drop-down list, choose the calling search space to which the call should be forwarded.
|
Call Pickup Group
|
From the drop-down list, choose a number that can be dialed to answer calls to this directory number (in the specified partition).
|
Display
|
Leave this field blank to have the system display the extension of the caller.
Or, enter a maximum of 30 alphanumeric characters. Typically, use the user name or the directory number (if using the directory number, the person receiving the call may not see the proper identity of the caller.).
|
External Phone Number Mask
|
Enter the phone number (or mask) that is used to send Caller ID information when a call is placed from this line
You can enter a maximum of 30 numbers and "X" characters. The Xs represent the directory number and must appear at the end of the pattern.
For example, if you specify a mask of
972813XXXX, an external call from extension
1234 displays a caller ID number of
9728131234.
|
Customizing Cisco Unified CallManager AutoAttendant
Cisco Unified CallManager AutoAttendant comes with a prerecorded welcome prompt. By default, it spells out user names; it does not attempt to pronounce names. You can customize your automated attendant by adding your own welcome prompt and recordings of your user spoken names. These topics describe how to customize Cisco Unified CallManager AutoAttendant:
•
Modifying an Instance of Cisco Unified CallManager AutoAttendant
•
Configuring Prompts
Modifying an Instance of Cisco Unified CallManager AutoAttendant
This section describes how to modify Cisco Unified CallManager AutoAttendant settings.
Tip
To start Cisco CRS Administration, open http://servername/AppAdmin in your web browser, where servername specifies the DNS name or IP address of the application server. Click Help for detailed information on using the interface.
Procedure
Step 1
From the Cisco CRS Administration main window, choose Applications > Configure Applications. The Application Configuration window displays.
Step 2
Click the instance of Cisco Unified CallManager AutoAttendant that you want to configure. The Cisco Script Application window displays
Step 3
You can change these settings:
•
Description—The description of the application.
•
ID—The application ID. The system reports the ID in Historical Reporting to identify this application.
•
Maximum Number of Sessions—The maximum number of simultaneous callers that can use this automated attendant. This number should not exceed the number of CTI ports that were created for its use.
•
Enabled—Indication that the automated attendant is running.
•
Script—The script that will be running the application.
•
welcomePrompt—The prompt that initially plays when the automated attendant answers the phone. See Configuring the Welcome Prompt, for information about how to upload prompts.
•
MaxRetry—The number of times that a caller is returned to the Cisco Unified CallManager AutoAttendant script main menu if caller encounters an error. The default specifies 3.
•
operExtn—The extension of the phone that the operator will use.
•
Default Script—The script that executes when an error occurs with the configured application script.
Step 4
Click Update.
Additional Information
See the "Related Topics" section
Configuring Prompts
Through Cisco CRS Administration Media Configuration, you can modify the prompts that Cisco Unified CallManager AutoAttendant uses. You can also upload spoken names for each person in the organization, so callers receive spoken names rather than spelled-out names when the automated attendant is asking the caller to confirm which party they want.
These topics describe how to customize these features:
•
Recording the Welcome Prompt
•
Configuring the Welcome Prompt
•
Uploading a Spoken Name
Recording the Welcome Prompt
Cisco Unified CallManager AutoAttendant comes with a prerecorded, generic welcome prompt. You should record your own welcome prompt to customize your automated attendant for the specific role that it is to fulfill for your organization.
You can use any sound recording software to record the welcome prompt if the software can save the prompt in the required file format. You can record a different welcome prompt for each instance of Cisco Unified CallManager AutoAttendant that you create.
This section describes how to record the welcome prompt by using Microsoft Sound Recorder. Save the prompt as a .wav file in CCITT (mu-law) 8-kHz, 8-bit, mono format. You must have a microphone and speakers on your system to use the software.
Procedure
Step 1
Start the Sound Recorder software; for example, by choosing Start > Programs > Accessories > Entertainment > Sound Recorder.
Step 2
Click the Record button and say your greeting into the microphone.
Step 3
When you finish the greeting, click the Stop button.
Step 4
To check your greeting
a.
Click the Rewind button (also called "Seek to Start") or drag the slider back to the beginning of the recording.
b.
To play the recording, click the Play button. Rerecord your greeting until you are satisfied.
Step 5
When you are satisfied with your greeting, save the recording:
a.
Choose File > Save As.
b.
To set the recording options, click Change. (You can also do this by choosing Properties from the Sound Recorder File menu). Choose these options:
•
Name—Choose [untitled].
•
Format—Choose CCITT u-law.
•
Attributes—Choose 8.000 kHz, 8 Bit, Mono 7 kb/sec.
You can save these settings to reuse later by clicking Save As and entering a name for the format.
c.
To close the Sound Selection window, click OK.
d.
Browse to the directory where you want to save the file, enter a file name, and click Save. Use the .wav file extension.
Additional Information
See the "Related Topics" section
Configuring the Welcome Prompt
Cisco Unified CallManager AutoAttendant can only use welcome prompts that are stored on the Cisco CRS Engine. To configure your automated attendant to use a customized welcome prompt, you must upload it to the server and configure the appropriate Cisco Unified CallManager AutoAttendant instance.
Tip
To start Cisco CRS Administration, open http://servername/AppAdmin in your web browser, where servername specifies the DNS name or IP address of the application server. Click Help for detailed information on using the interface.
Procedure
Step 1
From the Cisco CRS Administration main menu, choose Applications > Prompt Management.
The Prompt Management window displays.
Step 2
From the Language Directory drop-down menu, choose the specific language and directory where the prompt should be uploaded.
Step 3
To add a new prompt
a.
Click the Add a new prompt hyperlink.
The the Prompt File Name dialog box displays.
b.
To open the Choose file dialog box, click Browse.
c.
Navigate to the source .wav file folder and double-click the .wav file that you want to upload to the Cisco CRS Engine.
d.
Confirm your choice in the Destination File Name field by clicking in the field.
e.
To upload the .wav file, click Upload.
The system displays a message that the upload was successful.
f.
Click the Return to Prompt Management hyperlink.
The window refreshes, and the file displays in the Prompt Management window.
Step 4
To replace an existing prompt with a new .wav file
a.
Click the arrow in the Upload column for the prompt that you want to modify.
The Choose file dialog box opens.
b.
Enter the name of the .wav file that you want to use to replace the existing prompt.
c.
When you have provided the .wav file and prompt name information, click Upload.
Additional Information
See the "Related Topics" section
Uploading a Spoken Name
By default, Cisco Unified CallManager AutoAttendant spells out the names of parties when it asks a caller to choose between more than one matching name or to confirm that the user wants to connect to the party. You can upload spoken names to the system, so your automated attendant plays spoken names rather than spelling them out.
To upload Cisco Unified CallManager Spoken Names in your users voices, upload the corresponding .wav files into the directory by performing the following steps:
Procedure
Step 1
Ask users to record their names in the manner that is described in the "Recording the Welcome Prompt" section and to save their files as userId.wav, where userId is their user name.
Step 2
Connect to Cisco CRS Administration. Choose Tools > User Management. The User Management window displays
Step 3
From the menu on the left, click the Spoken Name Upload link.
The Spoken Name Prompt Upload window displays. In the User ID field, enter a unique identifier of the user for which the spoken name is to be uploaded.
Step 4
In the Codec field, the codec that was chosen during installation for this CRS server automatically displays.
Step 5
In the Spoken Name (.wav) field, browse to the .wav file that you want to upload. Click it and then click Open
Step 6
From the Spoken Name Prompt Upload page, click Upload.
See the "Related Topics" section
Managing Cisco Unified CallManager AutoAttendant
Use Cisco CRS Administration to manage Cisco Unified CallManager AutoAttendant. Use the online help to learn how to use the interface and perform these tasks. Table 7-5 describes the management tasks.
Table 7-5 Managing Cisco Unified CallManager AutoAttendant
Task
|
Purpose
|
Commands (from the Cisco CRS Administration main window)
|
Start and stop the Cisco CRS Engine
|
Make sure that the engine is running for your automated attendant to work. You can stop and restart the engine to help resolve or troubleshoot problems.
|
Choose System > Control Center and click the Cisco CRS Engine in the menu on the left. In the list that appears, find "CRS Engine". In the Status column, if a triangular button points to the right, you know that the engine is running.
If a square shows in this column, you know that the engine is not running. To restart the engine, click the radio button next to "CRS Engine" and click Restart.
If the engine is running and you want to stop it, click the radio button next to "CRS Engine" and click Stop.
|
Change the Cisco CRS Engine configuration
|
Modify the engine configuration to resolve problems.
|
Choose System > System Parameters.
|
Set up trace files
|
Set up trace files to collect troubleshooting information.
|
Choose System > Tracing; then, click Trace File Configuration. See the online help for detailed information.
|
View trace files
|
View trace files to see the results of your tracing.
|
Choose System > Control Center; then, click server name. Click the Server Traces link. Choose the trace file that you created.
|
Monitor performance in real time
|
You can monitor the performance of the system while it is running if you install the real-time reporting monitor.
|
Choose Tools > Real-Time Reporting. See the online help for information on using Real Time Reporting.
|
Additional Information
See the "Related Topics" section
Related Topics
•
Understanding Cisco Unified CallManager AutoAttendant
•
Cisco Unified CallManager AutoAttendant Overview
•
Installing and Upgrading the Customer Response Solutions (CRS) Engine
•
Components of Cisco Unified CallManager AutoAttendant
•
Hardware and Software Requirements
•
Installing or Upgrading Cisco Unified CallManager AutoAttendant
•
Installing or Upgrading Cisco Unified CallManager AutoAttendant
•
Configuring the Cisco Customer Response Solutions Engine
•
Configuring a Cisco Unified CallManager User for Cisco Unified CallManager AutoAttendant
•
Configuration Checklist for Cisco Unified CallManager AutoAttendant
•
Configuring Cisco Unified CallManager
•
Configuring the Cisco Customer Response Solutions Engine
•
Cluster Setup
•
Server Setup
•
Adding a JTAPI Call Control Group
•
Provisioning Cisco Media Termination Subsystem
•
Adding a New Cisco Unified CallManager AutoAttendant
•
Configuring a JTAPI Trigger
•
Customizing Cisco Unified CallManager AutoAttendant
•
Modifying an Instance of Cisco Unified CallManager AutoAttendant
•
Configuring Prompts
•
Configuring the Welcome Prompt
•
Recording the Welcome Prompt
•
Uploading a Spoken Name
•
Managing Cisco Unified CallManager AutoAttendant