Feedback
Table Of Contents
Installing Cisco MDS DMM Software
DMM Management Installation and Configuration Tools
Enabling DMM with Fabric Manager
Configuring Migration Rate Using the CLI
Configuring Migration Rate Using Fabric Manager
Getting Started
This chapter describes how to install and configure the Cisco MDS DMM software. The required tasks are described in the following sections:
•
Installing Cisco MDS DMM Software
•
Installing Cisco MDS DMM Software
The Cisco MDS DMM feature runs on the Storage Service Module (SSM) in a MDS 9000 series switch.
The DMM software package is included in the SSI image as a part of the SAN-OS or NX-OS.
For information on how to install the SSM image, refer to Cisco MDS 9000 Family Storage Services Module Software Installation and Upgrade Guide.
Using DMM Software Licenses
You can use the Cisco MDS DMM software without a license for a period of 120 days.
To purchase a license for DMM, use one of the following product identifiers for the MDS 9500 family:
•
•
Use one of the following product identifiers for the MDS 9200 family:
•
•
You may purchase a DMM license for an SSM in a fabric that does not have a Fabric Manager license. In this configuration, you can open multiple fabrics in Fabric Manager and use the DMM functionality. Full Fabric Manager functionality is not available. For example, performance manager, desktop client remote login, and web client fabric reporting are not available without an Fabric Manager license.
For more information about installing or upgrading software licenses, refer to Cisco MDS 9000 Family NX-OS Licensing Guide.
Note
DMM Management Installation and Configuration Tools
Cisco MDS DMM supports a CLI tool and a GUI tool for configuring and managing data migrations. The tools are described in these sections:
DMM CLI
The Cisco MDS DMM feature uses the CLI on the MDS switch and on the SSM.
No DMM-specific tasks are required to install or configure the CLI. For additional information about the CLI, refer to "Related Documentation" section on page -x.
DMM GUI (Fabric Manager)
The Cisco MDS 9000 Fabric Manager, a Java-based GUI, manages Cisco MDS 9000 Family switches using SNMP. The GUI for the Cisco MDS DMM is integrated into Fabric Manager.
To use the DMM GUI, complete the following tasks:
•
Installing Fabric Manager
The DMM GUI software is bundled into the Fabric Manager software package.
For information about installing Fabric Manager software, refer to the Cisco Fabric Manager Fundamentals Configuration Guide.
Configuring SSH on the Switch
The DMM GUI communicates with the SSM using a secure shell protocol (SSH) connection. Before using DMM, you need to enable SSH on the switch that hosts the SSM.
For information about configuring SSH, see the SSH chapter of the Cisco Fabric Manager Security Configuration Guide and the Cisco MDS 9000 Family NX-OS Security Configuration Guide.
Configuring IP Connectivity
SSMs and the supervisor module in an MDS switch communicate over VSAN 1 using IP. You need to configure an IP subnetwork for VSAN 1 on the MDS switch.
SSMs communicate with their peer SSMs using the management IP network (See Figure 2-1). Each DMM-enabled SSM on the management IP network must have a unique subnetwork address configured for VSAN 1.
Configuring IP over Fibre Channel (IPFC) for an SSM consists of the following tasks:
•
The IP subnet can use a private address space because these addresses will not be advertised. As noted, the subnet number needs to be unique for each SSM-enabled MDS switch that is connected to the same management IP subnetwork.
•
CPP IP addresses needs to be in the same subnet as the VSAN 1 interface.
•
The CPP interfaces and the VSAN 1 interface need to be zoned together.
•
•
Configure the default-gateway for the CPP interface to point to the VSAN 1 IP address, so that all IP traffic from the CPP interface is routed to the management interface.
•
Configure static routes in the switch to each SSM-enabled peer switch to enable routing of packets between peer SSMs.
Figure 2-1 IP Configuration
The following example is based on the configuration and subnetwork numbers shown in Figure 2-1. The example shows the configuration for MDS switch 1:
•
MDS-1# configure terminalMDS-1(config)# interface vsan 1MDS-1(config-if)# ip address 10.10.1.1 255.255.255.0MDS-1(config-if)# no shutdownMDS-1(config-if)# exit•
MDS-1(config)# interface cpp 8/1/1MDS-1(config-if)# ip address 10.10.1.6 255.255.255.0MDS-1(config-if)# no shutdownMDS-1(config-if)# exit•
MDS-1(config)# zone name DMM_IP_MGMT vsan 1MDS-1(config-zone)# member pwwn 22:00:00:20:37:39:15:09MDS-1(config-zone)# member pwwn 21:00:00:e0:8b:05:76:28MDS-1(config-zone)# exitThe zone created for the IPFC interfaces must be added to the existing zone set in VSAN 1 and the zone set must be re-activated to include the new zone. If a zone set does not exist in VSAN 1, create a zone set. Add the zone to the zone set and activate the zone set.
For additional information about creating and activating zone set, refer to the Cisco Fabric Manager Security Configuration Guide and the Cisco MDS 9000 Family NX-OS Security Configuration Guide.
•
MDS-1(config)# ip routing•
MDS-1(config)# ip default-gateway 10.10.1.1 interface cpp 8/1/1•
MDS-1(config)# ip route 10.10.2.0 255.255.255.0 172.22.43.94You can also create a host specific route to point to the ipfc interface on the peer:
ip route 10.10.2.1 255.255.255.255 172.22.43.94The following example shows the configuration for MDS switch 2 (see Figure 2-1):
MDS-2# configure terminalMDS-2(config)# interface vsan 1MDS-2(config-if)# ip address 10.10.2.1 255.255.255.0MDS-2(config-if)# no shutdownMDS-2(config-if)# exitMDS-2(config)# interface cpp 8/1/1MDS-2(config-if)# ip address 10.10.2.7 255.255.255.0MDS-2(config-if)# no shutdownMDS-2(config-if)# exitMDS-2(config)# zone name DMM_IP_MGMT vsan 1MDS-2(config-zone)# member pwwn 22:00:00:20:25:19:25:11MDS-2(config-zone)# member pwwn 21:00:00:c0:7d:76:04:15MDS-2(config-zone)# exitMDS-2(config)# ip routingMDS-2(config)# ip default-gateway 10.10.2.1 interface cpp 8/1/1MDS-2(config)# ip route 10.10.1.1 255.255.255.0 172.22.43.95For additional information about configuring IPFC, refer to the Cisco Fabric Manager IP Services Configuration Guide and the Cisco MDS 9000 Family NX-OS IP Services Configuration Guide.
Enabling the DMM Feature
You can use the CLI or the Fabric Manager GUI to enable the DMM feature. The two methods are described in the following sections:
•
Enabling DMM with the CLI
To enable DMM on an SSM and to provision ports to use the DMM feature, follow these steps:
Enabling DMM with Fabric Manager
To enable DMM for an SSM and MSM using Fabric Manager, and to provision ports to use the DMM service, follow these steps:
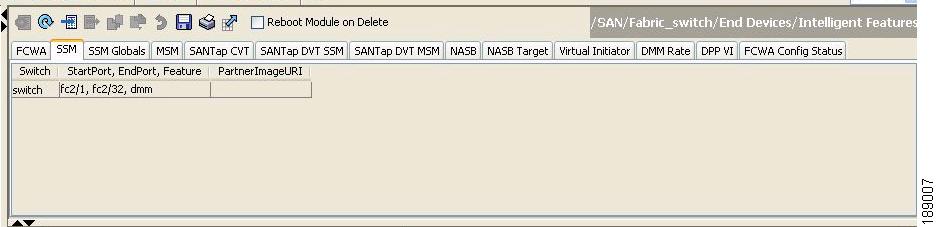
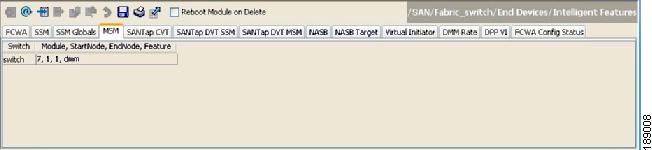
Step 1
Choose either SSM or MSM to provision DMM.
a.
You see the set of configured services in the Information pane as shown in Figure 2-2.
Figure 2-2 SSM Tab
b.
You see the set of configured services in the Information pane as shown in Figure 2-3.
Figure 2-3 MSM Tab
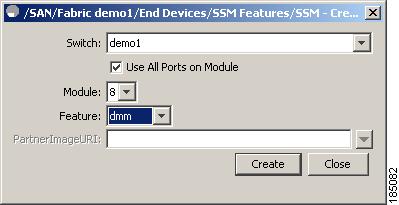
Step 2
You see the Create SSM dialog box shown in Figure 2-4.
Figure 2-4 Create SSM Dialog Box
Step 3
Step 4
Step 5
Step 6
Configuring Migration Rate
When a migration job is created, you can configure the migration rate as fast, medium, or slow. Use the CLI or the Fabric Manager GUI to configure the values for these rates, as described in the following sections:
•
•
Configuring Migration Rate Using the CLI
To configure the values associated with the fast, medium, and slow migration rates, follow this step:
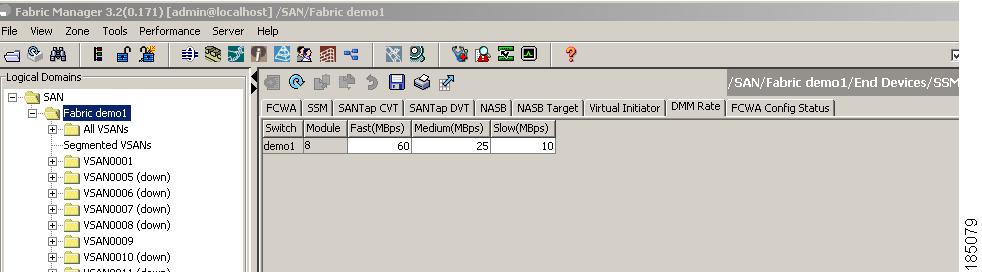
The following example sets the fast migration rate to 100 MB/s for the SSM in slot 4:
MDS-1(config)# dmm module 4 rate_of_migration fast 100 medium 25 slow 10Configuring Migration Rate Using Fabric Manager
To configure the values to associate with the fast, medium, and slow migration rates, follow these steps:
Step 1
You see the SSM services in the Information pane.
Step 2
You see the set of configured services in the Information pane as shown in Figure 2-5.
Figure 2-5 Configuring Migration Rate
Step 3
Step 4
Step 5
Note