Downloads |
Table Of Contents
About Cisco Validated Design (CVD) Program
VMware Built on FlexPod Deployment Guide
VMware Built on FlexPod Overview
VMware Built on FlexPod Configuration Deployment
VMware ESXi Deployment Procedure
VMware vCenter Server Deployment Procedure
Cisco Nexus 1010 and 1000V Deployment Procedure
NetApp Virtual Storage Console Deployment Procedure
NetApp Operations Manager Deployment Procedure
Appendix—VMware Built on FlexPod Configuration Information
Nexus 1010 and 1000V Configuration Information
VMware Configuration Information
Cisco Nexus 5548 Sample Running Configuration
Cisco Nexus 1010 Sample Running Configuration
Cisco Nexus 1000V Sample Running Configuration
VMware Built on FlexPod Deployment GuideLast Updated: August 31, 2011
Building Architectures to Solve Business Problems
About the Authors
David Antkowiak, Solutions Architect, Systems Development Unit, Cisco SystemsDavid Antkowiak is a Solutions Architect with the Systems Development Unit (SDU). With over 10 years of experience in various private and government organizations, his areas of focus have included virtual desktop infrastructure, server virtualization, cloud migration, and storage design. Prior to joining Cisco, David was Solutions Architect at JetBlue. David holds a masters degree from Florida State University and two VMware certifications.
Chris Reno, Reference Architect, Infrastructure and Cloud Engineering, NetAppChris Reno is a reference architect in the NetApp Infrastructure and Cloud Enablement group and is focused on creating, validating, supporting, and evangelizing solutions based on NetApp products. Before his current role, he worked with NetApp product engineers designing and developing innovative ways to do Q&A for NetApp products, including enablement of a large grid infrastructure using physical and virtualized compute resources. In these roles, Chris gained expertise in stateless computing, netboot architectures, and virtualization.
Mike Zimmerman, Reference Architect, Infrastructure and Cloud Enablement, NetAppMike Zimmerman is a Reference Architect in NetApp's Infrastructure and Cloud Engineering team. He focuses on the implementation, compatibility, and testing of various vendor technologies to develop innovative end-to-end cloud solutions for customers. Zimmerman started his career at NetApp as an architect and administrator of Kilo Client, NetApp's internal cloud infrastructure, where he gained extensive knowledge and experience building end-to-end shared architectures based upon server, network, and storage virtualization.
Wen Yu, Senior Infrastructure Technologist, VMwareWen Yu is a Sr. Infrastructure Technologist at VMware, with a focus on partner enablement and evangelism of virtualization solutions. Wen has been with VMware for six years during which time four years have been spent providing engineering level escalation support for customers. Wen specializes in virtualization products for continuous availability, backup recovery, disaster recovery, desktop, and vCloud. Wen Yu is VMware, Red Hat, and ITIL certified.
About Cisco Validated Design (CVD) Program
The CVD program consists of systems and solutions designed, tested, and documented to facilitate faster, more reliable, and more predictable customer deployments. For more information visit http://www.cisco.com/go/designzone.
ALL DESIGNS, SPECIFICATIONS, STATEMENTS, INFORMATION, AND RECOMMENDATIONS (COLLECTIVELY, "DESIGNS") IN THIS MANUAL ARE PRESENTED "AS IS," WITH ALL FAULTS. CISCO AND ITS SUPPLIERS DISCLAIM ALL WARRANTIES, INCLUDING, WITHOUT LIMITATION, THE WARRANTY OF MERCHANTABILITY, FITNESS FOR A PARTICULAR PURPOSE AND NONINFRINGEMENT OR ARISING FROM A COURSE OF DEALING, USAGE, OR TRADE PRACTICE. IN NO EVENT SHALL CISCO OR ITS SUPPLIERS BE LIABLE FOR ANY INDIRECT, SPECIAL, CONSEQUENTIAL, OR INCIDENTAL DAMAGES, INCLUDING, WITHOUT LIMITATION, LOST PROFITS OR LOSS OR DAMAGE TO DATA ARISING OUT OF THE USE OR INABILITY TO USE THE DESIGNS, EVEN IF CISCO OR ITS SUPPLIERS HAVE BEEN ADVISED OF THE POSSIBILITY OF SUCH DAMAGES.
THE DESIGNS ARE SUBJECT TO CHANGE WITHOUT NOTICE. USERS ARE SOLELY RESPONSIBLE FOR THEIR APPLICATION OF THE DESIGNS. THE DESIGNS DO NOT CONSTITUTE THE TECHNICAL OR OTHER PROFESSIONAL ADVICE OF CISCO, ITS SUPPLIERS OR PARTNERS. USERS SHOULD CONSULT THEIR OWN TECHNICAL ADVISORS BEFORE IMPLEMENTING THE DESIGNS. RESULTS MAY VARY DEPENDING ON FACTORS NOT TESTED BY CISCO.
The Cisco implementation of TCP header compression is an adaptation of a program developed by the University of California, Berkeley (UCB) as part of UCB's public domain version of the UNIX operating system. All rights reserved. Copyright © 1981, Regents of the University of California.
Cisco and the Cisco Logo are trademarks of Cisco Systems, Inc. and/or its affiliates in the U.S. and other countries. A listing of Cisco's trademarks can be found at http://www.cisco.com/go/trademarks. Third party trademarks mentioned are the property of their respective owners. The use of the word partner does not imply a partnership relationship between Cisco and any other company. (1005R)
Any Internet Protocol (IP) addresses and phone numbers used in this document are not intended to be actual addresses and phone numbers. Any examples, command display output, network topology diagrams, and other figures included in the document are shown for illustrative purposes only. Any use of actual IP addresses or phone numbers in illustrative content is unintentional and coincidental.
VMware Built on FlexPod Deployment Guide
© 2011 Cisco Systems, Inc. All rights reserved.
VMware Built on FlexPod Deployment Guide
VMware Built on FlexPod Overview
Industry trends indicate a vast data center transformation toward shared infrastructures. Enterprise customers are moving away from silos of information and moving toward shared infrastructures to virtualized environments and eventually to the cloud to increase agility and reduce costs.
FlexPod™ is a predesigned, base configuration that is built on the Cisco® Unified Computing System™ (UCS), Cisco Nexus® data center switches, and NetApp® FAS storage components and includes a range of software partners. FlexPod can scale up for greater performance and capacity or it can scale out for environments that need consistent, multiple deployments. FlexPod is a baseline configuration, but also has the flexibility to be sized and optimized to accommodate many different use cases.
VMware Built on FlexPod is a platform that can address current virtualization needs and simplify their evolution to ITaaS infrastructure. It is built on the FlexPod infrastructure stack with added VMware® components including VMware vSphere™ and vCenter™ for virtualized application workloads. The FlexPod Deployment Guide is available at: http://www.cisco.com/en/US/docs/solutions/Enterprise/Data_Center/Virtualization/flexpod_deploy.html.
NetApp partners may access additional information at: https://fieldportal.netapp.com/.
Audience
This document describes the general procedures for deploying VMware on a base FlexPod. The intended audience of this document includes, but is not limited to, sales engineers, field consultants, professional services, IT managers, partner engineering, and customers who want to deploy the VMware Built on FlexPod architecture.
NoteFor more deployment information, Cisco, NetApp, and VMware partners should contact their local account teams or visit: http://www.netapp.com/us/technology/flexpod/.
VMware Built on FlexPod Configuration Deployment
The first step is to setup and configure the base FlexPod (see the FlexPod Deployment Guide available at: http://www.cisco.com/en/US/docs/solutions/Enterprise/Data_Center/Virtualization/flexpod_deploy.html).
The following section provides information on configuring VMware vSphere and vCenter on a base FlexPod. The FlexPod for VMware architecture is flexible, so the exact configuration detailed below may vary depending on specific customer implementation requirements. The practices, features, and configurations below may be used to build a customized VMware Built on FlexPod deployment.
Cabling Information
Follow the cabling instructions in the FlexPod Deployment Guide available at: http://www.cisco.com/en/US/docs/solutions/Enterprise/Data_Center/Virtualization/flexpod_deploy.html.
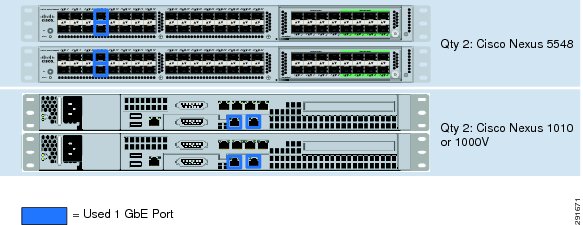
NoteFigure 1 VMware Built on FlexPod Cabling
Table 1 VMware Built on FlexPod Ethernet Cabling Information
Cisco Nexus1 5548 A
Eth1/7
1GbE
Cisco Nexus 1010 A
Eth1
Eth1/8
1GbE
Cisco Nexus 1010 B
Eth1
Cisco Nexus1 5548 B
Eth1/7
1GbE
Cisco Nexus 1010 A
Eth2
Eth1/8
1GbE
Cisco Nexus 1010 B
Eth2
Nexus 1010 A (only used with VMware
Eth1
1GbE
Nexus 5548 A
Eth1/7
Eth2
1GbE
Nexus 5548 B
Eth1/7
Nexus 1010 A (only used with VMware
Eth1
1GbE
Nexus 5548 A
Eth1/8
Eth2
1GbE
Nexus 5548 B
Eth1/8
1 The Cisco Nexus 1010 virtual appliances require the use of two 1GbE Copper SFP+'s (GLC-T=).
VMware ESXi Deployment Procedure
This section describes the installation of ESXi 4.1 on the Cisco UCS and should result in the following:
•
•
•
The following outlines the process for installing VMware ESXi within a FlexPod environment.
•
There are multiple methods for installing ESXi within such an environment. In this case, an ISO image is mounted via the KVM console to make ESXi accessible to the blade.
•
•
•
•
•
•
•
•
•
•
•
•
NoteVMware vCenter Server Deployment Procedure
The following section describes the installation of VMware vCenter 4.1 within a FlexPod environment and results in the following:
•
•
•
•
The deployment procedures necessary to achieve these objectives include:
•
•
•
Note•
•
•
•
•
•
•
NoteCisco Nexus 1010 and 1000V Deployment Procedure
The following section outlines the procedures to deploy the Cisco Nexus 1010 and 1000v platforms within a FlexPod environment. At the completion of this section the following should be in place:
•
•
•
•
The following procedures are required to meet these objective.
•
•
•
•
•
•
–
–
–
–
–
•
•
•
NetApp Virtual Storage Console Deployment Procedure
The following presents the general procedures for installing the NetApp Virtual Storage Console for use in a VMware Built on FlexPod environment.
•
Note
Note•
•
•
NetApp Operations Manager Deployment Procedure
The following section provides the general procedures for configuring the NetApp Operations Manager which is part of the DataFabric Manager (DFM) 4.0 suite for use in a VMware Built on FlexPod environment. After completing this section the following should be available:
•
–
–
–
•
The following section provides the procedures for configuring NetApp Operations Manager for use in a VMware Built on FlexPod environment.
•
Note•
•
•
•
•
•
•
•
Appendix—VMware Built on FlexPod Configuration Information
The following tables outline the information which needs to be available to complete the setup and deployment of VMware Built on FlexPod.
Nexus 1010 and 1000V Configuration Information
This information is used with the Nexus 1010 and 1000V deployment in the environment.
VMware Configuration Information
The information in Table 3 is specific to the VMware specifc portion of the deployment.
Cisco Nexus 5548 Sample Running Configuration
version 5.0(3)N2(1)feature fcoefeature npivfeature fport-channel-trunkfeature telnetfeature tacacs+cfs ipv4 distributecfs eth distributefeature lacpfeature vpcfeature lldpfeature fexlogging level aaa 5logging level cdp 6logging level vpc 6logging level lldp 5logging level flogi 5logging level radius 5_[7m--More--_[mlogging level tacacs 5logging level monitor 6logging level session-mgr 6logging level port-channel 6logging level spanning-tree 6role distributerole commitusername admin password 5 $1$EaGDiyA3$MFDqLd80A1y/b7sk57EWO/ role network-adminip domain-lookuptacacs-server key 7 "K1kmN0gy"ip tacacs source-interface mgmt0tacacs-server host 172.26.162.216 timeout 3tacacs-server host 172.26.162.214aaa group server tacacs+ TacacsServerserver 172.26.162.216deadtime 1use-vrf managementsource-interface mgmt0hostname DC24-N5K-1logging event link-status defaultlogging event trunk-status defaultservice unsupported-transceiver_[7m--More--_[mclass-map type qos class-fcoeclass-map type queuing class-all-floodmatch qos-group 2class-map type queuing class-ip-multicastmatch qos-group 2class-map type network-qos class-all-floodmatch qos-group 2class-map type network-qos class-ip-multicastmatch qos-group 2policy-map type network-qos jumboclass type network-qos class-fcoepause no-dropmtu 2158class type network-qos class-defaultmtu 9216system qosservice-policy type network-qos jumbosnmp-server user admin network-admin auth md5 0xa4b33c3268a7f0d1d2fdceea57d08390priv 0xa4b33c3268a7f0d1d2fdceea57d08390 localizedkeysnmp-server host 172.26.165.6 traps version 2c public udp-port 2162snmp-server host 172.26.162.250 traps version 2c public udp-port 1163snmp-server host 172.26.162.250 traps version 2c public udp-port 1164snmp-server host 64.102.87.252 traps version 2c public udp-port 1163snmp-server host 172.26.165.6 traps version 2c public udp-port 1163snmp-server enable traps entity frusnmp-server community RO group network-operatorntp server 172.26.162.9 use-vrf managementvrf context managementip route 0.0.0.0/0 172.26.162.1vlan 1vlan 2name New_Nativevlan 10name NAS_GLOBAL_VLANvlan 11name VLAN11vlan 12name VLAN12vlan 18fcoe vsan 18name GLOBAL_VSAN18_FCOEvlan 20fcoe vsan 20name GLOBAL_VSAN20_FCOEvlan 101-163vlan 164name Mgmtvlan 165-200,301-500vlan 501name Tenant_41_Ext_Applicationvlan 502name Tenant_41_Publicvlan 503-508vlan 509name Tenant_41_RAC_Privatevlan 510-600vlan 900name Nexus1010_Trafficvpc domain 100role priority 100peer-keepalive destination 172.26.164.28interface Ethernet1/7description *** drs24-n1010-1 Mgmt Int port 1 ***switchport mode trunkswitchport trunk allowed vlan 185spanning-tree port type edge trunkspanning-tree bpdufilter enableinterface Ethernet1/8description *** drs25-n1010-1 Mgmt Int port 1 ***switchport mode trunkswitchport trunk allowed vlan 185spanning-tree port type edge trunkspanning-tree bpdufilter enableCisco Nexus 1010 Sample Running Configuration
version 4.0(4)SP1(1)username admin password 5 $1$EVg2LPBC$EX8pjL9GBayKAaUmwjLjD. role network-adminntp server 10.61.185.9ip domain-lookupip host n1010-1 10.61.185.165kernel core target 0.0.0.0kernel core limit 1system default switchportsnmp-server user admin network-admin auth md5 0x7ccf323f71b74c6cf1cba6d255e9ded9 priv 0x7ccf323f71b74c6cf1cba6d255e9ded9 localizedkeysnmp-server enable traps licensevrf context managementip route 0.0.0.0/0 10.61.185.1switchname n1010-1vlan 1,162,950vlan 902name datavdc n1010-1 id 1limit-resource vlan minimum 16 maximum 513limit-resource monitor-session minimum 0 maximum 64limit-resource vrf minimum 16 maximum 8192limit-resource port-channel minimum 0 maximum 256limit-resource u4route-mem minimum 32 maximum 80limit-resource u6route-mem minimum 16 maximum 48network-uplink type 3virtual-service-blade drs1-vsm1virtual-service-blade-type name VSM-1.0interface control vlan 950interface packet vlan 950ramsize 2048disksize 3no shutdownvirtual-service-blade drs2-vsm1virtual-service-blade-type name VSM-1.0interface control vlan 950interface packet vlan 950ramsize 2048disksize 3no shutdownvirtual-service-blade drs3-vsm1virtual-service-blade-type name VSM-1.0interface control vlan 950interface packet vlan 950ramsize 2048disksize 3no shutdownvirtual-service-blade NAMvirtual-service-blade-type name NAM-1.0interface data vlan 902ramsize 2048disksize 53no shutdown primaryinterface mgmt0ip address 10.61.185.165/16interface control0logging logfile messages 6boot kickstart bootflash:/nexus-1010-kickstart-mz.4.0.4.SP1.1.binboot system bootflash:/nexus-1010-mz.4.0.4.SP1.1.binboot kickstart bootflash:/nexus-1010-kickstart-mz.4.0.4.SP1.1.binboot system bootflash:/nexus-1010-mz.4.0.4.SP1.1.binsvs-domaindomain id 51control vlan 950Cisco Nexus 1000V Sample Running Configuration
version 4.0(4)SV1(3b)username admin password 5 $1$hgzMSZ3F$NCCbwTw4Z8QU5yjIo7Me11 role network-adminssh key rsa 2048ntp server 10.61.185.3ip domain-lookupip host n1010-1-vsm 10.61.185.137kernel core target 0.0.0.0kernel core limit 1system default switchportvem 3host vmware id 737ff954-0de3-11e0-0000-000000000001vem 4host vmware id 737ff954-0de3-11e0-0000-000000000002snmp-server user admin network-admin auth md5 0xfe02f063cf936282f39c604c06e628df priv 0xfe02f063cf936282f39c604c06e628df localizedkeysnmp-server enable traps licensevrf context managementip route 0.0.0.0/0 10.61.185.1hostname n1010-1-vsmvlan 1vlan 185name MGMT-VLANvlan 900name NFS-VLANvlan 901name vMotion-VLANvlan 950name VM-Traffic-VLANvdc n1010-1-vsm id 1limit-resource vlan minimum 16 maximum 513limit-resource monitor-session minimum 0 maximum 64limit-resource vrf minimum 16 maximum 8192limit-resource port-channel minimum 0 maximum 256limit-resource u4route-mem minimum 32 maximum 80limit-resource u6route-mem minimum 16 maximum 48port-profile type vethernet MGMT-VLANvmware port-groupswitchport mode accessswitchport access vlan 185no shutdownsystem vlan 185state enabledport-profile type vethernet NFS-VLANvmware port-groupswitchport mode accessswitchport access vlan 900no shutdownsystem vlan 900state enabledport-profile type ethernet Unused_Or_Quarantine_Uplinkdescription Port-group created for Nexus1000V internal usage. Do not use.vmware port-groupshutdownstate enabledport-profile type vethernet Unused_Or_Quarantine_Vethdescription Port-group created for Nexus1000V internal usage. Do not use.vmware port-groupshutdownstate enabledport-profile type vethernet VM-Traffic-VLANvmware port-groupswitchport mode accessswitchport access vlan 950no shutdownsystem vlan 950state enabledport-profile type ethernet system-uplinkdescription system profile for blade uplink portsvmware port-groupswitchport mode trunkswitchport trunk allowed vlan 185,900-901,950system mtu 9000channel-group auto mode on mac-pinningno shutdownsystem vlan 185,900-901,950state enabledport-profile type vethernet vMotion-VLANvmware port-groupswitchport mode accessswitchport access vlan 901no shutdownsystem vlan 901state enabledinterface port-channel1inherit port-profile system-uplinkmtu 9000interface port-channel2inherit port-profile system-uplinkmtu 9000interface Ethernet3/1inherit port-profile system-uplinkmtu 9000interface Ethernet3/2inherit port-profile system-uplinkmtu 9000interface Ethernet4/1inherit port-profile system-uplinkmtu 9000interface Ethernet4/2inherit port-profile system-uplinkmtu 9000interface mgmt0ip address 10.61.185.137/24interface Vethernet1inherit port-profile MGMT-VLANdescription VMware VMkernel, vmk0vmware dvport 35interface Vethernet2inherit port-profile NFS-VLANdescription VMware VMkernel, vmk1vmware dvport 67interface Vethernet3inherit port-profile vMotion-VLANdescription VMware VMkernel, vmk2vmware dvport 130interface control0boot kickstart bootflash:/nexus-1000v-kickstart-mz.4.0.4.SV1.3b.bin sup-1boot system bootflash:/nexus-1000v-mz.4.0.4.SV1.3b.bin sup-1boot kickstart bootflash:/nexus-1000v-kickstart-mz.4.0.4.SV1.3b.bin sup-2boot system bootflash:/nexus-1000v-mz.4.0.4.SV1.3b.bin sup-2svs-domaindomain id 10control vlan 950packet vlan 950svs mode L2svs connection vCenterprotocol vmware-vimremote ip address 10.61.185.114 port 80vmware dvs uuid "2d 5b 20 50 21 69 05 64-2c 68 d0 b3 63 bf b2 9f" datacenter-name FlexPod_DC_1connectReferences
•
•
•