Feedback Feedback
|
Table Of Contents
Cisco AnyConnect Secure Mobility Client for Apple iOS User Guide, Release 2.4
Devices Supported by Cisco AnyConnect 2.4 for Apple iOS
Enabling the Apple iOS Connect On Demand Feature
Cisco AnyConnect Secure Mobility Client for Apple iOS User Guide, Release 2.4
Updated: September 27, 2010,Contents
This document describes the Cisco AnyConnect Secure Mobility Client 2.4 for Apple iOS and includes the following sections:
•
Devices Supported by Cisco AnyConnect 2.4 for Apple iOS
•
•
Introduction
The Cisco AnyConnect Secure Mobility Client for Apple iOS provides seamless and secure remote access to enterprise networks. The client allows any installed application to communicate as though connected directly to the enterprise network. It is available from the iTunes App Store. All distribution and updates will be provided from the App Store, not the ASA. Connections take only a few seconds each to be added into the application.
The user interface of the application has been designed to integrate tightly with the look and feel of Apple iOS. However, the functionality is similar to that found in the desktop AnyConnect client.
Devices Supported by Cisco AnyConnect 2.4 for Apple iOS
AnyConnect requires Apple iOS 4.1 or later and runs on the following Apple devices:
•
•
•
•
Note
Installation
The Cisco AnyConnect Secure Mobility Client for Apple iOS is installed from the iTunes App Store like any other iOS application. To install directly from the device via an EDGE, 3G, or Wi-Fi connection:
Step 1
Step 2
Step 3
Step 4
Step 5
Step 6
The application can also be installed via iTunes on a computer connected to the Internet.
Getting Started
Cisco AnyConnect Secure Mobility Client for Apple iOS provides similar functionality to the AnyConnect client for Windows, Mac OS X, and Linux. Your organization may provide documentation on using AnyConnect on Apple iOS. If not, you should refer to your organization's standard AnyConnect documentation.
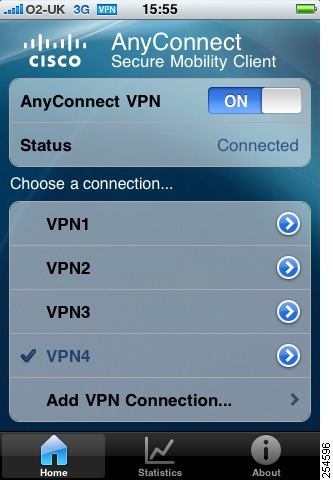
When you open the application, the Home tab is displayed.
From this tab you can switch AnyConnect VPN on and off. When you are connected to a VPN, an icon is displayed in the status area. The status of the current connection is shown below the switch.
You can scroll the list of connections to display the available connections.
Note
Select a connection to enable it or select the arrow icon to configure the connection.
You can select Add VPN Connection to add a new connection.
Select the Statistics tab to display statistics for the current connection.
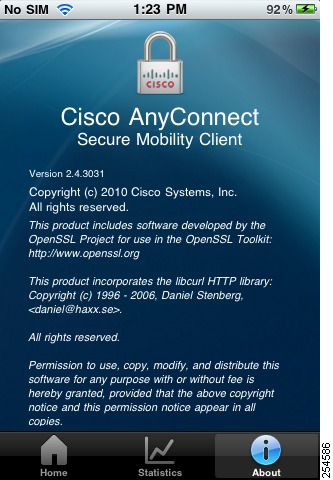
Select the About tab to display the version, copyright, and licensing information for AnyConnect.
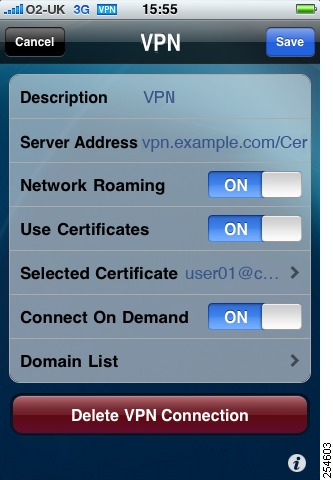
Configuring a VPN Connection
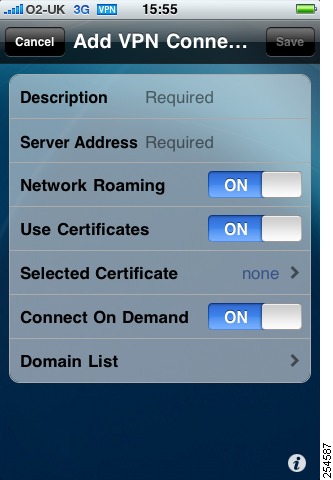
Whether you are adding a new VPN connection or configuring an existing connection, the screen you see is the same.
Select Cancel to return to the Home screen without saving your changes.
Select Save to save your changes. This button is dimmed until you have completed all of the required fields.
Select Description to enter a unique case-sensitive name for the connection.
Select Server Address to enter the domain name, IP address, or Group URL of the ASA, for example asa2.example.com.
Switch on Network Roaming to reconnect when your network changes. You may wish to enable this for applications that require a sustained connection to the VPN. Network changes occur when roaming between cellular (EDGE and 3G) and Wi-Fi networks, or when your device wakes up. Unless this option is enabled, AnyConnect will attempt to reconnect for 20 seconds and then disconnect if the connection cannot be re-established. Enabling this option may reduce battery life. If this option is switched off then you will have to manually reestablish the VPN connection when switching between EDGE, 3G or Wi-Fi.
Note
Switch on Use Certificate to specify a certificate to use when connecting to a tunnel group that requires a certificate. This option requires at least one client certificate to be installed. See Using Certificates.
Select Selected Certificate to specify the certificate used for authentication when connecting to the ASA.
Switch on the Apple iOS Connect On Demand feature to initiate a VPN connection when accessing domains in the domain list. This option requires a certificate to be installed for the connection.
Select Domain List to configure the list of domains that you want to use the Apple iOS Connect On Demand feature. See Editing the Domain List.
Select the information icon ( i ) to display the online help.
If you are editing an existing connection, you can select the Delete button to permanently remove the connection.
Note
Using Certificates
If your IT department has chosen to use certificates they should inform you how to obtain a certificate. A certificate is required by the Apple iOS Connect On Demand feature to enable VPN connections to be established without user interaction.
Certificates can be installed using several different methods:
•
•
•
•
When connecting to the ASA, the Authentication page is displayed.
The exact display will depend on how your network administrator has configured the ASA. You may be prompted to enter details before selecting Get Certificate. You may then be prompted to enter a user name and a one-time password.
When one or more certificates are installed, you will be able to switch on Use Certificates.
You must specify which certificate you want to use in the VPN connection settings. If you are not using any other form of authentication it is best to use a GroupURL to connect, if your IT support department has made one available to you.
Selecting a Certificate
When Use Certificates is switched on, you must specify a certificate by selecting Selected Certificate and choosing a certificate from the list.
For each certificate the following is shown:
•
•
•
Enabling the Apple iOS Connect On Demand Feature
The Apple iOS Connect On Demand feature enables the establishment of VPN connections specified in the Domain List without user interaction. All applications should be compatible with the Connect on Demand framework. However, it is not possible to prevent an application that makes a DNS request from potentially triggering a VPN connection. Connect on Demand supports only certificate authenticated connections (see Using Certificates).
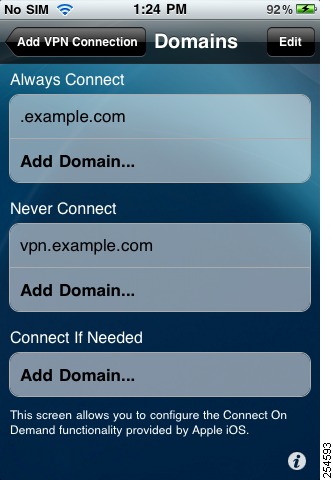
Editing the Domain List
You can create lists of rules including host names such as a domain (example.com), a sub-domain (internal.example.com), or a partial domain (.example.com), to perform one of three actions.
For domains in the Always Connect list, Apple iOS will always attempt to initiate a VPN connection to the addresses in the list.
Apple iOS will never attempt to initiate a VPN connection to addresses in the Never Connect list.
For domains in the Connect if Needed list, Apple iOS will attempt to initiate a VPN connection to addresses in the list only if it could not resolve the address using DNS.
You can move rules from one list to another.
You can click the information icon ( i ) to display the online help.
You should always include a leading period (.) in a partial domain (.example.com) otherwise any domain ending in the partial domain (*example.com) will be matched.
IP addresses are not supported.
Rules are applied in the following order:
1.
2.
3.
There is no maximum limit on the number of rules that can be created.
Note
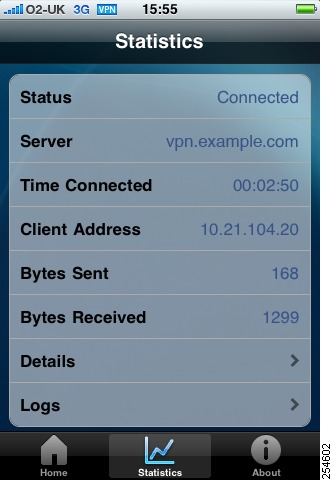
Viewing Statistics
Select the Statistics tab to view statistics for the current VPN connection.
The following information is displayed:
•
•
•
•
•
•
In addition you can select Details to view detailed statistics or Logs to view the log files.
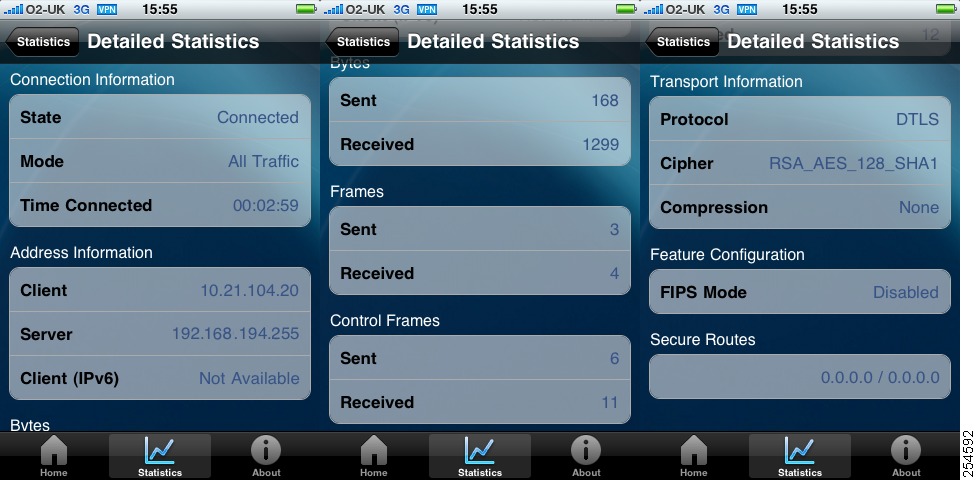
Viewing Detailed Statistics
Select Statistics then select Details to display the Statistics Details screen. The full set of AnyConnect statistics is available by scrolling the Statistics Details screen.
The following statistics are displayed:
•
–
–
–
•
–
–
–
•
–
–
•
–
–
•
–
–
•
–
–
–
–
•
–
•
•
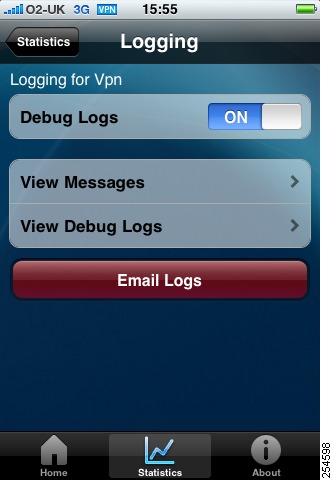
Viewing Logs
Select the Statistics tab then select Logs to display the Logging screen.
From here you can switch logging on and off. Logging is switch ed off by default because it puts an extra load on your device's resources. You should enable logging only for troubleshooting purposes.
Select View Messages to display the messages.
Select View Debug Logs to display the logs.
Select Email Logs to send the logs to an email address.
Note
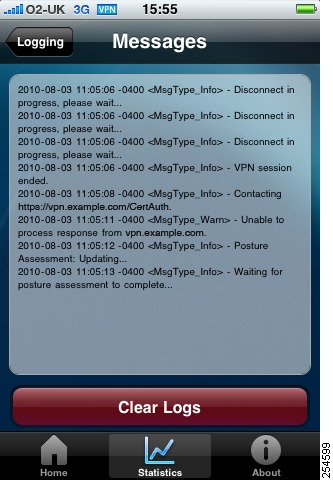
Viewing Messages
Select the Statistics tab, select Logs, then select View Messages to display the Messages screen.
Select Logging to return to the Logging screen. You can select Clear Logs to clear the messages.
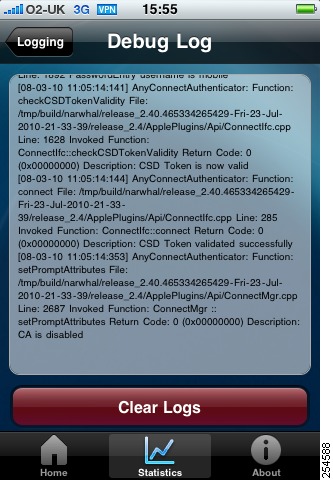
Viewing Debug Logs
Select the Statistics tab, select Logs, then select View Debug Logs to display the Debug Log screen.
Select Logging to return to the Logging screen. You can select Clear Logs to clear the debug logs.
Sending Logs via Email
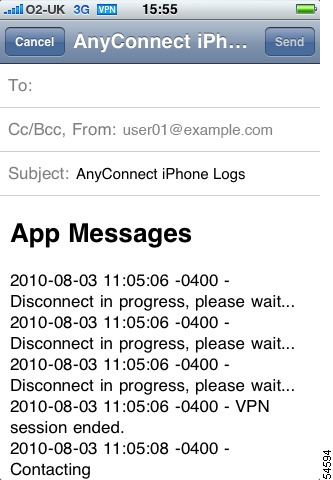
Select the Statistics tab, select Logs, then select Email Logs to open the Mail application and create an email containing the current logs.
Enter the recipient email address in the To area and edit the Subject if required.
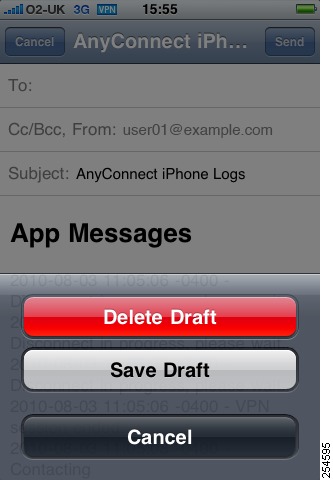
Select Send to send the email. Alternatively, select Cancel to return to the AnyConnect application without sending the email.
Removing AnyConnect
AnyConnect 2.4 for Apple iOS can be removed from the device in the same way as any other application. Close the application to return to the Home screen. If you have placed AnyConnect in a folder, open the folder. Select and hold the AnyConnect icon until the delete icon ( X ) is shown on the application, then select the delete icon to remove it.
Troubleshooting
This section describes solutions to common problems. If after trying these solutions problems still persist, contact your organization's IT support department.
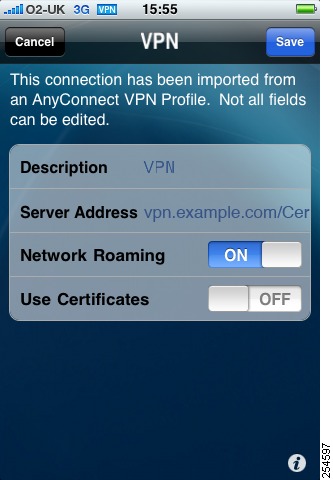
I cannot edit/delete some profiles
This is due to policy set by your administrator which affects host entries imported from your AnyConnect XML Profile.
Errors while trying to save or edit configuration
This is caused by a known issue with the operating system. Apple is working to resolve it. As a workaround, try restarting the application.
Connection time-outs and unresolved hosts
This is normally due to Internet connectivity issues, such as low cell signal level.
VPN connection is not re-established when the device wakes from sleep
Ensure Network Roaming is enabled. If the issue is not resolved, check your EDGE, 3G, or Wi-Fi connection.
Note
Certificate based authentication does not work
Ensure the appropriate certificate has been selected for the connection. If the issue is not resolved, check the validity and expiration of the certificate.
The Apple iOS Connect On Demand feature is not working or connecting unexpectedly
Ensure the connection does not have a conflicting rule in the Never Connect list. If a Connect If Needed rule exists for the connection, try replacing it with an Always Connect rule.
AnyConnect failed to establish a connection but no error message was displayed
Messages can be displayed only when the AnyConnect application is open.
A profile called Cisco AnyConnect exists that cannot be deleted
Try restarting the application.
When I remove the AnyConnect application, VPN configurations still appear in the Apple iOS VPN Settings
This is a known issue and will be addressed in a future release.
Open Software License Notices
OpenSSL SSL Project
This product includes software developed by the OpenSSL Project for use in the OpenSSL Toolkit (http://www.openssl.org/).
This product includes cryptographic software written by Eric Young (eay@cryptsoft.com).
This product includes software written by Tim Hudson (tjh@cryptsoft.com).
Cisco and the Cisco logo are trademarks or registered trademarks of Cisco and/or its affiliates in the U.S. and other countries. To view a list of Cisco trademarks, go to this URL: www.cisco.com/go/trademarks. Third-party trademarks mentioned are the property of their respective owners. The use of the word partner does not imply a partnership relationship between Cisco and any other company. (1110R)
Any Internet Protocol (IP) addresses and phone numbers used in this document are not intended to be actual addresses and phone numbers. Any examples, command display output, network topology diagrams, and other figures included in the document are shown for illustrative purposes only. Any use of actual IP addresses or phone numbers in illustrative content is unintentional and coincidental.
© 2010 Cisco Systems, Inc. All rights reserved.