Feedback Feedback
|
Table Of Contents
User Guide for Cisco AnyConnect Secure Mobility Client, Release 2.4.x for Android
AnyConnect for Lenovo Device Requirements
AnyConnect for Rooted Device Requirements
AnyConnect for Samsung Device Requirements
What You Need Before You Connect
Viewing the Connection Summary
Using the AnyConnect Icon in the Status Bar
Placing a Widget on Your Android Home Window
Viewing and Managing Log Messages
Modifying a VPN Connection Entry
Deleting a Connection Entry You Added
Displaying the AnyConnect Version and Licensing Details
Responding to "Another Application has requested that AnyConnect...Do you want to allow this?"
User Guide for Cisco AnyConnect Secure Mobility Client, Release 2.4.x for Android
Updated: September 15, 2011Contents
This document describes the Cisco AnyConnect Secure Mobility Client 2.4.x for Android. It includes the following sections:
•
AnyConnect for Lenovo Device Requirements
•
•
•
•
•
•
•
•
•
•
Introduction
The Cisco AnyConnect Secure Mobility Client 2.4.x for Android provides seamless and secure remote access to enterprise networks. The client lets any installed application communicate as though connected directly to the enterprise network.
The Android Market provides access to the installation app. You can install the app on all supported Samsung devices and on rooted Android devices.
Your organization may provide additional documentation on using AnyConnect for Android.
Features
Table 1 lists the features in AnyConnect 2.4.x for Android devices.
AnyConnect for Lenovo Device Requirements
Cisco AnyConnect for Lenovo, Release 2.4.x supports the Lenovo ThinkPad tablet product, provided the device is running the latest software update from Lenovo.
AnyConnect for Rooted Device Requirements
Cisco AnyConnect for Rooted, Release 2.4.x, runs on most rooted devices running Android 2.1 or later. A rooted device is a requirement unless the device is a supported Samsung device.
Caution
The AnyConnect client download for Samsung does not work on rooted devices; you must use the rooted version of AnyConnect on rooted devices.
Both a tun.ko module and IP tables are required. AnyConnect displays an error message informing you about what is missing when you attempt to establish a VPN. If the tun.ko module is missing, obtain or build it for your corresponding device kernel and place it in the
/data/local/kernel_modules/directory.AnyConnect for Samsung Device Requirements
Cisco AnyConnect for Samsung, Release 2.4.x, supports the following Samsung product lines, provided the devices are running the latest software update from Samsung:
•
•
•
Note
•
•
Note
Installation and Upgrades
To install or upgrade AnyConnect for Android, go to the Android Market for the app that matches the device:
•
•
Note
What You Need Before You Connect
You must obtain one or more of the following from your system administrator, depending on your network requirements, before you can set up AnyConnect to establish a VPN session:
•
•
•
Alternatively, your system administrator may supply a link on your corporate network that you can tap to add the required connection entries to your device.
Adding a VPN Connection Entry
Before attempting to establish a VPN connection for the first time, add a VPN connection entry to identify the VPN secure gateway, as follows:
Step 1
Figure 1 AnyConnect Icon
AnyConnect shows the VPN connection status in the AnyConnect home window (Figure 2).
Figure 2 AnyConnect Home (New Installation)
Step 2
The Add VPN Connection window shows the VPN connection parameters (Figure 3).
Figure 3 Add VPN Connection with Example Values
Step 3
Step 4
Description—Enter a unique name for the connection entry to appear in the connection list of the AnyConnect home window. You can use any letters, spaces, numbers, or symbols on the keyboard display. AnyConnect retains the letters in the upper- or lower-case letters you specify. For example,
Example 1Server Address—Enter the domain name, IP address, or Group URL of the Cisco Adaptive Security Appliance with which to connect. For example,
vpn.example.comCertificate—(Optional, depending on VPN requirements) Your system administrator will provide you with instructions to install a certificate if one is necessary to establish a VPN session. You can tap Certificate to view summary details of any certificates enrolled on the device and to select one for use when establishing a VPN connection. The Certificates window displays the summary information for the installed certificates (Figure 4).
Figure 4 Example Certificate
The options are as follows:
•
•
•
user_user_id)—Tap the certificate your system administrator instructs you to use. The Certificate window reopens.Step 5
AnyConnect closes the Add VPN Connection window and adds the entry to the home window.
Connecting to a VPN
To establish a VPN connection,
Step 1
Step 2
Step 3
AnyConnect disconnects any VPN connection currently in use.
Step 4
•
•
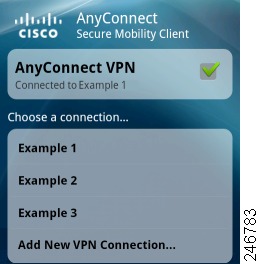
The top row of the AnyConnect home window highlights the checkmark, indicating the VPN connection is established (Figure 5).
Figure 5 AnyConnect Home (Connected)
Depending on the VPN secure gateway setup, AnyConnect retrieves connection entries and adds them to the VPN connection list in the AnyConnect home window.
Caution
Viewing the Connection Summary
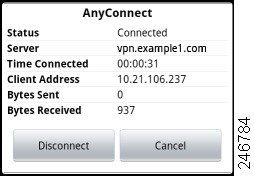
To display a summary view of a connected VPN session, tap the name in the AnyConnect home window associated with the connection under
Choose a connection. Figure 6 shows an example connection summary window.Figure 6 Connection Summary
Using the AnyConnect Icon in the Status Bar
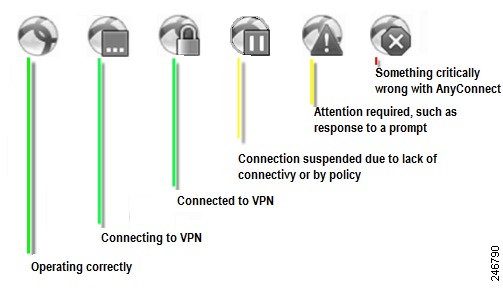
By default, AnyConnect reveals its status by changing its icon in the Android status bar at the top of the Android windows (Figure 7).
Figure 7 AnyConnect Notification Icons in Android Status Bar
To reveal a text description of the status of AnyConnect, drag the status bar down. Then, to go to the AnyConnect home window, tap AnyConnect.
Using the AnyConnect Widgets
AnyConnect provides three optional widgets you can add to your home screen: large, medium, and small. The following sections show the widgets and describe how to place one on your Android home window.
Widget Descriptions
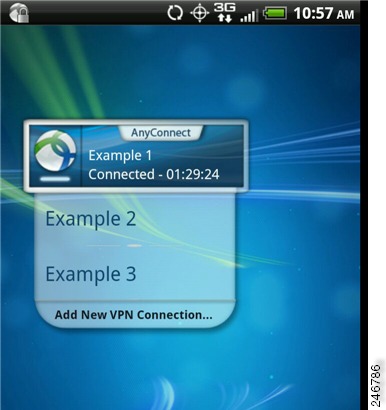
The large widget provides easy access to both the AnyConnect status information and controls. Figure 8 shows how the large widget looks on the Android home window.
Figure 8 Large Widget
The large widget shows the AnyConnect icon, app name, default VPN secure gateway, and VPN status. It shows the name of the VPN secure gateway to which AnyConnect is connected or the default connection if it is not. The color of the bar below the icon reveals the VPN status. You can tap the icon to connect to or disconnect from the VPN secure gateway, tap a connection entry to disconnect and connect to the VPN secure gateway you chose, or tap Add New VPN Connection to specify connection details for a new VPN secure gateway.
Figure 9 shows how the medium widget looks on the Android home window.
Figure 9 Medium Widget
The medium widget provides the same data as the large one, except for the list of connection entries. Tap the widget to connect to or disconnect from the VPN secure gateway indicated.
Figure 10 shows how the small widget looks on the Android home window.
Figure 10 Small Widget
The small widget is the same size as the AnyConnect apps icon. The color of the bar below the icon reflects the VPN status. Tap the widget to connect to or disconnect from the default VPN secure gateway.
Placing a Widget on Your Android Home Window
The instructions for placing a widget may vary, depending on the device and the Android version you are using. Example instructions follow:
Step 1
Step 2
Step 3
Step 4
Step 5
Android adds the widget to the home screen.
Step 6
Viewing Overview Statistics
AnyConnect records statistics when a VPN connection is present.
To view the overview statistics for the current VPN connection,
Step 1
Step 2
Step 3
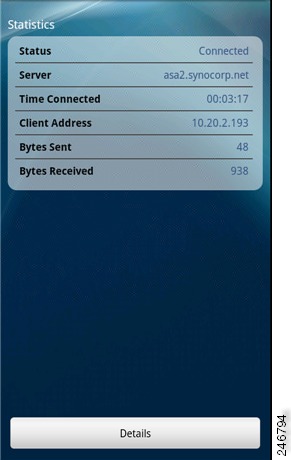
The Statistics Overview window opens (Figure 11).
Figure 11 Statistics Overview
The Statistics window displays the following:
•
•
•
•
•
•
•
•
Viewing Detailed Statistics
To view the detailed statistics for the current VPN connection,
Step 1
Step 2
Step 3
Step 4
Step 5
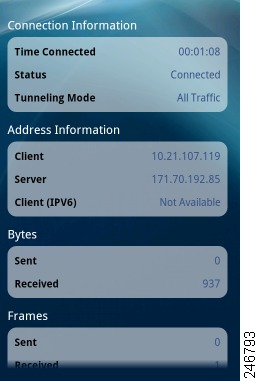
The Detailed Statistics window opens (Figure 12).
Figure 12 Detailed Statistics
Step 6
The Detailed Statistics window shows the following:
•
–
–
–
•
–
–
–
•
–
–
•
–
–
•
–
–
•
–
–
–
•
•
•
Viewing and Managing Log Messages
To view, send, or clear AnyConnect log messages:
Step 1
Step 2
Step 3
Step 4
Step 5
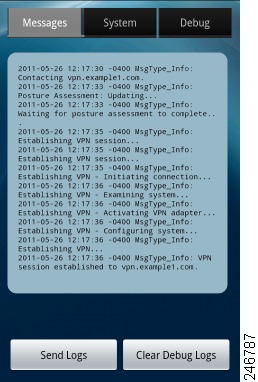
AnyConnect retrieves its messages from Android and displays them in the Messages window (Figure 13).
Figure 13 Messages
Use this window to do any of the following:
•
•
•
•
•
Step 6
Modifying a VPN Connection Entry
You might need to change a VPN connection entry to correct a configuration error or comply with an IT policy change.
Note
To modify a connection entry:
Step 1
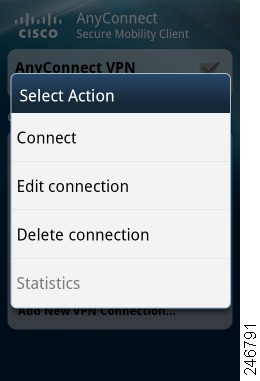
Step 2
AnyConnect displays the Select Action window (Figure 14).
Figure 14 Select Action
Step 3
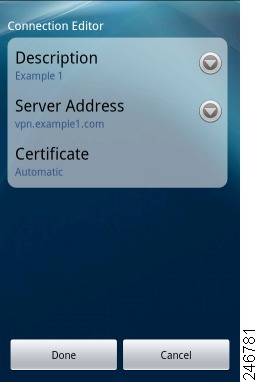
The Connection Editor window displays the parameter values assigned to the connection entry.
Step 4
For parameter instructions, use the online help or go to "Adding a VPN Connection Entry."
Step 5
AnyConnect saves the entry and reopens the AnyConnect window.
Deleting a Connection Entry
AnyConnect provides two procedures for deleting a connection entry, depending on whether you added it or a VPN secure gateway added it.
Deleting a Connection Entry You Added
To permanently delete a VPN connection entry you added manually:
Step 1
Step 2
AnyConnect displays the Select Action window.
Step 3
AnyConnect removes the entry and reopens the AnyConnect window.
Clearing all AnyConnect Data
The only way to remove a connection entry imported from a VPN secure gateway is to clear all of the AnyConnect connection entries from the device.
Caution
To clear all data, go to the Android home window and tap Applications > Settings > Applications > Manage Applications > AnyConnect > Clear Data.
Changing the Theme
AnyConnect provides the following themes:
•
•
Note
To change the theme of the AnyConnect user interface,
Step 1
Step 2
Step 3
Step 4
AnyConnect shows a green button next to the theme currently in use.
Step 5
Displaying the AnyConnect Version and Licensing Details
To display a link to the online version of this guide, the AnyConnect version running on your device, and the copyright and licensing information,
Step 1
Step 2
Step 3
AnyConnect displays the About window.
Tip
Responding to "Another Application has requested that AnyConnect...Do you want to allow this?"
To protect your device, AnyConnect alerts you when another application attempts to add a set of connection entries, import certificates, establish a VPN connection, or disconnect from a VPN. Please ask your system administrator whether to tap Yes in response to the following prompts:
•
Another application has requested that AnyConnect create a new connection tohost. Do you want to allow this? [Yes or No]•
Another application has requested that AnyConnect import a certificate bundle to the AnyConnect certificate store. Do you want to allow this? [Yes or No]•
Another application has requested that AnyConnect connect tohost. Do you want to allow this? [Yes or No]•
Another application has requested that AnyConnect disconnect the current connection. Do you want to allow this? [Yes or No]Known Issues and Bugs
This release has the following known issues and bugs:
•
•
•
Troubleshooting
This section describes solutions to common problems. If you try a solution and the problem persists, contact your system administrator.
•
A tun.ko module is required if it is not already compiled into the kernel. If it is not included on the device or compiled with the kernel, obtain or build it for your corresponding device kernel and place it in the
/data/local/kernel_modules/directory.•
Your system administrator set a policy that prevents the modification and removal of host entries imported from a VPN secure gateway. The only way to remove them is to clear all AnyConnect data.
•
Internet connectivity issues, a low cell signal level, and a congested network resource are typical causes of time-outs and unresolved host errors. Try moving to an area with a stronger signal or use WiFi. If a Wi-Fi network is within reach, try using your device Settings app to establish a connection to it first. Retrying multiple times in response to time-outs often results in success.
•
Check the validity and expiration of the certificate if you succeeded with it before. To do so, go to the AnyConnect home window, long-press the connection entry, then tap Certificate. The Certificates window lists all certificates. Long-press the certificate name, then tap View Certificate Details. Check with your system administrator to make sure you are using the appropriate certificate for the connection.
•
To view all the certificates imported by AnyConnect, go to the AnyConnect home window, tap Add New VPN Connection, then tap Certificate. The Certificates window lists all certificates. To see the details of a certificate, long-press the certificate name, then tap View Certificate Details.
•
Ask your system administrator if the VPN secure gateway is configured and licensed to permit mobile connections.
•
Use the Internet browser to check the network connection. Try using the browser to go to https://vpn.example.com, where vpn.example.com is the URL of the VPN secure gateway to verify connectivity.
•
Ensure that the device is rooted or is listed as a supported Samsung device.
•
If users attempt to install AnyConnect on devices that are not supported, they receive this message. Ensure that the device is rooted or is listed as a supported Samsung device.
•
AnyConnect does not work on this device. It must be rooted or listed as a supported Samsung device.
•
AnyConnect includes the current profile when you email the logs.
•
Go to Applications > Settings > About Phone -> Status.
•
Try another internet-accessible network. Save the log messages in a draft email message if you do not have network connectivity or you need to reset the device.
Removing AnyConnect
To remove AnyConnect from the device, go to Settings > Applications > Manage applications > AnyConnect, then tap Uninstall.
Licensing
For our open source licensing acknowledgements, see Open Source Used in Cisco AnyConnect Secure Mobility Client, Release 2.4 for Android.
For the end-user license agreement, see End User License Agreement.
Cisco and the Cisco Logo are trademarks of Cisco Systems, Inc. and/or its affiliates in the U.S. and other countries. A listing of Cisco's trademarks can be found at www.cisco.com/go/trademarks. Third party trademarks mentioned are the property of their respective owners. The use of the word partner does not imply a partnership relationship between Cisco and any other company. (1005R)
Any Internet Protocol (IP) addresses and phone numbers used in this document are not intended to be actual addresses and phone numbers. Any examples, command display output, network topology diagrams, and other figures included in the document are shown for illustrative purposes only. Any use of actual IP addresses or phone numbers in illustrative content is unintentional and coincidental.
© 2004-2011 Cisco Systems, Inc. All rights reserved.