-
Cisco AnyConnect VPN Client Administrator Guide, Release 2.4
-
Introduction to AnyConnect
-
Configuring the Security Appliance to Deploy the AnyConnect Client
-
Configuring AnyConnect Client Features
-
Fulfilling Other Administrative Requirements for AnyConnect
-
Managing Authentication
-
Customizing and Localizing the AnyConnect Client and Installer
-
Communicating User Guidelines
-
Managing, Monitoring, and Troubleshooting AnyConnect Connections
-
Open Software License Notices
-
 Feedback
Table Of Contents
Configuring the Security Appliance to Deploy the AnyConnect Client
How the Security Appliance Deploys the AnyConnect Client
Before You Install the AnyConnect Client
Ensuring Automatic Installation of AnyConnect Clients
Adding a Security Appliance to the List of Trusted Sites (IE)
Adding a Security Certificate in Response to Browser Alert Windows
Ensuring Fast Connection Time when Loading Multiple AnyConnect Client Images
Configuring the Security Appliance to Download the AnyConnect Client
Prompting Remote Users for AnyConnect Client Download
Enabling Modules for Additional AnyConnect Features
Configuring Certificate-only Authentication
Configuring the Security Appliance to Deploy the AnyConnect Client
This chapter describes how to use ASDM to configure the security appliance to deploy the AnyConnect client. To use CLI to configure the security appliance, see the Cisco 5500 Series Adaptive Security Appliance CLI Configuration Guide.
This chapter includes the following sections:
•
How the Security Appliance Deploys the AnyConnect Client
•
•
•
•
•
How the Security Appliance Deploys the AnyConnect Client
The Cisco AnyConnect VPN Client provides secure SSL connections to the security appliance for remote users. Without a previously-installed client, remote users enter the IP address or DNS name in their browser of an interface configured to accept clientless SSL VPN connections. Unless the security appliance is configured to redirect http:// requests to https://, users must enter the URL in the form https://<address>.
A security appliance uses data that is stored in filtering tables to evaluate and match URL request attributes such as domain names and IP address path segments with locally maintained database records. If a match occurs, access policy settings determine an action to block or monitor the traffic. If no match occurs, processing continues.
After entering the URL, the browser connects to that interface and displays the login screen. If the user satisfies the login and authentication, and the security appliance identifies the user as requiring the client, it downloads the client that matches the operating system of the remote computer. After downloading, the client installs and configures itself, establishes a secure SSL connection and either remains or uninstalls itself (depending on the security appliance configuration) when the connection terminates.
In the case of a previously installed client, when the user authenticates, the security appliance examines the version of the client, and upgrades the client as necessary.
When the client negotiates an SSL VPN connection with the security appliance, it attempts to connect using Datagram Transport Layer Security (DTLS). DTLS avoids latency and bandwidth problems associated with some SSL connections and improves the performance of real-time applications that are sensitive to packet delays. If it cannot establish a DTLS connection, it falls back to Transport Layer Security (TLS).
The security appliance downloads the client based on the group policy or username attributes of the user establishing the connection. You can configure the security appliance to automatically download the client, or you can configure it to prompt the remote user, asking them if they want to download the client. In the latter case, if the user does not respond, you can configure the security appliance to either download the client after a timeout period or present the login page.
Before You Install the AnyConnect Client
The following sections contain recommendations to ensure successful AnyConnect client installation, as well as tips about certificates, Cisco Security Agent (CSA), adding trusted sites, and responding to browser alerts:
•
•
•
Ensuring Automatic Installation of AnyConnect Clients
The following recommendations and caveats apply to the automatic installation of AnyConnect client software on client PCs:
•
–
–
The procedure varies by browser. See the procedures that follow this section.
–
If the certificate has a SAN (Subject Alternate Name) then the browser will ignore the CN value in the Subject field and look for a DNS Name entry in the SAN field.
If users connect to the ASA using its hostname, the SAN should contain the hostname and domain name of the ASA. For example, the SAN field would contain
DNS Name=hostname.domain.com.If users connect to the ASA using its IP address, the SAN should contain the IP address of the ASA. For example, the SAN field would contain
DNS Name=209.165.200.254.•
Current shipping versions of CSA do not have a built-in rule that is compatible with the AnyConnect client. You can create the following rule using CSA version 5.0 or later by following these steps:
Step 1
Priority Allow, no Log, Description: "Cisco Secure Tunneling Browsers, read/write
vpnweb.ocx"
Applications in the following class: "Cisco Secure Tunneling Client - Controlled Web Browsers"Attempt: Read file, Write FileOn any of these files: @SYSTEM\vpnweb.ocx
Step 2
**\vpndownloader.exe@program_files\**\Cisco\Cisco AnyConnect VPN Client\vpndownloader.exeWe recommend that Microsoft Internet Explorer (MSIE) users add the security appliance to the list of trusted sites, or install Java. The latter enables the ActiveX control to install with minimal interaction from the user. This is particularly important for users of Windows XP SP2 with enhanced security. Windows Vista users must add the security appliance to the list of trusted sites in order to use the dynamic deployment feature. For more information, see Adding a Security Appliance to the List of Trusted Sites (IE) .
Adding a Security Appliance to the List of Trusted Sites (IE)
To add a security appliance to the list of trusted sites, use Microsoft Internet Explorer and do the following steps.
Note
Step 1
The Internet Options window opens.
Step 2
Step 3
Step 4
The Trusted Sites window opens.
Step 5
Step 6
Step 7
The Trusted Sites window closes.
Step 8
Adding a Security Certificate in Response to Browser Alert Windows
This section explains how to install a self-signed certificate as a trusted root certificate on a client in response to the browser alert windows.
In Response to a Microsoft Internet Explorer "Security Alert" Window
The following procedure explains how to install a self-signed certificate as a trusted root certificate on a client in response to a Microsoft Internet Explorer Security Alert window. This window opens when you establish a Microsoft Internet Explorer connection to a security appliance that is not recognized as a trusted site. The upper half of the Security Alert window shows the following text:
Information you exchange with this site cannot be viewed or changed by others.
However, there is a problem with the site's security certificate. The security
certificate was issued by a company you have not chosen to trust. View the certificate
to determine whether you want to trust the certifying authority.
Install the certificate as a trusted root certificate as follows:
Step 1
The Certificate window opens.
Step 2
The Certificate Import Wizard Welcome opens.
Step 3
The Certificate Import Wizard - Certificate Store window opens.
Step 4
Step 5
The Certificate Import Wizard - Completing window opens.
Step 6
Step 7
The Certificate Import Wizard window indicates the import is successful.
Step 8
Step 9
Step 10
The security appliance window opens, signifying the certificate is trusted.
In Response to a Netscape, Mozilla, or Firefox "Certified by an Unknown Authority" Window
The following procedure explains how to install a self-signed certificate as a trusted root certificate on a client in response to a "Web Site Certified by an Unknown Authority" window. This window opens when you establish a Netscape, Mozilla, or Firefox connection to a security appliance that is not recognized as a trusted site. This window shows the following text:
Unable to verify the identity of <Hostname_or_IP_address> as a trusted site.Install the certificate as a trusted root certificate as follows:
Step 1
The Certificate Viewer window opens.
Step 2
Step 3
The security appliance window opens, signifying the certificate is trusted.
Ensuring Fast Connection Time when Loading Multiple AnyConnect Client Images
When you load multiple AnyConnect client images on the security appliance, you should order the images in a manner that ensures the fastest connection times for greatest number of remote users.
The security appliance downloads portions of the client images to the remote computer until it achieves a match with the operating system. It downloads the image at the top of the ordered list first. Therefore, you should assign the image that matches the most commonly-encountered operating system used on remote computers to the top of the list.
Because mobile users have slower connection speeds, you should load the AnyConnect client image for Windows Mobile at the top of the list.
For mobile users, you can decrease the connection time of the mobile device by using the regex keyword. When the browser connects to the adaptive security appliance, it includes the User-Agent string in the HTTP header. When the adaptive security appliance receives the string, if the string matches an expression configured for an image, it immediately downloads that image without testing the other client images.
Configuring the Security Appliance to Download the AnyConnect Client
To prepare the security appliance to deploy the AnyConnect client, complete these steps:
Step 1
Step 2
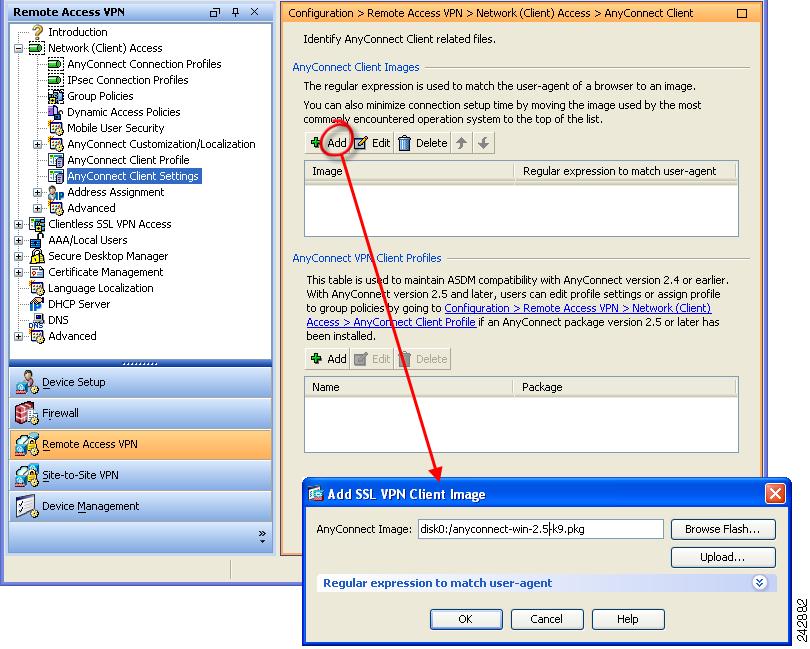
Navigate to Configuration > Remote Access VPN > Network Access > Advanced > SSL VPN > Client Settings. The SSL VPN Client Settings panel displays. (Figure 2-1).
This panel lists AnyConnect client files that have been identified as client images. The order in which they appear in the table reflects the order the security appliance downloads them to the remote computer.
To add a client image, click Add in the SSL VPN Client Images area. Enter the name of the file you downloaded from Cisco.com and click Upload. You can also browse your computer for the file.
Figure 2-1 Specify AnyConnect Client Images
Step 3
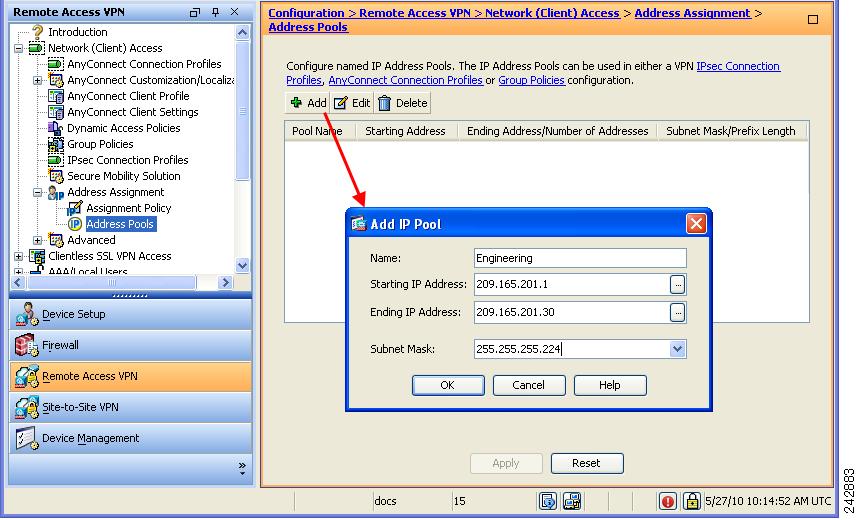
You can use DHCP, and/or user-assigned addressing. You can also create a local IP address pool and assign the pool to a tunnel group. This guide uses the popular address pools method as an example.
Navigate to Configuration > Remote Access VPN > Network (Client) Access > Address Assignment > Address Pools (Figure 2-2). Enter address pool information in the Add IP Pool window.
Figure 2-2 Add IP Pool Dialog
Step 4
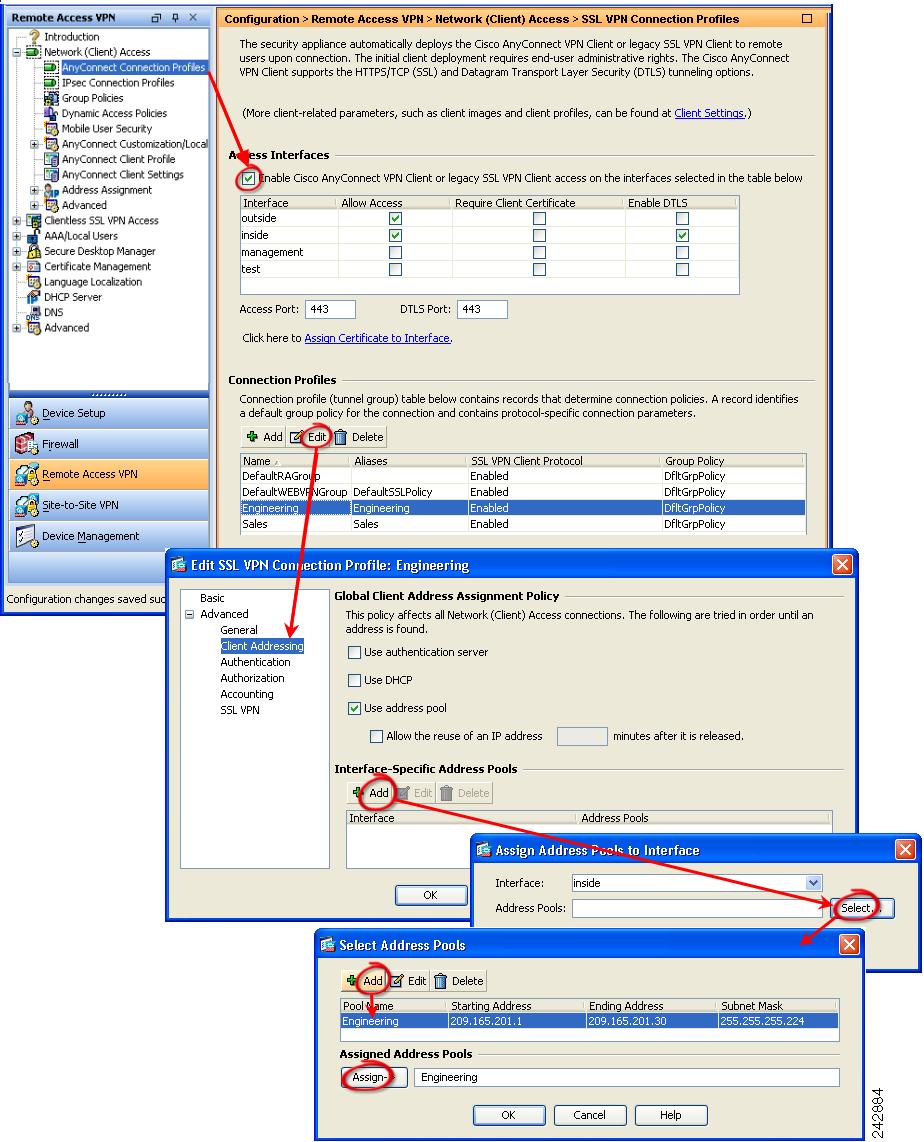
Navigate to Configuration > Remote Access VPN > Network (Client) Access > AnyConnect Connection Profiles. Follow the arrows in (Figure 2-3) to enable the AnyConnect client and then assign an address pool.
Figure 2-3 Enable SSL VPN Client Download
Step 5
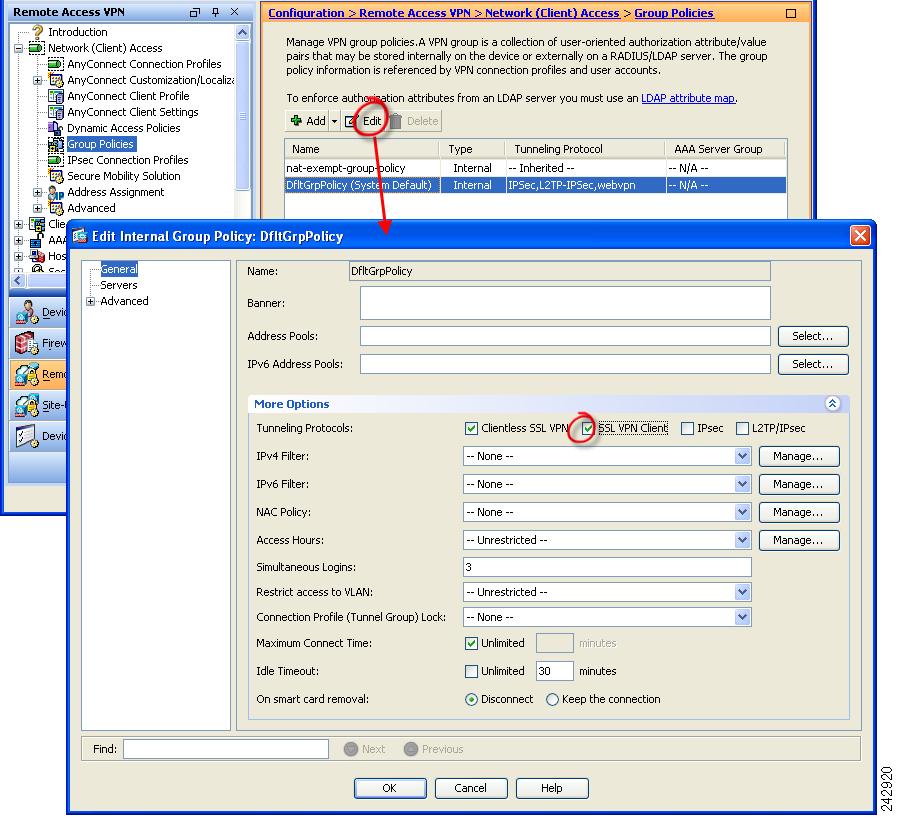
Navigate to Configuration > Remote Access VPN > Network (Client) Access > Group Policies. The Group Policies panel displays. Follow the arrows in Figure 2-4 to enable SSL VPN for the group.
Figure 2-4 Specify SSL VPN as a Tunneling Protocol
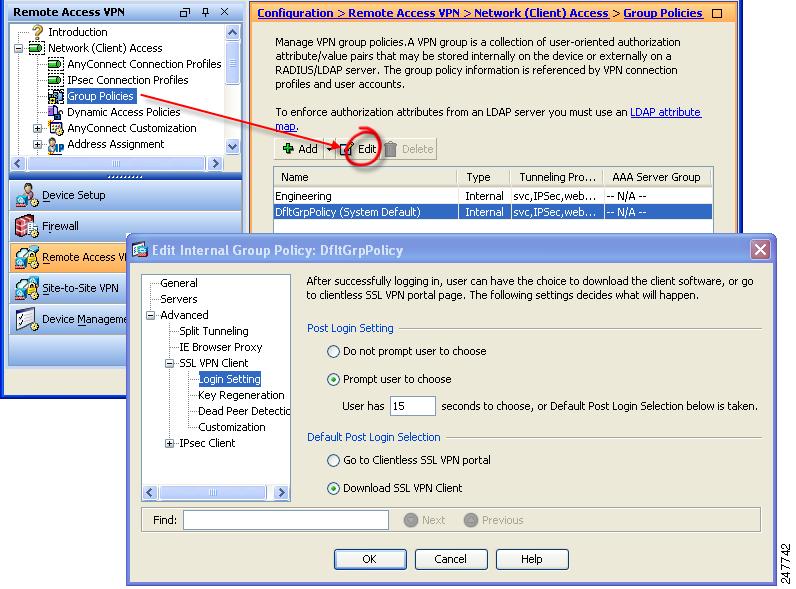
Prompting Remote Users for AnyConnect Client Download
By default, the security appliance does not download the AnyConnect client when the remote user initially connects using the browser. After users authenticate, the default clientless portal page displays a Start AnyConnect Client drawer that users can select to download the client. Alternatively, you can configure the security appliance to immediately download the client without displaying the clientless portal page.
You can also configure the security appliance to prompt remote users, providing a configured time period within which they can choose to download the client or go to the clientless portal page.
You can configure this feature for a group policy or user. To change these login settings, follow this procedure:
Step 1
Step 2
If you choose to prompt users, specify a timeout period and select a default action to take when that period expires in the Default Post Login Selection area.
Figure 2-5 Changing Login Settings
Step 3
Figure 2-6 shows the prompt displayed to remote users if you choose Prompt user to choose and Download SSL VPN Client:
Figure 2-6 Post Login Prompt Displayed to Remote Users
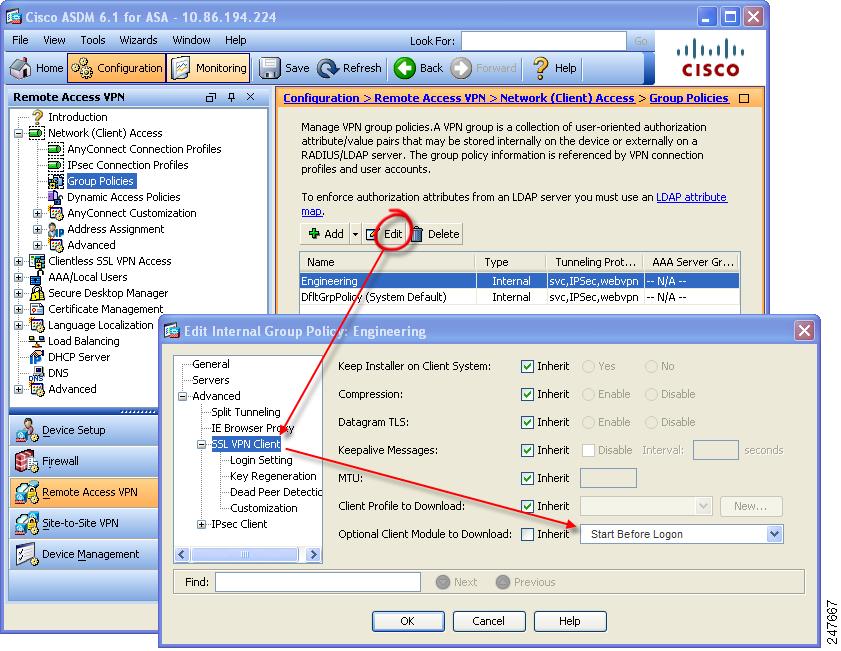
Enabling Modules for Additional AnyConnect Features
As new features are released for the AnyConnect client, you must update the AnyConnect clients of your remote users for them to use the new features. To minimize download time, the AnyConnect client requests downloads (from the security appliance) only of modules that it needs for each feature that it supports.
To enable new features, you must specify the new module names as part of the group-policy or username configuration. To enable module download for a group policy, follow this procedure:
Step 1
Step 2
Figure 2-7 Specifying an Optional Client Module to Download
Step 3
If you choose Start Before Logon, you must also enable this client feature in the AnyConnect client profile. See Configuring AnyConnect Client Features for details.
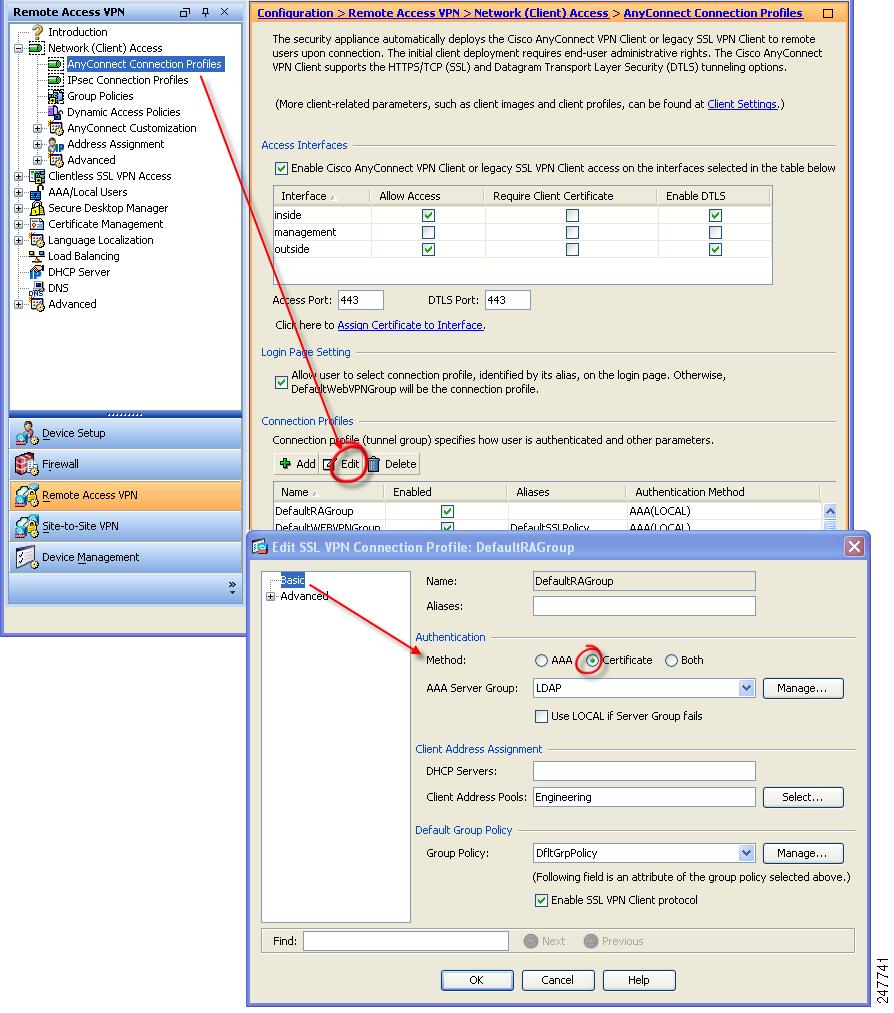
Configuring Certificate-only Authentication
You can specify whether you want users to authenticate using AAA with a username and password or using a digital certificate (or both). When you configure certificate-only authentication, users can connect with a digital certificate and are not required to provide a user ID and password.
You can configure certificate-only authentication in connection profiles. To enable this setting, follow this procedure:
Step 1
Figure 2-8 Configuring Certificate-Only Authentication
Step 2
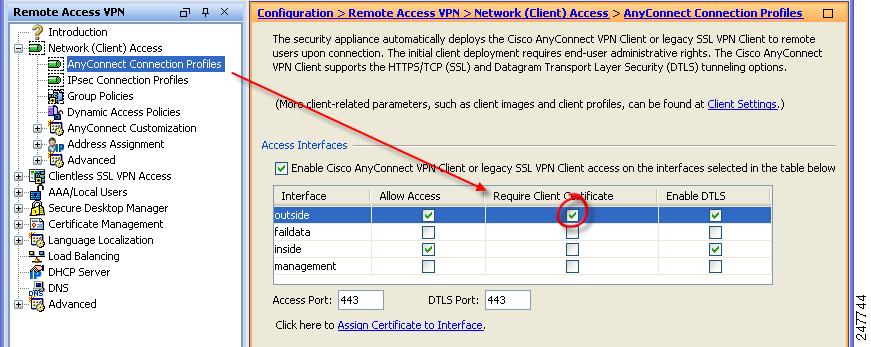
Step 3
Figure 2-9 Requiring a Certificate on an Interface
Step 4
To do this, go to Configuration > Remote Access VPN > Advanced > SSL Settings. In the Certificates area, select an interface and click Edit. the Select SSL Certificate window displays (Figure 2-10). Select a certificate from the drop-list. Click OK and apply your changes.
Figure 2-10 Specifying a Certificate for an Interface
Note