-
Cisco AnyConnect VPN Client Administrator Guide, Version 2.0
-
About This Guide
-
Introduction
-
Common AnyConnect VPN Client Installation and Configuration Procedures
-
Installing the AnyConnect Client and Configuring the Security Appliance with ASDM
-
Installing the AnyConnect Client on a Security Appliance Using CLI
-
Configuring Anyconnect Features Using ASDM
-
Configuring AnyConnect Features Using CLI
-
Configuring and Using AnyConnect Client Operating Modes and User Profiles
-
Customizing and Localizing the Anyconnect Client
-
Monitoring and Maintaining the AnyConnect Client
-
Sample AnyConnect Profile and XML Schema
-
Using Microsoft Active Directory to Add the Security Appliance to the List of Internet Explorer Trusted Sites for Domain Users
-
Index
-
 Feedback
Table Of Contents
Customizing and Localizing the AnyConnect Client
Customizing the End-user Experience
Language Translation (Localization) for User Messages
Understanding Language Translation
Configuring Language Localization Using ASDM
Creating or Modifying a Translation Table Using ASDM
Import/Export Language Localization
Creating or Modifying a Translation Table Using CLI
Customizing and Localizing the AnyConnect Client
Customizing the End-user Experience
You can customize certain elements, such as the corporate logo, of the AnyConnect client graphical user interface that the remote user sees upon logging in. You customize the AnyConnect Client user interface by replacing files that affect the interface with your own, custom files. For example, with a Windows installation, you can change the company logo from the default Cisco logo by replacing the file company_logo.bmp with your own file.
You can also customize the client by translating user messages into other languages.
The sections that follow list the files you can replace for each operating system supported by the AnyConnect client.
Note
There is no automated mechanism included with the client to allow customizing the bitmaps and icons. Customizing requires that you manually copy the custom files to the filenames and locations listed in this section.
For Windows
All files for Windows are located in %PROGRAMFILES%\Cisco\Cisco AnyConnect VPN Client\res\. Table 8-1 lists the files that you can replace and the client GUI area affected.
Note
For Linux
All files for Linux are located in /opt/cisco/vpn/pixmaps/. Table 8-2 lists the files that you can replace and the client GUI area affected.
For Mac OS X
All files for OS X are located in /Applications/Cisco AnyConnect VPN Client/Contents/Resources. Table 8-3 lists the files that you can replace and the client GUI area affected.
Language Translation (Localization) for User Messages
Localization provides a way of implementing translation for user messages that appear on the client user interface. The security appliance provides language translation for the portal and screens displayed to users that initiate browser-based, Clientless SSL VPN connections, as well as the interface displayed to Cisco AnyConnect VPN Client users.
This section describes how to configure the security appliance to translate these user messages and includes the following sections:
•
•
•
•
Understanding Language Translation
Functional areas and their messages that are visible to remote users are organized into translation domains. Table 8-4 shows the translation domains and the functional areas translated.
The standard software image package for the security appliance includes a translation table template for each domain. The templates for plug-ins are included with the plug-ins and define their own translation domains.
You can export the template for a translation domain, which in some cases creates an XML file of the template at the URL or IP address you provide. The message fields in this file are empty. You can edit the messages and import the template to create a new translation table object that resides in flash memory.
You can also export an existing translation table. The XML file created displays the messages you edited previously. Reimporting this XML file with the same language name creates a new version of the translation table object, overwriting previous messages.
Some templates are static, but some change based on the configuration of the security appliance. Because you can customize the logon and logout pages, portal page, and URL bookmarks for clientless users, the security appliance generates the customization and url-list translation domain templates dynamically, and the template automatically reflects your changes to these functional areas.
After you create translation tables, they are available to customization objects that you create and apply to group policies or user attributes. With the exception of the AnyConnect translation domain, a translation table has no effect, and messages are not translated on user screens, until you create a customization object, identify a translation table to use in that object, and specify that customization for the group policy or user. Changes to the AnyConnect translations are automatically downloaded to clients the next time they connect to the Secure Gateway.
Configuring Language Localization Using ASDM
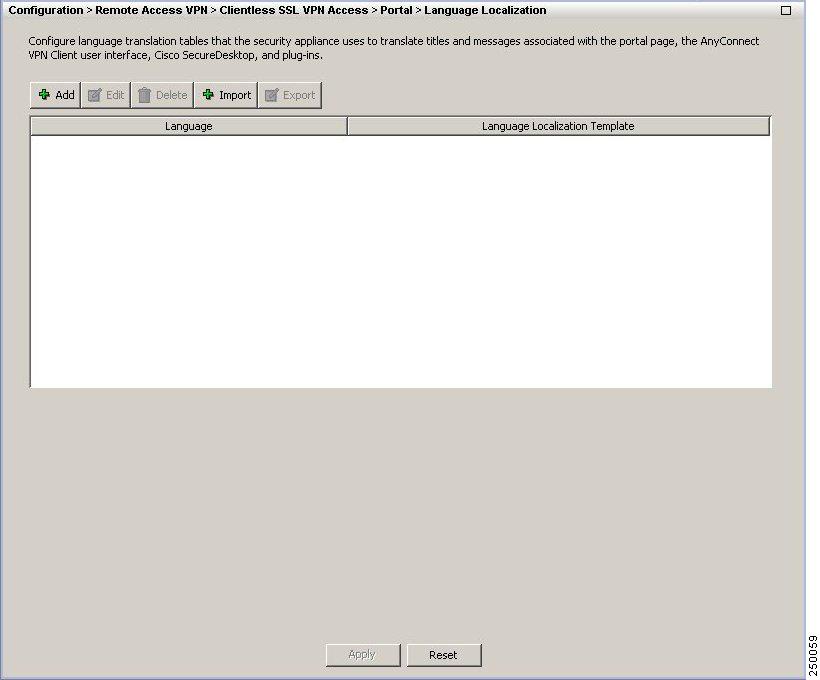
To use ASDM to configure language localization, select Configuration > Remote Access VPN > Clientless SSL VPN Access > Portal > Language Localization. This opens the Language Localization pane (Figure 8-1).
Note
The language localization pane shows the language of existing language localization tables and the language localization templates the translation tables are based on and lets you add, edit, delete, import, or export language localization templates. Using the buttons on this pane, you can configure language translation tables that the security appliance uses to translate titles and messages associated with the portal page, the AnyConnect VPN client user interface, Cisco Secure Desktop, and plug-ins.
Figure 8-1 Language Localization Pane
Fields
•
•
•
•
•
•
•
Creating or Modifying a Translation Table Using ASDM
To create a translation table, do the following steps:
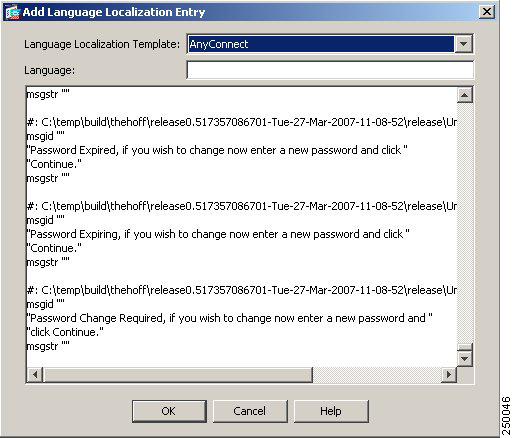
Step 1
Figure 8-2 Add Language Localization Dialog Box
Step 2
Step 3
Note
Step 4
msgid "Connected"msgstr "Conectado"
Note
To ensure that the first user message appears correctly translated, add the following lines to the message catalog file that you are using for translations, before re-importing it with the missing tags:
msgid "Please enter your username and password."
msgstr ""
The message string (msgstr) value should be your translation of the English string in msgid.Step 5
Import/Export Language Localization
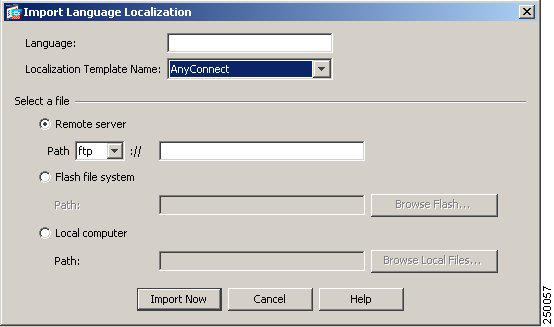
To import or export a translation table, click Import or Export on the Language Localization pane. This opens the Import or Export Language Localization pane (Figure 8-3), on which you can import or export a translation table to the security appliance to provide translation of user messages.
Translation templates are XML files that contain message fields that can be edited with translated messages. You can export a template, edit the message fields, and import the template as a new translation table, or you can export an existing translation table, edit the message fields, and re-import the table to overwrite the previous version.
Figure 8-3 Import Language Localization Pane
Fields
•
•
•
•
–
–
–
–
–
–
–
–
–
–
–
•
–
–
–
–
–
–
–
–
•
Creating or Modifying a Translation Table Using CLI
The following procedure describes how to create translation tables:
Step 1
In the following example, the show webvpn translation-table command shows available translation table templates and tables.
hostname# show import webvpn translation-tableTranslation Tables' Templates:AnyConnectPortForwarderbannerscsdcustomizationurl-listwebvpnTranslation Tables:test customizationhostname#The next example exports the translation table template for the AnyConnect domain, which affects messages displayed to AnyConnect client users. In this example, the filename of the XML file created is test (user-specified), and it contains empty message fields:
hostname# export webvpn translation-table AnyConnect template tftp://209.165.200.225/testStep 2
The following example shows a portion of the template that was exported as test. The end of this output includes a message ID field (msgid) and a message string field (msgstr) for the message Clientless SSL VPN Service, which is displayed on the portal page when a Clientless user establishes a VPN connection. The complete template contains many pairs of message fields:
# Copyright (C) 2007 by Cisco Systems, Inc.##, fuzzymsgid ""msgstr """Project-Id-Version: ASA\n""Report-Msgid-Bugs-To: support@cisco.com\n""POT-Creation-Date: 2007-04-23 18:57 GMT\n""PO-Revision-Date: YEAR-MO-DA HO:MI+ZONE\n""Last-Translator: FULL NAME <EMAIL@ADDRESS>\n""Language-Team: LANGUAGE <LL@li.org>\n""MIME-Version: 1.0\n""Content-Type: text/plain; charset=UTF-8\n""Content-Transfer-Encoding: 8bit\n"#: DfltCustomization:24 DfltCustomization:64msgid "Clientless SSL VPN Service"msgstr ""The message ID field (msgid) contains the default translation. The message string field (msgstr) that follows msgid provides the translation. To create a translation, enter the translated text between the quotes of the msgstr string.
Step 3
In the following example, the XML file is imported es-us—the abbreviation for Spanish spoken in the United States.
hostname# import webvpn translation-table customization language es-us
tftp://209.165.200.225/portal
hostname# !!!!!!!!!!!!!!!!!!!!!!!!!!!!!!!!!!!hostname# show import webvpn translation-tableTranslation Tables' Templates:AnyConnectPortForwardercsdcustomizationkeepouturl-listwebvpnCitrix-pluginRPC-pluginTelnet-SSH-pluginVNC-pluginTranslation Tables:es-us customizationIf you import a translation table for the AnyConnect domain, your changes to the AnyConnect translations are automatically downloaded to clients the next time they connect to the Secure Gateway. If you import a translation table for any other domain, you must continue to Step 4, where you create a customization object, identify the translation table to use in that object, and specify that customization object for the group policy or user.
Referencing the Language in a Customization Object
Now that you have created a translation table, you need to refer to this table in a customization object.
Steps 4 through 6 describe how to export the customization template, edit it, and import it as a customization object:
Step 4
hostname# export webvpn customization template tftp://209.165.200.225/salesStep 5
Two areas of XML code in the customization template pertain to translation tables. The first area, shown below, specifies the translation tables to use:
<localization><languages>en,ja,zh,ru,fr</languages><default-language>en</default-language></localization>The <languages> tag in the code is followed by the names of the translation tables. In this example code, they are en, ja, zh, ru, and fr (English, Japanese, Chinese, Russian, and French). For the customization object to call these translation tables correctly, the tables must have been previously imported using the exact same names. These names must be compatible with language options of the browser.
Note
The <default-language> tag specifies the language that the remote user first encounters when connecting to the security appliance. In the example code above, the language is English.
Figure 8-4 shows the login page and the Language Selector. This Language Selector gives remote users establishing an SSL VPN connection the ability to select the language of their choice.
Figure 8-4 Language Selector
The following XML code affects the display of the Language Selector, and includes the <language selector> tag and the associated <language> tags that enable and customize the Language Selector:
<auth-page>....<language-selector><mode>enable</mode><title l10n="yes">Language:</title><language><code>en</code><text>English</text></language><language><code>es-us</code><text>Spanish</text></language></language-selector>The <language-selector> group of tags includes the <mode> tag that enables and disables the displaying of the Language Selector, and the <title> tag that specifies the title of the drop-down box listing the languages.
The <language> group of tags includes the <code> and <text> tags that map the language name displayed in the Language Selector drop-down box to a specific translation table.
Make your changes to this file and save the file.
Step 6
hostname# import webvpn customization sales tftp://209.165.200.225/saleshostname# !!!!!!!!!!!!!!!!!!!!!!!!!!!!!!!!!!!The output of the show import webvpn customization command shows the new customization object sales:
hostname(config)# show import webvpn customizationTemplatesaleshostname(config)#Changing a Group Policy or User Attributes to Use the Customization Object
Now that you have created the customization object, you must activate your changes for specific groups or users. Step 7 shows how to enable the customization object in a group policy:
Step 7
hostname(config)# group-policy sales attributeshostname(config-group-policy)# webvpnhostname(config-group-webvpn)# customization value sales
Note
export webvpn translation-table AnyConnect template url
The variable url includes the file name that you supply; for example:
https://192.168.200.30/my_anyconnect_translation_template
After you export the AnyConnect template, you add the additional message and insert the desired translations for the messages currently in the file. When this is complete, you use the import procedure, which specifies the language. You do not reimport the template itself. Only the updated file, which includes the translations, is reloaded. The import command is:
import webvpn translation-table AnyConnect language en url
The url variable is the address and the filename of the XML file that you edited.
To ensure that the first user message appears correctly translated, add the following lines to the message catalog file that you are using for translations, before re-importing it with the missing tags:
msgid "Please enter your username and password."
msgstr ""
The message string (msgstr) value should be your translation of the English string in msgid.