-
Cisco Identity Services Engine User Guide, Release 1.1
-
Preface
-
What's New In This Release
- Introducing Cisco ISE
-
Administering Cisco ISE
-
Cisco ISE Task Navigator
-
Managing Identities and Admin Access
-
Managing External Identity Sources
-
Managing Network Devices
-
Managing Resources
-
Administering Cisco ISE
-
Setting Up Cisco ISE in a Distributed Environment
-
Setting Up Inline Posture
-
Setting Up Endpoint Protection Services
-
Managing Licenses
-
Managing Certificates
-
Logging
-
Managing Cisco ISE Backup and Restore Operations
-
- Managing Cisco ISE Policy Models
- Monitoring and Troubleshooting
- Reference
-
Index
-
 Feedback
Table Of Contents
Navigating Multiple Task Procedures
Client Provisioning and Posture
Cisco ISE Task Navigator
This chapter introduces the Cisco Identity Service Engine (ISE) Task Navigators, and covers the following topics:
•
Navigating Multiple Task Procedures
•
Navigating Multiple Task Procedures
Task Navigators provide a visual path through Cisco ISE administration and configuration processes, which span multiple user interface screens. The linear presentation of the Task Navigator outlines the order in which the tasks should be completed, while also providing direct links to the screens where you perform the tasks.
Note
Task Navigator Menu
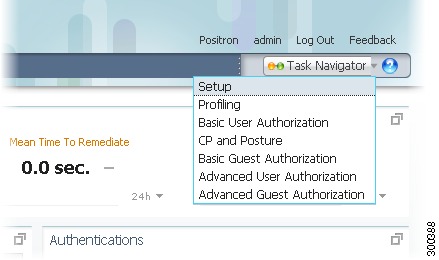
The Task Navigator menu appears in the upper right corner of the Cisco ISE window.
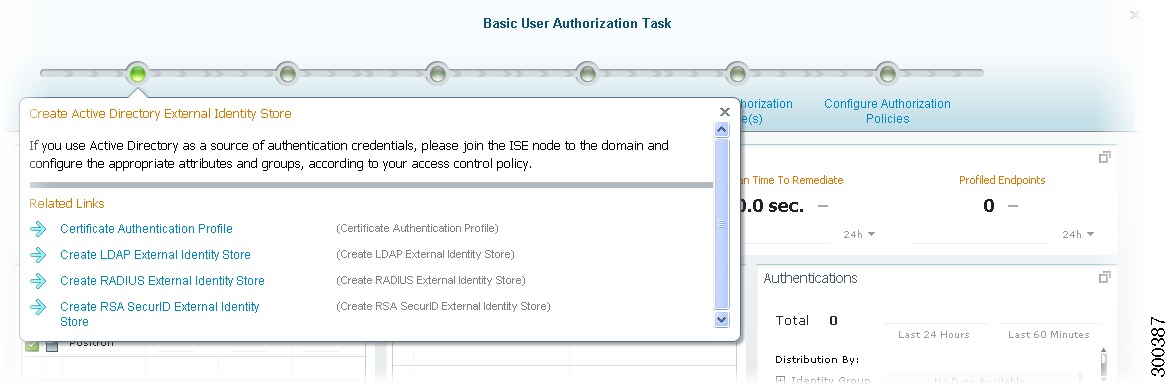
Figure 3-1 Task Navigator Menu
Bringing Up and Using a Task Navigator
Each option on the Task Navigator menu brings up a pop-up dialog that shows a list of tasks arranged along a line. The tasks are arranged in the order in which they should be performed, from left to right.
To bring up and use a task navigator, complete the following steps:
Step 1
•
•
•
•
•
•
•
The Task Navigator you selected appears at the top of the window.
Step 2
Note
Step 3
Figure 3-2 Basic User Authorization Task
Step 4
Step 5
Next Steps
See the other sections in this chapter for information on each of the Task Navigator options.
Setup
Table 3-1 lists the initial tasks you perform to setup your Cisco ISE network. Links to detailed information about the tasks are provided for your convenience.
Table 3-1 Setup Task Map
Navigation Path1. Administrator password policy
Verify the password policy for Cisco ISE administrators to make sure it is in accordance with your company security policy.
Administration > System > Admin Access > Settings > Password Policy
2. Network access password policy
Verify the password policy for internal users who are requesting network access to make sure it is in accordance with your company security policy.
Administration > Identity Management > Settings > User Password Policy
Configuring a User Password Policy for the Network Access User Account
3. Guest access password policy
Verify the password policy for internal users who are requesting network access to make sure it is in accordance with your company security policy.
Administration > Guest Management > Settings > Guest > Password Policy
4. Licensing
Verify that you have the correct licensing for the products you purchased.
Administration > System > Licensing > Current Licenses
5. Time
Configure and verify the system time, date, and NTP settings.
Administration > System > Settings > System Time
6. Proxy
Configure the appropriate proxy server settings so that the Cisco ISE node can communicate externally for updates.
Administration > System > Settings > Proxy
7. Certificate signing request
Create a certificate signing request (CSR).
Administration > System > Certificates > Local Certificates
8. Export certificate signing request
Export the CSR to be submitted to the appropriate Certificate Authority (CA) for your company.
Administration > System > Certificates > Certificate Signing Requests
9. Certificate authority certificates
Import the necessary CA certificates to establish trusts for internode communication, Cisco ISE administration, and client authentication.
Administration > System > Certificates > Certificate Authority Certificates
10. Monitoring and troubleshooting email settings
Configure the correct Simple Mail Transfer Protocol (SMTP) server so that alarms can be sent to the appropriate operations team.
Administration > System > Settings > Monitoring > Email Settings
11. Monitoring and troubleshooting system alarm settings
Configure the necessary alarm settings so that they meet your operational requirements.
Administration > System > Settings > Monitoring > System Alarm Settings
12. System logging settings
Configure logging functions, to ensure proper event management operations for your environment.
Administration > System > Logging > Local Log Settings
13. Scheduled backup
Configure an automated backup schedule that is based on your data recovery policy.
Administration > System > Maintenance > Data Management > Administration Node > Scheduled Backup
14. Distributed deployment
Verify the proper number, type, and synchronization status of the Cisco ISE nodes in your installation.
Administration > System > Deployment
•
–
•
Profiling
Table 3-2 lists the tasks you perform to establish profiling for endpoints. Links to detailed information about the tasks are provided for your convenience.
Table 3-2 Task Navigator: Profiling
Navigation Path1. Node sensor configuration
Review each of the Cisco ISE nodes in your deployment and verify that the profiling sensor probes for all of the nodes are configured properly.
Administration > System > Deployment > [Choose a Node] > Edit > Profiling Configuration
2. Verify/Create profiler conditions
Verify or create new profiler conditions for your profiling requirements.
Policy > Policy Elements > Conditions > Profiling > Conditions
3. Verify/Create profiler policy
Verify or create profiler policies using the profiler conditions.
Policy > Profiling > Profiling Policies > Endpoint Policies
4. Create Downloadable ACLs1
Create appropriate downloadable ACLs for security enforcement.
Policy > Policy Elements > Results > Authorization > Downloadable ACLs > DACL Management > Add
5. Create authorization profiles
Create authorization profiles that are based on the types of privileges that are used for your deployment and security policy.
Policy > Policy Elements > Results > Authorization > Authorization Profiles > Standard Authorization Profiles > Add
Creating and Configuring Permissions for a New Standard Authorization Profile
6. Create authorization rules for profiled endpoints
Create authorization rules for profiled endpoints that are pertinent to your environment.
Policy > Authorization > Standard
1 Downloadable Access Control Lists (ACLs)
Basic User Authorization
The process for setting up basic user authorization involves the use of multiple screens in the user interface. Table 3-3 lists the tasks you perform. Links to detailed information about the tasks are provided for your convenience.
Table 3-3 Task Navigator: Basic User Authorization
Navigation Path1. Create Active Directory External Identity Store
If you use Active Directory as a source of authentication credentials, join the Cisco ISE node to the domain and configure the appropriate attributes and groups, according to your access control policy.
Administration > Identity Management > External Identity Sources > Active Directory
2. Create Identity Source Sequences
Create identity source sequences that are based on the external identity stores you created in the previous task.
Administration > Identity Management > Identity Source Sequences
3. Verify Authentication Policy
Create or modify the authentication policy to include any new identity source sequences that were created in Task 2.
Policy > Authentication
•
•
4. Create Downloadable ACLs
Create the appropriate downloadable ACLs for security enforcement, as necessary.
Policy Elements > Results > Authorization > Downloadable ACLs
5. Create Authorization Profile(s)
Create authorization profiles that are based on the types of privileges that are used for your deployment and security policy.
Policy > Policy Elements > Results > Authorization > Authorization Profiles > Standard Authorization Profiles
Creating and Configuring Permissions for a New Standard Authorization Profile
6. Create Authorization Policy
Create an authorization policy to grant the appropriate access privileges for your implementation.
Policy > Authorization
Client Provisioning and Posture
Table 3-4 lists the tasks you perform to establish client provisioning and posture. After login and successful posture, you may also have to perform additional tasks in posture on Acceptable Use Policy and Reassessments, which are not part of this flow. Links to detailed information about the tasks are provided for your convenience.
Table 3-4 Task Navigator: Client Provisioning and Posture
Navigation Path1. Configure Posture updates URL
Initial compliance module download (posture updates) takes 15 to 20 minutes for the first time.
Administration > System > Settings > Posture > Updates
For posture updates through web and offline, see Posture Updates.
2. Configure client provisioning settings
Configure the client provisioning update feed URL.
Administration > System > Settings > Client Provisioning
3. Manual client provisioning resources download and create agent profiles
Download client provisioning resources which you can add from local and remote resources.
Create client provisioning agent profiles which you can add from local and remote resources.
Policy > Policy Elements> Results > Client Provisioning > Resources > Add
•
•
4. Create client provisioning policy
Create client provisioning policies that are based on identity groups and operating systems.
Policy > Client Provisioning
5. Verify/create posture conditions
Verify that the compliance module update (posture updates) is fully downloaded and installed where predefined simple conditions are downloaded to Cisco ISE.
Create simple conditions for posture as needed.
Policy > Policy Elements > Conditions > Posture
To create the posture simple conditions, see the following:
6. Verify/create posture compound conditions
Verify that the compliance module update (posture updates) is fully downloaded and installed where predefined compound conditions and antivirus and antispyware support chart updates are downloaded to Cisco ISE.
Create posture compound conditions using posture simple conditions that are already created.
Policy > Policy Elements > Conditions > Posture
To create posture compound conditions, see the following:
•
7. Create remediation actions
Create remediation actions, which are listed in alphabetical order.
Policy > Policy Elements > Results > Posture > Remediation Actions
To create remediation actions, see Configuring Custom Posture Remediation Actions.
8. Verify/Create posture requirements
Create posture requirements using posture simple conditions, or compound conditions.
Policy > Policy Elements > Results > Posture > Requirements
9. Verify/Create posture policy
Create posture policies using posture requirements.
Policy > Posture
Basic Guest Authorization
Table 3-5 lists the tasks you perform to establish basic authorization for guests. Links to detailed information about the tasks are provided for your convenience.
Advanced User Authorization
Table 3-6 lists the tasks you perform for more advanced authorization for users. Links to detailed information about the tasks are provided for your convenience.
Table 3-6 Task Navigator: Advanced User Authorization
Navigation Path1. Create Active Directory external identity store
If you use Active Directory as a source of authentication credentials, join the Cisco ISE node to the domain and configure the appropriate attributes and groups, according to your access control policy.
Internal guest users do not require an Active Directory Identity Store setup.
Administration > Identity Management > External Identity Sources > Active Directory
2. Create identity source sequences
Create identity source sequences that are based on the external identity stores you created in the previous task, as necessary.
Administration > Identity Management > Identity Source Sequences
3. Verify authentication policy
Create or modify the authentication policy to include any new identity source sequences that you created in the previous task.
Policy > Authentication
•
•
4. Configure Posture Updates URL
Initial compliance module download (posture updates) takes 15 to 20 minutes for the first time.
Administration > System > Settings > Posture > Updates
For posture updates through web and offline, see Posture Updates.
5. Configure client provisioning settings
Configure the client provisioning update feed URL.
Administration > System > Settings > Client Provisioning
6. Manual client provisioning resources
Download client provisioning resources which you can add from local and remote resources.
Create client provisioning agent profiles which you can add from local and remote resources.
Policy > Policy Elements> Results > Client Provisioning > Resources > Add
•
•
7. Create client provisioning policy
Create client provisioning policies that are based on identity groups and operating systems.
Policy > Client Provisioning
8. Verify/create posture conditions
Verify that the compliance module update (posture updates) is fully downloaded and installed where predefined simple conditions are downloaded to Cisco ISE.
Create simple conditions for posture as needed.
Policy > Policy Elements > Conditions > Posture
To create posture simple conditions, see the following:
9. Verify/create posture compound conditions
Verify that the compliance module update (posture updates) is fully downloaded and installed where predefined compound conditions and antivirus and antispyware support chart updates are downloaded to Cisco ISE.
Create posture compound conditions using posture simple conditions that are already created.
Policy > Policy Elements > Conditions > Posture
To create posture compound conditions, see the following:
•
10. Create Remediation actions
Create remediation actions, which are listed in alphabetical order.
Policy > Policy Elements > Results > Posture > Remediation Actions
To create remediation actions, see Configuring Custom Posture Remediation Actions.
11. Verify/create posture requirements
Create posture requirements using posture simple conditions, or compound conditions.
Policy > Policy Elements > Results > Posture > Requirements
12. Verify/create posture policy
Create posture policies using posture requirements.
Policy > Posture
13. Create downloadable ACLs
Create the appropriate downloadable ACLs for enforced security, as necessary.
Policy Elements > Results > Authorization > Downloadable ACLs
14. Create authorization profiles
Create authorization profiles that are based on the types of privileges that apply to your deployment and security policy.
Policy > Policy Elements > Results > Authorization > Authorization Profiles > Standard Authorization Profiles
Creating and Configuring Permissions for a New Standard Authorization Profile
15. Authorization policies
Create an authorization policy to grant the appropriate access privileges. Choose the conditions and/or attributes in each rule to define an overall network access policy.
Create pre-posture and post-posture authorization policies.
Policy > Authorization
Advanced Guest Authorization
Table 3-7 lists the tasks you perform for more advanced authorization for guests. Links to detailed information about the tasks are provided for your convenience.
Table 3-7 Task Navigator: Advanced Guest Authorization
Navigation Path1. Create Active Directory external identity store
If you use Active Directory as a source of authentication credentials, join the Cisco ISE node to the domain and configure the appropriate attributes and groups, according to your access control policy.
Administration > Identity Management > External Identity Sources > Active Directory
2. Create identity source sequences
Create identity source sequences that are based on the external identity stores you created in Task 1, as per requirements.
Administration > Identity Management > Identity Source Sequences
3. Configure guest settings
Configure guest settings, as per guest requirements.
Administration > Guest Management > Settings > Guest > Multi-portal Configuration
4. Configure for self-service guest settings
Configure self-service guest settings, if "allow for self-service" was selected in Task 3.
Administration > Guest Management > Settings > Guest > Portal Policy
5. Create time profile
Create a guest time profile.
Administration > Guest Management > Settings > Guest > Time Profiles
6. Configure sponsor authentication identity sequence
Provide a sponsor authentication source.
Administration > Guest Management > Settings > Sponsor > Authentication Source
7. Create guest sponsor group
Create a guest sponsor group for sponsor login.
Administration > Guest Management > Sponsor Groups
8. Create sponsor policy
Create a guest sponsor login policy.
Administration > Guest Management > Sponsor Group Policy
9. Verify authentication policy
Create or modify the authentication policy to include any new identity source sequences that you created in the Task 8.
Policy > Authentication
•
•
10. Configure Posture Updates URL
Initial compliance module download (posture updates) takes 15 to 20 minutes for the first time.
Administration > System > Settings > Posture > Updates
For posture updates through web and offline, see Posture Updates.
11. Configure client provisioning settings
Configure the client provisioning update feed URL.
Administration > System > Settings > Client Provisioning
12. Manual client provisioning resources
Download client provisioning resources which you can add from local and remote resources.
Create client provisioning agent profiles which you can add from local and remote resources.
Policy > Policy Elements> Results > Client Provisioning > Resources > Add
•
•
13. Create client provisioning policy
Create client provisioning policies that are based on identity groups and operating systems.
Policy > Client Provisioning
14. Verify/create posture conditions
Verify that the compliance module update (posture updates) is fully downloaded and installed where predefined simple conditions are downloaded to Cisco ISE.
Create simple conditions for posture as needed.
Policy > Policy Elements > Conditions > Posture
To create posture simple conditions, see the following:
15. Verify/create posture compound conditions
Verify that the compliance module update (posture updates) is fully downloaded and installed where predefined compound conditions and antivirus and antispyware support chart updates are downloaded to Cisco ISE.
Create posture compound conditions using posture simple conditions that are already created.
Policy > Policy Elements > Conditions > Posture
To create posture compound conditions, see the following:
•
16. Create remediation actions
Create remediation actions, which are listed in alphabetical order.
Policy > Policy Elements > Results > Posture > Remediation Actions
To create remediation actions, see Configuring Custom Posture Remediation Actions.
17. Verify/create posture requirements
Create posture requirements using posture simple conditions, or compound conditions.
Policy > Policy Elements > Results > Posture > Requirements
18. Verify/create posture policy
Create posture policies using posture requirements.
Policy > Posture
19. Create downloadable ACLs
Create the appropriate downloadable ACLs, as needed for enforced security.
Policy Elements > Results > Authorization > Downloadable ACLs
20. Create authorization profiles
Create authorization profiles that are based on the types of privileges that apply to your deployment and security policy.
Policy > Policy Elements > Results > Authorization > Authorization Profiles > Standard Authorization Profiles
Creating and Configuring Permissions for a New Standard Authorization Profile
21. Authorization policies
Create an authorization policy to grant the appropriate access privileges. Choose the conditions and attributes in each rule to define the overall network access policy.
Create pre-posture and post-posture authorization policies.
Policy > Authorization