Feedback
Table Of Contents
Creating a Single Guest Account
Creating Random Guest Accounts
Editing an Existing Guest User Account
Deleting an Existing Guest User Account
Suspending a Guest User Account
Reinstating a Suspended Account
Viewing Guest Accounts and Resending Account Details
Managing Guest Accounts
You can create and manage guest user accounts to provide temporary network access for guests. If you have numerous guest user accounts whose account information is stored in an external database, you can import this information to expedite the account creation process.
This section covers the following topics:
•
Creating a Single Guest Account
•
•
•
•
•
•
Creating a Single Guest Account
You can create a single guest user accounts to provide network access to any guest. User account is created with a randomly generated password, based on the Password Policy that is set globally for the system.
Guest User Password Protection
Passwords can be viewed by the sponsor or admin, until such time that the guests change their passwords. After a guest changes their password, asterisks (*****) replace the password in the Password field hiding it from view.
Note
To create a single guest user account, complete the following steps:
Step 1
Step 2
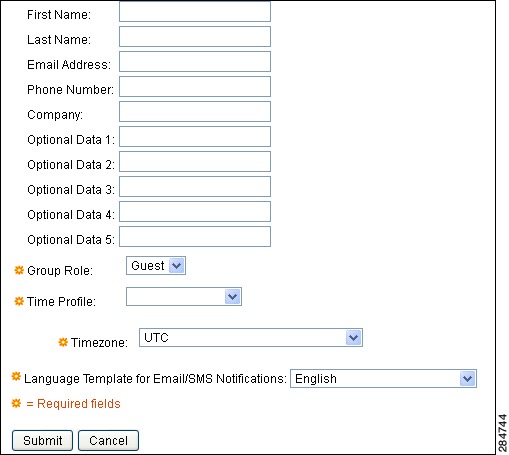
The Create Guest Account dialog box appears. See Figure 2-1.
Figure 2-1 Create Guest Account Dialog Box
Step 3
Step 4
The Successfully Created Guest Account screen appears with the Guest details and the system-generated username and password for the guest account. Do one of the following:
a.
b.
c.
Initially, when you create a guest user account, the status that is shown for that account is Awaiting Initial Login. After the guest logs in with the given user name and password, and accepts the Use Policy, the status changes to Active.
After you create a guest user, the logs are stored in the guest sponsor summary report.
Note
Note
Note
Related Topics
•
•
•
•
•
Creating Random Guest Accounts
You can create up to 10,000 random guest accounts in advance, record the details separately, and store them in the system for future use. An example of random accounts usage could be a lobby ambassador who hands out guest user access accounts from a predefined list.
Random accounts are created with randomly generated usernames and passwords. You can add a username prefix to each account name. The remainder of the username and generation of the password follow the username and password policies that are set by your network administrator in the Cisco ISE Admin portal.
Guest User Password Protection
Randomly generated passwords can be viewed by the sponsor or admin, until such time that the guests change their passwords. After a guest changes their password, asterisks (*****) replace the password in the Password field hiding it from view.
Note
To create a random guest account, complete the following steps:
Step 1
Step 2
A dialog box appears.
Step 3
Step 4
The Current Guests listing page is displayed with the list of newly created guest accounts.
Table 2-2 describes the fields that are available in the Create Random Guest Account dialog box.
Related Topics
•
•
•
•
•
Importing Guest Accounts
To create numerous guest user accounts whose account information is stored in an external database, you can use the Import Guest Accounts feature to import the details. Upload a .csv file to the sponsor portal. The sponsor portal parses the information in the .csv file and creates new guest user account for each entry in the file.
To import a .csv file, complete the following steps:
Step 1
Step 2
The Import Accounts dialog box appears.
Step 3
Step 4
Table 2-3 describes the fields that are available in the Import Guest Account dialog box.
The import process creates as many guest accounts as there are entries in the .csv file. If there is an error in any entry, that entry is omitted and the remaining entries are imported.
Related Topics
•
•
•
•
•
•
Editing an Existing Guest User Account
This section shows you how to edit an existing guest user account.
To edit an existing guest user account, complete the following steps:
Step 1
Step 2
Step 3
The Edit Guest User page appears.
Step 4
Status displays the current status of the guest user account.
Step 5
Step 6
Related Topics
•
•
•
•
•
Deleting an Existing Guest User Account
This section shows you how to delete an existing guest user account.
To delete an existing guest user account, complete the following steps:
Step 1
Step 2
Step 3
Related Topics
•
•
•
•
•
Suspending a Guest User Account
This section shows you how to suspend a guest user account.
To suspend a guest user account, complete the following steps:
Step 1
Step 2
Step 3
Related Topics
•
•
•
•
•
Reinstating a Suspended Account
This section shows you how to reinstate a suspended guest user account.
To reinstate a suspended guest user account, complete the following steps:
Step 1
Step 2
Step 3
Related Topics
•
•
•
•
•
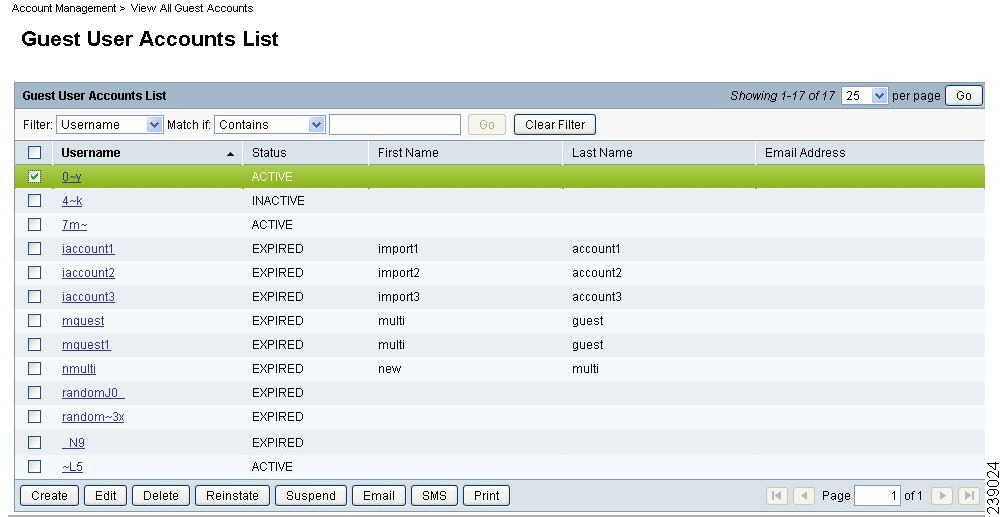
Viewing Guest Accounts and Resending Account Details
All the guest user accounts that you created appear on the Guest User Accounts List page. This page allows you to view, print, or email the account access details to guests if they have lost or forgotten them.
The guest accounts might display the following status:
•
•
•
•
This page also allows you to edit, delete, reinstate, or suspend a guest account as shown in Figure 2-2.
Depending on the privileges set for the sponsor group that you belong to, you may or may not have permission to perform some of the following actions. See Sponsor Groups for more details.
The following actions can be performed from the Guest User Accounts List page:
•
•
•
•
•
•
•
To send the guest's account details by email, the Cisco ISE administrator must first setup an email server. Contact your administrator if this feature is not available to you.
•
•
•
•
Table 2-4 Page Navigation Icons

To view the next page

To view the previous page

To view the last page

To view the first page
Figure 2-2 Guest Users Listing Page