Downloads |
 Feedback Feedback
|
Table Of Contents
Release Notes for Cisco ASDM, Version 7.0(x)
ASDM Client Operating System and Browser Requirements
New Features in ASA Version 7.0(2.9)
New Features in ASA Version 7.0(2)
New Features in ASA Version 7.0(1)
Downloading the Software from Cisco.com
Upgrading from Your Local Computer (ASDM 6.0 or Later)
Upgrading Using the Cisco.com Wizard (ASDM 6.3 or Later)
Upgrading Using the Cisco.com Wizard (ASDM 6.0 Through ASDM 6.2)
Upgrading from Your Local Computer (ASDM 5.2 or Earlier)
Upgrading a Failover Pair or ASA Cluster
Upgrading an Active/Standby Failover Pair
Upgrading an Active/Active Failover Pair
Ignored and View-Only Commands
Effects of Unsupported Commands
Discontinuous Subnet Masks Not Supported
Interactive User Commands Not Supported by the ASDM CLI Tool
Open Caveats in Version 7.0(2.9)
Open Caveats in Version 7.0(2)
Open Caveats in Version 7.0(1)
Resolved Caveats in Version 7.0(2.9)
Resolved Caveats in Version 7.0(2)
Obtaining Software, Documentation, and Submitting a Service Request
Release Notes for Cisco ASDM, Version 7.0(x)
Released: October 29, 2012Updated: January 27, 2014This document contains release information for Cisco ASDM Version 7.0(x) for the Cisco ASA series. This document includes the following sections:
•
ASDM Client Operating System and Browser Requirements
•
Important Notes
•
•
To enable per-session PAT after you upgrade:
a.
b.
After you delete the Deny rules, only the default permit rules are still in place, thus enabling per-session PAT.
c.
•
–
–
You can still install the Strong Encryption (3DES/AES) license for use with management connections and encrypted route messages for OSPFv3. For example, you can use ASDM HTTPS/SSL, SSHv2, Telnet and SNMPv3. You can also download the dynamic database for the Botnet Traffic Filer (which uses SSL) and redirect traffic to Cloud Web Security.
•
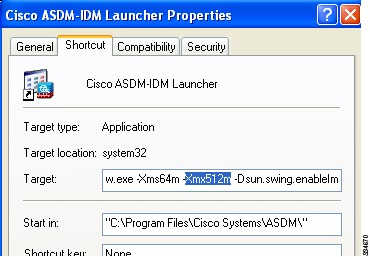
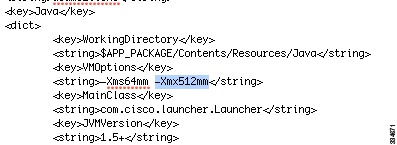
To increase the ASDM heap memory size, download the ASDM-IDM Launcher, and then modify the ASDM-IDM Launcher shortcut by performing the following steps.
Windows:
a.
b.
c.
Macintosh:
a.
b.
c.
d.
e.
If you do not see the Unlock dialog box, exit the editor, right click the Cisco ASDM-IDM icon, choose Copy Cisco ASDM-IDM, and paste it to a location where you have write permissions, such as the Desktop. Then change the heap size from this copy.
•
In ASDM 6.4, assigning a profile to a certificate map acted somewhat differently:
If you assign an SSL Connection Profile to Certificate Map Name, that certificate map is not displayed under the SSL certficiate map list (Configuration > Remote Access VPN > Advanced > Certificate to AnyConnect and Clientless SSL VPN Connection Profile Maps); it is displayed under the IPSec certificate map list (Configuration > Remote Access VPN > Network (Client) Access > Advanced > IPsec > Certificate to Connection Profile Maps > Rules).
Limitations and Restrictions
Clientless SSL VPN with a self-signed certificate on the ASA—When the ASA uses a self-signed certificate or an untrusted certificate, Firefox 4 and later and Safari are unable to add security exceptions when browsing using an IPv6 address HTTPS URL (FQDN URL is OK): the "Confirm Security Exception" button is disabled. See: https://bugzilla.mozilla.org/show_bug.cgi?id=633001. This caveat affects all SSL connections originating from Firefox or Safari to the ASA (including clientless SSL VPN connections, and ASDM connections). To avoid this caveat, configure a proper certificate for the ASA that is issued by a trusted certificate authority. For Internet Explorer 9 and later, use compatibility mode.
System Requirements
For information about ASA/ASDM requirements and compatibility, see Cisco ASA Compatibility:
http://www.cisco.com/en/US/docs/security/asa/compatibility/asamatrx.html
For VPN compatibility, see the Supported VPN Platforms, Cisco ASA 5500 Series:
http://www.cisco.com/en/US/docs/security/asa/compatibility/asa-vpn-compatibility.html
ASDM Client Operating System and Browser Requirements
Table 1 lists the supported and recommended client operating systems and Java for ASDM.
Table 2 lists compatibility caveats for Java, ASDM, and browser compatibility.
Table 2 Caveats for ASDM Compatibility
7 update 51
•
•
To continue using the Launcher, either install a trusted certificate (from a known CA; a self-signed certificate will not work) on the ASA or downgrade Java to 7 update 45 or earlier. You can alternatively use Java Web Start.
To use Java Web Start, do one of the following:
•
•
http://java.com/en/download/help/java_blocked.xml
If you already upgraded Java, and can no longer launch ASDM in order to upgrade it to Version 7.1(5.100) or later, then you can either use the CLI to upgrade ASDM, or you can use the above security exception workaround to launch the older ASDM, after which you can upgrade to a newer version.
7 update 45
ASDM shows a yellow warning about the missing Permissions attribute
Java 7 update 45 shows a warning when an application does not have the Permissions attribute in the JAR manifest. It is safe to ignore this warning. To prevent this warning from appearing, upgrade to ASDM 7.1(5.100) or later; this ASDM version includes the Permissions attribute, which will be required as of Java 7 Update 51.
Note
7
Requires strong encryption license (3DES/AES) on ASA
ASDM requires an SSL connection to the ASA. If the ASA has only the base encryption license (DES), and therefore has weak encryption ciphers for the SSL connection, you cannot launch ASDM. You must uninstall Java 7, and install Java 6 (http://www.oracle.com/technetwork/java/javase/downloads/java-archive-downloads-javase6-419409.html). Note that a workaround is required for weak encryption and Java 6 (see below, in this table).
MacOS
You may see the following error message when opening the ASDM Launcher:
Cannot launch Cisco ASDM-IDM. No compatible version of Java
1.5+ is available.
In this case, Java 7 is the currently-preferred Java version. Either upgrade ASDM to 7.1(4) or later, or you need to set Java 6 as the preferred Java version: Open the Java Preferences application (under Applications > Utilities), select the preferred Java version, and drag it up to be the first line in the table.
6
No usernames longer than 50 characters
Due to a Java bug, ASDM does not support usernames longer than 50 characters when using Java 6. Longer usernames work correctly for Java 7.
Requires strong encryption license (3DES/AES) on ASA or workaround
When you initially connect a browser to the ASA to load the ASDM splash screen, the browser attempts to make an SSL connection to the ASA. If the ASA has only the base encryption license (DES), and therefore has weak encryption ciphers for the SSL connection, you may not be able to access the ASDM splash screen; most current browsers do not support weak encryption ciphers. Therefore, without the strong encryption license (3DES/AES), use one of the following workarounds:
•
•
•
All
•
•
•
When the ASA uses a self-signed certificate or an untrusted certificate, Firefox 4 and later and Safari are unable to add security exceptions when browsing using HTTPS over IPv6. See https://bugzilla.mozilla.org/show_bug.cgi?id=633001. This caveat affects all SSL connections originating from Firefox or Safari to the ASA (including ASDM connections). To avoid this caveat, configure a proper certificate for the ASA that is issued by a trusted certificate authority.
•
•
If you change the SSL encryption on the ASA to exclude both RC4-MD5 and RC4-SHA1 algorithms (these algorithms are enabled by default), then Chrome cannot launch ASDM due to the Chrome "SSL false start" feature. We suggest re-enabling one of these algorithms (see the Configuration > Device Management > Advanced > SSL Settings pane); or you can disable SSL false start in Chrome using the --disable-ssl-false-start flag according to http://www.chromium.org/developers/how-tos/run-chromium-with-flags.
IE9 for servers
For Internet Explorer 9.0 for servers, the "Do not save encrypted pages to disk" option is enabled by default (See Tools > Internet Options > Advanced). This option causes the initial ASDM download to fail. Be sure to disable this option to allow ASDM to download.
MacOS
On MacOS, you may be prompted to install Java the first time you run ASDM; follow the prompts as necessary. ASDM will launch after the installation completes.
All
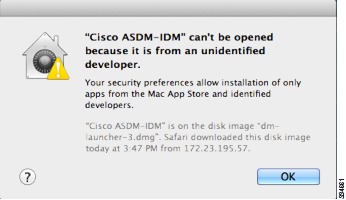
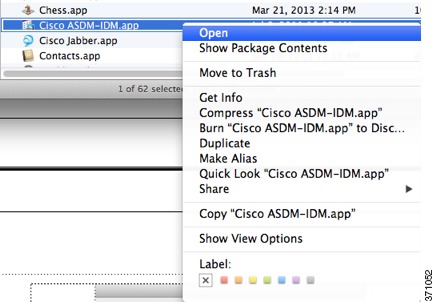
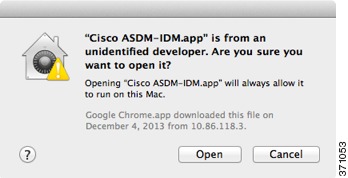
MacOS 10.8 and later
You need to allow ASDM to run because it is not signed with an Apple Developer ID. If you do not change your security preferences, you see an error screen.
1.
2.
New Features
•
•
•
New Features in ASA Version 7.0(2.9)
Released: November 6, 2012There are no new features in Version 7.0(2.9).
New Features in ASA Version 7.0(2)
Released: October 31, 2012Table 3 lists the new features for ASA Version 8.4(5).
New Features in ASA Version 7.0(1)
Released: October 29, 2012Table 4 lists the new features for ASA Version 9.0(1)/ASDM Version 7.0(1).
Note
Table 4 New Features for ASA Version 9.0(1)/ASDM Version 7.0(1)
Cisco TrustSec integration
Cisco TrustSec provides an access-control solution that builds upon an existing identity-aware infrastructure to ensure data confidentiality between network devices and integrate security access services on one platform. In the Cisco TrustSec solution, enforcement devices utilize a combination of user attributes and end-point attributes to make role-based and identity-based access control decisions.
In this release, the ASA integrates with Cisco TrustSec to provide security group based policy enforcement. Access policies within the Cisco TrustSec domain are topology-independent, based on the roles of source and destination devices rather than on network IP addresses.
The ASA can utilize the Cisco TrustSec solution for other types of security group based policies, such as application inspection; for example, you can configure a class map containing an access policy based on a security group.
We introduced the following MIB: CISCO-TRUSTSEC-SXP-MIB.
We introduced or modified the following screens:
Configuration > Firewall > Identity by TrustSec
Configuration > Firewall > Objects > Security Groups Object Groups
Configuration > Firewall > Access Rules > Add Access Rules
Monitoring > Properties > Identity by TrustSec > PAC
Monitoring > Properties > Identity by TrustSec > Environment Data
Monitoring > Properties > Identity by TrustSec > SXP Connections
Monitoring > Properties > Identity by TrustSec > IP Mappings
Monitoring > Properties > Connections
Tools > Packet TracerCisco Cloud Web Security (ScanSafe)
Cisco Cloud Web Security provides content scanning and other malware protection service for web traffic. It can also redirect and report about web traffic based on user identity.
Note
We introduced or modified the following screens:
Configuration > Device Management > Cloud Web Security
Configuration > Firewall > Objects > Class Maps > Cloud Web Security
Configuration > Firewall > Objects > Class Maps > Cloud Web Security > Add/Edit
Configuration > Firewall > Objects > Inspect Maps > Cloud Web Security
Configuration > Firewall > Objects > Inspect Maps > Cloud Web Security > Add/Edit
Configuration > Firewall > Objects > Inspect Maps > Cloud Web Security > Add/Edit > Manage Cloud Web Security Class Maps
Configuration > Firewall > Identity Options
Configuration > Firewall > Service Policy Rules
Monitoring > Properties > Cloud Web SecurityExtended ACL and object enhancement to filter ICMP traffic by ICMP code
ICMP traffic can now be permitted/denied based on ICMP code.
We introduced or modified the following screens:
Configuration > Firewall > Objects > Service Objects/Groups
Configuration > Firewall > Access RuleUnified communications support on the ASA SM
The ASA SM now supports all Unified Communications features.
NAT support for reverse DNS lookups
NAT now supports translation of the DNS PTR record for reverse DNS lookups when using IPv4 NAT, IPv6 NAT, and NAT64 with DNS inspection enabled for the NAT rule.
Per-session PAT
The per-session PAT feature improves the scalability of PAT and, for ASA clustering, allows each member unit to own PAT connections; multi-session PAT connections have to be forwarded to and owned by the master unit. At the end of a per-session PAT session, the ASA sends a reset and immediately removes the xlate. This reset causes the end node to immediately release the connection, avoiding the TIME_WAIT state. Multi-session PAT, on the other hand, uses the PAT timeout, by default 30 seconds. For "hit-and-run" traffic, such as HTTP or HTTPS, the per-session feature can dramatically increase the connection rate supported by one address. Without the per-session feature, the maximum connection rate for one address for an IP protocol is approximately 2000 per second. With the per-session feature, the connection rate for one address for an IP protocol is 65535/average-lifetime.
By default, all TCP traffic and UDP DNS traffic use a per-session PAT xlate. For traffic that can benefit from multi-session PAT, such as H.323, SIP, or Skinny, you can disable per-session PAT by creating a per-session deny rule.
We introduced the following screen: Configuration > Firewall > Advanced > Per-Session NAT Rules.
ARP cache additions for non-connected subnets
The ASA ARP cache only contains entries from directly-connected subnets by default. You can now enable the ARP cache to also include non-directly-connected subnets. We do not recommend enabling this feature unless you know the security risks. This feature could facilitate denial of service (DoS) attack against the ASA; a user on any interface could send out many ARP replies and overload the ASA ARP table with false entries.
You may want to use this feature if you use:
•
•
We modified the following screen: Configuration > Device Management > Advanced > ARP > ARP Static Table.
Also available in 8.4(5).
SunRPC change from dynamic ACL to pin-hole mechanism
Previously, Sun RPC inspection does not support outbound access lists because the inspection engine uses dynamic access lists instead of secondary connections.
In this release, when you configure dynamic access lists on the ASA, they are supported on the ingress direction only and the ASA drops egress traffic destined to dynamic ports. Therefore, Sun RPC inspection implements a pinhole mechanism to support egress traffic. Sun RPC inspection uses this pinhole mechanism to support outbound dynamic access lists.
Also available in 8.4(4.1).
Inspection reset action change
Previously, when the ASA dropped a packet due to an inspection engine rule, the ASA sent only one RST to the source device of the dropped packet. This behavior could cause resource issues.
In this release, when you configure an inspection engine to use a reset action and a packet triggers a reset, the ASA sends a TCP reset under the following conditions:
•
•
For more information, see the service command in the ASA Cisco Security Appliance Command Reference.
This behavior ensures that a reset action will reset the connections on the ASA and on inside servers; therefore countering denial of service attacks. For outside hosts, the ASA does not send a reset by default and information is not revealed through a TCP reset.
Also available in 8.4(4.1).
Increased maximum connection limits for service policy rules
The maximum number of connections for service policy rules was increased from 65535 to 2000000.
We modified the following screen: Configuration > Firewall > Service Policy Rules > Connection Settings.
Also available in 8.4(5)
ASA Clustering for the ASA 5580 and 5585-X
ASA Clustering lets you group multiple ASAs together as a single logical device. A cluster provides all the convenience of a single device (management, integration into a network) while achieving the increased throughput and redundancy of multiple devices. ASA clustering is supported for the ASA 5580 and the ASA 5585-X; all units in a cluster must be the same model with the same hardware specifications. See the configuration guide for a list of unsupported features when clustering is enabled.
We introduced or modified the following screens:
Home > Device Dashboard
Home > Cluster Dashboard
Home > Cluster Firewall Dashboard
Configuration > Device Management > Advanced > Address Pools > MAC Address Pools
Configuration > Device Management > High Availability and Scalability > ASA Cluster
Configuration > Device Management > Logging > Syslog Setup > Advanced
Configuration > Device Setup > Interfaces > Add/Edit Interface > Advanced
Configuration > Device Setup > Interfaces > Add/Edit Interface > IPv6
Configuration > Device Setup > Interfaces > Add/Edit EtherChannel Interface > Advanced
Configuration > Firewall > Advanced > Per-Session NAT Rules
Monitoring > ASA Cluster
Monitoring > Properties > System Resources Graphs > Cluster Control Link
Tools > Preferences > General
Tools > System Reload
Tools > Upgrade Software from Local Computer
Wizards > High Availability and Scalability Wizard
Wizards > Packet Capture Wizard
Wizards > Startup WizardOSPF, EIGRP, and Multicast for clustering
For OSPFv2 and OSPFv3, bulk synchronization, route synchronization, and spanned EtherChannels are supported in the clustering environment.
For EIGRP, bulk synchronization, route synchronization, and spanned EtherChannels are supported in the clustering environment.
Multicast routing supports clustering.
Packet capture for clustering
To support cluster-wide troubleshooting, you can enable capture of cluster-specific traffic on the master unit using the cluster exec capture command, which is then automatically enabled on all of the slave units in the cluster. The cluster exec keywords are the new keywords that you place in front of the capture command to enable cluster-wide capture.
We modified the following screen: Wizards > Packet Capture Wizard.
Logging for clustering
Each unit in the cluster generates syslog messages independently. You can use the logging device-id command to generate syslog messages with identical or different device IDs to make messages appear to come from the same or different units in the cluster.
We modified the following screen: Configuration > Logging > Syslog Setup > Advanced > Advanced Syslog Configuration.
Configure the connection replication rate during a bulk sync
You can now configure the rate at which the ASA replicates connections to the standby unit when using Stateful Failover. By default, connections are replicated to the standby unit during a 15 second period. However, when a bulk sync occurs (for example, when you first enable failover), 15 seconds may not be long enough to sync large numbers of connections due to a limit on the maximum connections per second. For example, the maximum connections on the ASA is 8 million; replicating 8 million connections in 15 seconds means creating 533 K connections per second. However, the maximum connections allowed per second is 300 K. You can now specify the rate of replication to be less than or equal to the maximum connections per second, and the sync period will be adjusted until all the connections are synchronized.
Also available in 8.4(4.1) and 8.5(1.7).
IPv6 Support on the ASA's outside interface for VPN Features.
This release of the ASA adds support for IPv6 VPN connections to its outside interface using SSL and IKEv2/IPsec protocols.
This release of the ASA continues to support IPv6 VPN traffic on its inside interface using the SSL protocol as it has in the past. This release does not provide IKEv2/IPsec protocol on the inside interface.
Remote Access VPN support for IPv6:
IPv6 Address Assignment PolicyYou can configure the ASA to assign an IPv4 address, an IPv6 address, or both an IPv4 and an IPv6 address to an AnyConnect client by creating internal pools of addresses on the ASA or by assigning a dedicated address to a local user on the ASA.
The endpoint must have the dual-stack protocol implemented in its operating system to be assigned both types of addresses.
Assigning an IPv6 address to the client is supported for the SSL protocol. This feature is not supported for the IKEv2/IPsec protocol.
We modified the following screens:
Configuration > Remote Access VPN > Network (Client) Access > Address Assignment > Assignment Policy
Configuration > Remote Access VPN > AAA/Local Users > Local Users > (Edit local user account) > VPN PolicyRemote Access VPN support for IPv6:
Assigning DNS Servers with IPv6 Addresses to group policiesDNS servers can be defined in a Network (Client) Access internal group policy on the ASA. You can specify up to four DNS server addresses including up to two IPv4 addresses and up to two IPv6 addresses.
DNS servers with IPv6 addresses can be reached by VPN clients when they are configured to use the SSL protocol. This feature is not supported for clients configured to use the IKEv2/IPsec protocol.
We modified the following screen: Configuration > Remote Access VPN > Network (Client) Access > Group Policies > (Edit group policy) > Servers.
Remote Access VPN support for IPv6:
Split tunnelingSplit tunneling enables you to route some network traffic through the VPN tunnel (encrypted) and to route other network traffic outside the VPN tunnel (unencrypted or "in the clear"). You can now perform split tunneling on IPv6 network traffic by defining an IPv6 policy which specifies a unified access control rule.
IPv6 split tunneling is reported with the telemetric data sent by the Smart Call Home feature. If either IPv4 or IPv6 split tunneling is enabled, Smart Call Home reports split tunneling as "enabled." For telemetric data, the VPN session database displays the IPv6 data typically reported with session management.
You can include or exclude IPv6 traffic from the VPN "tunnel" for VPN clients configured to use the SSL protocol. This feature is not supported for the IKEv2/IPsec protocol.
We modified the following screen: Configuration > Remote Access VPN > Network (Client) Access > Group Policies > (Edit group policy) > Advanced > Split Tunneling.
Remote Access VPN support for IPv6:
AnyConnect Client Firewall RulesAccess control rules for client firewalls support access list entries for both IPv4 and IPv6 addresses.
ACLs containing IPv6 addresses can be applied to clients configured to use the SSL protocol. This feature is not supported for the IKEv2/IPsec protocol.
We modified the following screen: Configuration > Remote Access VPN > Network (Client) Access > Group Policies > (Edit group policy) > Advanced > AnyConnect Client > Client Firewall.
Remote Access VPN support for IPv6:
Client Protocol BypassThe Client Protocol Bypass feature allows you to configure how the ASA manages IPv4 traffic when it is expecting only IPv6 traffic or how it manages IPv6 traffic when it is expecting only IPv4 traffic.
When the AnyConnect client makes a VPN connection to the ASA, the ASA could assign it an IPv4, IPv6, or both an IPv4 and IPv6 address. If the ASA assigns the AnyConnect connection only an IPv4 address or only an IPv6 address, you can now configure the Client Bypass Protocol to drop network traffic for which the ASA did not assign an IP address, or allow that traffic to bypass the ASA and be sent from the client unencrypted or "in the clear."
For example, assume that the ASA assigns only an IPv4 address to an AnyConnect connection and the endpoint is dual stacked. When the endpoint attempts to reach an IPv6 address, if Client Bypass Protocol is disabled, the IPv6 traffic is dropped; however, if Client Bypass Protocol is enabled, the IPv6 traffic is sent from the client in the clear.
This feature can be used by clients configured to use the SSL or IKEv2/IPsec protocol.
We modified the following screen: Configuration > Remote Access VPN > Network (Client) Access > Group Policies > (Group Policy) Advanced > AnyConnect Client > Client Bypass Protocol.
Remote Access VPN support for IPv6:
IPv6 Interface ID and prefixYou can now specify a dedicated IPv6 address for local VPN users.
This feature benefits users configured to use the SSL protocol. This feature is not supported for the IKEv2/IPsec protocol.
We modified the following screen: Configuration > Remote Access VPN > AAA/Local Users > Local Users > (Edit User) > VPN Policy.
Remote Access VPN support for IPv6:
Sending ASA FQDN to AnyConnect clientYou can return the FQDN of the ASA to the AnyConnect client to facilitate load balancing and session roaming.
This feature can be used by clients configured to use the SSL or IKEv2/IPsec protocol.
We modified the following screen: Configuration > Remote Access VPN > Network (Client) Access > Group Policies > (Edit group policy) > Advanced > AnyConnect.
Remote Access VPN support for IPv6:
ASA VPN Load BalancingClients with IPv6 addresses can make AnyConnect connections through the public-facing IPv6 address of the ASA cluster or through a GSS server. Likewise, clients with IPv6 addresses can make AnyConnect VPN connections through the public-facing IPv4 address of the ASA cluster or through a GSS server. Either type of connection can be load-balanced within the ASA cluster.
For clients with IPv6 addresses to successfully connect to the ASAs public-facing IPv4 address, a device that can perform network address translation from IPv6 to IPv4 needs to be in the network.
This feature can be used by clients configured to use the SSL or IKEv2/IPsec protocol.
We modified the following screen: Configuration > Remote Access VPN > Load Balancing.
Remote Access VPN support for IPv6:
Dynamic Access Policies support IPv6 attributesWhen using ASA 9.0 or later with ASDM 6.8 or later, you can now specify these attributes as part of a dynamic access policy (DAP):
•
•
•
This feature can be used by clients configured to use the SSL or IKEv2/IPsec protocol.
We modified the following screens:
Configuration > Remote Access VPN > Network (Client) Access > Dynamic Access Policies > Add > Cisco AAA attribute
Configuration > Remote Access VPN > Network (Client) Access > Dynamic Access Policies > Add > Device > Add Endpoint Attribute
Configuration > Remote Access VPN > Network (Client) Access > Dynamic Access Policies > Network ACL Filters (client)
Configuration > Remote Access VPN > Network (Client) Access > Dynamic Access Policies > Webtype ACL Filters (clientless)Remote Access VPN support for IPv6:
Session ManagementSession management output displays the IPv6 addresses in Public/Assigned address fields for AnyConnect connections, site-to-site VPN connections, and Clientless SSL VPN connections. You can add new filter keywords to support filtering the output to show only IPv6 (outside or inside) connections. No changes to IPv6 User Filters exist.
This feature can be used by clients configured to use the SSL protocol. This feature does not support IKEv2/IPsec protocol.
We modified these screen: Monitoring > VPN > VPN Statistics > Sessions.
NAT support for IPv6
NAT now supports IPv6 traffic, as well as translating between IPv4 and IPv6 (NAT64). Translating between IPv4 and IPv6 is not supported in transparent mode.
We modified the following screens:
Configuration > Firewall > Objects > Network Objects/Group
Configuration > Firewall > NAT RulesDHCPv6 relay
DHCP relay is supported for IPv6.
We modified the following screen: Configuration > Device Management > DHCP > DHCP Relay.
OSPFv3
OSPFv3 routing is supported for IPv6. Note the following additional guidelines and limitations for OSPFv2 and OSPFv3:
Clustering
•
•
•
•
Other
•
•
•
We introduced the following screens:
Configuration > Device Setup > Routing > OSPFv3 > Setup
Configuration > Device Setup > Routing > OSPFv3 > Interface
Configuration > Device Setup > Routing > OSPFv3 > Redistribution
Configuration > Device Setup > Routing > OSPFv3 > Summary Prefix
Configuration > Device Setup > Routing > OSPFv3 > Virtual Link
Monitoring > Routing > OSPFv3 LSAs
Monitoring > Routing > OSPFv3 NeighborsUnified ACL for IPv4 and IPv6
ACLs now support IPv4 and IPv6 addresses. You can also specify a mix of IPv4 and IPv6 addresses for the source and destination. The IPv6-specific ACLs are deprecated. Existing IPv6 ACLs are migrated to extended ACLs.
ACLs containing IPv6 addresses can be applied to clients configured to use the SSL protocol. This feature is not supported for the IKEv2/IPsec protocol.
We modified the following screens:
Configuration > Firewall > Access Rules
Configuration > Remote Access VPN > Network (Client) Access > Group Policies > General > More OptionsMixed IPv4 and IPv6 object groups
Previously, network object groups could only contain all IPv4 addresses or all IPv6 addresses. Now network object groups can support a mix of both IPv4 and IPv6 addresses.
Note
We modified the following screen: Configuration > Firewall > Objects > Network Objects/Groups.
Range of IPv6 addresses for a Network object
You can now configure a range of IPv6 addresses for a network object.
We modified the following screen: Configuration > Firewall > Objects > Network Objects/Groups.
Inspection support for IPv6 and NAT64
We now support DNS inspection for IPv6 traffic.
We also support translating between IPv4 and IPv6 for the following inspections:
•
•
•
•
You can now also configure the service policy to generate a syslog message (767001) when unsupported inspections receive and drop IPv6 traffic.
We modified the following screen: Configuration > Firewall > Service Policy Rules > Add Service Policy Rule Wizard - Service Policy.
Clientless SSL VPN:
Additional SupportWe have added additional support for these browsers, operating systems, web technologies and applications:
Internet browser support: Microsoft Internet Explorer 9, Firefox 4, 5, 6, 7, and 8
Operating system support: Mac OS X 10.7
Web technology support: HTML 5
Application Support: Sharepoint 2010
Clientless SSL VPN:
Enhanced quality for rewriter enginesThe clientless SSL VPN rewriter engines were significantly improved to provide better quality and efficacy. As a result, you can expect a better end-user experience for clientless SSL VPN users.
We did not add or modify any ASDM screens for this feature.
Also available in 8.4(4.1).
Clientless SSL VPN:
Citrix Mobile ReceiverThis feature provides secure remote access for Citrix Receiver applications running on mobile devices to XenApp and XenDesktop VDI servers through the ASA.
For the ASA to proxy Citrix Receiver to a Citrix Server, when users try to connect to Citrix virtualized resource, instead of providing the Citrix Server's address and credentials, users enter the ASA's SSL VPN IP address and credentials.
We modified the following screen: Configuration > Remote Access VPN > Clientless SSL VPN Access > Group Policy > Edit > More Options > VDI Access > Add VDI Server.
Clientless SSL VPN:
Enhanced Auto-sign-onThis feature improves support for web applications that require dynamic parameters for authentication.
We modified the following screen: Configuration > Remote Access VPN > Clientless SSL VPN Access > Portal > Bookmarks.
Clientless SSL VPN:
Clientless Java Rewriter Proxy SupportThis feature provides proxy support for clientless Java plug-ins when a proxy is configured in client machines' browsers.
We did not add or modify any ASDM screens for this feature.
Clientless SSL VPN:
Remote File ExplorerThe Remote File Explorer provides users with a way to browse the corporate network from their web browser. When users click the Remote File System icon on the Cisco SSL VPN portal page, an applet is launched on the user's system displaying the remote file system in a tree and folder view.
We did not add or modify any ASDM screens for this feature.
Clientless SSL VPN:
Server Certificate ValidationThis feature enhances clientless SSL VPN support to enable SSL server certificate verification for remote HTTPS sites against a list of trusted CA certificates.
We modified the following screen: Configuration > Remote Access VPN > Certificate Management > Trusted Certificate Pool.
AnyConnect Performance Improvements
This feature improves throughput performance for AnyConnect TLS/DTLS traffic in multi-core platforms. It accelerates the SSL VPN datapath and provides customer-visible performance gains in AnyConnect, smart tunnels, and port forwarding.
We modified the following screen: Configuration > Remote Access VPN > Advanced > Crypto Engine.
Custom Attributes
Custom attributes define and configure AnyConnect features that have not yet been added to ASDM. You add custom attributes to a group policy, and define values for those attributes.
For AnyConnect 3.1, custom attributes are available to support AnyConnect Deferred Upgrade.
Custom attributes can benefit AnyConnect clients configured for either IKEv2/IPsec or SSL protocols.
A new screen was added: Configuration > Remote Access VPN > Network (Client) Access > Advanced > AnyConnect Custom Attributes.
Next Generation Encryption
The National Standards Association (NSA) specified a set of cryptographic algorithms that devices must support to meet U.S. federal standards for cryptographic strength. RFC 6379 defines the Suite B cryptographic suites. Because the collective set of algorithms defined as NSA Suite B are becoming a standard, the AnyConnect IPsec VPN (IKEv2 only) and public key infrastructure (PKI) subsystems now support them. The next generation encryption (NGE) includes a larger superset of this set adding cryptographic algorithms for IPsec V3 VPN, Diffie-Hellman Groups 14 and 24 for IKEv2, and RSA certificates with 4096 bit keys for DTLS and IKEv2.
The following functionality is added to ASA to support the Suite B algorithms:
•
–
–
–
•
–
–
•
–
–
–
•
–
–
–
–
New cryptographic algorithms are added for IPsecV3.
Note
We introduced or modified the following screens:
Monitor > VPN > Sessions
Monitor > VPN > Encryption Statistics
Configuration > Site-to-Site VPN > Certificate Management > Identity Certificates
Configuration > Site-to-Site VPN > Advanced > System Options
Configuration > Remote Access VPN > Network (Client) Access > Advanced > IPsec > Crypto MapsSupport for VPN on the ASA SM
The ASA SM now supports all VPN features.
Site-to-Site VPN in multiple context mode
Site-to-site VPN tunnels are now supported in multiple context mode.
New resource type for site-to-site VPN tunnels
New resource types, vpn other and vpn burst other, were created to set the maximum number of site-to-site VPN tunnels in each context.
We modified the following screen: Configuration > Context Management > Resource Class > Add Resource Class.
Dynamic routing in Security Contexts
EIGRP and OSPFv2 dynamic routing protocols are now supported in multiple context mode. OSPFv3, RIP, and multicast routing are not supported.
New resource type for routing table entries
A new resource class, routes, was created to set the maximum number of routing table entries in each context.
We modified the following screen: Configuration > Context Management > Resource Class > Add Resource Class.
Mixed firewall mode support in multiple context mode
You can set the firewall mode independently for each security context in multiple context mode, so some can run in transparent mode while others run in routed mode.
You cannot set the firewall mode in ASDM; you must use the command-line interface.
Also available in Version 8.5(1).
ASA Services Module support on the Cisco 7600 switch
The Cisco 7600 series now supports the ASASM. For specific hardware and software requirements, see: http://www.cisco.com/en/US/docs/security/asa/compatibility/asamatrx.html.
ASA 5585-X support for the ASA CX SSP-10 and -20
The ASA CX module lets you enforce security based on the complete context of a situation. This context includes the identity of the user (who), the application or website that the user is trying to access (what), the origin of the access attempt (where), the time of the attempted access (when), and the properties of the device used for the access (how). With the ASA CX module, you can extract the full context of a flow and enforce granular policies such as permitting access to Facebook but denying access to games on Facebook or permitting finance employees access to a sensitive enterprise database but denying the same to other employees.
We introduced the following screens:
Home > ASA CX Status
Wizards > Startup Wizard > ASA CX Basic Configuration
Configuration > Firewall > Service Policy Rules > Add Service Policy Rule > Rule Actions > ASA CX InspectionAlso available in 8.4(4.1).
ASA 5585-X Dual SSP support for the SSP-10 and SSP-20 (in addition to the SSP-40 and SSP-60); VPN support for Dual SSPs
The ASA 5585-X now supports dual SSPs using all SSP models (you can use two SSPs of the same level in the same chassis). VPN is now supported when using dual SSPs.
We did not modify any screens.
ACL Migration in Version 9.0
The following ACL configurations will be migrated when upgrading to Version 9.0.
IPv6 ACLs
IPv6 ACLs (ipv6 access-list) will be migrated to extended ACLs (access-list extended); IPv6 ACLs are no longer supported.
If IPv4 and IPv6 ACLs are applied on the same direction of an interface (access-group command), then the ACLs are merged:
•
•
Any Keyword
Now that ACLs support both IPv4 and IPv6, the any keyword now represents "all IPv4 and IPv6 traffic." Any existing ACLs that use the any keyword will be changed to use the any4 keyword, which denotes "all IPv4 traffic."
In addition, a separate keyword was introduced to designate "all IPv6 traffic": any6.
Note
Upgrading the Software
This section describes how to upgrade to the latest version and includes the following topics:
•
•
Note
Upgrade Path and Migrations
•
–
–
•
•
The units in a failover configuration or ASA cluster should have the same major (first number) and minor (second number) software version. However, you do not need to maintain version parity on the units during the upgrade process; you can have different versions on the software running on each unit and still maintain failover support. To ensure long-term compatibility and stability, we recommend upgrading all units to the same version as soon as possible.
Table 1-5 shows the supported scenarios for performing zero-downtime upgrades.
Viewing Your Current Version
The software version appears on the ASDM home page; view the home page to verify the software version of your ASA.
Downloading the Software from Cisco.com
If you are using the ASDM Upgrade Wizard, you do not have to pre-download the software. If you are manually upgrading, for example for a failover upgrade, download the images to your local computer.
If you have a Cisco.com login, you can obtain the OS and ASDM images from the following website:
http://www.cisco.com/cisco/software/navigator.html?mdfid=279513386
Upgrading a Standalone Unit
Note
If the ASA is running a version earlier than 8.0, then use the already installed version of ASDM to upgrade both the OS and ASDM to the latest versions, and then reload.
•
•
•
•
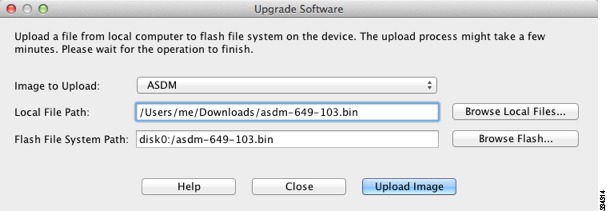
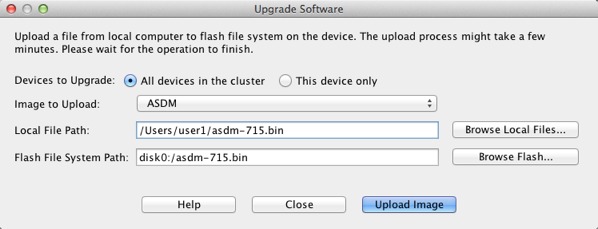
Upgrading from Your Local Computer (ASDM 6.0 or Later)
The Upgrade Software from Local Computer tool lets you upload an image file from your computer to the flash file system to upgrade the ASA.
To upgrade software from your computer, perform the following steps:
Step 1
Step 2
The Upgrade Software dialog box appears.
Step 3
Step 4
Step 5
Step 6
Step 7
Step 8
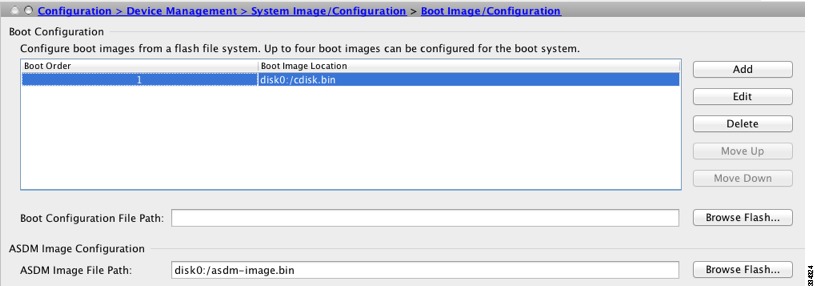
a.
b.
If you do not specify an image, the ASA searches the internal flash memory for the first valid image to boot; we recommend booting from a specific image.
c.
d.
e.
f.
g.
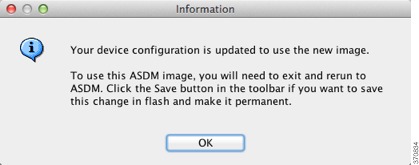
Step 9
Step 10
A new window appears that asks you to verify the details of the reload. Click the Save the running configuration at the time of reload radio button, choose a time to reload (for example, Now), and click Schedule Reload.
Once the reload is in progress, a Reload Status window appears that indicates that a reload is being performed. An option to exit ASDM is also provided.
Step 11
Upgrading Using the Cisco.com Wizard (ASDM 6.3 or Later)
The Upgrade Software from Cisco.com Wizard lets you automatically upgrade the ASDM and ASA to more current versions.
In this wizard, you can do the following:
•
Note
•
•
•
•
Detailed Steps
Step 1
Step 2
In multiple context mode, access this menu from the System.
The Cisco.com Authentication dialog box appears.
Step 3
The Cisco.com Upgrade Wizard appears.
Note
Step 4
The current ASA version and ASDM version appear.
Step 5
a.
b.
Step 6
Step 7
•
•
•
Step 8
You can then view the status of the upgrade installation as it progresses.
The Results screen appears, which provides additional details, such as the upgrade installation status (success or failure).
During the upgrade process from Version 8.2(1) to Version 8.3(1), the following files are automatically saved to flash memory:
•
•
•
If there is insufficient memory to save the configuration files, an error message appears on the console of the ASA and is saved in the bootup error log file. All previously saved configuration files are also removed.
Step 9
Step 10
Note
Upgrading Using the Cisco.com Wizard (ASDM 6.0 Through ASDM 6.2)
Detailed Steps
Step 1
Step 2
In multiple context mode, access this menu from the System.
The Upgrade Software from Cisco.com Wizard appears.
Step 3
The Authentication screen appears.
Step 4
The Image Selection screen appears.
Step 5
The Selected Images screen appears.
Step 6
The wizard indicates that the upgrade will take a few minutes. You can then view the status of the upgrade as it progresses.
The Results screen appears. This screen provides additional details, such as whether the upgrade failed or whether you want to save the configuration and reload the ASA.
If you upgraded the ASA version and the upgrade succeeded, an option to save the configuration and reload the ASA appears.
Step 7
For the upgrade versions to take effect, you must save the configuration, reload the ASA, and restart ASDM.
Step 8
Step 9
Upgrading from Your Local Computer (ASDM 5.2 or Earlier)
Detailed Steps
Step 1
Step 2
Step 3
Step 4
Step 5
The Browse Flash dialog box appears. Choose the new location, and click OK. If you do not have room for both the current image and the new image, you can install over the current image.
Step 6
Wait for the image to upload. An information window appears that indicates a successful upload.
Step 7
Step 8
Step 9
a.
b.
If you do not specify an image, the ASA searches the internal flash memory for the first valid image to boot; we recommend booting from a specific image.
c.
d.
e.
f.
g.
Step 10
Step 11
A new window appears that asks you to verify the details of the reload. Click the Save the running configuration at the time of reload radio button, choose a time to reload (for example, Now), and click Schedule Reload.
Once the reload is in progress, a Reload Status window appears that indicates that a reload is being performed. An option to exit ASDM is also provided.
Step 12
Upgrading a Failover Pair or ASA Cluster
•
•
Upgrading an Active/Standby Failover Pair
To upgrade the Active/Standby failover pair, perform the following steps.
Detailed Steps
Step 1
Step 2
The Upgrade Software dialog box appears.
Step 3
Step 4
Step 5
Step 6
Step 7
Step 8
Step 9
Repeat Step 2 through Step 8, choosing ASA from the Image to Upload drop-down list.
Step 10
Step 11
Step 12
A new window appears that asks you to verify the details of the reload.
a.
b.
c.
Once the reload is in progress, a Reload Status window appears that indicates that a reload is being performed. An option to exit ASDM is also provided.
Step 13
Step 14
Step 15
Step 16
A new window appears that asks you to verify the details of the reload.
a.
b.
c.
Once the reload is in progress, a Reload Status window appears that indicates that a reload is being performed. An option to exit ASDM is also provided.
After the ASA comes up, it will now be the standby unit.
Upgrading an Active/Active Failover Pair
To upgrade two units in an Active/Active failover configuration, perform the following steps.
Requirements
Perform these steps in the system execution space.
Detailed Steps
Step 1
Step 2
The Upgrade Software dialog box appears.
Step 3
Step 4
Step 5
Step 6
Step 7
Step 8
Step 9
Repeat Step 2 through Step 8, choosing ASA from the Image to Upload drop-down list.
Step 10
Step 11
Step 12
Step 13
A new window appears that asks you to verify the details of the reload.
a.
b.
c.
Once the reload is in progress, a Reload Status window appears that indicates that a reload is being performed. An option to exit ASDM is also provided.
Step 14
Step 15
Step 16
A new window appears that asks you to verify the details of the reload.
a.
b.
c.
Once the reload is in progress, a Reload Status window appears that indicates that a reload is being performed. An option to exit ASDM is also provided.
If the failover groups are configured with Preempt Enabled, they automatically become active on their designated unit after the preempt delay has passed. If the failover groups are not configured with Preempt Enabled, you can return them to active status on their designated units using the Monitoring > Failover > Failover Group # pane.
Upgrading an ASA Cluster
To upgrade all units in an ASA cluster, perform the following steps on the master unit. For multiple context mode, perform these steps in the system execution space.
Detailed Steps
Step 1
Step 2
Step 3
The Upgrade Software from Local Computer dialog box appears.
Step 4
The Upgrade Software dialog box appears.
Step 5
Step 6
Step 7
Step 8
Step 9
Step 10
Step 11
Repeat Step 3 through Step 10, choosing ASA from the Image to Upload drop-down list.
Step 12
Step 13
The System Reload dialog box appears.
Step 14
To avoid connection loss and allow traffic to stabilize, wait for each unit to come back up (approximately 5 minutes) before reloading the next unit. To view when a unit rejoins the cluster, see the Monitoring > ASA Cluster > Cluster Summary pane.
Step 15
Wait for 5 minutes for a new master to be selected and traffic to stabilize. When the former master unit rejoins the cluster, it will be a slave.
Do not save the configuration; when the master unit reloads, you want clustering to be enabled on it.
Step 16
Step 17
Unsupported Commands
ASDM supports almost all commands available for the adaptive ASA, but ASDM ignores some commands in an existing configuration. Most of these commands can remain in your configuration; see Tools > Show Commands Ignored by ASDM on Device for more information.
This section includes the following topics:
•
•
•
•
Ignored and View-Only Commands
Table 6 lists commands that ASDM supports in the configuration when added through the CLI, but that cannot be added or edited in ASDM. If ASDM ignores the command, it does not appear in the ASDM GUI at all. If the command is view-only, then it appears in the GUI, but you cannot edit it.
Effects of Unsupported Commands
If ASDM loads an existing running configuration and finds other unsupported commands, ASDM operation is unaffected. To view the unsupported commands, choose Tools > Show Commands Ignored by ASDM on Device.
Discontinuous Subnet Masks Not Supported
ASDM does not support discontinuous subnet masks such as 255.255.0.255. For example, you cannot use the following:
ip address inside 192.168.2.1 255.255.0.255Interactive User Commands Not Supported by the ASDM CLI Tool
The ASDM CLI tool does not support interactive user commands. If you enter a CLI command that requires interactive confirmation, ASDM prompts you to enter "[yes/no]" but does not recognize your input. ASDM then times out waiting for your response.
For example:
1.
2.
ASDM generates the default 1024-bit RSA key.
3.
Instead of regenerating the RSA keys by overwriting the previous one, ASDM displays the following error:
Do you really want to replace them? [yes/no]:WARNING: You already have RSA
ke0000000000000$A key
Input line must be less than 16 characters in length.%Please answer 'yes' or 'no'.Do you really want to replace them [yes/no]:%ERROR: Timed out waiting for a response.ERROR: Failed to create new RSA keys names <Default-RSA-key>Workaround:
•
•
crypto key generate rsa noconfirmOpen Caveats
This section contains open caveats in ASDM software Version 7.0, and includes the following topics:
•
•
•
Open Caveats in Version 7.0(2.9)
Table 8 contains open caveats in ASDM software Version 7.0(2.9).
Registered Cisco.com users can view more information about each caveat by using the Bug Toolkit at the following website:
http://tools.cisco.com/Support/BugToolkit/
Open Caveats in Version 7.0(2)
Table 8 contains open caveats in ASDM software Version 7.0(2).
Registered Cisco.com users can view more information about each caveat by using the Bug Toolkit at the following website:
http://tools.cisco.com/Support/BugToolkit/
Open Caveats in Version 7.0(1)
Table 9 contains open caveats in ASDM software Version 7.0(1).
Registered Cisco.com users can view more information about each caveat by using the Bug Toolkit at the following website:
http://tools.cisco.com/Support/BugToolkit/
Resolved Caveats
This section contains the following topics:
•
•
Resolved Caveats in Version 7.0(2.9)
Table 10 contains the resolved caveats in ASDM software Version 7.0(2.9).
Registered Cisco.com users can view more information about each caveat by using the Bug Toolkit at the following website:
http://tools.cisco.com/Support/BugToolkit/
Table 10 Resolved Caveats in ASDM Version 7.0(2.9)
CSCuc99271
Update demo mode files
CSCud03838
ASDM 7.0 warning "uploaded file is not a valid ASA-SM image" on 9.0.1
Resolved Caveats in Version 7.0(2)
Table 11 contains the resolved caveats in ASDM software Version 7.0(2).
Registered Cisco.com users can view more information about each caveat by using the Bug Toolkit at the following website:
http://tools.cisco.com/Support/BugToolkit/
End-User License Agreement
For information about the end-user license agreement, go to:
http://www.cisco.com/en/US/docs/general/warranty/English/EU1KEN_.html
Related Documentation
For additional information about ASDM or its platforms, see Navigating the Cisco ASA Series Documentation:
http://www.cisco.com/en/US/docs/security/asa/roadmap/asaroadmap.html
Obtaining Software, Documentation, and Submitting a Service Request
For information on obtaining documentation, submitting a service request, and gathering additional information, see the monthly What's New in Cisco Product Documentation, which also lists all new and revised Cisco technical documentation, at:
http://www.cisco.com/en/US/docs/general/whatsnew/whatsnew.html
Subscribe to the What's New in Cisco Product Documentation as an RSS feed and set content to be delivered directly to your desktop using a reader application. The RSS feeds are a free service. Cisco currently supports RSS Version 2.0.
This document is to be used in conjunction with the documents listed in the "Related Documentation" section.
Cisco and the Cisco logo are trademarks or registered trademarks of Cisco and/or its affiliates in the U.S. and other countries. To view a list of Cisco trademarks, go to this URL: www.cisco.com/go/trademarks. Third-party trademarks mentioned are the property of their respective owners. The use of the word partner does not imply a partnership relationship between Cisco and any other company. (1110R)
Any Internet Protocol (IP) addresses used in this document are not intended to be actual addresses. Any examples, command display output, and figures included in the document are shown for illustrative purposes only. Any use of actual IP addresses in illustrative content is unintentional and coincidental.
©2012 Cisco Systems, Inc. All rights reserved.