Feedback Feedback
|
Table Of Contents
Information About the ASA Services Module in the Switch Network
Verifying the Module Installation
Assigning VLANs to the ASA Services Module
Using the MSFC as a Directly-Connected Router
Logging Into the ASA Services Module
Logging Out of the ASA Services Module
(Optional) Allowing Access to Public Servers Behind the ASA Services Module
(Optional) Running Other Wizards in ASDM
Quick Start Guide
Cisco ASA Services Module
Related Documentation
To access all documents related to this product, go to:
http://www.cisco.com/en/US/docs/security/asa/roadmap/asaroadmap.html
Updated: May 15, 2013, 78-19998-021 Information About the ASA Services Module in the Switch Network
For switch and software compatibility with the ASA Services Module (ASASM), see the following: http://www.cisco.com/en/US/docs/security/asa/compatibility/asamatrx.html. The switch runs Cisco IOS software on both the switch supervisor engine and the integrated Multilayer Switch Feature Card (MSFC). The ASASM runs its own operating system.
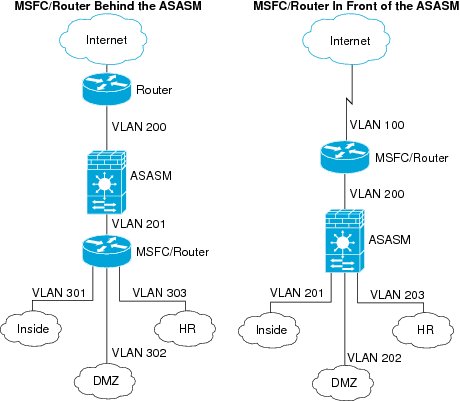
Although you need the MSFC as part of your system, you do not have to use it. If you choose to do so, you can assign one or more VLAN interfaces to the MSFC (known as switched virtual interfaces (SVIs)). You can alternatively use an external router instead of the MSFC.
In single context mode, you can place the MSFC or router in front of the ASASM or behind the ASASM; location depends on the VLANs that you assign to the ASASM interfaces.
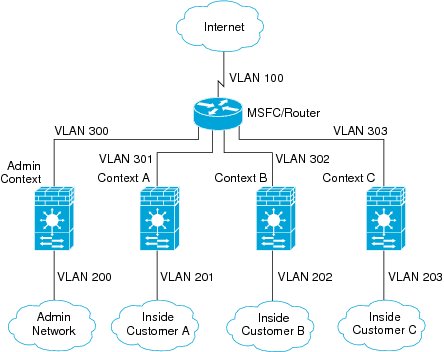
For multiple context mode, if you place the MSFC or router behind the ASASM, you should only connect it to a single context. If you connect it to multiple contexts, the MSFC/router will route between the contexts, which might not be your intention. The typical scenario for multiple contexts is to use a router in front of all the contexts to route between the Internet and the switched networks.
2 Verifying the Module Installation
Verify that the switch acknowledges the ASASM and has brought it online. (If you need to install your ASASM, see the module installation guide on Cisco.com.) Enter the following command to ensure that the Status column shows "Ok" for the ASASM:
show module [switch {1 |2}] [mod-num | all]For a switch in a VSS, enter the switch argument.
For example:
Router# show moduleMod Ports Card Type Model Serial No.--- ----- -------------------------------------- ------------------ -----------2 3 ASA Service Module WS-SVC-ASA-SM1 SAD143502E8Mod MAC addresses Hw Fw Sw Status--- ---------------------------------- ------ ------------ ------------ -------2 0022.bdd4.016f to 0022.bdd4.017e 0.201 12.2(2010080 12.2(2010121 Ok...3 Assigning VLANs to the ASA Services Module
The ASASM does not include any external physical interfaces. Instead, it uses VLAN interfaces passed down from the supervisor. Perform the following steps at the switch CLI to pass down VLANs from the supervisor:
4 Using the MSFC as a Directly-Connected Router
If you want to use the MSFC as a directly-connected router (for example, as the default gateway connected to the ASASM outside interface), then add an ASASM VLAN interface to the MSFC as a switched virtual interface (SVI). By default, you can add only one SVI; to add multiple SVIs, and understand the caveats for multiple SVIs, see the configuration guide on Cisco.com.
Perform the following steps at the switch CLI:
5 Logging Into the ASA Services Module
From the switch CLI, you can connect to a virtual console session on the ASASM:
Logging Out of the ASA Services Module
If you do not log out of the ASASM, the console connection persists; there is no timeout. To end the ASASM console session and access the switch CLI, perform the following steps.
To kill another user's active connection, which may have been unintentionally left open, see the configuration guide.
Step 1
To return to the switch CLI, type:
Ctrl-Shift-6, x
You return to the switch prompt.
Note: Shift-6 on US and UK keyboards issues the caret (^) character. If you have a different keyboard and cannot issue the caret (^) character as a standalone character, you can temporarily change the escape character to a different character. In Cisco IOS, before you session to the ASASM, use the terminal escape-character ascii_number command. For example, to temporarily change the sequence to Ctrl-w, x, enter terminal escape-character 23.
6 Configuring ASDM Connectivity
Because the ASASM does not have physical interfaces, it does not come pre-configured for ASDM access; you must configure ASDM access using the CLI on the ASASM.
7 Launching ASDM
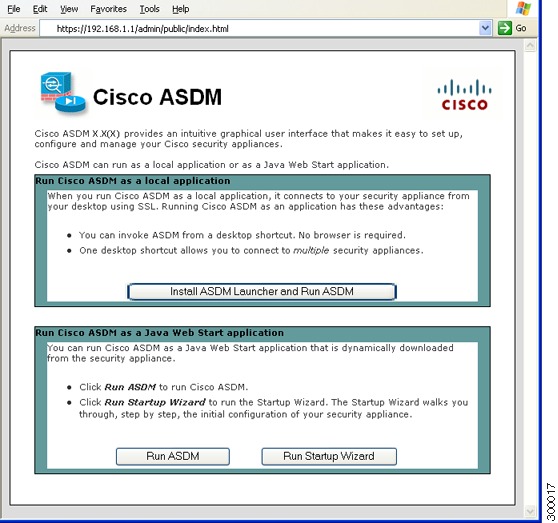
Using ASDM, you can use wizards to configure basic and advanced features. ASDM is a graphical user interface that allows you to manage the ASASM from any location by using a web browser.
See the ASDM release notes on Cisco.com for the requirements to run ASDM.
Step 1
Step 2
https://management_ip_address/admin
The Cisco ASDM web page appears.
Step 3
Step 4
Step 5
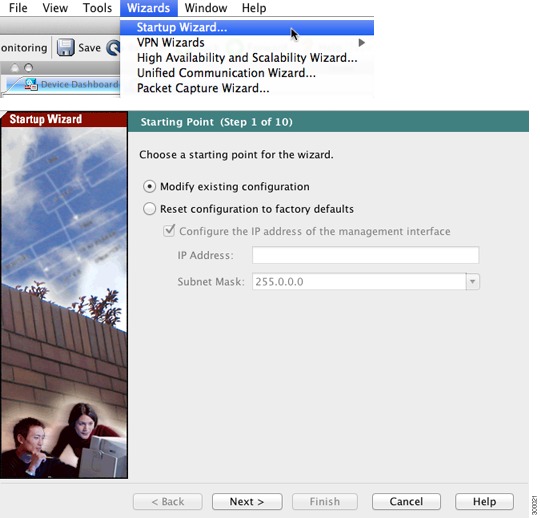
8 Running the Startup Wizard
Run the Startup Wizard so that you can customize the security policy to suit your deployment. Using the startup wizard, you can set the following:
•
•
•
•
•
•
•
•
•
Step 1
Step 2
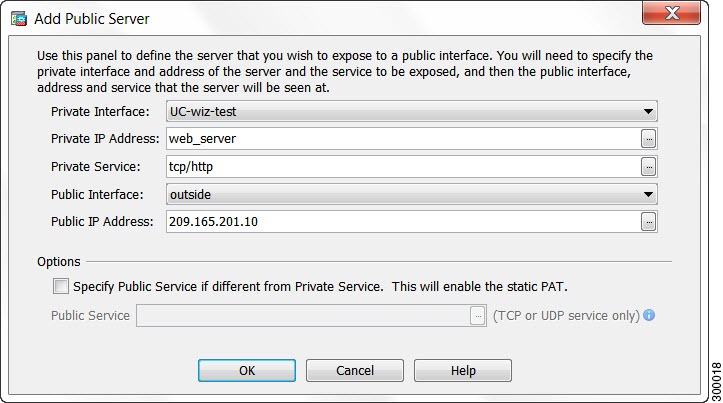
9 (Optional) Allowing Access to Public Servers Behind the ASA Services Module
The Public Server pane automatically configures the security policy to make an inside server accessible from the Internet. As a business owner, you might have internal network services, such as a web and FTP server, that need to be available to an outside user. You can place these services on a separate network behind the ASASM, called a demilitarized zone (DMZ). By placing the public servers on the DMZ, any attacks launched against the public servers do not affect your inside networks.
Step 1
Step 2
Step 3
Step 4
10 (Optional) Running Other Wizards in ASDM
You can optionally run the following additional wizards in ASDM:
•
Configure active/active or active/standby failover, or VPN cluster load balancing.
•
Configure and run packet capture. The wizard will run one packet capture on each of the ingress and egress interfaces. After capturing packets, you can save the packet captures to your PC for examination and replay in the packet analyzer.
11 Advanced Configuration
To continue configuring your ASASM, see the documents available for your software version at:
http://www.cisco.com/en/US/docs/security/asa/roadmap/asaroadmap.html