Downloads |
 Feedback Feedback
|
Table Of Contents
Connecting the ASA CX Management Interface
ASA 5512-X through ASA 5555-X (Software Module)
Launching the Adaptive Security Device Manager (ASDM) on the ASA
(ASA 5585-X) Changing the ASA CX Management IP Address
(ASA 5512-X through ASA 5555-X; May Be Required) Installing the Software Module
Configuring Basic ASA CX Settings at the ASA CX CLI
Redirecting Traffic to the ASA CX Module
Configuring the Security Policy on the ASA CX Module Using PRSM
Quick Start Guide
Cisco ASA CX Module
Revised: December 3, 20121 About the ASA CX Module
The ASA CX module might be a hardware module or a software module, depending on your ASA model. For ASA model software and hardware compatibility with the ASA CX module, see Cisco ASA Compatibility at http://www.cisco.com/en/US/docs/security/asa/compatibility/asamatrx.html.
The ASA CX module lets you enforce security based on the complete context of a situation. This context includes the identity of the user (who), the application or website that the user is trying to access (what), the origin of the access attempt (where), the time of the attempted access (when), and the properties of the device used for the access (how). With the ASA CX module, you can extract the full context of a flow and enforce granular policies such as permitting access to Facebook but denying access to games on Facebook or permitting finance employees access to a sensitive enterprise database but denying the same to other employees.
The ASA CX module runs an application that is separate from the ASA. Configuring the ASA CX module requires two parts: the ASA CX policy configuration, using Cisco Prime Security Manager (PRSM); and the ASA policy for redirecting traffic to the ASA CX module, using ASDM.
The ASA CX module might include an external management interface (and console port) so you can connect to the ASA CX module directly; if it does not have a management interface, you can connect to the ASA CX module through the ASA interface. Any other interfaces on the ASA CX module, if available for your model, are used for ASA traffic only.
Traffic undergoes the firewall checks on the ASA before being forwarded to the ASA CX module. When you identify traffic for ASA CX inspection on the ASA, traffic flows through the ASA and the ASA CX module as described in the following steps:
1.
Traffic enters the ASA.
2.
3.
4.
5.
6.
7.
8.
The following figure shows the traffic flow when using the ASA CX module. In this example, the ASA CX module automatically blocks traffic that is not allowed for a certain application. All other traffic is forwarded through the ASA.
2 Connecting the ASA CX Management Interface
In addition to providing management access to the ASA CX module, the ASA CX management interface needs access to an HTTP proxy server or a DNS server and the Internet for signature updates and more. This section describes recommended network configurations. Your network may differ.
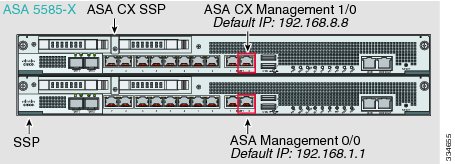
ASA 5585-X (Hardware Module)
The ASA CX module includes a separate management interface from the ASA.
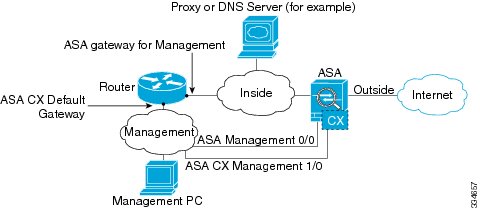
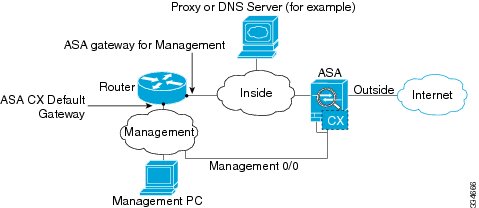
If you have an inside router
If you have an inside router, you can route between the management network, which can include both the ASA Management 0/0 and ASA CX Management 1/0 interfaces, and the ASA inside network for Internet access. Be sure to also add a route on the ASA to reach the Management network through the inside router.
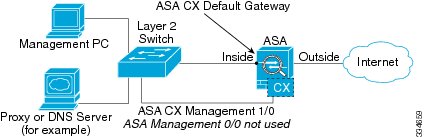
If you do not have an inside router
If you have only one inside network, then you cannot also have a separate management network, which would require an inside router to route between the networks. In this case, you can manage the ASA from the inside interface instead of the Management 0/0 interface. Because the ASA CX module is a separate device from the ASA, you can configure the ASA CX Management 1/0 address to be on the same network as the inside interface.
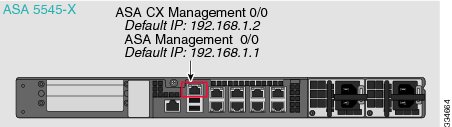
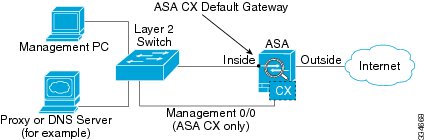
ASA 5512-X through ASA 5555-X (Software Module)
These models run the ASA CX module as a software module, and the ASA CX management interface shares the Management 0/0 interface with the ASA.
If you have an inside router
If you have an inside router, you can route between the Management 0/0 network, which includes both the ASA and ASA CX management IP addresses, and the inside network for Internet access. Be sure to also add a route on the ASA to reach the Management network through the inside router.
If you do not have an inside router
If you have only one inside network, then you cannot also have a separate management network. In this case, you can manage the ASA from the inside interface instead of the Management 0/0 interface. If you remove the ASA-configured name from the Management 0/0 interface, you can still configure the ASA CX IP address for that interface. Because the ASA CX module is essentially a separate device from the ASA, you can configure the ASA CX management address to be on the same network as the inside interface.
Note
3 Launching the Adaptive Security Device Manager (ASDM) on the ASA
The default ASA configuration lets you connect to the default management IP address (192.168.1.1). Depending on your network, you might need to change the ASA management IP address, or even configure additional ASA interfaces for ASDM access (see the "Connecting the ASA CX Management Interface" section). For the ASA 5512-X through ASA 5555-X, if you do not have a separate management network (see the "If you do not have an inside router" section), you need to configure an inside interface for management, and you need to remove the name from the Management 0/0 interface. To change interface and management settings, see the ASA configuration guide.
Step 1
Step 2
Step 3
Step 4
Step 5
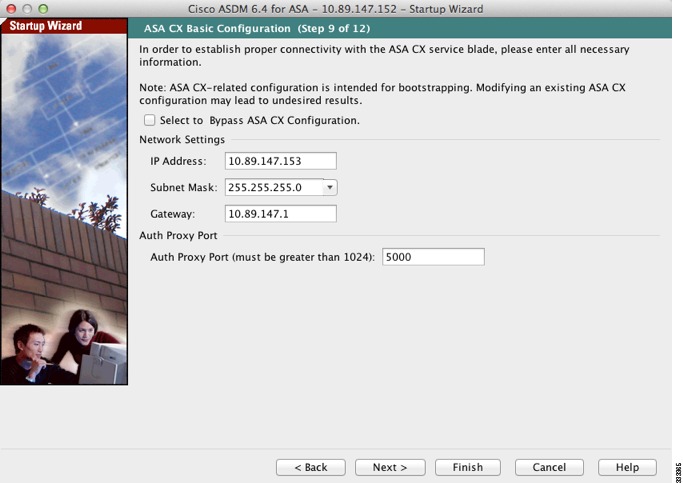
4 (ASA 5585-X) Changing the ASA CX Management IP Address
If you cannot use the default management IP address, then you can set the management IP address from the ASA. After you set the management IP address, you can access the ASA CX module using SSH to perform initial setup.
Note
Step 1
Step 2
Step 3
Step 4
Step 5
5 (ASA 5512-X through ASA 5555-X; May Be Required) Installing the Software Module
If you purchase the ASA with the ASA CX module, the module software and solid state drive(s) (SSDs) come pre-installed and ready to go. If you want to add the ASA CX to an existing ASA, or need to replace the SSD, you need to install the ASA CX boot software and partition the SSD according to this procedure. Only Cisco SSDs are supported. To physically install the SSD, see the ASA hardware guide.
Note
Step 1
http://www.cisco.com/cisco/software/release.html?mdfid=284325223&softwareid=284399946
The boot software lets you set basic ASA CX network configuration, partition the SSD, and download the larger system software from a server of your choice to the SSD.
Step 2
http://www.cisco.com/cisco/software/release.html?mdfid=284325223&softwareid=284399944
Step 3
Step 4
Step 5
hostname# sw-module module ips shutdownhostname# sw-module module ips uninstallhostname# reloadAfter the ASA reloads, reconnect to the ASA CLI.
Step 6
hostname# sw-module module cxsc recover configure image disk0:file_pathExample:
hostname# sw-module module cxsc recover configure image disk0:asacx-boot-9.1.1.imgStep 7
hostname# sw-module module cxsc recover bootStep 8
hostname# session cxsc consoleEstablishing console session with slot 1Opening console session with module cxsc.Connected to module cxsc. Escape character sequence is 'CTRL-SHIFT-6 then x'.cxsc login: adminPassword: Admin123Step 9
asacx-boot> partition....Partition Successfully CompletedStep 10
Step 11
asacx-boot> system install urlExample:
The following command installs the asacx-sys-9.1.1.pkg system software from an HTTPS server.
asacx-boot> system install
https://upgrades.example.com/packages/asacx-sys-9.1.1.pkg
Username: buffyPassword: angelforeverVerifyingDownloadingExtractingPackage DetailDescription:Requires reboot:Cisco ASA CX System UpgradeYesDo you want to continue with upgrade? [n]: YWarning: Please do not interrupt the process or turn off the system. Doing so might leave system in unusable state.UpgradingStopping all the services ...Starting upgrade process ...Reboot is required to complete the upgrade. Press Enter to reboot the system.Step 12
6 Configuring Basic ASA CX Settings at the ASA CX CLI
You must configure basic network settings and other parameters on the ASA CX module before you can configure your security policy.
Step 1
•
•
hostname# session cxsc consoleStep 2
Step 3
asacx> setupExample:
asacx> setupWelcome to Cisco Prime Security Manager Setup[hit Ctrl-C to abort]Default values are inside [ ]The following example shows a typical path through the wizard. Note: You can configure IPv6 stateless auto configuration by answering N when asked if you want to configure a static IPv6 address.
Enter a hostname [asacx]: asa-cx-hostDo you want to configure IPv4 address on management interface?(y/n) [Y]: YDo you want to enable DHCP for IPv4 address assignment on management interface?(y/n)[N]: NEnter an IPv4 address [192.168.8.8]: 10.89.31.65Enter the netmask [255.255.255.0]: 255.255.255.0Enter the gateway [192.168.8.1]: 10.89.31.1Do you want to configure static IPv6 address on management interface?(y/n) [N]: YEnter an IPv6 address: 2001:DB8:0:CD30::1234/64Enter the gateway: 2001:DB8:0:CD30::1Enter the primary DNS server IP address [ ]: 10.89.47.11Do you want to configure Secondary DNS Server? (y/n) [N]: NDo you want to configure Local Domain Name? (y/n) [N] YEnter the local domain name: example.comDo you want to configure Search domains? (y/n) [N] YEnter the comma separated list for search domains: example.comDo you want to enable the NTP service?(y/n) [N]: YEnter the NTP servers separated by commas: 1.ntp.example.com, 2.ntp.example.comStep 4
Example:
Apply the changes?(y,n) [Y]: YConfiguration saved successfully!Applying...Done.Generating self-signed certificate, the web server will be restarted after that...Done.Press ENTER to continue...asacx>Step 5
asacx> config timezoneasacx> config timeStep 6
asacx> config passwdExample:
asacx> config passwdThe password must be at least 8 characters long and must containat least one uppercase letter (A-Z), at least one lowercase letter(a-z) and at least one digit (0-9).Enter password: Farscape1Confirm password: Farscape1SUCCESS: Password changed for user adminStep 7
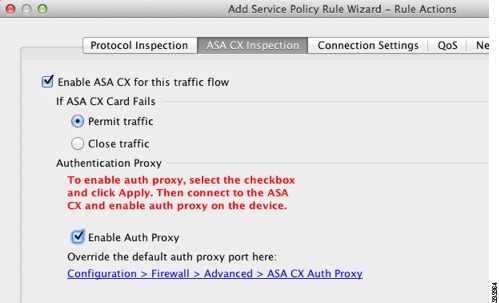
7 Redirecting Traffic to the ASA CX Module
This section identifies traffic to redirect from the ASA to the ASA CX module. Configure this policy on the ASA.
Note
If you enable the authentication proxy on the ASA using this procedure, be sure to also configure a directory realm for authentication on the ASA CX module. See the ASA CX user guide for more information.
If you have an active service policy redirecting traffic to an IPS module (that you replaced with the ASA CX), you must remove that policy before you configure the ASA CX service policy.
Step 1
Step 2
Step 3
Step 4
Step 5
Step 6
Step 7
Step 8
Step 9
Step 10
Step 11
Step 12
8 Configuring the Security Policy on the ASA CX Module Using PRSM
This section describes how to launch PRSM to configure the ASA CX module application. For details on using PRSM to configure your ASA CX security policy, see the following ASA CX documentation roadmap: http://www.cisco.com/en/US/docs/security/asacx/roadmap/asacxprsmroadmap.html.
Note
You can launch PRSM from your web browser, or you can launch it from ASDM.
•
https://ASA_CX_management_IPWhere the ASA CX management IP address is the one you set in the "Configuring Basic ASA CX Settings at the ASA CX CLI" section.
•
9 Where to Go Next
•
http://www.cisco.com/en/US/docs/security/asacx/roadmap/asacxprsmroadmap.html.
•