Feedback
Table Of Contents
Validating the ASA 1000V Configuration
Topology Used for Troubleshooting
Security Profile Configuration in the Cisco VNMC
Port Profile Configuration in the VSM
Port Profile Assignment from vCenter to the VMs
Binding of the Organization Path, ASA 1000V, and Security Profile to the Port Profile in the VSM
Security Profile-to-Interface Mapping in the ASA 1000V
Port Profile Configuration in the VSM and Application in vCenter
Dynamic VSM Interface Configuration
Cisco VNMC Security Profile ID
ASA 1000V IP-SPID Mapping (Control Path)
ASA 1000V IP-SPID Mapping (Data Path)
ASA 1000V Services for Security Profile Interfaces
ASA 1000V Interface Statistics
Validating the ASA 1000V Configuration
This chapter describes how to validate the ASA 1000V configuration. To make sure that the configuration works correctly, follow the validation procedures listed in the sequence as shown in this chapter. The sample output from certain commands helps indicate whether or not an issue exists.
The chapter includes the following sections:
•
Topology Used for Troubleshooting
•
•
•
•
•
•
•
•
•
•
•
•
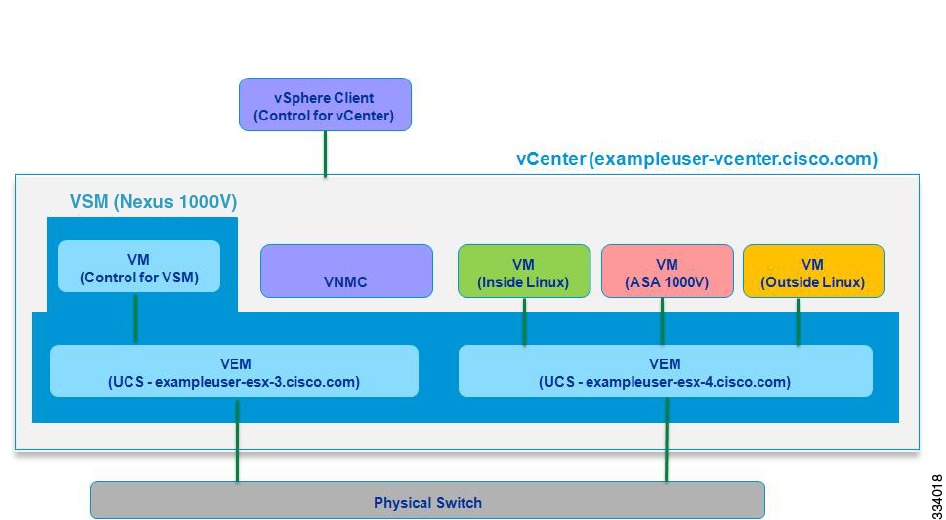
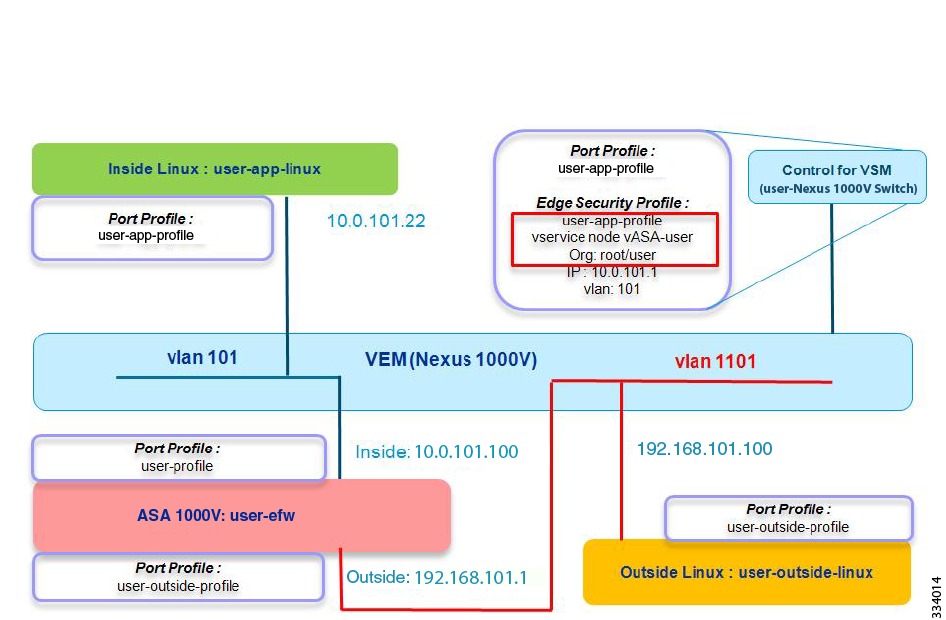
Topology Used for Troubleshooting
To help isolate problem areas, you should also have an accurate topology of your system configuration. Figure 2-1 shows the topology that provides the basis for the examples and case studies in this guide.
Figure 2-1 Topology Used for Troubleshooting
This system configuration includes the following components:
•
•
•
•
•
•
•
•
•
•
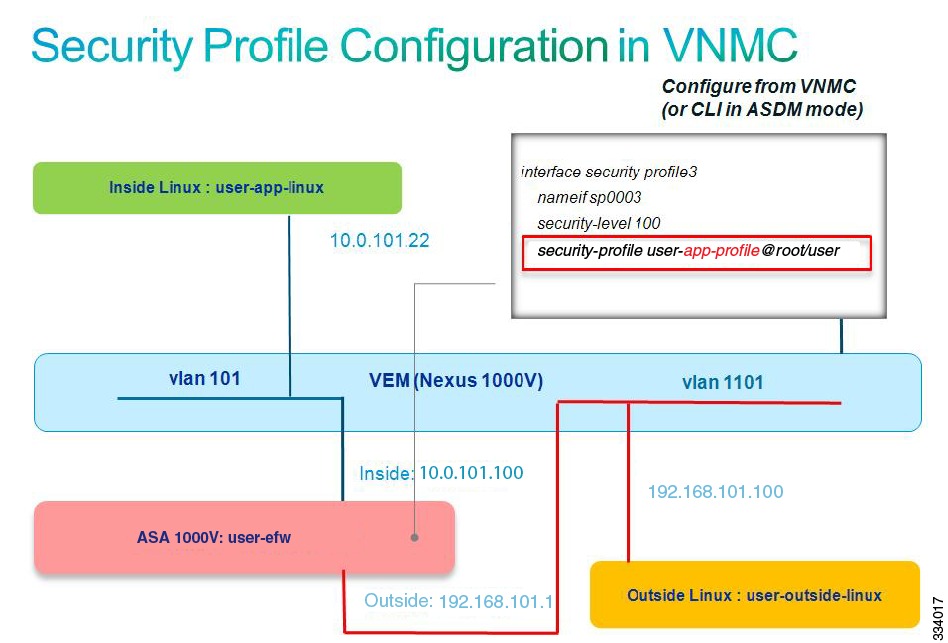
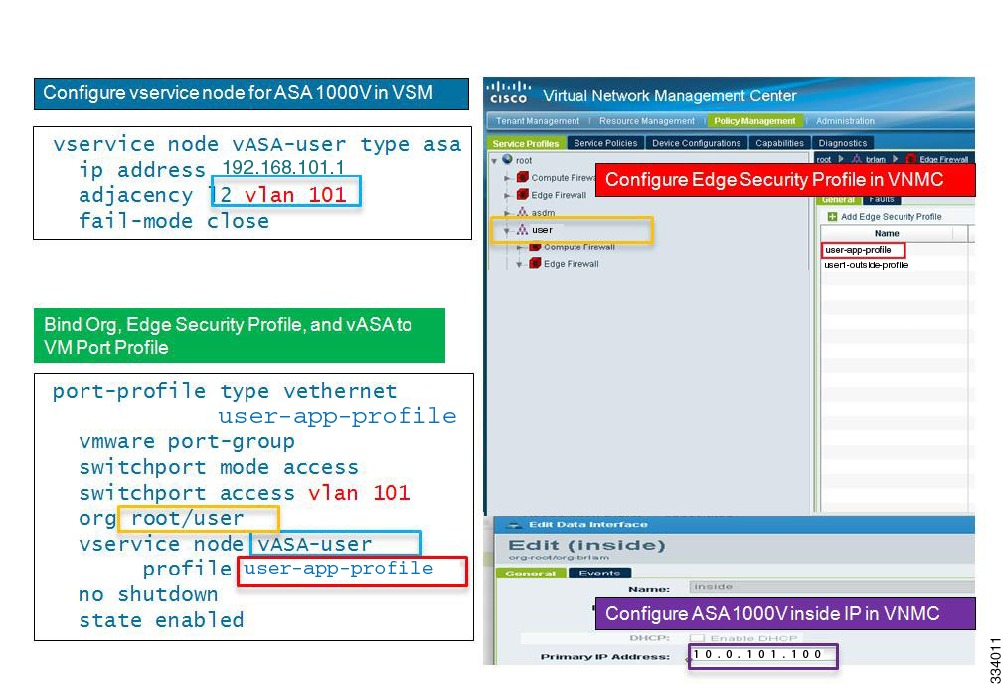
Security Profile Configuration in the Cisco VNMC
You need to verify the entire system configuration to make sure that traffic can pass between the inside and outside Linux machines (VMs).
The first step is to validate that a security profile has been created in the Cisco VNMC and was pushed to the ASA 1000V. Figure 2-2 shows the topology for a security profile configuration in the Cisco VNMC.
Figure 2-2 Security Profile Configuration in the Cisco VNMC
Make sure that you have configured a security profile from the Cisco VNMC or from the ASA 1000V CLI if you are using the ASDM mode. This configuration shows the following:
•
•
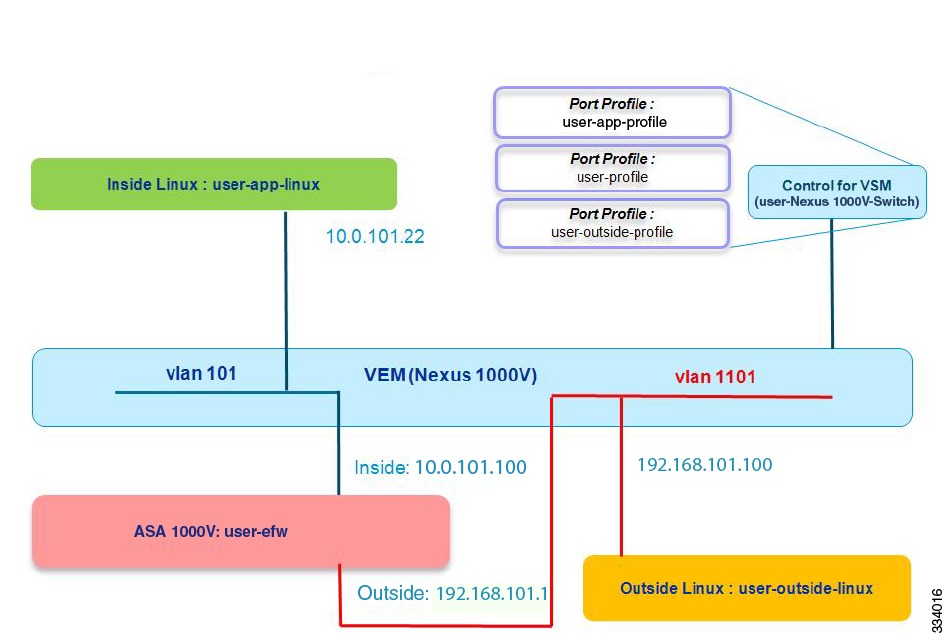
Port Profile Configuration in the VSM
The next step is to validate that the port profile has been correctly configured in the VSM. Figure 2-3 shows the topology for a valid port profile configuration in the VSM.
Figure 2-3 Port Profile Configuration in the VSM
Make sure that you have configured three port profiles through the VSM console: one for the inside Linux VM (user-app-profile), one for the inside ASA 1000V interface and VMs (user-profile), and one for the outside ASA 1000V interface (user-outside-profile).
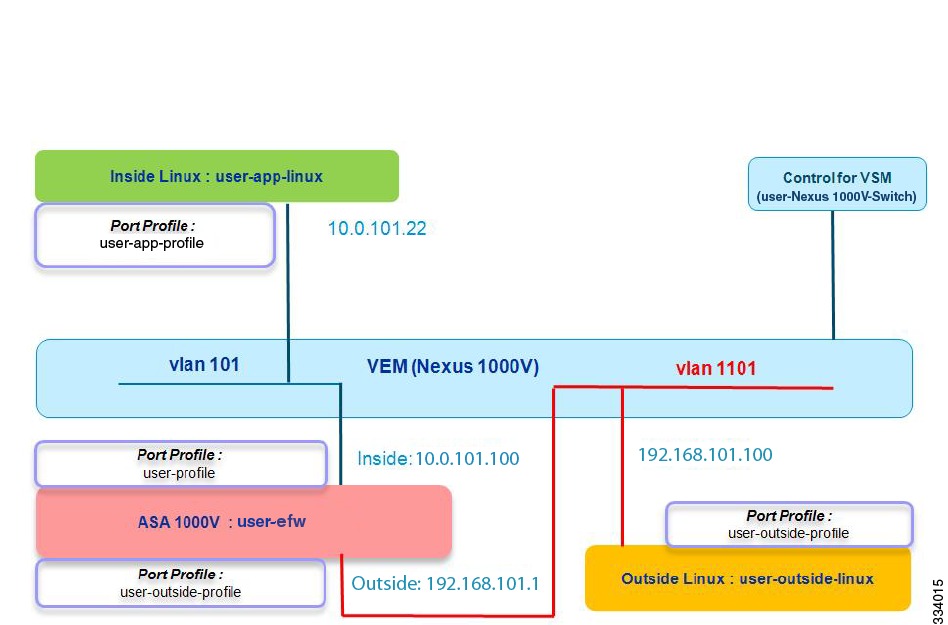
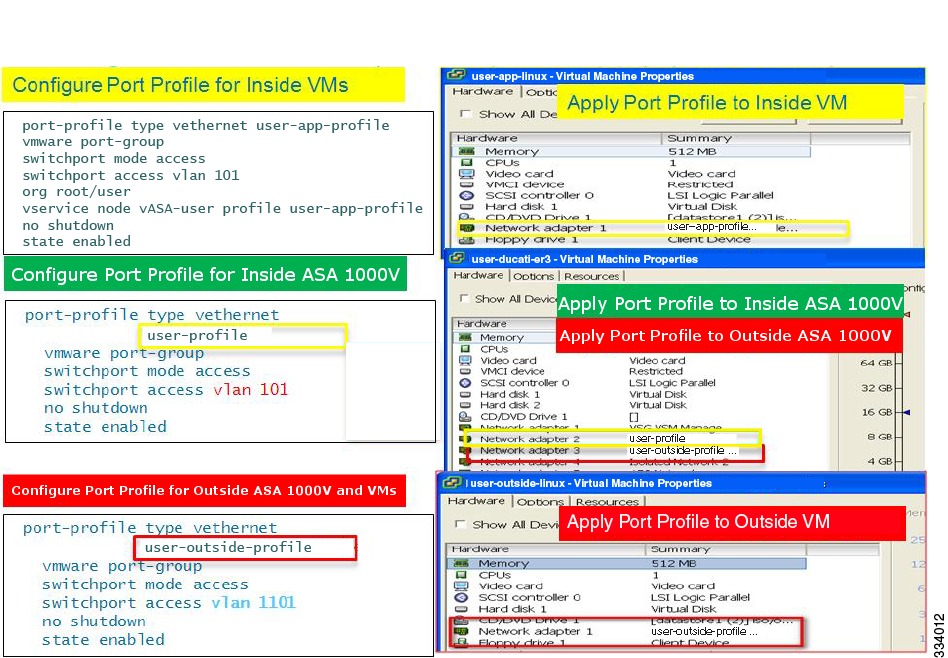
Port Profile Assignment from vCenter to the VMs
The next step is to validate that port profiles were correctly assigned from vCenter to the VMs. Figure 2-4 shows the topology for a valid port profile assignment from vCenter to the VMs.
Figure 2-4 Port Profile Assignment from vCenter to the VMs
Make sure that you have completed the following tasks in this step:
•
•
•
Binding of the Organization Path, ASA 1000V, and Security Profile to the Port Profile in the VSM
The next step is to validate that the binding of the organization (org) path (root/user), ASA 1000V (vservice node vASA-user), and security profile (user-app-profile) to the port profile in the VSM was completed correctly. Figure 2-5 shows the topology for correctly binding the organization path, ASA 1000V, and security profile to the port profile in the VSM.
Figure 2-5 Binding of the Org Path, ASA 1000V, and Security Profile to the Port Profile in the VSM
Figure 2-6 shows a visual representation of the steps that you should have performed for binding of the organization path, ASA 1000V, and security profile to the port profile in the VSM. Colored boxes on the right and left sides of the illustration indicate matching values.
Figure 2-6 Binding of the Org Path, ASA 1000V, and Security Profile to the Port Profile in the VSM
To bind the organization path, ASA 1000V, and security profile to the port profile in the VSM, make sure that you have performed the following steps:
1.
2.
3.
4.
5.
Note
There is no need for the name of the port profile to be the same as the name of the edge security profile that is used in the vservice command in the port profile. In this example, user-app-profile is used in both for convenience.
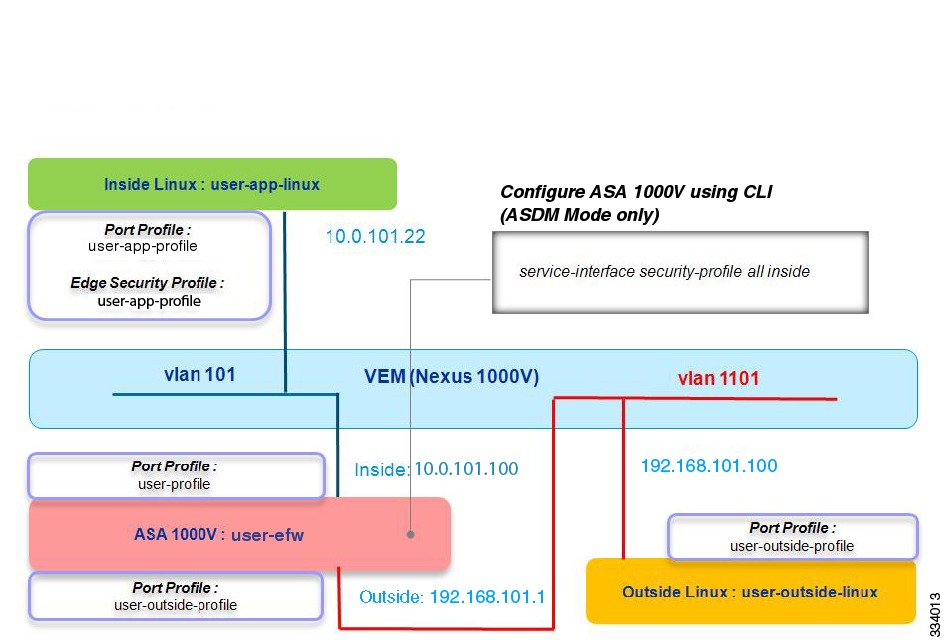
Security Profile-to-Interface Mapping in the ASA 1000V
The next step applies only if you are using the ASDM mode. This mapping is automatically configured if you are using the VNMC mode. Make sure that you have completed this step by entering the service-interface security-profile all inside command at the ASA 1000V CLI or through the ASDM GUI. This configuration shows that all security profile traffic uses the inside interface for traffic to the ASA 1000V and to servers for the inside VMs. Figure 2-7 shows the topology of a correct configuration for security profile-to-interface mapping in the ASA 1000V.
Figure 2-7 Security Profile-to-Interface Mapping in the ASA 1000V
The configuration that enables traffic to flow between the inside VMs and the outside VMs is complete.
Port Profile Configuration in the VSM and Application in vCenter
Figure 2-8 shows a visual representation of the steps that you should have performed to configure the port profile for inside VMs in the VSM and apply this configuration in vCenter. Colored boxes on the right and left sides of the illustration indicate matching values.
Figure 2-8 Port Profile Configuration in the VSM and Application in vCenter
To configure the port profile for inside VMs in the VSM and apply this configuration in vCenter, make sure that you have performed the following steps:
1.
2.
3.
4.
5.
6.
7.
8.
9.
VSM Module Configuration
To make sure that the VSM module has been correctly configured, use the show module command on the Cisco Nexus 1000V switch to display the current statistics and configuration settings.
The following is sample output from the show module command:
Switch# show moduleMod Ports Module-Type Model Status--- ----- -------------------------------- ------------------ ------------1 0 Virtual Supervisor Module Nexus1000V active3 248 Virtual Ethernet Module NA ok4 248 Virtual Ethernet Module NA okMod Sw Hw--- ------------------ ------------------------------------------------1 4.2(1)SV1(5.2) 0.03 4.2(1)SV1(5.2) VMware ESXi 4.1.0 Releasebuild-260247 (2.0)4 4.2(1)SV1(5.2) VMware ESXi 4.1.0 Releasebuild-260247 (2.0)Mod MAC-Address(es) Serial-Num--- -------------------------------------- ----------1 00-19-07-6c-5a-a8 to 00-19-07-6c-62-a8 NA3 02-00-0c-00-03-00 to 02-00-0c-00-03-80 NA4 02-00-0c-00-04-00 to 02-00-0c-00-04-80 NAMod Server-IP Server-UUID Server-Name--- --------------- ------------------------------------ --------------------1 10.0.10.10 NA NA3 172.23.34.129 849aa5f8-a4ce-11df-be27-f866f223184e exampleuser-esx-3.cisco.com4 172.23.34.134 ab420101-aefe-11df-a902-1cdf0f1d532c exampleuser-esx-4.cisco.comIn this example, the following applies:
•
•
•
•
VSM vCenter Configuration
To make sure that the VSM vCenter configuration is correct, use the show svs connection command on the Cisco Nexus 1000V switch. The following is sample output from the show svs connections command:
Switch# show svs connectionsconnection vCenter:ip address: 10.1.1.3remote port: 80protocol: vmware-vim httpscertificate: defaultdatacenter name: Org/user-DCadmin:max-ports: 8192DVS uuid: b0 6a 0e 50 e2 e4 79 25-76 d8 24 d4 02 b0 32 27config status: Enabledoperational status: Connectedsync status: Completeversion: VMware vCenter Server 4.1.0 build-345043vc-uuid: 32D940A7-CB4E-467A-AD42-923A8AF53192The output shows the IP address for the main data center that contains the servers and the data center name.
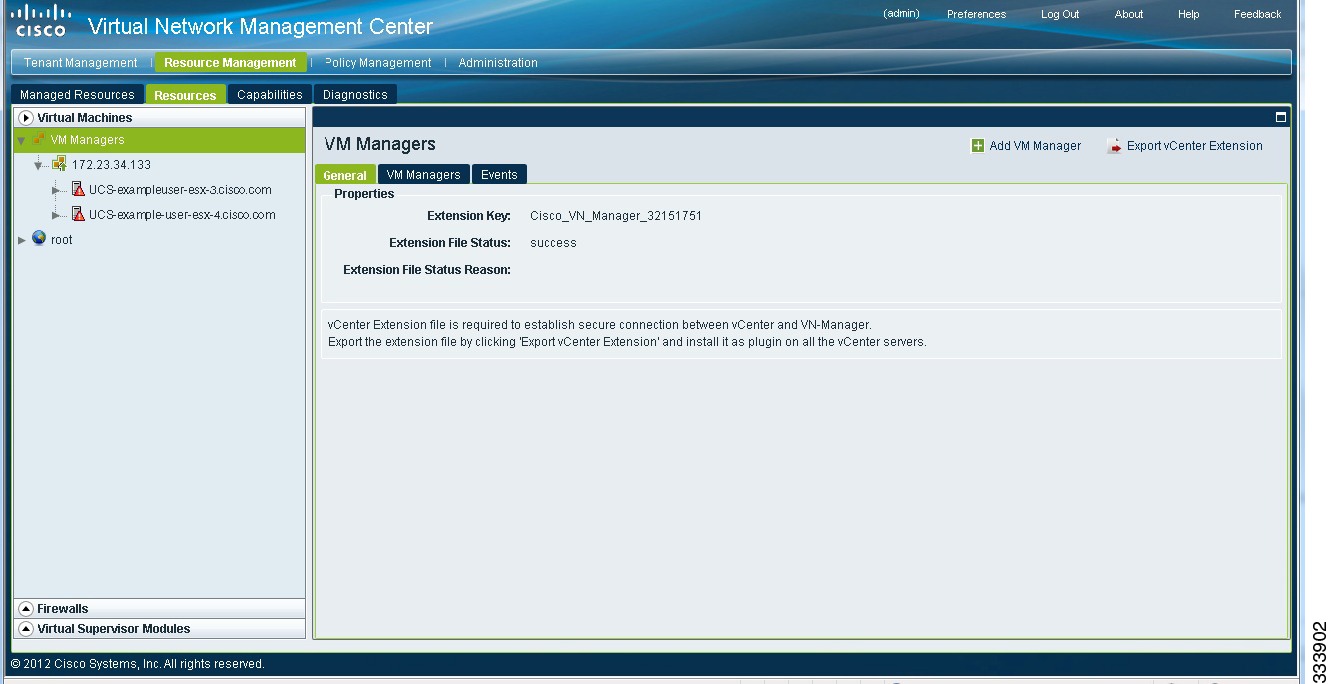
Cisco VNMC VM Manager
To make sure that the Cisco VNMC VM Manager has been correctly configured to manage the VMs, in the Cisco VNMC, choose Resource Management > Resources > Virtual Machines > VM Managers. Figure 2-9 shows the UCS host that is being managed by the Cisco VNMC.
Figure 2-9 Cisco VNMC VM Manager
Dynamic VSM Interface Configuration
Make sure that the dynamic VSM interface has been correctly configured. The dynamic VSM interface configuration shows multiple vEthernet interfaces, including the outside, inside, and inside VM interfaces, and the virtual network interface cards (vNICs) for the VMs. To validate that the dynamic VSM interfaces have been correctly configured, use the show running-config interface command on the Cisco Nexus 1000V switch. The following is sample output from the show running-config interface command:
Switch# show running-config interfaceinterface Vethernet5inherit port-profile user-outside-profiledescription user-outside-linux, Network Adapter 1vmware dvport 4579 dvswitch uuid "b0 6a 0e 50 e2 e4 79 25-76 d8 24 d4 02 b0 32 27"vmware vm mac 0050.568E.00A1interface Vethernet40inherit port-profile user-outside-profiledescription user-ASA-1000V-efw, Network Adapter 3vmware dvport 4581 dvswitch uuid "b0 6a 0e 50 e2 e4 79 25-76 d8 24 d4 02 b0 32 27"vmware vm mac 0050.568E.011Finterface Vethernet43inherit port-profile user-profiledescription user-ASA-1000V-efw, Network Adapter 2vmware dvport 4548 dvswitch uuid "b0 6a 0e 50 e2 e4 79 25-76 d8 24 d4 02 b0 32 27"vmware vm mac 0050.568E.011Binterface Vethernet55inherit port-profile user-app-profiledescription user-app-linux, Network Adapter 1vmware dvport 4866 dvswitch uuid "b0 6a 0e 50 e2 e4 79 25-76 d8 24 d4 02 b0 32 27"vmware vm mac 0050.568E.00A0The output shows the following:
•
•
•
To view the interface status for the VSM, use the show interface status command on the Cisco Nexus 1000V switch. The following is sample output from the show interface status command:
Switch# show interface status--------------------------------------------------------------------------------Port Name Status Vlan Duplex Speed Type--------------------------------------------------------------------------------mgmt0 -- up routed full 1000 --Eth3/6 -- up trunk full 1000 --Eth4/6 -- up trunk full 1000 --Veth1 VSM-Nexus1000V-4.2 up 2 auto auto --Veth2 VSM-Nexus1000V-4.2 up 3 auto auto --..Veth5 user-outside-linux up 1101 auto auto --Veth40 user-ASA1000V-efw, up 1101 auto auto --Veth43 user-ASA1000V-efw, up 101 auto auto --Veth55 user-app-linux, N up 101 auto auto --....The output shows the following:
•
•
•
VEM Port Configuration
To validate that the VEM port has been correctly configured, use the show port command on the ESX or ESXi server on which the VEM is installed. The following is sample output from the show port command on the VEM:
~ # vemcmd show portLTL VSM Port Admin Link State PC-LTL SGID Vem Port Type58 Veth40 UP UP FWD 0 user-ASA1000V-efw.eth259 Veth43 UP UP FWD 0 user-ASA1000V-efw.eth164 Veth5 UP UP FWD 0 user-outside-linux.eth065 Veth55 UP UP FWD 0 user-app-linux.eth0The output shows the following:
•
•
•
Note
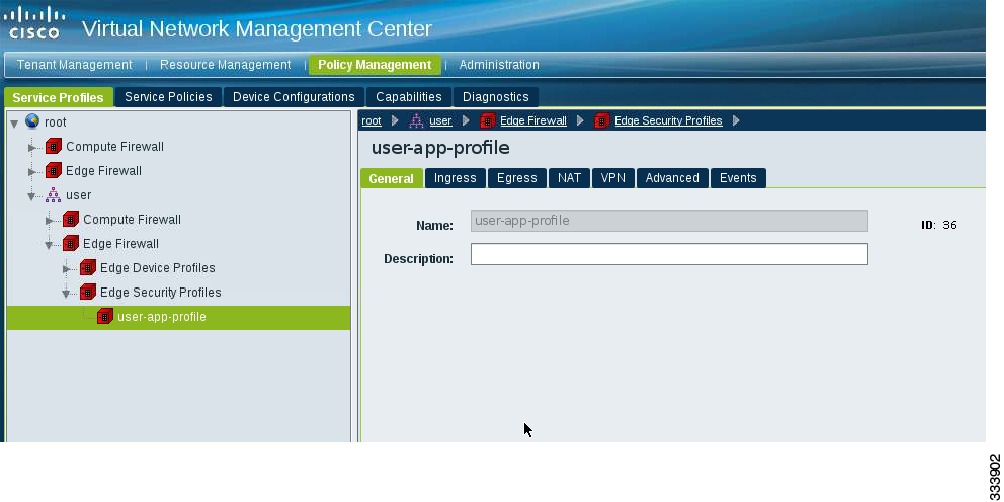
Cisco VNMC Security Profile ID
The security profile ID (SPID) is mapped to an edge security profile and is generated by the Cisco VNMC. The SPID is encapsulated in the traffic packet. To validate that the Cisco VNMC SPID has been correctly configured, in the Cisco VNMC, choose Policy Management > Service Profiles > root > User > user-app-profile. Figure 2-10 shows an example of a correctly configured Cisco VNMC SPID.
Figure 2-10 Cisco VNMC SPID
VSM vService Configuration
To validate that the VSM vservice has been correctly configured, use the show vservice detail command on the Cisco Nexus 1000V switch. The following is sample output from the show vservice detail command:
Switch# show vservice detail#License InformationMod VSG ASA3 0 24 0 2#Node Information#Node ID:13 Name:vASA-userType:asa IPAddr:10.0.101.1 Fail:close Vlan:101Mod State MAC-Addr VVer4 Alive 00:50:56:8e:01:1b 2#PortProfile:user-app-profile Org:root/userNode:vASA-user Profile(Id):user-app-profile(36)#Veth55VM-Name :user-app-linuxNIC-Name:Network Adapter 1DV-Port :4866VM-UUID :42 0e 13 70 3c 73 06 3b-3e c2 3c 80 da df 63 87DVS-UUID:b0 6a 0e 50 e2 e4 79 25-76 d8 24 d4 02 b0 32 27IP-Addrs:10.0.101.22The output shows the following:
•
•
•
•
•
•
•
•
•
•
VSN Configuration in the VSM
To validate the VSN configuration in the VSM, use the show vservice brief command on the Cisco Nexus 1000V switch. The following is sample output from the show vservice brief command:
Switch# show vservice brief--------------------------------------------------------------------------------License Information--------------------------------------------------------------------------------Type In-Use-Lic-Count UnLicensed-Modvsg 0asa 4--------------------------------------------------------------------------------Node Information--------------------------------------------------------------------------------ID Name Type IP-Address Mode State Module............13 vASA-user asa 10.0.101.1 v-101 Alive 4,............--------------------------------------------------------------------------------Path Information----------------------------------------------------------------------------------------------------------------------------------------------------------------Port Information--------------------------------------------------------------------------------PortProfile:user-app-profileOrg:root/userNode:vASA-user(10.0.101.1) Profile(Id):user-app-profile(36)Veth Mod VM-Name vNIC IP-Address55 4 user-app-linux 1 10.0.101.22,--More--Module 4 shows the inside interface configuration of the ASA 1000V, which displays information for all vPath traffic.
To see vEthernet information, use the show vservice port brief | detail command on the Cisco Nexus 1000V switch. The following is sample output from the show vservice port brief command:
Switch# show vservice port brief--------------------------------------------------------------------------------Port Information--------------------------------------------------------------------------------PortProfile:user-app-profileOrg:root/userNode:vASA-user(10.0.101.1) Profile(Id):user-app-profile(36)Veth Mod VM-Name vNIC IP-Address55 4 user-app-linux 1 10.0.101.22,--More--The following is sample output from the show vservice port detail command:
Switch# show vservice port detail--------------------------------------------------------------------------------Port Information--------------------------------------------------------------------------------PortProfile:user-app-profileOrg:root/userNode:vASA-user(10.0.101.1) Profile(Id):user-app-profile(36)Veth55Module :4VM-Name :user-app-linuxvNIC:Network Adapter 1DV-Port :4866VM-UUID :42 0e 13 70 3c 73 06 3b-3e c2 3c 80 da df 63 87DVS-UUID:b0 6a 0e 50 e2 e4 79 25-76 d8 24 d4 02 b0 32 27IP-Addrs:10.0.101.22,--More--The output shows the following:
•
•
VSN Configuration in the VEM
To validate the VSN configuration in the VEM, use the show vsn binding command on the ESX or ESXi server on which the VEM is installed. The following is sample output from the show vsn binding command:
~ # vemcmd show vsn bindingVSG Services Disabled | VSG Licenses Available 0ASA Services Enabled | ASA Licenses Available 2LTL PATH VSN SWBD IP P-TYPE P-ID63 5 9 21 10.0.21.1 2 265 6 13 101 10.0.101.1 2 36LTL 65 is associated with user-app-linux, which is the inside VM. As a result, the VEM can correlate the inside VM with SPID 36. A profile type of 2 indicates the edge security profile.
To validate the IP address of the inside VM, use the show learnt ip command on the Cisco Nexus 1000V switch. The following is sample output from the show learnt ip command:
~ # vemcmd show learnt ipIP Address LTL VLAN BD/SegID10.0.21.36 63 21 1010.0.101.22 65 101 18The VEM learns the IP addresses of the VMs present on the network and knows the IP address of the inside VM, which is user-app-linux. The IP and SPID information is the same in the VEM and in the VSM.
ASA 1000V IP-SPID Mapping (Control Path)
To validate the ASA 1000V IP-SPID mapping from the control path, use the show vsn command on the ASA 1000V. The following is sample output from the show vsn command:
ASA1000V# show vsnConfiguration through VNMC: enabledvsn security-profile info:security-profile : user-outside-profile@root/userSPID : 35Interface : sp0001security-profile : default@rootSPID : 2Interface : sp0002security-profile : user-app-profile@root/userSPID : 36Interface : sp0003vsn ip-binding info:IP : 10.0.101.22security-profile : user-app-profile@root/userInterface : sp0003ASA1000V#The output shows the binding (mapping) information in the Cisco VNMC, ASA 1000V, and Cisco Nexus 1000V switch, and the following:
•
•
•
•
ASA 1000V IP-SPID Mapping (Data Path)
To validate the ASA 1000V IP-SPID binding from the data path, use the show asp table vsn ip-binding command on the ASA 1000V. You can use this command in ASDM or in VNMC mode. The following is sample output from the show asp table vsn ip-binding command:
ASA1000V(config)# show asp table vsn ip-bindingSPID IP Address11 10.0.0.2611 10.0.0.2011 10.0.0.25This output may help determine if the control path or data path is the issue that requires resolution.
To validate the security profile-SPID binding from the data path, use the show asp table vsn security-profile command on the ASA 1000V. You can only use this command when you are in ASDM mode. The following is sample output from the show asp table vsn security-profile command on the ASA 1000V:
ASA1000V(config)# show asp table vsn security-profileSPID Security profile11 sp1ASA 1000V Services for Security Profile Interfaces
To validate the ASA 1000V services for security profiles, use the show running-config service-interface command on the ASA 1000V. The following is sample output from the show running-config service-interface command:
ASA1000V# show running-config service-interfaceservice-interface security-profile all insideYou only need to enter this command if you use the ASDM mode. The command runs automatically if you use the VNMC mode. The security profile interface is not a physical interface that can send or receive vPath tagged traffic from the Cisco Nexus 1000V switch. You can associate the physical interface to be used to send or receive vPath traffic using the service-interface command.
VSM Interface Counters
To see the vEthernet statistics, use the show interface counters command on the Cisco Nexus 1000V switch. The following is sample output from the show interface counters command:
Switch# show interface counters--------------------------------------------------------------------------------Port InOctets InUcastPkts InMcastPkts InBcastPkts--------------------------------------------------------------------------------Veth55 43639 25386 19 163Veth40 18772 198 0 532Veth43 117240 28656 0 608--------------------------------------------------------------------------------Port OutOctets OutUcastPkts OutMcastPkts OutBcastPkts--------------------------------------------------------------------------------Veth55 1512452 327 0 149429Veth40 60508 613 18 51Veth43 141150 340 18 134246VEM Packet Statistics
To see the correlation between the VSM and VEM statistics, use the show packets command on the ESX or ESXi server on which the VEM installed. The following is sample output from the show packets command on the VEM:
~ # vemcmd show packetsLTL RxUcast TxUcast RxMcast TxMcast RxBcast TxBcast Txflood Rxdrop Txdrop Name65 25386 327 19 0 163 149429 1593 0 0 user-app-linux.eth058 198 613 0 18 532 51 21 0 0 user-ASA1000V-efw.eth259 28656 340 0 18 608 134246 1926 0 0 user-ASA1000V-efw.eth1The packet statistics on the VEM and on the VSM must match each other in a working configuration.
ASA 1000V vPath Counters
To see the packets sent or received on the service interface, use the show counters command on the ASA 1000V. The following is sample output from the show counters command:
ASA1000V# show countersProtocol Counter Value ContextIP IN_PKTS 18342 SummaryIP OUT_PKTS 167 SummaryVPATH IN_PKTS 181 SummaryVPATH OUT_PKTS 29 SummaryVPATH OUT_VSN_PKTS 152 SummaryVPATH HA_COMMON_OUT_PKTS 1 SummaryVPATH HA_COMMON_OUT_BYTES 56 SummaryIP TO_ARP 10105 SummaryIP TO_UDP 157 SummaryUDP IN_PKTS 157 SummaryUDP OUT_PKTS 157 SummarySSLERR BAD_PROTOCOL_VERSION_NUMBER 2 SummarySSLERR BAD_SIGNATURE 2 SummarySSLALERT TX_CLOSE_NOTIFY 101 SummarySSLALERT TX_WARNING_ALERT 101 SummarySSLDEV NEW_CTX 1 SummarySSLNP OPEN_CONN 1 SummarySSLNP HANDSHAKE_START 101 Summary<---More-->In this output, the vPath counters specify the following:
•
•
•
•
•
Example
An ICMP packet is sent from an inside VM to the outside, with five ping packets.
The show counters command output shows that the vPath counters on the ASA 1000V were the following:
ASA1000V# show countersProtocol Counter Value ContextVPATH IN_PKTS 12 SummaryVPATH OUT_PKTS 5 SummaryVPATH OUT_VSN_PKTS 7 SummaryThe result is the following:
•
•
•
VSM vService Statistics
To see VSM vService statistics, use the show vservice statistics vlan 101 command on the Cisco Nexus 1000V switch. The following is sample output from the show vservice statistics vlan 101 command:
Switch(config)# show vservice statistics vlan 101#VSN VLAN: 101, IP-ADDR: 10.0.101.1Module: 4#VPath Packet Statistics Ingress Egress TotalTotal Seen 5 0 5Policy Redirects 0 0 0No-Policy Passthru 0 0 0Policy-Permits Rcvd 0 5 5Policy-Denies Rcvd 0 0 0Permit Hits 0 0 0Deny Hits 0 0 0Decapsulated 0 5 5Fail-Open 0 0 0Badport Err 0 0 0VSN Config Err 0 0 0VSN State Down 0 0 0Encap Err 0 0 0All-Drops 0 0 0Flow Notificns Sent 0Total Rcvd From VSN 7Non-Cisco Encap Rcvd 0VNS-Port Drops 1The output shows the following:
•
•
•
ASA 1000V Interface Statistics
To see interface statistics for the ASA 1000V, use the show interface command on the ASA 1000V. The following is sample output from the show interface command:
ASA1000V(config)# show interfaceInterface GigabitEthernet0/0 "inside", is up, line protocol is upInterface security profile "sp0003", is up, line protocol is upsecurity-profile user-app-profile@root/user, spid 36service-interface is insideHardware is 1825445EM rev01, BW 1000 Mbps, DLY 10 usecAuto-Duplex (Full-duplex), Auto-Speed (1000Mbps)Input flow control is unsupported, output flow control is offMAC address 0050.568e.011b, MTU 1500IP address 10.0.101.1, subnet mask 255.255.255.098 packets input, 6272 bytes, 0 no bufferReceived 0 broadcasts, 0 runts, 0 giants0 input errors, 0 CRC, 0 frame, 0 overrun, 8 ignored, 0 abort0 pause input, 0 resume input0 L2 decode drops51 packets output, 3600 bytes, 0 underruns0 pause output, 0 resume output0 output errors, 0 collisions, 2 interface resets0 late collisions, 0 deferred48 input reset drops, 0 output reset dropsinput queue (blocks free curr/low): hardware (255/205)output queue (blocks free curr/low): hardware (204/204)Traffic statistics for "inside":44 packets input, 2024 bytes45 output, 1260 bytes0 packets dropped<---More--->The output shows the following:
•
•
•
•
•
•
To see interface statistics for security profiles, use the show interface command on the ASA 1000V. The following is sample output from the show interface command for security profiles:
ASA1000V(config)# show interfaceInterface security-profile "sp0003", is up, line protocol is upsecurity-profile user-app-profile@root/user, spid 36Traffic statistics for "sp0003":29 packets input, 2436 bytes29 packets output, 2436 bytes0 packets dropped1 minute input rate 0 pkts/sec, 0 bytes/sec1 minute output rate 0 pkts/sec, 0 bytes/sec1 minute drop rate, 0 pkts/sec5 minute input rate 0 pkts/sec, 0 bytes/sec5 minute output rate 0 pkts/sec, 0 bytes/sec5 minute drop rate, 0 pkts/secTraffic statistics for "sp0003":29 packets input, 2436 bytes29 packets output, 2436 bytes0 packets dropped1 minute input rate 0 pkts/sec, 0 bytes/sec1 minute output rate 0 pkts/sec, 0 bytes/sec1 minute drop rate, 0 pkts/sec5 minute input rate 0 pkts/sec, 0 bytes/sec5 minute output rate 0 pkts/sec, 0 bytes/sec5 minute drop rate, 0 pkts/secASA1000V(config)#The output indicates that security profile interface sp0003 is up, and no packets have been dropped.