-
Cisco ASA 5500 Series Configuration Guide using the CLI, 8.3
-
About This Guide
-
Glossary
- Getting Started and General Information
- Setting Up the Adaptive Security Appliance
- Configuring Access Lists
- Configuring IP Routing
- Configuring NAT
- Configuring Service Policies Using the Modular Policy Framework
- Configuring Access Control
- Configuring Application Inspection
- Configuring Unified Communications
- Configuring Connection Settings and QoS
- Configuring Advanced Network Protection
- Configuring Applications on SSMs and SSCs
- Configuring High Availability
-
Configuring VPN
-
Configuring IPSec and ISAKMP
-
Configuring L2TP over IPSec
-
Setting General VPN Parameters
-
Configuring Tunnel Groups, Group Policies, and Users
-
Configuring IP Addresses for VPN
-
Configuring Remote Access VPNs
-
Configuring Network Admission Control
-
Configuring Easy VPN on the ASA 5505
-
Configuring the PPPoE Client
-
Configuring LAN-to-LAN VPNs
-
Configuring Clientless SSL VPN
-
Configuring AnyConnect VPN Client Connections
-
- Configuring Logging and SNMP
- System Administration
- Reference
-
 Feedback
Table Of Contents
Configuring the TLS Proxy for Encrypted Voice Inspection
Information about the TLS Proxy for Encrypted Voice Inspection
Decryption and Inspection of Unified Communications Encrypted Signaling
Prerequisites for the TLS Proxy for Encrypted Voice Inspection
Configuring the TLS Proxy for Encrypted Voice Inspection
Task flow for Configuring the TLS Proxy for Encrypted Voice Inspection
Creating Trustpoints and Generating Certificates
Creating a CTL Provider Instance
Creating the TLS Proxy Instance
Enabling the TLS Proxy Instance for Skinny or SIP Inspection
Feature History for the TLS Proxy for Encrypted Voice Inspection
Configuring the TLS Proxy for Encrypted Voice Inspection
This chapter describes how to configure the adaptive security appliance for the TLS Proxy for Encrypted Voice Inspection feature.
This chapter includes the following sections:
•
Information about the TLS Proxy for Encrypted Voice Inspection
•
•
•
Information about the TLS Proxy for Encrypted Voice Inspection
End-to-end encryption often leaves network security appliances "blind" to media and signaling traffic, which can compromise access control and threat prevention security functions. This lack of visibility can result in a lack of interoperability between the firewall functions and the encrypted voice, leaving businesses unable to satisfy both of their key security requirements.
The adaptive security appliance is able to intercept and decrypt encrypted signaling from Cisco encrypted endpoints to the Cisco Unified Communications Manager (Cisco UCM), and apply the required threat protection and access control. It can also ensure confidentiality by re-encrypting the traffic onto the Cisco UCM servers.
Typically, the adaptive security appliance TLS Proxy functionality is deployed in campus unified communications network. This solution is ideal for deployments that utilize end to end encryption and firewalls to protect Unified Communications Manager servers.
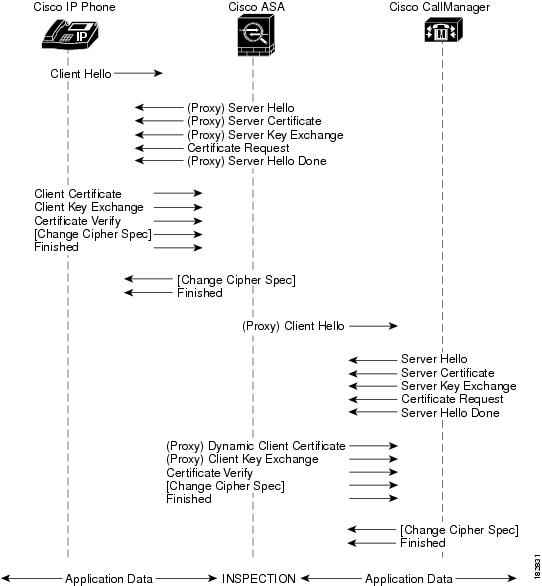
The security appliance in Figure 45-1 serves as a proxy for both client and server, with Cisco IP Phone and Cisco UCM interaction.
Figure 45-1
TLS Proxy Flow
Decryption and Inspection of Unified Communications Encrypted Signaling
With encrypted voice inspection, the security appliance decrypts, inspects and modifies (as needed, for example, performing NAT fixup), and re-encrypts voice signaling traffic while all of the existing VoIP inspection functions for Skinny and SIP protocols are preserved. Once voice signaling is decrypted, the plaintext signaling message is passed to the existing inspection engines.
The security appliance acts as a TLS proxy between the Cisco IP Phone and Cisco UCM. The proxy is transparent for the voice calls between the phone and theCisco UCM. Cisco IP Phones download a Certificate Trust List from the Cisco UCM before registration which contains identities (certificates) of the devices that the phone should trust, such as TFTP servers and Cisco UCM servers. To support server proxy, the CTL file must contain the certificate that the security appliance creates for the Cisco UCMs. To proxy calls on behalf of the Cisco IP Phone, the security appliance presents a certificate that the Cisco UCM can verify, which is a Local Dynamic Certificate for the phone, issued by the certificate authority on the security appliance.
TLS proxy is supported by the Cisco Unified CallManager Release 5.1 and later. You should be familiar with the security features of the Cisco UCM. For background and detailed description of Cisco UCM security, see the Cisco Unified CallManager document:
http://www.cisco.com/univercd/cc/td/doc/product/voice/c_callmg/5_0/sec_vir/ae/sec504/index.htm
TLS proxy applies to the encryption layer and must be configured with an application layer protocol inspection. You should be familiar with the inspection features on the adaptive security appliance, especially Skinny and SIP inspection.
CTL Client Overview
The CTL Client application supplied by Cisco Unified CallManager Release 5.1 and later supports a TLS proxy server (firewall) in the CTL file. Figure 45-2 through Figure 45-5 illustrate the TLS proxy features supported in the CTL Client.
Figure 45-2 CTL Client TLS Proxy Features — Add Firewall
Figure 45-2 shows support for adding a CTL entry consisting of the security appliance as the TLS proxy.
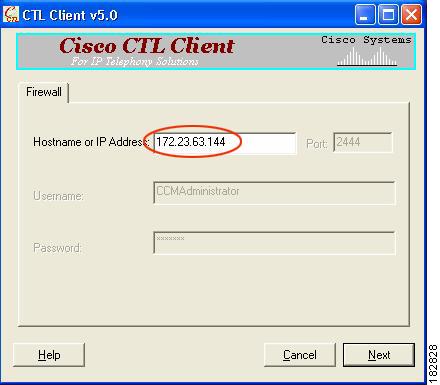
Figure 45-3 CTL Client TLS Proxy Features — ASA IP Address or Domain Name
Figure 45-3 shows support for entering the security appliance IP address or domain name in the CTL Client.
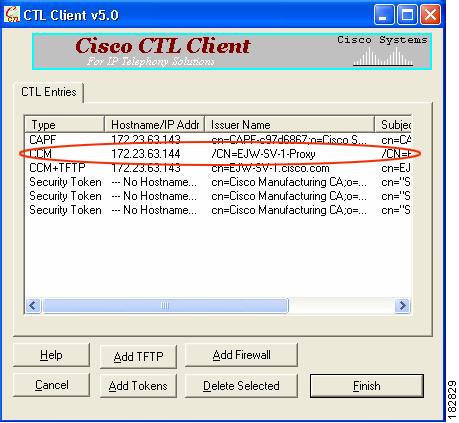
Figure 45-4 CTL Client TLS Proxy Features — CTL Entry for ASA
Figure 45-4 shows that the CTL entry for the security appliance as the TLS proxy has been added. The CTL entry is added after the CTL Client connects to the CTL Provider service on the security appliance and retrieves the proxy certificate.
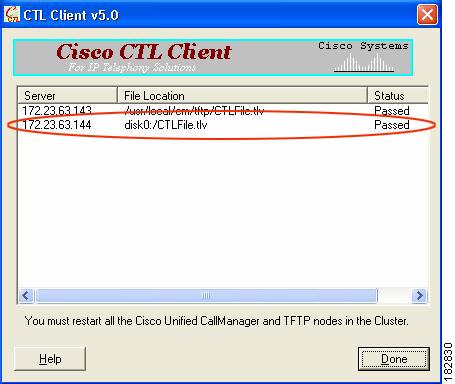
Figure 45-5 CTL Client TLS Proxy Features — CTL File Installed on the ASA
The security appliance does not store the raw CTL file in the flash, rather, it parses the CTL file and installs appropriate trustpoints. Figure 45-5 indicates the installation was successful.
Licensing for the TLS Proxy
The TLS proxy for encrypted voice inspection feature supported by the adaptive security appliance require a Unified Communications Proxy license.
The following table shows the Unified Communications Proxy license details by platform:
ASA 5505
Base License and Security Plus License: 2 sessions1 .
Optional license: 24 sessions.
ASA 5510
Base License and Security Plus License: 2 sessions1.
Optional licenses: 24, 50, or 100 sessions.
ASA 5520
Base License: 2 sessions1.
Optional licenses: 24, 50, 100, 250, 500, 750, or 1000 sessions.
ASA 5540
Base License: 2 sessions1.
Optional licenses: 24, 50, 100, 250, 500, 750, 1000, or 2000 sessions.
ASA 5550
Base License: 2 sessions1.
Optional licenses: 24, 50, 100, 250, 500, 750, 1000, 2000, or 3000 sessions.
ASA 5580
Base License: 2 sessions1.
Optional licenses: 24, 50, 100, 250, 500, 750, 1000, 2000, 3000, 5000, or 10,000 sessions.2
1 The following applications use TLS proxy sessions for their connections. Each TLS proxy session used by these applications (and only these applications) is counted against the UC license limit:
- Phone Proxy
- Presence Federation Proxy
- Encrypted Voice Inspection
Other applications that use TLS proxy sessions do not count towards the UC limit, for example, Mobility Advantage Proxy (which does not require a license) and IME (which requires a separate IME license).
Some UC applications might use multiple sessions for a connection. For example, if you configure a phone with a primary and backup Cisco Unified Communications Manager, there are 2 TLS proxy connections, so 2 UC Proxy sessions are used.
You independently set the TLS proxy limit using the tls-proxy maximum-sessions command. To view the limits of your model, enter the tls-proxy maximum-sessions ? command. When you apply a UC license that is higher than the default TLS proxy limit, the adaptive security appliance automatically sets the TLS proxy limit to match the UC limit. The TLS proxy limit takes precedence over the UC license limit; if you set the TLS proxy limit to be less than the UC license, then you cannot use all of the sessions in your UC license.
Note: For license part numbers ending in "K8" (for example, licenses under 250 users), TLS proxy sessions are limited to 1000. For license part numbers ending in "K9" (for example, licenses 250 users or larger), the TLS proxy limit depends on the configuration, up to the model limit. K8 and K9 refer to whether the license is restricted for export: K8 is unrestricted, and K9 is restricted.
Note: If you clear the configuration (using the clear configure all command, for example), then the TLS proxy limit is set to the default for your model; if this default is lower than the UC license limit, then you see an error message to use the tls-proxy maximum-sessions command to raise the limit again . If you use failover and enter the write standby command on the primary unit to force a configuration synchronization, the clear configure all command is generated on the secondary unit automatically, so you may see the warning message on the secondary unit. Because the configuration synchronization restores the TLS proxy limit set on the primary unit, you can ignore the warning.
You might also use SRTP encryption sessions for your connections:
- For K8 licenses, SRTP sessions are limited to 250.
- For K9 licenses, there is not limit.
Note: Only calls that require encryption/decryption for media are counted towards the SRTP limit; if passthrough is set for the call, even if both legs are SRTP, they do not count towards the limit.2 With the 10,000-session license, the total combined sessions can be 10,000, but the maximum number of Phone Proxy sessions is 5000.
Table 45-1 shows the default and maximum TLS session details by platform.
For more information about licensing, see Chapter 3 "Managing Feature Licenses."
Prerequisites for the TLS Proxy for Encrypted Voice Inspection
Before configuring TLS proxy, the following prerequisites are required:
•
•
•
–
–
–
–
If LSC provisioning is required or you have LSC enabled IP phones, you must import the CAPF certificate from the Cisco UCM. If the Cisco UCM has more than one CAPF certificate, you must import all of them to the adaptive security appliance.
See Chapter 44 "Configuring the Cisco Phone Proxy."For example, the CA Manufacturer certificate is required by the phone proxy to validate the IP phone certificate.
Configuring the TLS Proxy for Encrypted Voice Inspection
This section includes the following topics:
•
•
•
•
•
Task flow for Configuring the TLS Proxy for Encrypted Voice Inspection
To configure the security appliance for TLS proxy, perform the following steps:
Step 1
hostname(config)# tls-proxy maximum-sessions 1200
Note
Step 2
Step 3
Step 4
Step 5
Step 6
Step 7
a.
hostname(config)# crypto ca export ldc_server identity-certificateb.
hostname(config)# show crypto ca server certificateSave the output to a file and import the certificate on the Cisco UCM. For more information, see the Cisco Unified CallManager document: /en/US/docs/voice_ip_comm/cucm/cucos/5_0_4/iptpch6.html#wp1040848
After this step, you may use the Display Certificates function on the Cisco Unified CallManager GUI to verify the installed certificate:
/en/US/docs/voice_ip_comm/cucm/cucos/5_0_4/iptpch6.html#wp1040354
Step 8
http://www.cisco.com/univercd/cc/td/doc/product/voice/c_callmg/5_1/nci/p08/secuauth.htm
Note
Creating Trustpoints and Generating Certificates
The Cisco UCM proxy certificate could be self-signed or issued by a third-party CA. The certificate is exported to the CTL client.
Prerequisites
Import the required certificates, which are stored on the Cisco UCM. See the "Certificates from the Cisco UCM" section and the "Importing Certificates from the Cisco UCM" section.
What to Do Next
Once you have created the trustpoints and generated the certificates, create the internal CA to sign the LDC for Cisco IP Phones. See Creating an Internal CA.
Creating an Internal CA
Create an internal local CA to sign the LDC for Cisco IP Phones.
This local CA is created as a regular self-signed trustpoint with proxy-ldc-issuer enabled. You can use the embedded local CA LOCAL-CA-SERVER on the adaptive security appliance to issue the LDC.
What to Do Next
Once you have created the internal CA, create the CTL provider instance. See Creating a CTL Provider Instance.
Creating a CTL Provider Instance
Create a CTL Provider instance in preparation for a connection from the CTL Client.
The default port number listened by the CTL Provider is TCP 2444, which is the default CTL port on the Cisco UCM. Use the service port command to change the port number if a different port is used by the Cisco UCM cluster.
What to Do Next
Once you have created the CTL provider instance, create the TLS proxy instance. See Creating the TLS Proxy Instance.
Creating the TLS Proxy Instance
Create the TLS proxy instance to handle the encrypted signaling.
What to Do Next
Once you have created TLS proxy instance, enable the TLS proxy instance for Skinny and SIP inspection. See Enabling the TLS Proxy Instance for Skinny or SIP Inspection.
Enabling the TLS Proxy Instance for Skinny or SIP Inspection
Enable TLS proxy for the Cisco IP Phones and Cisco UCMs in Skinny or SIP inspection. The following procedure shows how to enable the TLS proxy instance for Skinny inspection.
Monitoring the TLS Proxy
You can enable TLS proxy debug flags along with SSL syslogs to debug TLS proxy connection problems. For example, using the following commands to enable TLS proxy-related debug and syslog output only:
hostname(config)# debug inspect tls-proxy eventshostname(config)# debug inspect tls-proxy errorshostname(config)# logging enablehostname(config)# logging timestamphostname(config)# logging list loglist message 711001hostname(config)# logging list loglist message 725001-725014hostname(config)# logging list loglist message 717001-717038hostname(config)# logging buffer-size 1000000hostname(config)# logging buffered loglisthostname(config)# logging debug-traceThe following is sample output reflecting a successful TLS proxy session setup for a SIP phone:
hostname(config)# show logApr 17 2007 23:13:47: %ASA-6-725001: Starting SSL handshake with client outside:133.9.0.218/49159 for TLSv1 session.Apr 17 2007 23:13:47: %ASA-7-711001: TLSP cbad5120: Set up proxy for Client outside:133.9.0.218/49159 <-> Server inside:195.168.2.201/5061Apr 17 2007 23:13:47: %ASA-7-711001: TLSP cbad5120: Using trust point 'local_ccm' with the Client, RT proxy cbae1538Apr 17 2007 23:13:47: %ASA-7-711001: TLSP cbad5120: Waiting for SSL handshake from Client outside:133.9.0.218/49159.Apr 17 2007 23:13:47: %ASA-7-725010: Device supports the following 4 cipher(s).Apr 17 2007 23:13:47: %ASA-7-725011: Cipher[1] : RC4-SHAApr 17 2007 23:13:47: %ASA-7-725011: Cipher[2] : AES128-SHAApr 17 2007 23:13:47: %ASA-7-725011: Cipher[3] : AES256-SHAApr 17 2007 23:13:47: %ASA-7-725011: Cipher[4] : DES-CBC3-SHAApr 17 2007 23:13:47: %ASA-7-725008: SSL client outside:133.9.0.218/49159 proposes the following 2 cipher(s).Apr 17 2007 23:13:47: %ASA-7-725011: Cipher[1] : AES256-SHAApr 17 2007 23:13:47: %ASA-7-725011: Cipher[2] : AES128-SHAApr 17 2007 23:13:47: %ASA-7-725012: Device chooses cipher : AES128-SHA for the SSL session with client outside:133.9.0.218/49159Apr 17 2007 23:13:47: %ASA-7-725014: SSL lib error. Function: SSL23_READ Reason: ssl handshake failureApr 17 2007 23:13:47: %ASA-7-717025: Validating certificate chain containing 1 certificate(s).Apr 17 2007 23:13:47: %ASA-7-717029: Identified client certificate within certificate chain. serial number: 01, subject name: cn=SEP0017593F50A8.Apr 17 2007 23:13:47: %ASA-7-717030: Found a suitable trustpoint _internal_ejw-sv-2_cn=CAPF-08a91c01 to validate certificate.Apr 17 2007 23:13:47: %ASA-6-717022: Certificate was successfully validated. serial number: 01, subject name: cn=SEP0017593F50A8.Apr 17 2007 23:13:47: %ASA-6-717028: Certificate chain was successfully validated with warning, revocation status was not checked.Apr 17 2007 23:13:47: %ASA-6-725002: Device completed SSL handshake with client outside:133.9.0.218/49159Apr 17 2007 23:13:47: %ASA-6-725001: Starting SSL handshake with server inside:195.168.2.201/5061 for TLSv1 session.Apr 17 2007 23:13:47: %ASA-7-725009: Device proposes the following 2 cipher(s) to server inside:195.168.2.201/5061Apr 17 2007 23:13:47: %ASA-7-725011: Cipher[1] : AES128-SHAApr 17 2007 23:13:47: %ASA-7-725011: Cipher[2] : AES256-SHAApr 17 2007 23:13:47: %ASA-7-711001: TLSP cbad5120: Generating LDC for client 'cn=SEP0017593F50A8', key-pair 'phone_common', issuer 'LOCAL-CA-SERVER', RT proxy cbae1538Apr 17 2007 23:13:47: %ASA-7-711001: TLSP cbad5120: Started SSL handshake with ServerApr 17 2007 23:13:47: %ASA-7-711001: TLSP cbad5120: Data channel ready for the ClientApr 17 2007 23:13:47: %ASA-7-725013: SSL Server inside:195.168.2.201/5061 choose cipher : AES128-SHAApr 17 2007 23:13:47: %ASA-7-717025: Validating certificate chain containing 1 certificate(s).Apr 17 2007 23:13:47: %ASA-7-717029: Identified client certificate within certificate chain. serial number: 76022D3D9314743A, subject name: cn=EJW-SV-2.inside.com.Apr 17 2007 23:13:47: %ASA-6-717022: Certificate was successfully validated. Certificate is resident and trusted, serial number: 76022D3D9314743A, subject name: cn=EJW-SV-2.inside.com.Apr 17 2007 23:13:47: %ASA-6-717028: Certificate chain was successfully validated with revocation status check.Apr 17 2007 23:13:47: %ASA-6-725002: Device completed SSL handshake with server inside:195.168.2.201/5061Apr 17 2007 23:13:47: %ASA-7-711001: TLSP cbad5120: Data channel ready for the ServerUse the show tls-proxy commands with different options to check the active TLS proxy sessions. The following are some sample outputs:
hostname(config-tlsp)# show tls-proxyMaximum number of sessions: 1200TLS-Proxy 'sip_proxy': ref_cnt 1, seq# 3Server proxy:Trust-point: local_ccmClient proxy:Local dynamic certificate issuer: LOCAL-CA-SERVERLocal dynamic certificate key-pair: phone_commonCipher suite: aes128-sha1 aes256-sha1Run-time proxies:Proxy 0xcbae1538: Class-map: sip_ssl, Inspect: sipActive sess 1, most sess 3, byte 3456043TLS-Proxy 'proxy': ref_cnt 1, seq# 1Server proxy:Trust-point: local_ccmClient proxy:Local dynamic certificate issuer: ldc_signerLocal dynamic certificate key-pair: phone_commonCipher-suite: <unconfigured>Run-time proxies:Proxy 0xcbadf720: Class-map: skinny_ssl, Inspect: skinnyActive sess 1, most sess 1, byte 42916hostname(config-tlsp)# show tls-proxy session count2 in use, 4 most usedhostname(config-tlsp)# show tls-proxy session2 in use, 4 most usedoutside 133.9.0.211:50437 inside 195.168.2.200:2443 P:0xcbadf720(proxy) S:0xcbc48a08 byte 42940outside 133.9.0.218:49159 inside 195.168.2.201:5061 P:0xcbae1538(sip_proxy) S:0xcbad5120 byte 8786hostname(config-tlsp)# show tls-proxy session detail2 in use, 4 most usedoutside 133.9.0.211:50437 inside 195.168.2.200:2443 P:0xcbadf720(proxy) S:0xcbc48a08 byte 42940Client: State SSLOK Cipher AES128-SHA Ch 0xca55e498 TxQSize 0 LastTxLeft 0 Flags 0x1Server: State SSLOK Cipher AES128-SHA Ch 0xca55e478 TxQSize 0 LastTxLeft 0 Flags 0x9Local Dynamic CertificateStatus: AvailableCertificate Serial Number: 29Certificate Usage: General PurposePublic Key Type: RSA (1024 bits)Issuer Name:cn=TLS-Proxy-SignerSubject Name:cn=SEP0002B9EB0AADo=Cisco Systems Incc=USValidity Date:start date: 09:25:41 PDT Apr 16 2007end date: 09:25:41 PDT Apr 15 2008Associated Trustpoints:outside 133.9.0.218:49159 inside 195.168.2.201:5061 P:0xcbae1538(sip_proxy) S:0xcbad5120 byte 8786Client: State SSLOK Cipher AES128-SHA Ch 0xca55e398 TxQSize 0 LastTxLeft 0 Flags 0x1Server: State SSLOK Cipher AES128-SHA Ch 0xca55e378 TxQSize 0 LastTxLeft 0 Flags 0x9Local Dynamic CertificateStatus: AvailableCertificate Serial Number: 2bCertificate Usage: General PurposePublic Key Type: RSA (1024 bits)Issuer Name:cn=F1-ASA.default.domain.invalidSubject Name:cn=SEP0017593F50A8Validity Date:start date: 23:13:47 PDT Apr 16 2007end date: 23:13:47 PDT Apr 15 2008Associated Trustpoints:Feature History for the TLS Proxy for Encrypted Voice Inspection
Table 45-2 lists the release history for this feature.
Table 45-2 Feature History for Cisco Phone Proxy
TLS Proxy
8.0(2)
The TLS proxy feature was introduced.