Downloads |
 Feedback Feedback
|
Table Of Contents
Prerequisites for Set Inner CoS Bits for QinQ
PPPoE—QinQ Support on Subinterfaces
Configuring Inner CoS Bits for QinQ
Configuring Inner CoS Bits for QinQ
Set Inner CoS Bits for QinQ
First Published: September 2007
Revised: November 2009
This document describes the Set Inner CoS Bits for QinQ feature that allows you to mark both inner and outer VLAN tags of a QinQ frame with the same Class of Service (CoS) values.
History for the Set Inner CoS Bits for QinQ
Finding Support Information for Platforms and Cisco IOS Software Images
Use Cisco Feature Navigator to find information about platform and Cisco IOS software image support. Access Cisco Feature Navigator at http://www.cisco.com/go/fn. You must have an account on Cisco.com. If you do not have an account or have forgotten your username or password, click Cancel at the login dialog box and follow the instructions.
Contents
•
Prerequisites for Set Inner CoS Bits for QinQ
Prerequisites for Set Inner CoS Bits for QinQ
•
•
Feature Overview
The Set Inner CoS Bits for QinQ feature allows you to mark both the inner and outer VLAN tags of a QinQ frame with the same CoS values.
The router uses the CoS values to determine how to prioritize packets and can also use CoS marking to perform Layer 2 to Layer 3 mapping. Using the CoS field, you can differentiate user-defined QoS services for packets leaving a router and entering a switch.
Switches already have the ability to match and set CoS values; therefore, a router can set the CoS value of a packet to enable Layer 2 to Layer 3 mapping. The switch can then process the Layer 2 CoS header marking.
1.
2.
3.
4.
This feature is supported only for the subinterfaces that are configured with an inner (customer) VLAN.
PPPoE—QinQ Support on Subinterfaces
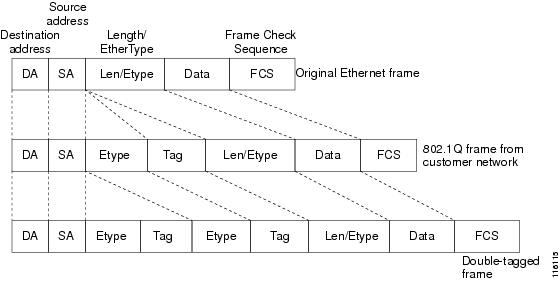
PPPoE—QinQ Support adds another layer of IEEE 802.1Q tag (called metro tag or PE-VLAN) to the 802.1Q tagged packets that enter the network. This additional layer expands the VLAN space by tagging the tagged packets, thus producing a double-tagged frame. The expanded VLAN space allows the service provider to provide certain services, such as Internet access on specific VLANs for specific customers, and yet still allows the service provider to provide other types of services for their other customers on other VLANs.
Service providers can allow their customers to use this feature to safely assign their own VLAN IDs on subinterfaces because these subinterface VLAN IDs are encapsulated within a service provider-designated VLAN ID for that customer. Therefore no overlap of VLAN IDs among customers exists, nor does traffic from different customers become mixed.
The double-tagged frame is assigned on a subinterface with an expanded encapsulation dot1q command that specifies the two VLAN ID tags (outer VLAN ID and inner VLAN ID) terminated on the subinterface. See Figure 1.
Figure 1 Untagged, 802.1Q-Tagged, and Double-Tagged Ethernet Frames
PPPoE—QinQ Support is generally supported on whichever Cisco IOS features or protocols are supported on the subinterface. For example, you can configure a double-tagged frame to run PPPoE on the subinterface. IPoQinQ supports IP packets that are double-tagged for QinQ VLAN tag termination by forwarding IP traffic with the double-tagged (also known as stacked) 802.1Q headers.
For more information on PPPoE—QinQ Support, refer to the PPPoE—QinQ Support feature module.
Configuration Tasks
To configure and verify the CoS markings for inner and outer VLAN tags of a QinQ frame, perform the following tasks:
•
Configuring Inner CoS Bits for QinQ
To configure both the inner and outer VLAN tags of a QinQ frame, enter the following commands beginning in global configuration mode:
Verifying Traffic Marking
The router collects statistical information about the number of packets and bytes marked. To verify traffic marking, enter any of the following commands in privileged EXEC configuration mode:
Configuration Example
This section provides the following configuration example:
•
Configuring Inner CoS Bits for QinQ
Example 1 shows how to configure the inner and outer VLAN tags of a QinQ frame with CoS values. In the example, a policy map called tos2cos is created. The class map named c1 and the default policy class map use the same CoS value on outbound and inbound packets on the Gigabit Ethernet 2/0/1 interface.
Example 1 Configuring Inner CoS Bits for QinQ
Router> enableRouter# configure terminalRouter(config)# class-map c1Router(config-cmap)# match ip precedence 5Router(config-cmap)# exitRouter(config)# policy-map tos2cosRouter(config-pmap)# class c1Router(config-pmap-c)# set cos 3Router(config-pmap-c)# set ip precedence 2Router(config-pmap-c)# class class-defaultRouter(config-pmap-c)# set cos 3Router(config-pmap-c)# exitRouter(config-pmap)# exitRouter(config)# interface GigabitEthernet 1/0/0.100Router(config-subif)# encapsulation dot1q 100Router(config-subif)# pppoe enableRouter(config-subif)# service-policy output tos2cosRouter(config-subif)# exitAdditional References
The following sections provide references related to the Set Inner CoS Bits for QinQfeature.
Related Documents
PPPoE—QinQ Support
PPPoE—QinQ Support feature module
Classification and Marking
Cisco IOS Quality of Service Solutions Configuration Guide, Release 12.2
Part 1: Classification > Configuring Class-Based Packet Marking
Class-Based Marking, Release 12.0(26)S feature module
Configuring Packet Marking on Frame Relay PVCs
Class of Service Marking
Service Provider Quality of Service Design Guide
Cisco IOS Quality of Service Solutions Configuration Guide, Release 12.2
Part 1: Classification > Configuring Class-Based Packet Marking
IP Precedence Marking
Service Provider Quality of Service Design Guide
Cisco IOS Quality of Service Solutions Configuration Guide, Release 12.2
Part 1: Classification > Configuring Class-Based Packet Marking
Standards
No new or modified standards are supported by this feature, and support for existing standards was not modified by this feature.
—
MIBs
RFCs
No new or modified RFCs are supported by this feature, and support for existing RFCs was not modified by this feature.
—
Command Reference
This section documents modified commands. All other commands used with this feature are documented in the Cisco IOS Command Reference publication for your Cisco IOS software release.
set cos
To set the Layer 2 class of service (CoS) value of an outgoing packet, use the set cos command in policy-map class configuration mode. To remove a specific CoS value setting, use the no form of this command.
set cos {cos-value | from-field [table table-map-name]}
no set cos {cos-value | from-field [table table-map-name]}
Cisco 10000 Series Router
set cos cos-value
Syntax Description
Defaults
No CoS value is set for the outgoing packet.
Command Modes
Policy-map class configuration
Command History
Usage Guidelines
CoS packet marking is supported only in the Cisco Express Forwarding switching path.
If a user wants to mark a packet that is being sent to a switch, the set cos command should be used by a router. Switches can leverage Layer 2 header information, including a CoS value marking.
The set cos command can be used only in service policies that are attached in the output direction of an interface. Packets entering an interface cannot be set with a CoS value.
The match cos and set cos commands can be used together to allow routers and switches to interoperate and provide quality of service (QoS) based on the CoS markings.
Layer 2 to Layer 3 mapping can be configured by matching on the CoS value because switches already can match and set CoS values. If a packet that needs to be marked to differentiate user-defined QoS services is leaving a router and entering a switch, the router should set the CoS value of the packet because the switch can process the Layer 2 header.
Using This Command with the Enhanced Packet Marking Feature
You can use this command as part of the Enhanced Packet Marking feature to specify the "from-field" packet-marking category to be used for mapping and setting the CoS value. The "from-field" packet-marking categories are as follows:
•
•
If you specify a "from-field" category but do not specify the table keyword and the applicable table-map-name argument, the default action is to copy the value associated with the "from-field" category as the CoS value. For instance, if you configure the set cos precedence command, the precedence value will be copied and used as the CoS value.
You can do the same for the DSCP marking category. That is, you can configure the set cos dscp command, and the DSCP value is copied and used as the CoS value.
Note
Examples
In the following example, the policy map called cos-set is created to assign different CoS values for different types of traffic. This example assumes that the class maps called voice and video-data are already created.
Router(config)#policy-map cos-set Router(config-pmap)#class voice Router(config-pmap-c)#set cos 1 Router(config-pmap-c)#exit Router(config-pmap)#class video-data Router(config-pmap-c)#set cos 2 Router(config-pmap-c)#endEnhanced Packet Marking Example
In the following example, the policy map called policy-cos is created to use the values defined in a table map called table-map1. The table map called table-map1 was created earlier with the table-map (value mapping) command. For more information about the table-map (value mapping) command, see the table-map (value mapping) command page.
In this example, the setting of the CoS value is based on the precedence value defined in table-map1:
Router(config)#policy-map policy-cos Router(config-pmap)#class class-default Router(config-pmap-c)#set cos precedence table table-map1Router(config-pmap-c)#end
Note
Related Commands