Feedback
Table Of Contents
Configuring Prime Network(s) in Prime Provisioning
Subscribing or Unsubscribing to Prime Central Device Commission and Decommission Notification
Manage Control Center
This chapter explains how to view and change the properties in the Dynamic Component Properties Library (DCPL); how to view status information about a host, servers, the WatchDog, and logs; how to define collection zones; and how to install license keys.
This chapter contains the following sections:
Hosts
Hosts allows you to manage the various servers. To access Hosts:
Choose Administration > Control Center > Hosts.
The Control Center Hosts window appears.
Note
Only the Logs button is enabled by default when there is no host selected. When any host is selected by using the check box, the Logs button is disabled and the other buttons are enabled.
Click any of the buttons and proceed as follows:
•
•
•
•
•
Details
For details about a chosen host, follow these steps:
Step 1
. The Host Details window appears. This shows the details about the chosen host.
Step 2
Config
To navigate to the Properties pane of the Host Configuration window, perform the following:
1.
2.
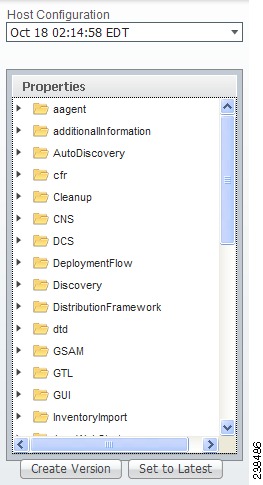
You can view or modify Dynamic Component Properties Library (DCPL) properties in the properties pane by following these steps
Step 1
Note
Figure 2-1 Properties
Step 2
Note
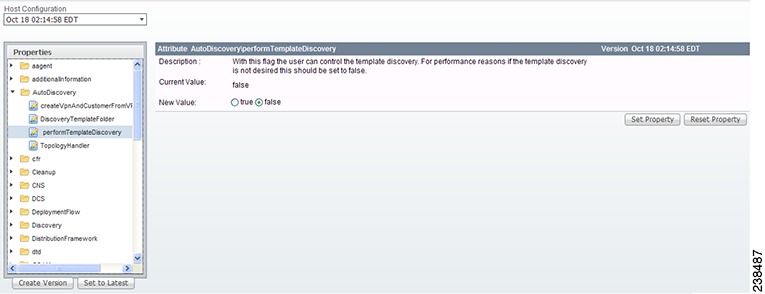
Step 3
Figure 2-2 Properties Detail Example
Step 4
Step 5
Step 6
Step 7
Step 8
From this release, you are able to perform the below mentioned additional tasks using the DCPL properties:
•
•
Note
Configuring Prime Network(s) in Prime Provisioning
In the Host Configuration screen, you can configure Prime Network in Prime Provisioning by choosing Properties > Inventory Import > Prime Network and modifying the below values:
•
•
For example, if there is a device D1 available in two instances of Prime Network
configured in the order  PN1 and PN2, inventory import will always import the device from
the first instance PN1 and will ignore the other.
•
•
•
•
•
For example, consider a user admin is created in Prime Central. In Suite mode, for all the
features to work as expected, admin should have access to Prime Provisioning with
appropriate role and access to Prime Network as Administrator. The user  should be
assigned with the scope of all the Network elements in Prime Network.
In case of Standalone mode, the user should have access to Prime Network as Administrator and should be assigned with the scope of all the Network elements in Prime Network. For more information about Prime Network configuration, refer to Prime Network User Guide.•
Subscribing or Unsubscribing to Prime Central Device Commission and Decommission Notification
When Prime Provisioning is either installed in suite mode or upgraded to suite mode, it subscribes to Prime Central device commission and decommission notifications by default. Once subscribed, Prime Central forwards the device commission and decommission notifications received from the other Domain Managers to Prime Provisioning.
To subscribe or unsubscribe to Prime Central device commission and decommission notifications, choose InventoryImport > PrimeCentral > enableNotification from the Properties pane and proceed as mentioned below.
•
•
To view the notification logs when there is no host selected in the Host window, choose Logs > PCNotification. The information related to creation and deletion of a device are captured here.
Servers
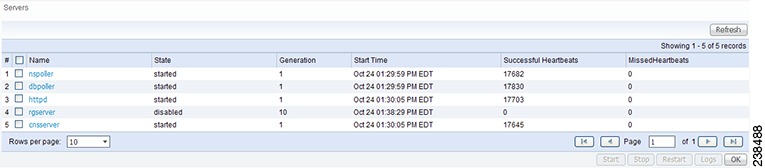
To view the status information about the servers, follow these steps:
Step 1
A window as shown in Figure 2-3, appears.
Figure 2-3 Servers
Step 2
Step 3
Step 4
Watchdog
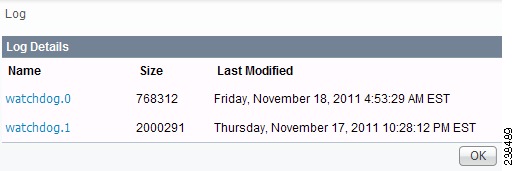
To view the log information about WatchDog, follow these steps:
Step 1
A window as shown in Figure 2-4, "WatchDog Logs," appears.
Figure 2-4 WatchDog Logs
Step 2
Step 3
Logs
To view install and uninstall logs for the Master server, follow these steps:
Step 1
Step 2
The window that appears is the log of installations or uninstallations, dependent on your selection in Step 2.
Step 3
Step 4
Step 5
Licensing
Licensing is where you install license keys, which is the only way to access services and APIs. The full version license key that is delivered, provides unlimited activation and unlimited VPNs and optional set of TEM activation license keys separately. To access Licensing:
Choose Administration > Control Center > Licensing.
To install license keys, follow these steps:
Step 1
Figure 2-5 Choose Administration > Control Center > Licensing
Step 2
Note
Note
Step 3
Step 4
Your newly installed license appears in an updated version o f the Installed License table, as shown in Figure 2-5.
Step 5
Note
Reporting Mechanism
Reporting mechanism is a tool used to export the devices available in the inventory. The report includes device name, device type, platform, and IOS/IOS XR version.
To execute the reporting tool, follow these steps:
Step 1
./prime.sh shell
Step 2
<PRIMEF _HOME>/resources/nbi/scripts/getDevices<PRIMEF _HOME>/resources/nbi/scripts/queries/DevicesQuery<PRIMEF _HOME>/resources/nbi/scripts/util/Login<PRIMEF _HOME>/resources/nbi/scripts/util/checkForErrorsStep 3
./getDevices
Step 4