- Cisco Prime Collaboration Assurance Guide - Advanced, 10.0
 Feedback
Contents
- Discovering Devices
- Device States
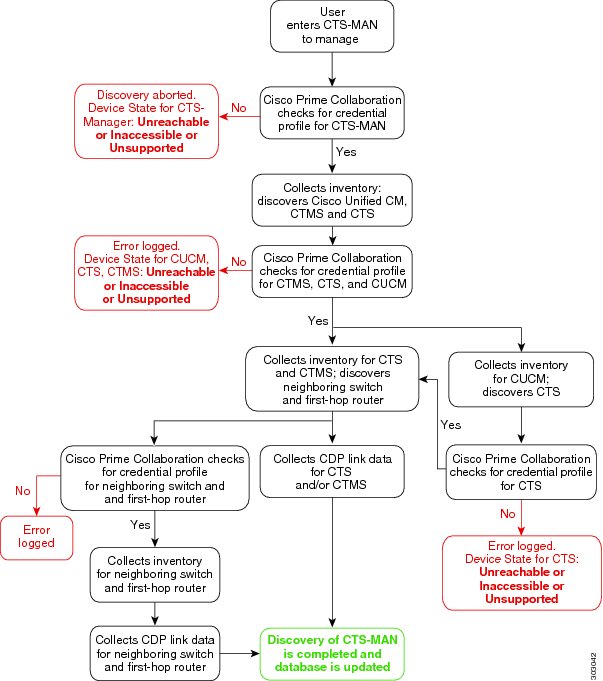
- Discovery Lifecycle for a Cisco TelePresence Manager (CTS-Manager)
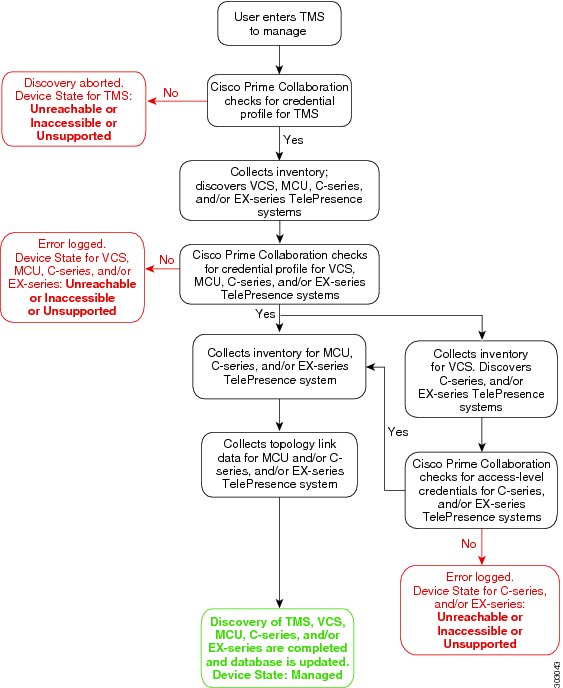
- Discovery Lifecycle of a Cisco TMS
- Notes for Managing Devices
- Device Discovery Methods
- Recommendations for Device Discovery
- Device Discovery Types and Common Use Cases
- Discovering Devices Automatically
- Discovery Filters and Scheduling Options
- Adding Devices
- Importing Devices
- Discovery and Cisco VCS Cluster
- Discovery and Cisco Unified CM Clusters
- Cluster Data Discovery Settings
- Prerequisites to Running Cluster Device Discovery
- Schedules Between Discoveries
- Scheduling Cluster Data Discovery
- Rediscovering Devices
- Rediscovering Deleted Devices
- Verifying Discovery Status
Discovering Devices
Before you can manage devices using Prime Collaboration, you need to discover devices in your network. After adding device credentials, you can discover and manage all collaboration endpoints, multipoint switches, application managers, call processors, routers, and switches that are part of your network.
For a list of devices supported by Prime Collaboration, see Supported Devices for Prime Collaboration Assurance.
NotePrime Collaboration supports third-party devices whose manageability depends on MIB-II support.
You must perform discovery to:
- Add devices to the Prime Collaboration database.
- Update or change IP addresses of devices managed by Prime Collaboration.
Discovery Phases
Any discovery involves three phases:
- Checks whether the device can be pinged using ICMP. If ICMP is not enabled on the device, the device is moved to the Unreachable state. See Device States for information on how to disable ICMP verification.
- Gets all the defined credential profiles, based on the IP address. See Managing Device Credentials to understand how to define the credential profiles.
- Checks whether the SNMP credentials match.
- Identifies the device types.
- Verifies all other mandatory device credentials, based on the device type. If the mandatory credentials are not defined, discovery fails. See Managing Device Credentials for information on required device credentials.
- Inventory discovery—Prime Collaboration polls MIB-II and other device MIBs to collect information on the device inventory, neighboring switches, and default gateway. It also verifies whether the polled device is supported in Prime Collaboration.
- Path trace discovery—Prime Collaboration verifies whether CDP is enabled on the device and discovers the topology, based on CDP. The links between the devices are computed using CDP and they are persisted in the Prime Collaboration database.
- Device States
- Discovery Lifecycle for a Cisco TelePresence Manager (CTS-Manager)
- Discovery Lifecycle of a Cisco TMS
- Notes for Managing Devices
- Device Discovery Methods
- Device Discovery Types and Common Use Cases
- Adding Devices
- Importing Devices
- Discovery and Cisco VCS Cluster
- Discovery and Cisco Unified CM Clusters
- Rediscovering Devices
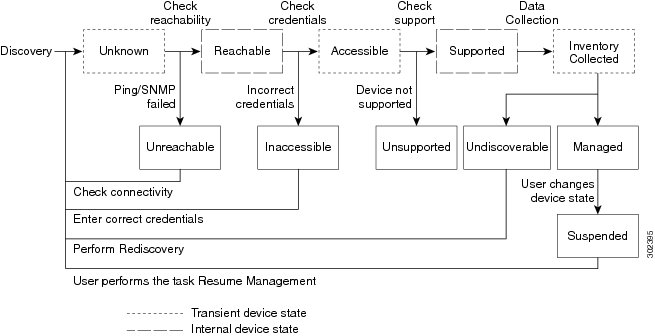
Device States
A device state indicates that Prime Collaboration is able to access the device and collect the inventory. The device state is updated only after performing either a discovery or an update inventory task.
Prime Collaboration displays the following device states:
Table 1 Discovery States and their Descriptions This is the preliminary state, when the device is first added. This is a transient state.
Prime Collaboration is unable to ping the device using ICMP. If ICMP is not enabled on the device, the device is moved to the Unreachable state.
Prime Collaboration compares the device with the device catalog. If the device does not match with the devices in the device catalog or the SysObjectID is not known, the device is moved to this state.
Prime Collaboration is able to access the device through all mandated credentials. This is part of the access-level discovery, which is an intermediate (transient) state during the device discovery.
Prime Collaboration is not able to access the device through any of the mandated credentials (see Managing Device Credentials ). You must check the credentials and discover the devices.
The device is hidden from the Device Work Center. However, the device is in the Prime Collaboration database and can be discovered.
Prime Collaboration is able to collect the required data using the mandated data collectors. This is part of the inventory discovery, which is an intermediate (transient) state during device discovery.
Prime Collaboration is not able to collect the required data using the mandated data collectors. The device state can be undiscoverable when:
- Prime Collaboration collects the endpoint data from CTS-Manager. If data is not collected, CTS-Manager is moved to Undiscovered state. There is no mandated data collection for Cisco Unified CM, CTS, CTMS, and other network devices.
- Connectivity issues can be caused by SNMP or HTTP/HTTPS timeout. Also, if you use HTTP/HTTPS to collect data, only one HTTP/HTTPS user can log in at a time. If Prime Collaboration faces any of these problems, the device state is moved to the Undiscoverable state. You must perform a rediscovery.
Prime Collaboration has successfully imported the required device data to the inventory database. All session, endpoints, and inventory data are available for devices in this state. You can troubleshoot a device only if it is in this state.
User has suspended monitoring of the device. Session and endpoint data are not displayed for devices in this state. Periodic polling is also not performed for devices in this state. You cannot update inventory for these devices. To do so, you will need to perform Resume Management. See Suspending and Resuming Managed Devices for details on suspended devices.
The following diagram shows the device discovery lifecycle.
Figure 1. Device Discovery LifecyclePrime Collaboration discovers both Layer 2 and Layer 3 paths.
- For Cisco 500, 1000 and 3000 series TelePresence systems, Prime Collaboration discovers the first-hop router and switch. See Discovery Lifecycle for a Cisco TelePresence Manager (CTS-Manager). The default hop count is 2 and is not configurable.
- For Cisco C and Ex series TelePresence systems, Prime Collaboration does not discover the first hop router and switch. See Discovery Lifecycle of a Cisco TMS.
The Layer 3 path is discovered when a troubleshooting workflow is triggered either manually or automatically.
For more information on the Troubleshooting workflow, see Features of the Troubleshooting Workflow.
See Supported Devices for Prime Collaboration Assurance for a list of devices that are supported in Prime Collaboration.
Notes for Managing Devices
Note the following when managing devices:
- If you login to Cisco TMS using the <domain/username> format, then ensure that you add the same <domain/username> value for the HTTPS credentials in the HTTP(s) Username field. In case the HTTP(s) Username does not match, discovery of that Cisco TMS will fail.
- If Cisco Discovery Protocol (CDP) is not enabled on a media server (it is either disabled or not responding), Prime Collaboration will not discover the device correctly and the device will be moved to the Unsupported state.
- If DNS is configured on a device, ensure that Prime Collaboration can resolve the DNS name for that device. Check the DNS Server configuration to make sure it is correct. This is critical for Cisco Unified CM, Unified Presence Server, and Unity Connection devices, since without DNS resolution certain monitoring features do not work.
- If you have installed a licensed version of Prime Collaboration, it is mandatory to configure the CTS-Manager Reporting API. If this feature is not configured on the CTS-Manager 1.7, 1.8, or 1.9, Prime Collaboration will not manage the CTS-Manager.
- If you are using Cisco TMS 13.0 or 13.1, it is mandatory to configure the Cisco TMS Booking API feature. If this feature is not configured, the sessions will not be monitored.
- For Cisco TMS 13.2 and above, the Cisco TMS Booking API feature need not be configured.
- If the Cisco VCS Expressway is configured within the DMZ, Prime Collaboration must be able to access the Cisco VCS Expressway through SNMP. If it cannot, then this device is moved to the Inaccessible state.
- You can also discover the devices (endpoints, TelePresence server, and so on) individually, except for mass endpoints like phones, Cisco Cius, and Cisco Jabber endpoints. These endpoints are discovered only with the discovery of the call processor with which they are registered.
- For discovery of Cisco Cius and Cisco Unified IP Phone 8900 and 9900 series, you must enable the HTTP interface so these devices appear in the inventory table.
- If you have Cisco MSE Supervisor, ensure that it is registered with the Cisco TMS.
- You must ensure that the device credentials that you have entered are correct. During the discovery process, based on the device that you want to discover, Prime Collaboration connects to the device using CLI, HTTP/HTTPS, or SNMP. CDP must be enabled on all CTS endpoints, CTMS, and network devices (routers and switches).
- If a monitored device is removed from the network, it will continue to be in the Monitored state until the next inventory collection occurs, even though the device is unreachable. If a device is unreachable, an Unreachable event appears that contains event information for this device appears.
- Configuration changes on a device are discovered by Cisco Prime Collaboration only during the inventory collection process. Therefore any changes to a device’s configuration will not be shown by Cisco Prime Collaboration until the next inventory collection, after the configuration change.
Device Discovery Methods
Cisco Prime Collaboration involves four discovery methods. The following table lists these discovery methods.
Table 2 Device Discovery Methods
- Discovers management applications, conferencing devices, and call processors such as CTS-Manager, Cisco TMS, Cisco VCS, and Cisco Unified CM.
- All endpoints and infrastructure devices registered with CTS-Manager, Cisco TMS, Cisco Unified CM, and Cisco VCS are discovered automatically during logical discovery.
- To discover clusters using logical discovery, you must discover the publisher of the cluster, which will automatically discover its subscribers and all the endpoints and infrastructure devices registered with both publisher and subscribers.
- Endpoints and infrastructure devices that are not registered with any of the management applications, conferencing devices, or call processors cannot be discovered using logical discovery. Use ping sweep or direct discovery to discover these devices. For more information on cluster discovery, see Discovering Devices.
- Deleted devices are not discovered again through Logical Discovery, you have to rediscover them. You can filter deleted devices using the quick filter in Device Work Center.
- Discovers devices independently of media and protocol used. This protocol runs on all Cisco-manufactured equipment, including routers, access servers, bridges, and switches.
- This discovery method queries the CDP Neighbor Table to find neighboring devices. When CDP is enabled, discovery queries the CDP cache on each seed device (and its peers) via SNMP. After CDP discovery, a logical discovery is performed automatically. That is, if a call processor or a management device is discovered by CDP discovery, then all endpoints and infrastructure devices registered with it are also discovered.
- CDP must be enabled on the devices to perform CDP discovery.
- There is no limit on the number of seed devices that can be used for CDP discovery. However, for a large network, it is advised to perform this on limited chunks of seed devices rather than all at once.
- Discovers devices within a range of IP addresses from a specified combination of IP address and subnet mask.
- This method pings each IP address in the range to check the reachability of devices. If a device is reachable, you must specify a list of subnets and network masks to be pinged. After ping sweep discovery, a logical discovery is performed automatically. That is, if a call processor or a management device is discovered by ping sweep discovery, then all endpoints and infrastructure devices registered with it are also discovered.
- Ping Sweep discovery does not require seed devices. Instead, you must specify a list of subnets and network masks to be pinged.
- Ping Sweep discovery may take longer than usual to discover devices if the IP ranges are large.
- You must create an “Any” credential profile for ping sweep and CDP discovery.
- Ping Sweep does not work for devices with IPv6 addresses.
- Discovers the device directly using the IP address.
- You can use this method to discover individual devices in your network.
- For example, if the discovery of a device fails because of incorrect credentials during a scheduled discovery, then you can discover the failed device alone using the direct discovery method.
Note
You cannot run both Ping Sweep and CDP discovery simultaneously in your network.
Discovery depends on the type of network deployed. For recommendations on which discovery to perform, see Recommendations for Device Discovery.
You must add credential profiles before discovering devices. See Adding a Device Credentials Profile for more information.
Recommendations for Device Discovery
These recommendations will help you decide which discovery method to use for your network.
- If you have management applications and call processors such as CTS-Manager, Cisco TMS, Cisco Unified CM, or Cisco VCS deployed in your network, you can discover these devices first using logical discovery. All endpoints registered with these devices are discovered when you discover the application managers and call processors.
- If you want to discover just the call processor and not the devices registered to the call processor, then you can use the direct device discovery method.
- If no call processors are deployed, or if no devices are registered to call processors, use ping sweep discovery. This method discovers all new infrastructure devices, new network devices, and new locations of devices in the target network. You must provide a list of subnet and network masks of the target network. During a scheduled ping sweep discovery, all devices in the network are identified and matched with their credential profiles. If a new device is discovered, it is added to the inventory.
- If you need to discover Cisco-manufactured equipment, use CDP discovery method.
- To discover only a specific device, use direct device discovery.
- During a scheduled discovery, if discovery of a single device fails because the device is in a suspended or inaccessible state, or you have updated the device credentials, use the direct device discovery.
- After discovering Cisco Unified CM, if you have registered any new endpoints, you must rediscover CUCM Publisher node to add them to Cisco Prime Collaboration. For Cisco VCS, the newly registered endpoints are automatically discovered.
- SIP and SRST devices cannot be discovered using logical discovery. You must add these devices manually, or perform direct discovery.
- If you have both voice and video endpoints deployed in your network, do not discover all clusters in your network at the same time, as discovery could take a long time.
- If HTTP is used to retrieve device details, disable the HTTP firewall.
To periodically update inventory, and synchronize the inventory with the Prime Collaboration database, you must perform inventory update. For more information, see Updating and Collecting Inventory Details.
After discovery, if you have changed any configuration details, you must rediscover devices. For more information, see Rediscovering Devices.
Additional Notes:
- If a managed device is removed from the network, it will continue to be in the Managed state until the next inventory collection occurs, even though the device is unreachable. If a device is unreachable, an Unreachable event for this device appears.
- Configuration changes on a device are discovered by Cisco Prime Collaboration only during the inventory collection process. Therefore, any changes to a device’s configuration will not be shown by Cisco Prime Collaboration until the next inventory collection after the configuration change.
- When you add devices, the HTTP (and HTTPS) port numbers are optional. These settings are automatically detected.
- When you add devices that have multiple interfaces and HTTP administrative access, you must manage the devices in Prime Collaboration using the same interface on which you have enabled HTTP administrative access.
- To enable Prime Collaboration to provide the correct phone count for the Cisco Unified CM Express and Cisco Unity Express (CUE), you must use the following configuration:
ephone 8
mac-address 001A.E2BC.3EFB
type 7945
where type is equal to the phone model type. If you are unsure of your model type, see Cisco.com for details on all phone model types, or enter type?. For information on how phone counts are displayed, see the Inventory Summary slider window in the Device Work Center page.- If a UC500 Series router is running Cisco Unified CM Express, configure "type" under ephone config for each phone so that the cmeEphoneModel MIB variable of CISCO-CME_MIB will return the correct phone model. This enables Prime Collaboration to discover the phones registered with Cisco Unified CM Express.
- For a Cisco Unity Express that is attached to a Cisco Unified CM Express to display in the Service Level View, you must use the following configuration:
dial-peer voice 2999 voip <where voip tag 2999 must be different from voicemail>
destination-pattern 2105 <prefix must be the full E.164 of configured voicemail 2105>
session protocol sipv2
session target ipv4:10.10.1.121
dtmf-relay sip-notify
codec g711ulaw
no vad
!
!
telephony-service
voicemail 2105
where the dial-peer VoIP tag, 2999, is not equal to the voice mail number, and the destination-pattern tag, 2105, is equal to the voice mail number. This will allow Unity Express to display properly in the Service Level View.- Cisco Prime Collaboration manages a device only when the device’s management state is set to True. A device with a management state set to False is called a suspended device. Prime Collaboration stops polling the device but may still receive device data, such as CDR records. You can also selectively unmanage device components.
- For information on how many devices Prime Collaboration can manage, see the Cisco Prime Collaboration 10.0 Quick Start Guide. If the Cisco Prime Collaboration inventory exceeds your device limit, you will see a warning message.
- Firewall devices are not supported in Cisco Prime Collaboration.
- Prime Collaboration supports Cisco TelePresence Conductor XC 1.2 in the standalone model. The cluster model is not supported.
Device Discovery Types and Common Use Cases
The various types of discovery and common use cases are tabulated below.
Table 3 Types of Discovery
- To discover devices in your network after a fresh installation of Prime Collaboration.
- To discover seed or publisher devices, with endpoints and subscriber devices registered to them, as these will be discovered automatically.
For more information, see Discovering Devices Automatically.
- To discover a device that failed because of incorrect credentials during a scheduled discovery.
- To discover single devices also, using the Add Device option.
- To discover devices, which cannot be discovered using auto discovery, such as Presence server, SIP and SRST devices.
- To discover individual seed or publisher devices without discovering the endpoints and subscriber devices registered to them.
- To discover infrastructure devices, which have not been discovered after a fresh installation.
For more information, see Adding Devices.
- To add devices in bulk, use the Import option.
- To add a subset of devices, within a subnet, from a larger group.
For more information, see Importing Devices.
For more information on Prime Collaboration support for IPv6 device discovery, see Prime Collaboration Support for IPv6.
Discovering Devices Automatically
You perform discovery when you want to add new devices to the Prime Collaboration database or when you have changed the IP address of the devices.
If the IP address of a DHCP-enabled endpoint registered to Cisco Unified CM changes, Prime Collaboration may not be able to automatically discover this endpoint. This is applicable to all Cisco TelePresence systems registered with Cisco Unified CM.
The endpoints registered with Cisco VCS are discovered automatically when the IP address is changed. Newly registered endpoints are also discovered automatically.
You must rediscover the following:
- The endpoints, by providing the new IP address or hostname.
- The Cisco Unified CM instance with which the endpoint is registered.
- The CTS-Manager with which the endpoint is registered.
If the IP address changes for network devices and infrastructure devices (such as CTS-Manager, Cisco Unified CM, CTMS, Cisco MCU, Cisco VCS, Cisco TS, and so on), you must rediscover these devices by providing the new IP address or hostname.
You can either discover devices immediately or schedule a discovery job.
Note
A discovery job, once started, cannot be stopped or cancelled.
Step 1 Choose Operate > Device Work Center. Step 2 In the Device Work Center page, click Auto Discovery. Step 3 Enter the job name, and check the Check Device Accessibility check box. Step 4 Select a discovery method. For information on the best discovery option to use, see Recommendations for Device Discovery. Step 5 Enter the IP address or hostname of the device. For various discovery protocols, enter the following:
Example:
- For Logical Discovery, Cisco Discovery Protocol and Direct Discovery, you can enter multiple IP addresses or hostnames using one of the supported delimiters: comma, colon, pipe, or blank space.
- For Ping Sweep specify a comma-separated list of IP address ranges using the /netmask specification. For example, use 172.20.57.1/24 to specify a ping sweep range starting from 172.20.57.1 and ending at 172.20.57.255.
Step 6 (Optional) Enter the Filter and Advanced Filter details (available only for logical, CDP and ping sweep discovery methods). You can use a wildcard to enter the IP address and DNS information that you may want to include or exclude. See Discovery Filters for field descriptions. Step 7 Schedule a periodic discovery job (see Discovery Filters for field descriptions) or run the discovery job immediately by following Step 8. Step 8 Click Run Now to immediately run the discovery job, or click Schedule to schedule a periodic discovery job to run at a later time. If you have scheduled a discovery, a notification appears after the job is created. You can click on Job Progress to view the job status on the job management page. Or, if you have run the discovery immediately, click Job Progress in the message confirmation window to verify discovery status. See Verifying Discovery Status for more information.
Discovery Filters and Scheduling Options
Discovery Filters
The following table describes the filters that are available when you run discovery.
Scheduling Options
The following table describes the scheduling options that are available
If you want to discover CTS-Manager, CTX, or TMS cluster, see Setting Up Clusters.
Adding Devices
You can add single or multiple devices to Prime Collaboration manually using the Add Device option on the Device Work Center page.
Step 1 Choose Operate > Device Work Center. Step 2 In the Device Work Center page, click Add Device. Step 3 In the Add Device window, enter the necessary information. For information regarding different credentials, see the Credential Profiles Field Descriptions table. Step 4 Click Discover. You can see the status of the discovery job in the Job Management page. The device appears in the inventory table after discovery. You can also look at the Assurance Inventory Summary to know the number of discovered devices and the number of devices for which discovery is in progress.
Importing Devices
You can import devices into Prime Collaboration, by importing a file with the device list and credentials. You need to be a network administrator, super administrator, or system administrator to perform this task.
You can see the format of the file to import by exporting a file first. For more information on exporting the device list and credentials file, see Exporting Device Lists and Credentials. For more information on the device credentials, see the Credential Profiles Field Descriptions table. You need to add the following for each devices to import it:
Discovery and Cisco VCS Cluster
Prime Collaboration supports Cisco VCS clusters. Cluster names must be unique, and all endpoints that Prime Collaboration will manage must be registered in the Cisco VCS. During VCS discovery, the endpoints registered to it are also discovered. All the VCSs in a cluster need to be in managed state so that all related features work, for example session monitoring may not work and affect CDR creation.
Note
Even if one VCS in a cluster is not in a managed state, there will be inconsistencies in data reporting.Discovery and Cisco Unified CM Clusters
Prime Collaboration supports Cisco Unified CM clusters. Cluster IDs must be unique.
Prime Collaboration supports Cisco Unified CM clusters with unique cluster IDs. The access control list (ACL) in Cisco Unified CM must contain all endpoints to be managed. If the Cisco Unified CM SNMP user configuration includes the ACL, all Cisco Unified CM nodes in the cluster must contain the Prime Collaboration server IP address.
Prime Collaboration must discover and manage only the Cisco Unified CM publisher to manage a cluster. Subscribers are not discovered directly; they are discovered through the publisher. Prime Collaboration must manage the publisher to monitor a cluster. The Computer Telephony Integration (CTI) service must be running on all subscribers. You must ensure that the access control list in Cisco Unified CM contains all endpoints that need to be managed. If the Cisco Unified CM SNMP user configuration includes the use of the access control list, you must enter the Prime Collaboration server IP address on all Cisco Unified CM nodes in the cluster.
Note
The JTAPI credential is optional for Cisco Unified CM clusters. However, the SNMP and HTTP credentials are mandatory for Cisco Unified CM publishers and subscribers.
You can schedule a Cisco Unified CM cluster discovery using Cluster Data Discovery. You can discover only phones registered with Cisco Unified CM clusters in this discovery. For more information on Prime Collaboration support for IPv6 device discovery, see Prime Collaboration Support for IPv6.
- Cluster Data Discovery Settings
- Prerequisites to Running Cluster Device Discovery
- Scheduling Cluster Data Discovery
Cluster Data Discovery Settings
Cluster data discovery is performed by the Common Devices Table (CDT) module. This allows Prime Collaboration to consolidate the inventory and the device registration information it collects from Unified CMs. It collects two different categories of information from Unified CMs:
- Cluster configuration data including Redundancy group, Devicepool, Location, Region, RouteList, RouteGroup, RoutePattern, Partition, and so on. This also includes the entities provisioned in the cluster such as phones, voice mail endpoints, media resources, gateways, and trunks.
- Registration information about all the entities which register with the Unified CM cluster. This includes Device IP, Registration status, the Unified CM server to which the entity is registered currently, the latest registration/unregistration time stamp, and the status reason. Registration information can be configured using a configuration file. This information is collected from all the subscriber nodes in the clusters to which the entities such as phones or gateways register.
The following are required for successful data collection:
- Cisco RIS Data Collector running in 7.x versions of Unified CM.
- Cisco SOAP - CDRonDemand Service running in other versions of Unified CM.
The data collected from the Unified CM cluster is used in other modules such as the Diagnostics View, Phone Inventory, Service Level View, and Voice Health Monitor (VHM).
Prerequisites to Running Cluster Device Discovery
The following conditions must be met before you perform discovery of cluster devices:
- Data is collected from Publisher/First node through AXL. Therefore, the publisher should be in fully in monitored state with proper HTTP credentials entered and the AXL Web Service should be running in the publisher.
NoteAXL is not supported in Unified CM versions prior to 4.x. These clusters cannot be monitored.
- If the Unified CM publisher is configured using name in the CUCM section/System Server section of Prime Collaboration Administration, then this name must be resolvable through DNS from the Prime Collaboration server. Otherwise, an entry must be configured for this name in the host files for the data collection to proceed further.
- For Prime Collaboration to be able to receive syslogs and process configurations required in the Unified CM, you must perform the steps in the Syslog Receivers section. Any changes in the registration information are updated through processing the relevant syslogs from Cisco Unified CM. Syslog processing can detect the following changes of the entities registered to the Cisco Unified CM cluster:
Other devices may also require configuring syslogs from within the device. For details on the device configurations required, see Syslog Receivers section in the Setting Up Devices for Prime Collaboration.
Schedules Between Discoveries
If any of the following changes occur on the cluster configuration before the scheduled periodic data collection and you want these changes to appear in Prime Collaboration immediately, you must use the Run Now option to collect the following types of data:
- New device pools, location, region, redundancy group, Route List, Route Group, Route pattern or Partition added, deleted or modified in the cluster.
- Changes in membership of any endpoint to the device pool or association of any endpoint to the redundancy group.
- New subscriber added to or deleted from the Unified CM cluster.
- Changes in membership of any subscriber to the redundancy group.
- Changes in membership of any gateway to route group or route group to route List.
The Run Now option triggers data collection and synchronizes all the clusters monitored in Prime Collaboration.
If changes are limited to a specific cluster, you can rediscover the publisher of the cluster by using Operate > Device Work Center > Rediscover.
For a new CUCM cluster, discovery or rediscovery is followed by phone discovery for that cluster. In case there is any other phone synch up operation (such as CME phone discovery, cluster phone discovery, or XML discovery) in progress then the cluster-based phone discovery will wait for it to complete. Thus a phone status change reflection in Prime Collaboration Assurance will take more time than expected in case there is any other phone sync up operation in progress.
Scheduling Cluster Data Discovery
Prime Collaboration collects cluster configuration from the Cisco Unified CM once a day as well as at startup. This periodic discovery data collection is done by default at midnight daily. You can change this default schedule using the Cluster Device Discovery.
Note
- Only voice endpoints registered to CUCM are discovered. TelePresence endpoints are not discovered.
- You can schedule only Cisco Unified CM cluster discovery using Cluster Data Discovery.
Step 1 Choose . The Cluster Device Discovery window displays the information tabulated in the following table: Step 2 Click Apply to set the discovery schedule for a future discovery, or Run Now to run the cluster discovery immediately.
Field Information
Description
Discovery Status
Displays the status of the discovery process using any of the following categories:
- In progress—When you start SEGServer for the first time or restart it, discovery takes place automatically and the status appears as In Progress.
- Completed—The discovery process is complete.
- Not available. Try after some time—Appears when you start SEGServer for the first time, or restart it, and the discovery process has not yet begun.
Last Discovery Start Time
—
Last Discovery End Time
—
Device Schedule using the hour and minute set for the discovery reoccurrence.
—
Rediscovering Devices
You can rediscover devices that have already been discovered. The credentials previously entered are already available in the Prime Collaboration database, and the system is updated with the changes. Devices in any state can be rediscovered.
- A deleted device must be rediscovered.
- There are changes in the first hop router configuration, and for software image updates.
- There are changes to the credentials; location; time zone; and device configurations such as IP address or hostname, SIP URI, H.323 gatekeeper address, and so on.
- After performing a backup and restoring Prime Collaboration.
To rediscover a device, use the Rediscover button on the Inventory table.
NoteAccessibility information is not checked during rediscovery.
The workflow for rediscovery is the same as for discovery. See Device Discovery Lifecycle for details.
Rediscovering Deleted Devices
Use the Rediscover button in the Current Inventory pane to rediscover devices listed in the Current Inventory table. You can perform rediscovery on a single device as well as on multiple devices.
Step 1 Choose . Step 2 From the Device Work Center page, choose the Deleted quick filter to get a list of devices that are in the Deleted state in the Current Inventory table. Step 3 Select the devices you want to rediscover, and click Rediscover. Step 4 In the confirmation message box that appears, click OK. Step 5 From the Device Work Center, click the Discovery Jobs button to check the progress and the status of the job in the Job Management page. For more information, see Verifying Discovery Status.
Note Deleted endpoints are not discovered as part of VCS, CUCM, or CTS-MAN seed device discovery.
Verifying Discovery Status
The status of all discovery jobs is displayed in the Job Management page. After running discovery, a dialog box appears with the Job Progress Details link to enable you to verify the discovery status. You can also choose Operate > Device Work Center > Discovery Jobs to navigate to the Job Management page. The time taken to complete a discovery job depends on your network. After the discovery is complete, the details appear in the Current Inventory table
To verify discovery status:
Step 1 Choose Operate > Device Work Center > Discovery Jobs. Step 2 From the Job Management page, select the discovery job for which you want to view the details. The status of discovery, and all the devices discovered during discovery appear in the pane below the Job Management table.
Step 3 Check the Job Management table for discovery status. or the Job details pane for details about discovered devices. Step 4 Depending on your results, do one or more of the following:
- For any devices that were not discovered because of incorrect credentials, verify the credentials for those devices (see Verifying Discovery Status), and run the discovery again.
- For CTS-Manager discovery failure with the error UNDISCOVERABLE Exception:: null, perform the discovery again. (This issue occurs if multiple users are accessing CTS-Manager at the same time.)
- To discover the same devices more than once, use the Rediscover option. For more information, see Rediscovering Devices.