-
User Guide for the Cisco Application Networking Manager 2.1
-
Preface
-
Overview
-
Adding and Managing Devices
-
Configuring Virtual Contexts
-
Managing Virtual Servers
-
Configuring Real Servers and Server Farms
-
Configuring Sticky Groups
-
Configuring Parameter Maps
-
Configuring SSL
-
Configuring Network Access
-
Configuring ANM High Availability
-
Configuring Traffic Policies
-
Configuring Application Acceleration and Optimization
-
Using Configuration Building Blocks
-
Monitoring Your Network
-
Administering the Cisco Application Networking Manager
-
Troubleshooting
-
Ports Reference
-
Glossary
-
Index
-
 Feedback
Table Of Contents
Cisco Application Networking Manager Overview
Logging Into the Cisco Application Networking Manager
Changing Your Account Password
Understanding ANM Screens and Menus
Using the Advanced Editing Option
Understanding Cisco Application Networking Manager Terminology
Cisco Application Networking Manager Overview
Date: 4/9/09The Cisco Application Networking Manager (ANM) is a networking management application that manages Cisco Application Control Engine (ACE) modules or appliances in your networking environment.
The following topics introduce you to ANM:
•
Logging Into the Cisco Application Networking Manager
•
•
Logging Into the Cisco Application Networking Manager
You access ANM features and functions through a web-based interface. The following sections describe logging in, the interface, and terms used in ANM.
The ANM login screen allows you to:
•
•
•
Use this procedure to log into ANM.
Procedure
Step 1
•
Caution
•
Note
For example, enter https://192.168.10.10. The login screen appears.
A new installation comes with predefined credentials; user name and password are both admin. Please use it for first time login.
Step 2
Note
Once you are logged in using this account, you can create additional user accounts. For information on changing account passwords, see the "Modifying User Accounts" section on page 15-44.
Step 3
This is the default password. We recommend you change the password after you install or upgrade. For information about changing the default password, see the "Changing Your Account Password" section.
Step 4
When you log in, the default window that appears is the Config > Devices screen. You can change your default window by editing your user profile. For a description of the user interface, see Figure 1-1. The interface will not contain data until you add devices by one of the methods described in the "Adding Network Devices into ANM" section on page 2-7.
Related Topics
•
Changing Your Account Password
Use this procedure to change your account password.
Procedure
Step 1
Step 2
Step 3
Step 4
Step 5
Step 6
Password attributes such as minimum and maximum length or accepted characters are defined at the organizational level. For more information on configuring passwords, see the "Configuring User Authentication" section on page 15-33.
Step 7
Step 8
•
•
Related Topics
•
Understanding ANM Licenses
In order for ANM to manage all your ACE devices, you must have the appropriate number of ANM licenses for your network devices. An ANM Server license comes with the software and must be uploaded to ANM after the installation in order for your software to work properly. ANM can manage up to two ACE devices with a default set of five virtual contexts each. You will need additional licenses for any devices you plan to manage beyond the standard configuration.
For detailed steps on adding new ANM licenses to expand the number of network devices you can manage, see the "Managing ANM Licenses" section on page 15-60. For details on how to install ACE licenses to increase the number of virtual contexts that you can create and manage on a device, see the "Managing ACE Licenses" section on page 3-27.
The ANM server also requires its own license (which you must install before ANM will work). For step-by-step instructions on uploading your ANM server license, see the Installation Guide for the Cisco Application Networking Manager 2.1.
Related Topics
•
•
•
•
•
ANM Interface Overview
This section covers the following ANM interface components including:
•
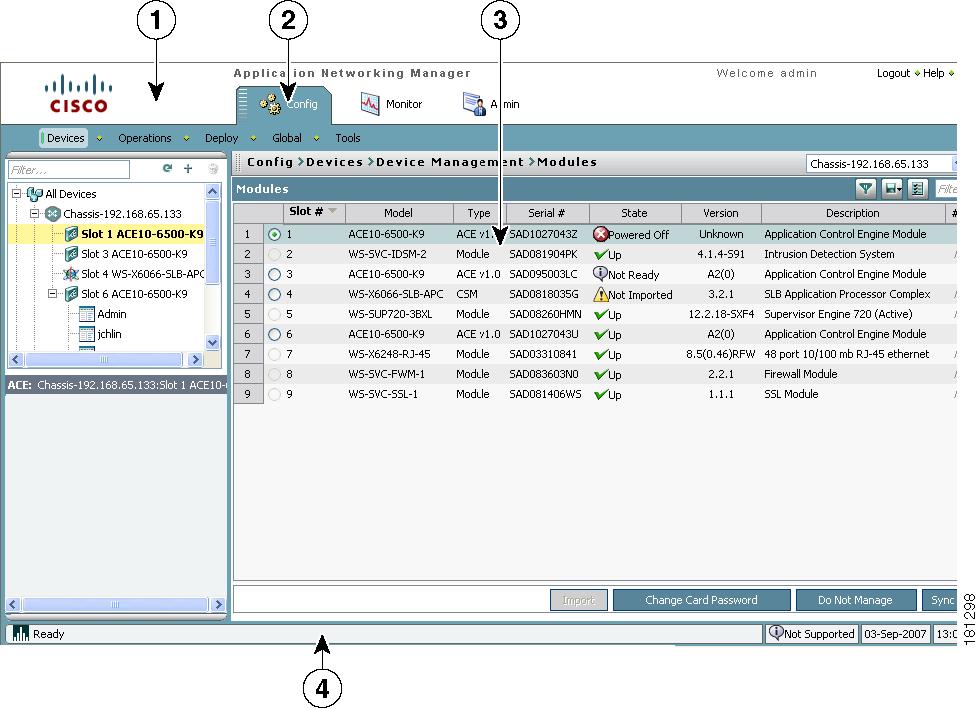
When you log into ANM, the default window that appears is the Config > Devices screen (similar to Figure 1-1 except that a new installation will have no devices or modules). You will need to import devices in order for your data to display in ANM. Table 1-1 describes the numbered fields.
Figure 1-1 ANM Interface Components
You can change the default window that appears when you log in by modifying user attributes under Admin > Role-Based Access Control > Users (see the "Modifying User Accounts" section on page 15-44).
Related Topics
•
Understanding ANM Screens and Menus
Figure 1-2 contains many common screen elements found in ANM and described in Table 1-2. Not all screens contain all buttons.
Figure 1-2 Example ANM Screen
Table 1-2 Example ANM Screen Descriptions
1
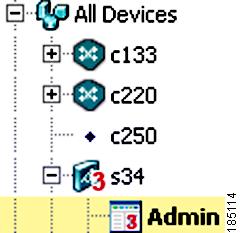
Device tree, which appears when you click Config or Monitor. The device tree includes All Devices and Groups:
•
•
The Organization tree displays when you click Admin > Role-Based Access Control. The organization tree includes all organizations in ANM. Selecting an organization name displays its details.
To expand folders in the device tree, click the plus sign (+) to the right of an option. To collapse the structure, click the minus sign (-). Double-clicking on objects results in various actions; for example, displaying the object's configuration screen.
At the top of the tree are the following buttons:
•
•
•
Note
2
Option menus, which appear in Config screens. Click the icon on the bar to show or hide the options.
3
Object selector. Use this field to choose a device, context, building block, or other object that you want to view information on or configure. This filters what is displayed in the content area.
4
Command buttons. Use these buttons to perform the action identified by the button label.
5
Input fields. Use these fields to make selections and provide information. When there are more than three choices for any field, the field displays as a dropdown list. Otherwise, selections display with radio buttons.
6
Feature panel that contains functions that correspond to what is selected in the device or organization tree. Click on a command to expand the list of options that correspond to that command.
Related Topics
Understanding ANM Buttons
Table 1-3 describes the buttons that appear in some of the Config, Monitor, and Admin screens.
Note
Table 1-3 Button Descriptions
ACL table (Expand)
Click to expand all ACL table entries.
ACL table (Collapse)
Click to collapse all ACL table entries.
ACL table (Resequence)
Click to open the resequence popup window that allows you to reorder the ACL table entries.
Add
Lets you add an entry to the displayed table.
Add Another
Saves the current entries and refreshes the screen so you can add another entry.
Advanced Editing Mode
Lets you view or enter advanced arguments for the selected display.
Auto Refresh (Pause)
Allows you to interrupt the table data autorefresh process.
Auto Refresh (Resume)
Indicates that the table data autorefresh process is on pause and allows you to resume.
Customize
Lets you customize the table to suit your needs. (See the "Customizing Tables" section.)
Delete
Deletes the selected entry in the table.
Duplicate
Duplicates the selected entry in the table.
Edit
Opens the configuration screen of a selected entry in the table.
Filter
Filters the displayed list of items according to the criteria you specify. (See the "Filtering Entries" section.) Also displays a filter text box where strings can be entered.
Go
Appears when filtering is enabled; updates the table with the filtering criteria.
Key
Indicates that the associated field is a foreign key field; that is, one that takes its values from another table.
Plus
Displays a table with information related to the field where Plus appears. For example, if Plus appears next to the field label VLAN Group, clicking Plus displays a list of all VLAN groups in a separate window.
Refresh
Refreshes the content area.
Save
Displays the current information in a new window in either raw data or Excel format so you can save it to a file or print it.
Screen View (Full)
Allows you to adopt a larger (full) screen view for table.
Screen View (Normal)
Allows you to adopt a smaller (normal) screen view for table.
Sort
Sorts a column alphabetically up or down.
Stop
Stops the current process. If a process is only partially complete, it will finish its current operation and exit. For example, when stop is used during the import of two modules, it will complete only the first of two module imports.
Switch between Configure and Browse modes
Displays the subtables for those items that have additional sets of parameters that can be configured, such as Config > Devices > Network > VLAN Interfaces.
Note
View Excel
View the raw data in Excel format in a separate browser window.
View Raw Data
View the raw data in table format.
Related Topics
•
Conventions in Tables
Filtering Entries
Click Filter to view table entries using criteria you select. When filtering is enabled, a filter row appears above the first table entry that allows you to filter entries in the following ways:
•
•
•
Figure 1-3 Example Table with Filtering Enabled
Related Topics
•
Customizing Tables
Click Customize in a table to configure the table to suit your needs.
When you place the cursor over Customize, the following items appear:
•
•
Use this procedure to customize tables for your use.
Procedure
Step 1
Step 2
Note
Note
Step 3
•
•
•
•
Related Topics
•
Using the Advanced Editing Option
By default, tables include columns that contain configured attributes, or a subset of columns related to a key field.
To view all configurable attributes in table format, click Advanced Editing Mode (the highlighted button in Figure 1-4). When advanced editing mode is enabled, all columns appear for your review (see Figure 1-4).
Figure 1-4 Advanced Editing Enabled Screen
Related Topics
ANM Screen Conventions
Table 1-5 describes other conventions used in ANM screens.
Related Topics
Understanding Cisco Application Networking Manager Terminology
It is useful to understand the following terms when using the ANM:
•
Cisco Application Control Engine, available as a module that resides in a Cisco Catalyst 6500 series chassis, Cisco 7600 series router, or as a standalone appliance. The ACE offers high-performance server load balancing (SLB), routing and bridging configuration, traffic policies, redundancy (high availability), virtualization for resource management, SSL, security features, and application acceleration and optimization.
•
A physical entity, service, or resource that can be managed using the ANM
•
An organization allows you to configure AAA server lookup for your users or set up users who work for a service provider customer. Organizations in the Cisco ANM system are defined by the system administrator.
•
A resource class is a defined set of resources and allocations available for use by a virtual context. Using resource classes prevents a single context from using all available resources.
•
There are two types of user contexts:
–
The Admin context, which contains the basic settings for each virtual device or context, allows a user to configure and manage all contexts. When a user logs into the Admin context, he or she has full system administrator access to the entire ACE and all contexts and objects within it. The Admin context provides access to network-wide resources, for example, a syslog server or context configuration server. All global commands for ACE settings, contexts, resource classes, and so on, are available only in the Admin context.
–
A user context has access to the resources in which the context was created. For example, a user context that was created by an administrator while in Admin context, by default, has access to all resources in an ACE device. Any user created by someone in a user-defined context, only has access to the resources within that context. In addition, roles are assigned to users, which determine the commands and resources that are available to that user.
•
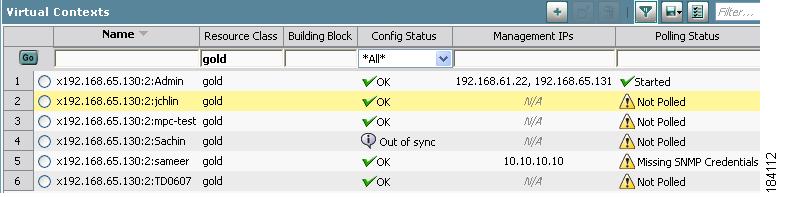
A virtual context is a concept that allows users to partition an ACE into multiple virtual devices. Each virtual context contains its own set of policies, interfaces, and resources, allowing administrators to more efficiently manage system resources and services.
•
In a load-balancing environment, a virtual server is a construct that allows multiple physical servers to appear as one for load-balancing purposes. A virtual server is bound to physical services running on real servers in a server farm and uses IP address and port information to distribute incoming client requests to the servers in the server farm according to a specified load-balancing algorithm.
Related Topics