Table Of Contents
Administering the Cisco Application Networking Manager
Overview of the Admin Function
Controlling Access to the Cisco ANM
Types of Users
Understanding Roles
Understanding Operations Privileges
Understanding Domains
Understanding Organizations
How ANM Handles Role-Based Access Control
Configuring User Authentication
Guidelines for Managing Organizations
Changing Authentication Server Passwords
Changing the Admin Password
Modifying Organizations
Duplicating an Organization
Displaying Authentication Server Organizations
Deleting Organizations
Managing User Accounts
Guidelines for Managing User Accounts
Displaying a List of Users
Creating User Accounts
Duplicating a User Account
Modifying User Accounts
Deleting User Accounts
Displaying or Terminating Current User Sessions
Managing User Roles
Guidelines for Managing User Roles
Understanding Predefined Roles
Displaying User Role Relationships
Displaying User Roles
Creating User Roles
Duplicating a User Role
Modifying User Roles
Deleting User Roles
Managing Domains
Guidelines for Managing Domains
Displaying Network Domains
Creating a Domain
Duplicating a Domain
Modifying a Domain
Deleting a Domain
Managing ANM
Checking the Status of the ANM Server
Managing ANM Licenses
Understanding ANM License Information
Adding Licenses into License Management
Viewing Licenses in License Management
Checking on License Compliance
Ordering ANM Licenses
Removing Licenses Files
Viewing ANM Server Statistics
Configuring ANM Statistics Collection
Configuring Audit Log Settings
Viewing Change Audit Logs
Configuring Auto Sync Settings
Lifeline Management
Administering the Cisco Application Networking Manager
Revised: 3/12/09
The following topics describe how to administer, maintain, and manage the ANM management system. Previous topics described how to manage your network devices on ANM, while this topic describes how to perform procedures on the system itself.
•
Overview of the Admin Function
•
Controlling Access to the Cisco ANM
•
How ANM Handles Role-Based Access Control
•
Configuring User Authentication
•
Managing User Accounts
•
Displaying or Terminating Current User Sessions
•
Managing User Roles
•
Managing Domains
•
Managing ANM
•
Lifeline Management
Overview of the Admin Function
Note
Some of the Admin options might not be visible to some users; the roles assigned to your login determine which options are available.
Table 15-1 describes the options that are displayed when you click Admin.
Controlling Access to the Cisco ANM
Access to ANM is based on usernames and passwords, which can be authenticated to a local database on the ANM system or to an external RADIUS, Active Directory/Lightweight Directory Access Protocol (AD/LDAPS), or TACACS+ server. For detailed procedures on remote authentication, see the "Configuring Authentication and Accounting Services" chapter of the Cisco ACE 4700 Series Appliance Security Configuration Guide on cisco.com at http://www.cisco.com/en/US/products/ps7027/products_installation_and_configuration_guides_list.html.
Note
ANM supports LDAPS is only through Active Directory (AD).
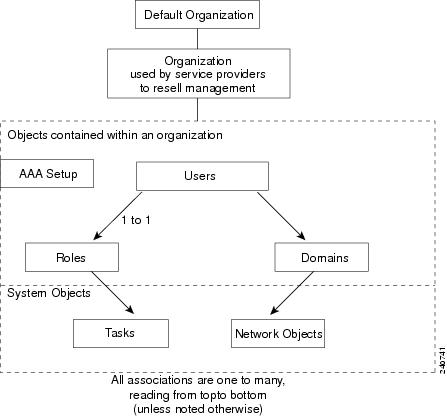
When a user logs into the system, the specific tasks they can perform and areas of the system they can use are controlled by organizations, roles, and domains.
An organization is a virtual group of users, their roles, and domains managed by a specific server that provides authentication to its users. Each organization has its own set of users. See Understanding Organizations for information on organizations.
The role assigned to a user defines the tasks a user can perform and the items in the hierarchy that they can see. Roles are either pre-defined or set up by the system administrator. See Understanding Roles for more information.
A domain is a collection of managed objects. When a user is given access to a domain, this acts as a filter for a sub-set of objects on the network which are displayed as a virtual context. The types of objects in the system that are domain controlled are:
•
Chassis (with VLANs)
•
Virtual contexts
•
Building Blocks
•
Resource classes
•
Real servers
•
Virtual servers
Thus, role-based access control ensures that a user or organization can view only the devices or services or perform the actions that are included in the domains to which they have been given access.
Figure 15-1 Role-Based Access Control Containment Overview
The following is an example of RBAC containment.
Organization
|
Webmasters
|
Domains
|
East Coast servers
|
Central servers
|
West Coast servers
|
Role
|
Web server administrator
|
Users
|
User A
|
User B
|
User C
|
Note Each association is one-to-many. Because the organization itself is a collection, it is possible for a role to be used in many organizations.
|
All other user interfaces, such as configuration and monitoring, respect this role-based access control policy:
•
Roles limit the screens (or functions on those screens) that a user can see.
•
Domains limit the objects that are listed on any screen that the roles allow.
•
Users (other than the system administrator) can only create subdomains of the domains to which they are assigned.
•
The system administrator user can see and modify all objects. All other users are subject to the role-based access controls illustrated in Figure 15-1.
Related Topics
•
Types of Users
•
Understanding Roles
•
Understanding Operations Privileges
•
Understanding Domains
•
Understanding Organizations
•
Managing User Accounts
Types of Users
Two types of users configure and monitor the ANM system:
•
Default users—individuals associated with the data center or IT department where the ANM system is installed. The default administrative account (user ID admin) is a system user account that is preconfigured on the system. The default administrative password (admin) is also set on the system. You can change the password for the admin user account in the same manner as any user password (see Managing User Accounts).
System roles are defined by the system administrator when the system is first set up. System roles are specified in terms of resource types and operations privileges. For each system role, the system administrator specifies which resource types a role can work with and what operations a role can perform on each resource type.
•
Organization users—users who work for the customer of a service provider or AAA server that segments your users and to whom you want to grant access to ANM. Organization users automatically have their access limited to the organization to which they belong.
Related Topics
•
Configuring User Authentication
•
Managing User Accounts
Understanding Roles
Roles in the Cisco ANM system are defined by the system administrator. Roles are specified in terms of resource types and operations privileges. For each role, the system administrator specifies which resource types a role can work with and what operations a role can perform on each resource type.
When users are created, they are assigned at least one system role and inherit the operations privileges specified for each of the resource types assigned to that role.
The options a user sees in the menu are filtered according to that user's role. See Table 15-2.
Roles can be applied to both default and organization users. All users are strictly limited by the combination of their operations privileges and user access. For example, a user cannot create another user who has greater privileges or access.
Related Topics
•
Configuring User Authentication
•
Managing User Accounts
•
Managing User Roles
Understanding Operations Privileges
Operations privileges define what users can do in the designated resource types. For example, each command and function on ANM has an assigned privilege. If a user's privileges are not sufficient, the command or function will not be available to them. The following operations privileges can be granted:
•
No Access—The user has no access to this command or function.
Note
If a user is configured with no access to virtual contexts, it means absolutely no access to them. The most a user with this access can do is activate or suspend real servers.
•
View—Allows the user to view statistics and specify parameter collection and threshold settings. Gives the user read-only or view access to system objects and information.
•
Modify—Allows the user to change the persistent information associated with system objects, such as an organization record, or configuration.
•
Debug—Gives the user read-only or view access to system objects and information.
•
Create—Allows the user to control system objects, for example, creating them, enabling them, or powering up. Also allows the user to control system objects, for example, deleting them, disabling them, or powering down.
Privileges are hierarchical. If a user has Modify privileges, they have View privileges as well. If a user has Create or Debug privileges, they have View privileges as well.
Note
The ability to create automatically contains the modify function, but the reverse is not true (a user with modify privileges cannot automatically create items).
Related Topics
•
How ANM Handles Role-Based Access Control
•
Managing User Roles
•
Guidelines for Managing User Roles
•
Understanding Predefined Roles
Understanding Domains
Domains in the Cisco ANM system are defined by the system administrator. A domain is a collection of managed objects to which a user is given access. By setting up a domain, you are filtering for a subset of objects on the network. The user is then given access to this virtual context.
The rows a user sees in any table are filtered according to the domain to which that user has access.
Understanding Organizations
An organization allows you to configure AAA server lookup for your users or set up users who work for a service provider customer. Organizations in the Cisco ANM system are defined by the system administrator.
When you use a ACE device as a AAA Server you may want to segment them for customer, business, or security reasons. If you use more than one authentication server, then you can use organizations to configure them to authenticate your users.
For example, if your company has four servers, one each for local, RADIUS, TACACS+, and LDAP authentication, then organizations could reflect that. The Default organization in ANM is set up to act as the local server.
ANM supports different device types that have unique ways of configuring authentication access (which helps with future device support). ANM can configure which users are authenticated by which authentication servers, but does not act as a AAA server itself since this would be in conflict of its role as a RBAC administrator. This allows for the separation of authority that is needed to perform RBAC successfully.
How ANM Handles Role-Based Access Control
This section describes how and why a system administrator might want to use the ANM role-based access control (RBAC) features.
ANM supports two distinct, but related RBAC capabilities:
1.
Where ANM acts as a system and network device overseer allowing it to implement its use of RBAC, referred to as ANM RBAC.
2.
That which the device enforces, referred to as device RBAC.
Understanding ANM RBAC
ANM is a central place where you can globally set the RBAC for users, roles, and domains (as well as for virtual contexts or device types using device RBAC).
As an system administrator you may need to delegate authority to allow another administrators to perform specific tasks on specific devices; such as activating, suspending, and monitoring traffic flow to specific real servers, but disabling any other capabilities. ANM interface enables you to accomplish this delegation with more control. For a description of how the roles map to the functions, see Table 15-2.
Understanding Device RBAC
ANM's device RBAC allows you to set up device permission levels of a more granular nature. You no longer have to provide "all-or-nothing" roles-based access of devices and device modules. Without ANM, some devices may be open to users who can perform every task on that device or module, regardless of their authorization due to permission level requirements on modules and or switches. ANM provides a central place to grant special access to users you specify. Device users, roles, and domain data are not part of, nor can they be used by ANM. Device RBAC is only for CLI access directly to the context.
For example, there may be a small number of users that need level 3 access when direct troubleshooting of ACE hardware is required. You can set up these users with or without ANM, but ANM centralizes the capability to do so. If you want to configure a network engineer with a special role, for example either ACE-Admin or Network-Admin, to provide the level 3 access. ANM accesses the ACE as a level 15 user and an admin supervisor and uses the RBAC to determine the level of access (to device types, segments, elements, subelements, and so on).
Some Cisco devices have the ability to configure RBAC directly on the device, for example the ACE. An example of a device that does not have the capability to have its own RBAC is the CSS or a CSM.
When you configure remote authentication (AAA, RADIUS, LDAP, or TACACs+) for the ACE via ANM, users no longer have to log out to access their device via Telnet. When you manually log into a CSS, the CSS performs user authentication in a Telnet session. Telnet does not provide any domain enforcement so is less secure.
If you are an admin using a CSS module outside of the ANM program, then you might have permission to do anything on this switch. If you are using ANM, you can set up better authorization for your administrators for specific devices. Better authorization controls are one of the advantages of using the ANM versus using only the CLI on the ACE hardware. You can now configure separate access for one function for this user in this domain only. ANM allows this high level of granularity and with it, more control over who does what to your devices.
You can access device RBAC using Config > Devices or Config > Global >All Building Blocks.
Note
When configuring device RBAC via Config > Devices, an message displays reminding you that you are configuring RBAC outside of ANM for direct access. Be aware that this may contradict your ANM settings.
For more information on centralizing direct access to devices through RBAC on individual devices, see Configuring Device Role-Based Access Controls, page 2-40.
Case Example
In this example, a CSM device must have a level 15 access which by default makes the admin a supervisor on everything in the switch (and everything in the module). Another way of looking at this is providing read-only access to everything or configuration access to everything.
ACE hardware can be configured on a virtual context to perform that task on a subset domain for every individual module, on every context, but this type of configuration must be configured individually.
A system administrator might need to configure a network admin to manage two CSM modules, one out of six virtual contexts, and all East Coast web servers. With ANM, the admin could create one configuration set that includes a user account with a Network-Admin role and a domain that includes these objects. ANM then becomes the security window through which this user passes to get to their destination for that domain and for that virtual context.
If there were six users, nine domains, and three virtual contexts, there would be 54 entries required into a AAA Server and ACE module. In ANM there is one entry completed for each of the six users.
Table 15-2 Role Mapping in ANM
Role Tasks/Permissions
|
Resulting Menus Available
|
ACE-Admin Predefined Role
|
Threshold/View
|
Monitor / Alarm Notifications / Alarms
Monitor / Alarm Notifications / Threshold Groups
Monitor / Alarm Notifications / Threshold Groups /Edit
Monitor / Settings / SMTP Configuration
|
Device Events/Create
|
Monitor / Events / Events
|
Virtual Contexts/Create
|
Config / Deploy
Config / Deploy / Deploy Now
Config / Deploy / Edit
Config / Devices / Device RBAC / Domains
Config / Devices / Device RBAC / Roles
Config / Devices / Device RBAC / Users
Config / Devices / Expert / Action List
Config / Devices / Expert / Building Block Audit
Config / Devices / Expert / Class Map
Config / Devices / Expert / Policy Map
Config / Devices / HA Tracking and Failure Detection / Hosts
Config / Devices / HA Tracking and Failure Detection / HSRP Groups
Config / Devices / HA Tracking and Failure Detection / Interfaces
Config / Devices / High Availability (HA) / Setup
Config / Devices / Load Balancing / Health Monitoring
Config / Devices / Load Balancing / Parameter Maps / Connection Parameter Map
Config / Devices / Load Balancing / Parameter Maps / Generic Parameter Map
Config / Devices / Load Balancing / Parameter Maps / HTTP Parameter Map
Config / Devices / Load Balancing / Parameter Maps / Optimization Parameter Map
Config / Devices / Load Balancing / Parameter Maps / RTSP Parameter Map
|
ACE-Admin Predefined Role (continued)
|
Virtual Contexts/Create (continued)
|
Config / Devices / Load Balancing / Parameter Maps / SIP Parameter Map
Config / Devices / Load Balancing / Parameter Maps / Skinny Parameter Map
Config / Devices / Load Balancing / Real Servers
Config / Devices / Load Balancing / Server Farms
Config / Devices / Load Balancing / Stickiness
Config / Devices / Load Balancing / Virtual Servers
Config / Devices / Load Balancing / Virtual Servers / Add
Config / Devices / Load Balancing / Virtual Servers / Edit
Config / Devices / Network / BVI Interfaces
Config / Devices / Network / GigabitEthernet Interfaces
Config / Devices / Network / Global IP DHCP
Config / Devices / Network / Port Channel Interfaces
Config / Devices / Network / Static Routes
Config / Devices / Network / Static VLAN
Config / Devices / Network / VLAN Interfaces
Config / Devices / Security / ACLs
Config / Devices / Security / Object Groups
Config / Devices / SSL / Auth Group Parameters
Config / Devices / SSL / Certificate Revocation List
Config / Devices / SSL / Certificates
Config / Devices / SSL / Chain Group Parameters
Config / Devices / SSL / CSR Parameters
Config / Devices / SSL / Keys
Config / Devices / SSL / Parameter Map
Config / Devices / SSL / Proxy Service
Config / Devices / System / Application Acceleration and Optimization
Config / Devices / System / Global Policy
Config / Devices / System / Licenses
Config / Devices / System / Primary Attributes
Config / Devices / System / Resource Classes
Config / Devices / System / Resource Classes / Add
Config / Devices / System / Resource Classes / Edit
|
ACE-Admin Predefined Role (continued)
|
Virtual Contexts/Create (continued)
|
Config / Devices / System / SNMP
Config / Devices / System / Syslog
Config / Devices / Virtual Context Management
Config / Devices / Virtual Context Management / Add
Config / Devices / Virtual Context Management / Edit
Config / Devices / Virtual Context Management / Extract building block
Config / Devices / Virtual Context Management / Restart Polling
Config / Devices / Virtual Context Management / Sync
Config / Global / Building Blocks
Config / Global / Building Blocks / Add
Config / Global / Building Blocks / Tag
Config / Global / Expert / Action List
Config / Global / Expert / Class Map
Config / Global / Expert / Policy Map
Config / Global / Load Balancing / Health Monitoring
Config / Global / Load Balancing / Parameter Maps / Connection Parameter Map
Config / Global / Load Balancing / Parameter Maps / Generic Parameter Map
Config / Global / Load Balancing / Parameter Maps / HTTP Parameter Map
Config / Global / Load Balancing / Parameter Maps / Optimization Parameter Map
Config / Global / Load Balancing / Parameter Maps / RTSP Parameter Map
Config / Global / Load Balancing / Parameter Maps / SIP Parameter Map
Config / Global / Load Balancing / Parameter Maps / Skinny Parameter Map
Config / Global / Load Balancing / Real Servers
Config / Global / Load Balancing / Server Farms
Config / Global / Load Balancing / Stickiness
|
ACE-Admin Predefined Role (continued)
|
Virtual Contexts/Create (continued)
|
Config / Global / Network / BVI Interfaces
Config / Global / Network / Global IP DHCP
Config / Global / Network / Static Routes
Config / Global / Network / Static VLAN
Config / Global / Network / VLAN Interfaces
Config / Global / Resource Classes
Config / Global / Resource Classes / Add
Config / Global / Resource Classes / Audit
Config / Global / Resource Classes / Edit
Config / Global / Role-Based Access Control / Domains
Config / Global / Role-Based Access Control / Roles
Config / Global / Role-Based Access Control / Users
Config / Global / Security / ACLs
Config / Global / Security / Object Groups
Config / Global / SSL / Auth Group Parameters
Config / Global / SSL / Certificate Revocation List
Config / Global / SSL / CSR Parameters
Config / Global / SSL / Keys
Config / Global / SSL / Parameter Map
Config / Global / System / Global Policy
Config / Global / System / Primary Attributes
Config / Global / System / SNMP
Config / Global / System / Syslog
Config / Operations / Real Servers
Config / Operations / Virtual Servers
Config / Operations / Virtual Servers / Activate
Config / Operations / Virtual Servers / Details
Config / Operations / Virtual Servers / Suspend
Monitor / Devices / Application Acceleration
Monitor / Devices / Load Balancing
Monitor / Devices / Load Balancing / Statistics
Monitor / Devices / Load Balancing / Virtual Servers
|
ACE-Admin Predefined Role (continued)
|
Virtual Contexts/Create (continued)
|
Monitor / Devices / Polling Settings
Monitor / Devices / Resource Usage
Monitor / Devices / Resource Usage / Connections
Monitor / Devices / Resource Usage / Features
Monitor / Devices / System View
Monitor / Devices / Traffic Summary
Monitor / Devices / Virtual Context Management
Monitor / Devices / Virtual Servers
Monitor / Events /Virtual Context Management
Monitor / Tools / Ping
Change Password
Copy License
Export
Generate CSR
Import
Install
Resequence
Status
Uninstall
Update
|
ANM-Admin Predefined Role
|
All Options
|
All menus (ANM System, ANM User Access, and ANM Inventory)
|
Network-Admin Predefined Role
|
Threshold/View
|
Monitor / Alarm Notifications / Alarms
Monitor / Alarm Notifications / Threshold Groups
Monitor / Alarm Notifications / Threshold Groups / Edit
Monitor / Settings / SMTP Configuration
|
Network-Admin Predefined Role (continued)
|
Switch/Create
|
Config / Devices / Device Management / Change Password
Config / Devices / Device Management / Edit
Config / Devices / Device Management / Sync
Config / Devices / Interfaces / Access Ports
Config / Devices / Interfaces / Routed Ports
Config / Devices / Interfaces / Summary
Config / Devices / Interfaces / Switched Virtual Interfaces
Config / Devices / Interfaces / Trunk Ports
Config / Devices / System / Primary Attributes
Config / Devices / System / Static Routes
Config / Devices / VLANs / Groups
Config / Devices / VLANs / Layer 2
Config / Devices / VLANs / Layer 2 / Add
Config / Devices / VLANs / Layer 2 / Edit
Config / Devices / VLANs / Layer 3
Config / Devices / VLANs / Layer 3 / Add
Config / Devices / VLANs / Layer 3 / Edit
Config / Devices / VLANs / Summary
Monitor / Events / Modules
|
Routing/Create
|
Config / Devices / Network / GigabitEthernet Interfaces
Config / Devices / Network / Global IP DHCP
Config / Devices / Network / Port Channel Interfaces
Config / Devices / Network / Static Routes
Config / Devices / Network / Static VLAN
|
Interface/Create
|
Config / Devices / Network / BVI Interfaces
Config / Devices / Network / VLAN Interfaces
Monitor / Devices / Traffic Summary
Monitor / Tools / Ping
|
NAT/Create
|
No specific menus
|
Network-Admin Predefined Role (continued)
|
Connection/Create
|
Config / Devices / Load Balancing / Parameter Maps / Connection Parameter Map
Config / Devices / Load Balancing / Parameter Maps / Generic Parameter Map
Config / Devices / Load Balancing / Parameter Maps / HTTP Parameter Map
Config / Devices / Load Balancing / Parameter Maps / Optimization Parameter Map
Config / Devices / Load Balancing / Parameter Maps / RTSP Parameter Map
Config / Devices / Load Balancing / Parameter Maps / SIP Parameter Map
Config / Devices / Load Balancing / Parameter Maps / Skinny Parameter Map
|
Network-Monitor Predefined Role
|
Inventory (which includes Threshold, UDG, Device Events, Switch, and all Virtual Context tasks)/View
|
Config / Deploy
Config / Deploy / Edit
Config / Devices / Device Management
Config / Devices / Device Management / Edit
Config / Devices / Device Management / Modules
Config / Devices / Device RBAC / Domains
Config / Devices / Device RBAC / Roles
Config / Devices / Device RBAC / Users
Config / Devices / Expert / Action List
Config / Devices / Expert / Building Block Audit
Config / Devices / Expert / Class Map
Config / Devices / Expert / Policy Map
Config / Devices / Groups
Config / Devices / Groups / Edit
Config / Devices / HA Tracking and Failure Detection / Hosts
Config / Devices / HA Tracking and Failure Detection / HSRP Groups
|
Network-Monitor Predefined Role
|
Inventory/View (continued)
|
Config / Devices / HA Tracking and Failure Detection / Interfaces
Config / Devices / High Availability (HA) / Setup
Config / Devices / Interfaces / Access Ports
Config / Devices / Interfaces / Routed Ports
Config / Devices / Interfaces / Summary
Config / Devices / Interfaces / Switched Virtual Interfaces
Config / Devices / Interfaces / Trunk Ports
Config / Devices / Load Balancing / Health Monitoring
Config / Devices / Load Balancing / Parameter Maps / Connection Parameter Map
Config / Devices / Load Balancing / Parameter Maps / Generic Parameter Map
Config / Devices / Load Balancing / Parameter Maps / HTTP Parameter Map
Config / Devices / Load Balancing / Parameter Maps / Optimization Parameter Map
Config / Devices / Load Balancing / Parameter Maps / RTSP Parameter Map
Config / Devices / Load Balancing / Parameter Maps / SIP Parameter Map
Config / Devices / Load Balancing / Parameter Maps / Skinny Parameter Map
Config / Devices / Load Balancing / Real Servers
Config / Devices / Load Balancing / Server Farms
Config / Devices / Load Balancing / Stickiness
Config / Devices / Load Balancing / Virtual Servers
Config / Devices / Load Balancing / Virtual Servers / Edit
Config / Devices / Network / BVI Interfaces
Config / Devices / Network / GigabitEthernet Interfaces
Config / Devices / Network / Global IP DHCP
Config / Devices / Network / Port Channel Interfaces
Config / Devices / Network / Static Routes
Config / Devices / Network / Static VLAN
|
Network-Monitor Predefined Role (continued)
|
Inventory/View (continued)
|
Config / Devices / Network / VLAN Interfaces
Config / Devices / Security / ACLs
Config / Devices / Security / Object Groups
Config / Devices / SSL / Auth Group Parameters
Config / Devices / SSL / Certificate Revocation List
Config / Devices / SSL / Certificates
Config / Devices / SSL / Chain Group Parameters
Config / Devices / SSL / CSR Parameters
Config / Devices / SSL / Keys
Config / Devices / SSL / Parameter Map
Config / Devices / SSL / Proxy Service
Config / Devices / System / Application Acceleration and Optimization
Config / Devices / System / Global Policy
Config / Devices / System / Licenses
Config / Devices / System / Primary Attributes
Config / Devices / System / Resource Classes
Config / Devices / System / Resource Classes / Edit
Config / Devices / System / SNMP
Config / Devices / System / Static Routes
Config / Devices / System / Syslog
Config / Devices / Virtual Context Management
Config / Devices / Virtual Context Management / Edit
Config / Devices / VLANs / Groups
Config / Devices / VLANs / Layer 2
Config / Devices / VLANs / Layer 2 / Edit
Config / Devices / VLANs / Layer 3
Config / Devices / VLANs / Layer 3 / Edit
Config / Devices / VLANs / Summary
Config / Global / Building Blocks
Config / Global / Expert / Action List
Config / Global / Expert / Class Map
|
Network-Monitor Predefined Role (continued)
|
Inventory/View (continued)
|
Config / Global / Expert / Policy Map
Config / Global / Load Balancing / Health Monitoring
Config / Global / Load Balancing / Parameter Maps / Connection Parameter Map
Config / Global / Load Balancing / Parameter Maps / Generic Parameter Map
Config / Global / Load Balancing / Parameter Maps / HTTP Parameter Map
Config / Global / Load Balancing / Parameter Maps / Optimization Parameter Map
Config / Global / Load Balancing / Parameter Maps / RTSP Parameter Map
Config / Global / Load Balancing / Parameter Maps / SIP Parameter Map
Config / Global / Load Balancing / Parameter Maps / Skinny Parameter Map
Config / Global / Load Balancing / Real Servers
Config / Global / Load Balancing / Server Farms
Config / Global / Load Balancing / Stickiness
Config / Global / Network / BVI Interfaces
Config / Global / Network / Global IP DHCP
Config / Global / Network / Static Routes
Config / Global / Network / Static VLAN
Config / Global / Network / VLAN Interfaces
Config / Global / Resource Classes
Config / Global / Resource Classes / Audit
Config / Global / Resource Classes / Edit
Config / Global / Role-Based Access Control / Domains
Config / Global / Role-Based Access Control / Roles
Config / Global / Role-Based Access Control / Users
Config / Global / Security / ACLs
Config / Global / Security / Object Groups
Config / Global / SSL / Auth Group Parameters
Config / Global / SSL / Certificate Revocation List
|
Network-Monitor Predefined Role (continued)
|
Inventory/View (continued)
|
Config / Global / SSL / CSR Parameters
Config / Global / SSL / Keys
Config / Global / SSL / Parameter Map
Config / Global / System / Global Policy
Config / Global / System / Primary Attributes
Config / Global / System / SNMP
Config / Global / System / Syslog
Config / Operations / Real Servers
Config / Operations / Virtual Servers
Config / Operations / Virtual Servers / Details
Config / Tools / Credential Pool Management
Config / Tools / IP Discovery
Monitor / Alarm Notifications / Alarms
Monitor / Alarm Notifications / Threshold Groups
Monitor / Alarm Notifications / Threshold Groups / Edit
Monitor / Devices / Application Acceleration
Monitor / Devices / Device Management
Monitor / Devices / Load Balancing
Monitor / Devices / Load Balancing / Statistics
Monitor / Devices / Load Balancing / Virtual Servers
Monitor / Devices / Polling Settings
Monitor / Devices / Resource Usage
Monitor / Devices / Resource Usage / Connections
Monitor / Devices / Resource Usage / Features
Monitor / Devices / System View
Monitor / Devices / Traffic Summary
Monitor / Devices / Virtual Context Management
Monitor / Devices / Virtual Servers
Monitor / Events / Events
Monitor / Events / Modules
Monitor / Events / Virtual Context Management
Monitor / Settings / Global Polling Configuration
|
Network-Monitor Predefined Role (continued)
|
Inventory/View (continued)
|
Monitor / Settings / SMTP Configuration
Monitor / Tools / Ping
Export
Status
|
Org-Admin Predefined Role
|
ANM User Access/Create
|
Admin / Role-Based Access Control / Domains
Admin / Role-Based Access Control / Domains / Add
Admin / Role-Based Access Control / Domains / Edit
Admin / Role-Based Access Control / Roles
Admin / Role-Based Access Control / Roles / Add
Admin / Role-Based Access Control / Roles / Edit
Admin / Role-Based Access Control / Roles / Users
Admin / Role-Based Access Control / Users
Admin / Role-Based Access Control / Users / Add
Admin / Role-Based Access Control / Users / Edit
|
ANM Inventory/Create
|
Config / Deploy
Config / Deploy / Deploy Now
Config / Deploy / Edit
Config / Devices / Device Management
Config / Devices / Device Management / Add
Config / Devices / Device Management / Change Password
Config / Devices / Device Management / Edit
Config / Devices / Device Management / Modules
Config / Devices / Device Management / Modules / Sync
Config / Devices / Device Management / Restart Polling
Config / Devices / Device Management / Sync
Config / Devices / Device RBAC / Domains
Config / Devices / Device RBAC / Roles
Config / Devices / Device RBAC / Users
Config / Devices / Expert / Action List
Config / Devices / Expert / Building Block Audit
Config / Devices / Expert / Class Map
|
Org-Admin Predefined Role (continued)
|
ANM Inventory/Create
(continued)
|
Config / Devices / Expert / Policy Map
Config / Devices / Groups
Config / Devices / Groups / Add
Config / Devices / Groups / Edit
Config / Devices / HA Tracking and Failure Detection / Hosts
Config / Devices / HA Tracking and Failure Detection / HSRP Groups
Config / Devices / HA Tracking and Failure Detection / Interfaces
Config / Devices / High Availability (HA) / Setup
Config / Devices / Interfaces / Access Ports
Config / Devices / Interfaces / Routed Ports
Config / Devices / Interfaces / Summary
Config / Devices / Interfaces / Switched Virtual Interfaces
Config / Devices / Interfaces / Trunk Ports
Config / Devices / Load Balancing / Health Monitoring
Config / Devices / Load Balancing / Parameter Maps / Connection Parameter Map
Config / Devices / Load Balancing / Parameter Maps / Generic Parameter Map
Config / Devices / Load Balancing / Parameter Maps / HTTP Parameter Map
Config / Devices / Load Balancing / Parameter Maps / Optimization Parameter Map
Config / Devices / Load Balancing / Parameter Maps / RTSP Parameter Map
Config / Devices / Load Balancing / Parameter Maps / SIP Parameter Map
Config / Devices / Load Balancing / Parameter Maps / Skinny Parameter Map
Config / Devices / Load Balancing / Real Servers
Config / Devices / Load Balancing / Server Farms
Config / Devices / Load Balancing / Stickiness
Config / Devices / Load Balancing / Virtual Servers
|
Org-Admin Predefined Role (continued)
|
ANM Inventory/Create
(continued)
|
Config / Devices / Load Balancing / Virtual Servers / Add
Config / Devices / Load Balancing / Virtual Servers / Edit
Config / Devices / Network / BVI Interfaces
Config / Devices / Network / GigabitEthernet Interfaces
Config / Devices / Network / Global IP DHCP
Config / Devices / Network / Port Channel Interfaces
Config / Devices / Network / Static Routes
Config / Devices / Network / Static VLAN
Config / Devices / Network / VLAN Interfaces
Config / Devices / Security / ACLs
Config / Devices / Security / Object Groups
Config / Devices / SSL / Auth Group Parameters
Config / Devices / SSL / Certificate Revocation List
Config / Devices / SSL / Certificates
Config / Devices / SSL / Chain Group Parameters
Config / Devices / SSL / CSR Parameters
Config / Devices / SSL / Keys
Config / Devices / SSL / Parameter Map
Config / Devices / SSL / Proxy Service
Config / Devices / System / Application Acceleration and Optimization
Config / Devices / System / Global Policy
Config / Devices / System / Licenses
Config / Devices / System / Primary Attributes
Config / Devices / System / Resource Classes
Config / Devices / System / Resource Classes / Add
Config / Devices / System / Resource Classes / Edit
Config / Devices / System / SNMP
Config / Devices / System / Static Routes
Config / Devices / System / Syslog
Config / Devices / Virtual Context Management
Config / Devices / Virtual Context Management / Add
Config / Devices / Virtual Context Management / Edit
|
Org-Admin Predefined Role (continued)
|
ANM Inventory/Create
(continued)
|
Config / Devices / Virtual Context Management / Extract building block
Config / Devices / Virtual Context Management / Restart Polling
Config / Devices / Virtual Context Management / Sync
Config / Devices / VLANs / Groups
Config / Devices / VLANs / Layer 2
Config / Devices / VLANs / Layer 2 / Add
Config / Devices / VLANs / Layer 2 / Edit
Config / Devices / VLANs / Layer 3
Config / Devices / VLANs / Layer 3 / Add
Config / Devices / VLANs / Layer 3 / Edit
Config / Devices / VLANs / Summary
Config / Global / Building Blocks
Config / Global / Building Blocks / Add
Config / Global / Building Blocks / Tag
Config / Global / Expert / Action List
Config / Global / Expert / Class Map
Config / Global / Expert / Policy Map
Config / Global / Load Balancing / Health Monitoring
Config / Global / Load Balancing / Parameter Maps / Connection Parameter Map
Config / Global / Load Balancing / Parameter Maps / Generic Parameter Map
Config / Global / Load Balancing / Parameter Maps / HTTP Parameter Map
Config / Global / Load Balancing / Parameter Maps / Optimization Parameter Map
Config / Global / Load Balancing / Parameter Maps / RTSP Parameter Map
Config / Global / Load Balancing / Parameter Maps / SIP Parameter Map
Config / Global / Load Balancing / Parameter Maps / Skinny Parameter Map
|
Org-Admin Predefined Role (continued)
|
ANM Inventory/Create
(continued)
|
Config / Global / Load Balancing / Real Servers
Config / Global / Load Balancing / Server Farms
Config / Global / Load Balancing / Stickiness
Config / Global / Network / BVI Interfaces
Config / Global / Network / Global IP DHCP
Config / Global / Network / Static Routes
Config / Global / Network / Static VLAN
Config / Global / Network / VLAN Interfaces
Config / Global / Resource Classes
Config / Global / Resource Classes / Add
Config / Global / Resource Classes / Audit
Config / Global / Resource Classes / Edit
Config / Global / Role-Based Access Control / Domains
Config / Global / Role-Based Access Control / Roles
Config / Global / Role-Based Access Control / Users
Config / Global / Security / ACLs
Config / Global / Security / Object Groups
Config / Global / SSL / Auth Group Parameters
Config / Global / SSL / Certificate Revocation List
Config / Global / SSL / CSR Parameters
Config / Global / SSL / Keys
Config / Global / SSL / Parameter Map
Config / Global / System / Global Policy
Config / Global / System / Primary Attributes
Config / Global / System / SNMP
Config / Global / System / Syslog
Config / Operations / Real Servers
Config / Operations / Virtual Servers
Config / Operations / Virtual Servers / Activate
Config / Operations / Virtual Servers / Details
Config / Operations / Virtual Servers / Suspend
Config / Tools / Credential Pool Management
Config / Tools / IP Discovery
|
Org-Admin Predefined Role (continued)
|
ANM Inventory/Create
(continued)
|
Monitor / Alarm Notifications / Alarms
Monitor / Alarm Notifications / Threshold Groups
Monitor / Alarm Notifications / Threshold Groups / Add
Monitor / Alarm Notifications / Threshold Groups / Edit
Monitor / Devices / Application Acceleration
Monitor / Devices / Device Management
Monitor / Devices / Load Balancing
Monitor / Devices / Load Balancing / Statistics
Monitor / Devices / Load Balancing / Virtual Servers
Monitor / Devices / Polling Settings
Monitor / Devices / Resource Usage
Monitor / Devices / Resource Usage / Connections
Monitor / Devices / Resource Usage / Features
Monitor / Devices / System View
Monitor / Devices / Traffic Summary
Monitor / Devices / Virtual Context Management
Monitor / Devices / Virtual Servers
Monitor / Events / Events
Monitor / Events / Modules
Monitor / Events / Virtual Context Management
Monitor / Settings / Global Polling Configuration
Monitor / Settings / SMTP Configuration
Monitor / Tools / Ping
Change Password
Copy License
Export
Generate CSR
Import
Install
Resequence
|
Org-Admin Predefined Role (continued)
|
ANM Inventory/Create
(continued)
|
Status
Uninstall
Update
|
Security-Admin Predefined Role
|
AAA/Create
|
No specific menu items
|
Access List/
|
Config / Devices / Security / ACLs
Config / Devices / Security / Object Groups
Resequence
|
Interface/Modify
|
Config / Devices / Network / BVI Interfaces
Config / Devices / Network / VLAN Interfaces
Monitor / Devices / Traffic Summary
Monitor / Tools / Ping
|
NAT/Create
|
No specific menu items
|
Inspect/Create
|
No specific menu items
|
Connection/Create
|
Config / Devices / Load Balancing / Parameter Maps / Connection Parameter Map
Config / Devices / Load Balancing / Parameter Maps / Generic Parameter Map
Config / Devices / Load Balancing / Parameter Maps / HTTP Parameter Map
Config / Devices / Load Balancing / Parameter Maps / Optimization Parameter Map
Config / Devices / Load Balancing / Parameter Maps / RTSP Parameter Map
Config / Devices / Load Balancing / Parameter Maps / SIP Parameter Map
Config / Devices / Load Balancing / Parameter Maps / Skinny Parameter Map
|
Server-Appln Maintenance Predefined Role
|
Threshold/View
|
Monitor / Alarm Notifications / Alarms
Monitor / Alarm Notifications / Threshold Groups
Monitor / Alarm Notifications / Threshold Groups/ Edit
Monitor / Settings / SMTP Configuration
|
Security-Admin Predefined Role (continued)
|
VIP/View
|
Config / Deploy
Config / Deploy / Edit
Config / Devices / Load Balancing / Health Monitoring
Config / Devices / Load Balancing / Real Servers
Config / Devices / Load Balancing / Server Farms
Config / Devices / Load Balancing / Stickiness
Config / Devices / Load Balancing / Virtual Servers
Config / Devices / Load Balancing / Virtual Servers / Edit
Config / Operations / Real Servers
Config / Operations / Virtual Servers
Config / Operations / Virtual Servers / Details
Monitor / Devices / Load Balancing
Monitor / Devices / Load Balancing / Statistics
Monitor / Devices / Load Balancing / Virtual Servers
Monitor / Devices / Virtual Servers
|
Server-Maintenance Predefined Role
|
Threshold/View
|
Monitor / Alarm Notifications / Alarms
Monitor / Alarm Notifications / Threshold Groups
Monitor / Alarm Notifications / Threshold Groups /Edit
Monitor / Settings / SMTP Configuration
|
VIP/View
|
Config / Deploy
Config / Deploy / Edit
Config / Devices / Load Balancing / Health Monitoring
Config / Devices / Load Balancing / Real Servers
Config / Devices / Load Balancing / Server Farms
Config / Devices / Load Balancing / Stickiness
Config / Devices / Load Balancing / Virtual Servers
Config / Devices / Load Balancing / Virtual Servers / Edit
Config / Operations / Real Servers
Config / Operations / Virtual Servers
Config / Operations / Virtual Servers / Details
Monitor / Devices / Load Balancing
Monitor / Devices / Load Balancing / Statistics
|
Security-Admin Predefined Role (continued)
|
VIP/View
|
Monitor / Devices / Load Balancing / Virtual Servers
Monitor / Devices / Virtual Servers
|
SLB-Admin Predefined Role
|
Threshold/View
|
Monitor / Alarm Notifications / Alarms
Monitor / Alarm Notifications / Threshold Groups
Monitor / Alarm Notifications / Threshold Groups /Edit
Monitor / Settings / SMTP Configuration
|
Building Block/Create
|
Config / Global / Building Blocks
Config / Global / Building Blocks / Add
Config / Global / Building Blocks / Tag
Config / Global / Expert / Action List
Config / Global / Expert / Class Map
Config / Global / Expert / Policy Map
Config / Global / Load Balancing / Health Monitoring
Config / Global / Load Balancing / Parameter Maps / Connection Parameter Map
Config / Global / Load Balancing / Parameter Maps / Generic Parameter Map
Config / Global / Load Balancing / Parameter Maps / HTTP Parameter Map
Config / Global / Load Balancing / Parameter Maps / Optimization Parameter Map
Config / Global / Load Balancing / Parameter Maps / RTSP Parameter Map
Config / Global / Load Balancing / Parameter Maps / SIP Parameter Map
Config / Global / Load Balancing / Parameter Maps / Skinny Parameter Map
Config / Global / Load Balancing / Real Servers
Config / Global / Load Balancing / Server Farms
Config / Global / Load Balancing / Stickiness
Config / Global / Network / BVI Interfaces
Config / Global / Network / Global IP DHCP
Config / Global / Network / Static Routes
|
SLB-Admin Predefined Role (continued)
|
Building Block/Create (continued)
|
Config / Global / Network / Static VLAN
Config / Global / Network / VLAN Interfaces
Config / Global / Role-Based Access Control / Domains
Config / Global / Role-Based Access Control / Roles
Config / Global / Role-Based Access Control / Users
Config / Global / Security / ACLs
Config / Global / Security / Object Groups
Config / Global / SSL / Auth Group Parameters
Config / Global / SSL / Certificate Revocation List
Config / Global / SSL / CSR Parameters
Config / Global / SSL / Keys
Config / Global / SSL / Parameter Map
Config / Global / System / Global Policy
Config / Global / System / Primary Attributes
Config / Global / System / SNMP
Config / Global / System / Syslog
|
Interface/Modify
|
Config / Devices / Network / BVI Interfaces
Config / Devices / Network / VLAN Interfaces
Monitor / Devices / Traffic Summary
Monitor / Tools / Ping
|
Expert/Create
|
Config / Deploy
Config / Deploy / Deploy Now
Config / Deploy / Edit
Config / Devices / Expert / Action List
Config / Devices / Expert / Class Map
Config / Devices / Expert / Policy Map
Config / Devices / Load Balancing / Health Monitoring
Config / Devices / Load Balancing / Parameter Maps / Connection Parameter Map
Config / Devices / Load Balancing / Parameter Maps / Generic Parameter Map
|
Expert/Create (continued)
|
Config / Devices / Load Balancing / Parameter Maps / HTTP Parameter Map
Config / Devices / Load Balancing / Parameter Maps / Optimization Parameter Map
Config / Devices / Load Balancing / Parameter Maps / RTSP Parameter Map
Config / Devices / Load Balancing / Parameter Maps / SIP Parameter Map
Config / Devices / Load Balancing / Parameter Maps / Skinny Parameter Map
Config / Devices / Load Balancing / Real Servers
Config / Devices / Load Balancing / Server Farms
Config / Devices / Load Balancing / Stickiness
Config / Devices / Load Balancing / Virtual Servers
Config / Devices / Load Balancing / Virtual Servers / Add
Config / Devices / Load Balancing / Virtual Servers / Edit
Config / Operations / Real Servers
Config / Operations / Virtual Servers
Config / Operations / Virtual Servers / Activate
Config / Operations / Virtual Servers / Details
Config / Operations / Virtual Servers / Suspend
Monitor / Devices / Load Balancing
Monitor / Devices / Load Balancing / Statistics
Monitor / Devices / Load Balancing / Virtual Servers
Monitor / Devices / Virtual Servers
|
SSL-Admin
|
SSL/Create
|
Config / Devices / SSL / Auth Group Parameters
Config / Devices / SSL / Certificate Revocation List
Config / Devices / SSL / Certificates
Config / Devices / SSL / Chain Group Parameters
Config / Devices / SSL / CSR Parameters
Config / Devices / SSL / Keys
Config / Devices / SSL / Parameter Map
|
SSL/Create (continued)
|
Config / Devices / SSL / Proxy Service
Export
Generate CSR
Import
|
Configuring User Authentication
In ANM, you can configure authentication for your users by specifying which AAA servers are used for specific users. You do this through organizations. An organization allows you to configure your AAA server lookup for your users, then associate specific users, roles, and domains with those organizations.
The following sections describe the organization authentication tasks you can complete in the ANM interface:
•
Guidelines for Managing Organizations
•
Configuring AAA Server lookup for your users—See Guidelines for Managing Organizations
•
Changing server passwords—See Changing Authentication Server Passwords
•
Modifying Organizations
•
Duplicating an Organization
•
Displaying Authentication Server Organizations
•
Deleting Organizations
The Default organization (in which all users belong), authenticates users through the ANM internal mechanism, which is based on the RBAC security model. This mechanism authenticates users through the local authentication module and a local database of user IDs and passwords. If you choose to use an external authentication method, you must specify the authentication server and port.
Many organizations, however, already have an authentication service. To use your own authentication service instead of the local module, you can select one of the alternate modules:
•
TACACS+
•
RADIUS
•
AD/LDAP
Note
For detailed procedures on remote authentication, see the "Configuring Authentication and Accounting Services" chapter of the Cisco ACE 4700 Series Appliance Security Configuration Guide on cisco.com at http://www.cisco.com/en/US/products/ps7027/products_installation_and_configuration_guides_list.html.
After you configure an organization, all authentication transactions are performed by the authentication service associated with that organization. Users log in with the user ID and password associated with the current authentication module.
Related Topics
•
Managing User Accounts
•
Managing User Roles
•
Managing Domains
Guidelines for Managing Organizations
Organizations define the mechanism for authenticating users: RADIUS, TACACS+, AD/LDAP, or Local. When the authentication is remote, users within that organization will have their passwords validated externally.
Note
For detailed procedures on remote authentication, see the "Configuring Authentication and Accounting Services" chapter of the Cisco ACE 4700 Series Appliance Security Configuration Guide on cisco.com at http://www.cisco.com/en/US/products/ps7027/products_installation_and_configuration_guides_list.html.
Use this procedure to configure organizations.
Note
All users logging into ANM must have a local account.
Procedure
Step 1
Select Admin > Role-Based Access Control > All Organizations.
Step 2
Click Add.
Step 3
Enter the name of the new organization, and notes if required. Click Save.
Step 4
Enter the attributes described in Table 15-3. Certain attributes will display when specific options are selected.
Table 15-3 Organization Attributes
Attribute
|
Description
|
Notes
|
Description of the organization or notes to administrator.
|
Organization Name
|
This can be different from the organization name above. Specifies the company, department, or division of the organization that administers the ANM server. Default name entered appears.
|
Account Number
|
Specifies an account number for the organization.
|
Contact Name
|
Specifies the name of the individual who is the contact in the organization.
|
E-Mail
|
Specifies an address for the organization's contact person.
|
Telephone #
|
Specifies a telephone number for the organization's contact person. The format is free text with no embedded spaces.
|
Alternative Telephone #
|
Specifies an alternative telephone number for the organization's contact person.
|
Street Address
|
Specifies the street for the organization.
|
City
|
Specifies the city where the organization is located.
|
Zip Code
|
Specifies a zip code for the organization's address.
|
Country
|
Specifies the country where the organization is located.
|
Authentication
|
Specifies how users are to be authenticated by the system. The default authentication mechanism is ANM's internal mechanism, which is based on ANM's security model. If an external authentication method is chosen, the authentication server and port must be specified.
Options:
• Local—Specifies the use of the local database.
• RADIUS
• TACACS+
• AD/LDAP (ANM requires that a Domain Controller Server certificate be installed on the Active Directory Server. For a document containing the detailed instructions, see the "Configuring an LDAP Server" section in the "Configuring Authentication and Accounting Services" chapter of the Cisco ACE 4700 Series Appliance Security Configuration Guide on cisco.com at http://www.cisco.com/en/US/docs/app_ntwk_services/data_center_app_services/ace_appliances/vA3_1_0/configuration/security/guide/aaa.html#wp1537851.)
Note ANM itself does not perform authorization. ANM only provides authentication for users who are logging in to ANM.
|
authentication-port
|
(Optional) Specifies the UDP destination port for communicating authentication requests to the authentication server. Depending on your server, the following may be true:
• By default, the RADIUS authentication port is 1812 (as defined in RFC 2138 and RFC 2139). The port_number argument specifies the RADIUS port number. Valid values are from 1 to 65535.
• TACACS+
• LDAP
|
secondary-authentication-port
|
(Optional) Specifies another UDP destination port for communicating authentication requests to the RADIUS server if the initial port is busy.
|
Note You will see the following fields if external authentication is used in the organization.
|
Authentication Server
|
Specifies the IP address of a RADIUS, TACACS+, or LDAP server for user authentication.
Specifies an external server when RADIUS, TACACS+, or LDAP is to be used to authenticate users.
Note Setting the server with this command is mandatory if the authentication mechanism is anything other than default.
If you select an external authentication method, you might need to specify a separate user ID for the authentication server.
For AD/LDAPS, you must provide the FQDN of the server (which must be in the users authenticating domain).
Note ANM supports LDAPS is only through Active Directory (AD).
|
Secondary Authentication Server
|
(Optional) Specifies a secondary external server when Radius or TACACS+ is to be used to authenticate users. If you specify a secondary authentication server, ANM uses this server to authenticate users if the primary authentication server is unavailable.
|
Authentication Secret
|
Encrypts the traffic between the Cisco ANM and the AAA server. This string needs to be identical on both.
|
Step 5
Click Save.
Related Topics
•
Managing User Accounts
•
Changing the Admin Password
Changing Authentication Server Passwords
Note
Your user role determines whether you can use this option.
Procedure
Step 1
Select Admin > Role-Based Access Control > Organization.
Step 2
Select the organization you want to modify, then click Edit.
Step 3
Change the password attribute in the attributes table (see Table 15-4).
Step 4
Click Save.
Step 5
The Edit User Details screen appears. Make any changes and click Save. When all the details are correct, click Cancel. The User Management table is displayed.
Related Topics
•
Managing User Accounts
•
Changing the Admin Password
Each ANM has an admin user account built into the device. The root user ID is admin, and the password is set when the system is installed. For information about changing the Admin password, see Changing Your Account Password, page 1-4.
Modifying Organizations
Assumptions
•
ANM is installed and running.
•
The organization exists in the ANM database.
•
You have reviewed the guidelines for managing customer organizations (see Guidelines for Managing Organizations).
Note
Your user role determines whether you can use this option.
Procedure
Step 1
Select Admin > Role-Based Access Control > Organizations.
Step 2
Select the organization you want to modify.
Step 3
Click Edit.
Step 4
Modify any of the attributes in the attributes table (see Table 15-3).
Step 5
Click Save.
Related Topics
Configuring User Authentication
Duplicating an Organization
Use this option to create a new organization from an existing one.
Assumptions
•
ANM is installed and running.
•
The organization exists in the ANM database.
•
You have reviewed the guidelines for managing customer organizations (see Guidelines for Managing Organizations).
Note
Your user role determines whether you can use this option.
Procedure
Step 1
Select Admin > Role-Based Access Control > Organizations.
Step 2
Select the organization you want to copy.
Step 3
Click Duplicate.
Step 4
At the prompt, enter a name for the new organization.
Step 5
Click OK.
Step 6
Make any changes to the organization settings (see Table 15-3).
Step 7
Click Save.
Related Topics
Configuring User Authentication
Displaying Authentication Server Organizations
Note
Your user role determines whether you can use this option.
Procedure
Step 1
Select Admin > Role-Based Access Control > All Organizations.
The list of customer organizations appears in the All Organizations table.
Step 2
From this screen you can create a users, roles, and domains that are associated with this specific organization. You can also access organizations by selecting the organization from the object selector that displays in the top right portion of the content area.
Related Topics
•
Understanding Organizations
•
Configuring User Authentication
Deleting Organizations
Assumptions
•
ANM is installed and running.
•
The organization exists in the ANM database.
•
You have reviewed the guidelines for managing customer organizations (see Guidelines for Managing Organizations).
Note
Your user role determines whether you can use this option.
Procedure
Step 1
Select Admin > Role-Based Access Control > Organizations.
The Organizations list contains a list of the existing organizations.
Step 2
Select the organization to be deleted.
Step 3
Click Delete. All users, domains, and roles within that organization are removed.
Related Topics
Configuring User Authentication
Managing User Accounts
Use the User Management feature to specify the people that are allowed to log onto the system. The following sections describe how to manage user accounts:
•
Guidelines for Managing User Accounts
•
Displaying a List of Users
•
Creating User Accounts
•
Duplicating a User Account
•
Modifying User Accounts
•
Deleting User Accounts
Note
You can create users in the organization in which you are a member. You will see users only in the organizations in which you are a member.
Guidelines for Managing User Accounts
•
User cannot log in until they have one domain and one user role associated via an organization. This can be the Default domain but a role must be specified.
•
Users cannot be moved from one organization to another. Organizations are designed to be separate and distinct.
Displaying a List of Users
Procedure
Step 1
Select Admin > Role-Based Access Control > Organization > Users. A table of users, their role, and their domain appears.
Step 2
From this screen you can create a new user, duplicate, modify or delete any existing user to which you have access.
Related Topics
Managing User Accounts
Creating User Accounts
Note
Your user role determines whether you can use this option.
Procedure
Step 1
Select Admin > Role-Based Access Control > Organization > Users. A list of users appears.
Step 2
Click Add.
Step 3
Complete the following required fields:
Table 15-4 User Attributes
Field
|
Description
|
Login Name
|
Specifies the name by which the user is to be identified in the system (up to 24 characters). Only letters, numbers, and underscore can be used. The field is case sensitive.
|
Name
|
Specifies the full name of the user. The format is free text.
|
Password
|
Allows you to specify a password for this user account.
|
Confirm
|
Renter the password for this account.
|
E-Mail
|
Specifies an e-mail address for this user.
|
Telephone#
|
Specifies a telephone number for this user. The format is free text with no embedded spaces.
|
Role
|
Specifies a predefined role from the list.
|
Domains
|
Allows you to use the Add and Remove buttons to select domains to which this user belongs.
|
Allowed login IP
|
Defines an IP address or a subnetwork from which the user is allowed to log in. You can define up to ten different addresses for a single user. Unless you specifically define IP addresses or subnetworks using this option, the user can log in from any IP address. When you enter an allowed single IP address or an allowed subnet, then the user is only allowed to log in from the specified addresses. To restrict access to a specific subnetwork, enter the IP address and the mask, for example, 10.1.200.60/255.255.255.0.
Note IP addresses 1.1.1.1 and 0.0.0.0 cannot be entered in this field.
|
Description
|
Enter any notes about the user.
|
firstmenu
|
Menu that displays when this user first logs in. Choose one from the pulldown menu.
|
Last login
|
Last time (local time) this user logged in.
|
Step 4
Click Save. The Users table is displayed.
Related Topics
Managing User Accounts
Duplicating a User Account
Use this option to create a new user account using settings from an existing user.
Note
Your user role determines whether you can use this option.
Procedure
Step 1
Select Admin > Role-Based Access Control > Organization > Users. A table of users, their role and domain appears.
Step 2
Select the user account you want to copy.
Step 3
Click Duplicate.
Step 4
At the prompt, enter a name for the new user account.
Step 5
Click OK.
The Users table appears with the new user account.
Step 6
To make changes to the user account settings as shown in Table 15-5.
Table 15-5 Duplicate User Attributes
Field
|
Description
|
Login Name
|
Name you specified when you created the user you want to duplicate. This is the name by which the user is to be identified in the system (up to 24 characters). Only letters, numbers, and underscore can be used. The field is case sensitive.
|
Name
|
Specifies the full name of the user. The format is free text.
|
E-Mail
|
Specifies an e-mail address for this user.
|
Telephone#
|
Specifies a telephone number for this user. The format is free text with no embedded spaces.
|
Role
|
Specifies a predefined role from the list.
|
Domains
|
Allows you to use the Add and Remove buttons to select domains to which this user belongs.
|
Allowed login IP
|
Defines an IP address or a subnetwork from which the user is allowed to log in. You can define up to ten different addresses for a single user. Unless you specifically define IP addresses or subnetworks using this option, the user can log in from any IP address. When you enter an allowed single IP address or an allowed subnet, then the user is only allowed to log in from the specified addresses. To restrict access to a specific subnetwork, enter the IP address and the mask, for example, 10.1.200.60/255.255.255.0.
Note IP addresses 1.1.1.1 and 0.0.0.0 cannot be entered in this field.
|
Description
|
Enter any notes about the user.
|
firstmenu
|
Menu that is displayed when this user first logs in. Choose one from the pulldown menu.
|
Last login
|
Last time (local time) this user logged in and the IP address that was used.
|
.
Step 7
Click Save.
Step 8
The Edit Organization User screen appears. Make any changes and click Save. When all the details are correct, click Cancel. The table of users is displayed.
Related Topics
Managing User Accounts
Modifying User Accounts
Note
Your user role determines whether you can use this option.
Procedure
Step 1
Select Admin > Role-Based Access Control > Organization > Users. A table of users, their role, and domain appears.
Step 2
Select the user account you want to modify.
Step 3
Click Edit.
Step 4
Modify any of the attributes in the attributes table (see Table 15-4).
Step 5
Click Save.
Step 6
The Edit User Details screen appears. Make any changes and click Save. When all the details are correct, click Cancel, the User Management table is displayed.
Related Topics
Managing User Accounts
Deleting User Accounts
Note
Your user role determines whether you can use this option.
Procedure
Step 1
Select Admin > Role-Based Access Control > Organization > Users. A table of users, their role and domain appears.
Step 2
Select the user account to be deleted, then click Delete.
Step 3
Confirm deletion of the user by clicking OK or Cancel to return to the Users table.
The user account is removed from the ANM database.
Related Topics
Managing User Accounts
Displaying or Terminating Current User Sessions
You can view a list of the users currently logged into the system and end their sessions, if required.
You can only see the users in your organization.
Note
Your user role determines whether you can use this option.
Procedure
Step 1
Select Admin > Role-Based Access Control > Active Users.
The Active User Sessions screen displays the following information for each active user who is logged in:
Table 15-6 Active User Session Information
Column
|
Description
|
Name
|
The name used to log into the Cisco ANM
|
Type of login
|
Method used to log in, for example WEB
|
Login from IP
|
IP address of host
|
Time of login
|
Time user logged in
|
Step 2
To terminate an active session, click Terminate.
When a user session is terminated, the user is logged out of the interface from which the user session was initiated. If the user was making changes to a configuration, the configuration lock is released and any uncommitted configuration change is discarded.
If a user session is terminated while an operation is in progress, the current operation is not stopped, but any subsequent operation is denied.
For more details on terminating active users, see Displaying or Terminating Current User Sessions.
Related Topics
•
Controlling Access to the Cisco ANM
•
Managing User Accounts
Managing User Roles
Use the Roles Management feature to add, modify, and delete user-defined roles and to modify predefined roles. You cannot delete predefined roles.
A user's role determines the tasks the user can access. Each role is associated with permissions or rules that define what feature access this role contains. For example, if you design a role that provides access to virtual servers, the role automatically includes access to all real servers that could be included in the virtual server.
The following sections describe how to manage user roles:
•
Guidelines for Managing User Roles
•
Displaying User Roles
•
Creating User Roles
•
Duplicating a User Role
•
Modifying User Roles
•
Deleting User Roles
Guidelines for Managing User Roles
•
System Administrators can view and modify all roles.
•
Organization administrator users can only see and modify the users, roles, and domains in their organization.
•
Other users can only view the user, roles, and domains assigned to them.
•
User-defined roles can be created but follow strict rules about which tasks can be selected or deselected. See the user interface for specific dependencies or Table 15-2 for role to task mapping information.
•
You must have the ability to create real servers in your role and at least one virtual context in your domain before you can create real servers.
•
You must have the ability to create virtual contexts in your role and an Admin context in your domain before you can create virtual contexts.
•
If you upgrade to ANM 1.2, any custom roles that are migrated retain their associations but have different role definitions. We encourage you to use the ANM 1.2 predefined default roles.
Understanding Predefined Roles
You must have one of the predefined roles in the Admin context in order to use the changeto command (which allows users to visit other contexts). Non-admin/user contexts do not have access to the changeto command; they can only visit their home context. Context administrators, who have access to multiple contexts, must explicitly log in to other contexts to which they have access.
The predefined roles and their default privileges are defined in Table 15-7. For detailed information on RBAC, see the Cisco 4700 Series Application Control Engine Appliance Virtualization Configuration Guide.
Table 15-7 ANM 1.2 Predefined Role Tasks
Predefined Role
|
Description
|
Role Tasks/Operation Privileges 1
|
ACE-Admin
|
Access to create virtual contexts and monitor threshold information.
|
• View Threshold
• Create Device Events
• Create Virtual Context+
|
ANM-Admin
|
Access to create virtual contexts and monitor threshold information. Provides access to all features and functions.
|
• Create ANM System
• Create ANM User Access
• Create ANM Inventory+
|
Network-Admin
|
Admin for L3 (IP and Routes) and L4 VIPs
|
• View Threshold
• Create Switch
• Create Routing
• Create Interface
• Create NAT
• Create Connection
|
Network-Monitor
|
Monitoring for all features
|
• View ANM Inventory+
|
Org-Admin
|
Access to create role-based access control and import and update device data.
|
• Create ANM User
• Create ANM Inventory+
|
Security-Admin
|
Security features
|
• Create AAA
• Modify Interface
• Create NAT
• Create Inspect
• Create Connection
|
Server-Appln-Maintenance
|
Server maintenance and L7 policy application
|
• View Threshold
• View VIP
• View Virtual Inservice
• Create LoadBalancer+
|
Server-Maintenance
|
Server maintenance, monitoring, and debugging
|
• View Threshold
• View VIP+
• Modify Real Server
• Debug Probe
• Create Real Inservice
|
SLB-Admin
|
Load-balancing features
|
• View Threshold
• Create Building Block
• Modify Interface
• Create Expert+
|
SSL-Admin
|
SSL feature features
|
• Create SSL+
|
Displaying User Role Relationships
Use this procedure to display which users are associated to specific roles.
Note
Your user role determines whether you can use this option.
Procedure
Step 1
Select Admin > Role-Based Access Control > Organizations > Roles. A table of the defined roles and their settings appears.
Step 2
Select a role and click Users. A screen displays a table containing the following:
•
Name—User name
•
Role—Role name
•
Domain—Domain access for this user
From this screen you can delete or duplicate a user.
Step 3
Click Close to return to the Roles table.
Related Topics
•
Duplicating a User Account
•
Managing User Roles
Displaying User Roles
Use this option to display the existing user roles.
Note
Your user role determines whether you can use this option.
Procedure
Step 1
Select Admin > Role-Based Access Control > Organizations > Roles. A table of the defined roles and their settings appears.
Step 2
You can use the options in this screen to:
•
Create a new role (see Creating User Roles).
•
View the users assigned to a role (see Displaying User Role Relationships).
•
Modify any existing role to which you have access (see Modifying User Roles).
•
Duplicate any existing role to which you have access (see Duplicating a User Role).
•
Delete any existing role to which you have access (see Deleting User Roles).
Related Topics
•
Understanding Operations Privileges
•
Managing User Roles
Creating User Roles
You can edit the predefined roles, or you can create new, user-defined roles. When you create a new role, you specify a name and description of the new role, then select the privileges for each task. You can also assign this role to one or more users.
Note
Your user role determines whether you can use this option.
Procedure
Step 1
Select Admin > Role-Based Access Control > Organization > Roles. A table of the defined roles and their settings appears.
Step 2
Click Add. The New Role form appears.
Step 3
Enter the following attributes:
Table 15-8 Role Attributes
Attribute
|
Description
|
Name
|
The name of the role.
|
Description
|
A brief description of the role.
|
Role Tasks
|
A role tree that defines the operation privileges and features available to this role.
|
Resulting Menu Items
|
Displays a synchronized list of features in the form of menus that this role is able to access after setting the role task operation privileges.
|
Step 4
Click Save. The new role is added to the list of user roles.
Step 5
To assign this new role to one or more users, go to Admin > Organizations > Users. For detailed steps, see Modifying User Accounts.
Related Topics
•
Understanding Operations Privileges
•
Managing User Roles
Duplicating a User Role
Use this option to create a new user-defined role from an existing one.
Note
Your user role determines whether you can use this option.
Procedure
Step 1
Select Admin > Role-Based Access Control > Organization > Roles. A table of the defined roles and their settings appears.
Step 2
Select the role you want to copy.
Step 3
Click Duplicate.
Step 4
At the prompt, enter a name for the new role.
Step 5
Click OK.
Step 6
Make any changes to the role settings.
Step 7
Click Save.
Related Topics
•
Understanding Operations Privileges
•
Managing User Roles
Modifying User Roles
You can modify any user-defined roles.
Note
Your user role determines whether you can use this option.
Procedure
Step 1
Select Admin > Role-Based Access Control > Organization > Roles. A table of the defined roles and their settings appears.
Step 2
Select the role you want to modify.
Step 3
Click Edit.
Step 4
Make the changes.
Step 5
Click Save.
Related Topics
•
Understanding Operations Privileges
•
Managing User Roles
Deleting User Roles
You can delete any user-defined roles.
Note
Your user role determines whether you can use this option.
Procedure
Step 1
Select Admin > Role-Based Access Control > Organization > Roles. A table of the defined roles and their settings appears.
Step 2
Select the role to be deleted.
Step 3
Click Delete.
Step 4
Click OK to confirm the deletion. Users that have the deleted role no longer have that access.
Related Topics
Managing User Roles
Managing Domains
Network domains provide a means for organizing the devices and their components (physical and logical) in your network and permitting access according to the way your site is organized. You can allow access to a domain by assigning it to an organization. Examples are specific virtual contexts, or specific servers within a context.
The following sections describe how to manage domains:
•
Guidelines for Managing Domains
•
Displaying Network Domains
•
Creating a Domain
•
Duplicating a Domain
•
Modifying a Domain
•
Deleting a Domain
Guidelines for Managing Domains
•
Domains are logical concepts. You do not delete a member of a domain when you delete the domain.
•
Domains can include supported Cisco chassis, ACE modules, ACE appliances, and CSS or CSM devices, as well as their virtual contexts, building blocks, resource classes, and real and virtual servers.
•
Select the Allow All setting to include current and future device objects in a domain.
•
Objects must already exist in ANM. To add objects, see Adding Network Devices into ANM, page 2-7.
•
You must have the ability to create real servers in your role and at least one virtual context in your domain before you can create real servers.
•
You must have the ability to create virtual contexts in your role and an Admin context in your domain before you can create virtual contexts.
•
Domains continue to display device information even after you remove that device from ANM. This allows the domain information to be easily reassociated if you reimport the device. The device name must remain the same for this to work properly.
Caution 
Domain objects are hierarchical. If you include a parent object in a domain, the child object is also included even though they do not display in the Object selector tree when you add or edit domains.
For example:
–
Inclusion of a Catalyst device includes all cards, virtual contexts, real servers and virtual servers
–
Inclusion of an ACE 4710 includes all cards, virtual contexts, real servers and virtual servers
–
Inclusion of a virtual context, CSM module or CSS device includes all associated objects
Related Topics
•
Creating a Domain
•
Modifying a Domain
•
Displaying Network Domains
•
Duplicating a Domain
•
Deleting a Domain
Displaying Network Domains
Note
Your user role determines whether you can use this option.
Procedure
Step 1
Select Admin > Role-Based Access Control > Organization > Domains. The Domains table appears.
Step 2
Expand the table until you can see all the network domains.
Step 3
Select a domain from the Domains table to view the settings for that domain, then click Edit.
Related Topics
•
Managing Domains
•
Guidelines for Managing Domains
•
Creating a Domain
•
Duplicating a Domain
•
Modifying a Domain
•
Deleting a Domain
Creating a Domain
Use this option to create a new domain.
Note
Your user role determines whether you can use this option.
Procedure
Step 1
Select Admin > Role-Based Access Control > Organization > Domains. The Domains table appears.
Step 2
Click Add.
Step 3
For the new domain, enter the following information:
Table 15-9 Domain Attributes
Field
|
Description
|
Name
|
The name of the domain.
|
Description
|
The description of the domain.
|
Allow all check box
|
Enables all objects within this domain (current and future objects). If left empty, the Objects tree displays.
|
Objects
|
The collection of objects which comprise this domain. Select an object name and use the arrows to move it from the available to selected column.
For example, selecting a virtual context selects all real servers within that virtual context, or selecting a chassis selects the virtual contexts on that chassis. The interface does not explicitly display this in the table, but the objects are, in fact, selected.
See Guidelines for Managing Domains for domain rules about creating virtual contexts and real servers.
|
Step 4
Click Save.
The Domains Edit screen updates and displays the total object number next to the object name.
Related Topics
•
Managing Domains
•
Guidelines for Managing Domains
•
Displaying Network Domains
•
Creating a Domain
•
Duplicating a Domain
•
Modifying a Domain
•
Deleting a Domain
Duplicating a Domain
Use this option to create a new domain from an existing one.
Note
Your user role determines whether you can use this option.
Procedure
Step 1
Select Admin > Role-Based Access Control > Organization > Domains.
Step 2
Select the domain you want to copy.
Step 3
Click Duplicate.
Step 4
At the prompt, enter a name for the new domain, then click OK.
Step 5
Click Save.
Related Topics
•
Managing Domains
•
Guidelines for Managing Domains
•
Displaying Network Domains
•
Creating a Domain
•
Modifying a Domain
•
Deleting a Domain
Modifying a Domain
Use this option to change the settings in a domain.
Note
Your user role determines whether you can use this option.
Procedure
Step 1
Select Admin > Role-Based Access Control > Organization > Domains.
Step 2
Select the domain you want to change.
Step 3
Click Edit.
Step 4
Make the changes. For detailed domain attribute descriptions, see Table 15-9.
Step 5
Click Save.
Related Topics
•
Managing Domains
•
Guidelines for Managing Domains
•
Displaying Network Domains
•
Creating a Domain
•
Duplicating a Domain
•
Deleting a Domain
Deleting a Domain
Use this option to delete a network domain from the systems. You do not delete objects associated with that domain when you delete the domain.
Note
Your user role determines whether you can use this option.
Procedure
Step 1
Select Admin > Role-Based Access Control > Organization > Domains.
The Domains list contains a list of the existing domains.
Step 2
Select the domain you want to delete.
Step 3
Click Delete. A prompt asks if you to confirm this action.
Step 4
Click OK. The domain is removed from the ANM database.
Related Topics
•
Managing Domains
•
Guidelines for Managing Domains
•
Displaying Network Domains
•
Creating a Domain
•
Duplicating a Domain
•
Modifying a Domain
Managing ANM
When you select Admin > ANM Management, you can view the following information:
•
ANM—Allows you to check the status of your ACE. See Checking the Status of the ANM Server.
•
License Management—Displays the license information stored in the ACE hardware. See Managing ANM Licenses.
•
Statistics—Displays the ANM server statistics. See Viewing ANM Server Statistics.
•
Statistics Collection—Allows you to enable or disable ANM server statistic collection. See Configuring ANM Statistics Collection.
•
Audit Log Settings—Allows you to determine how long audit log records are kept. See Configuring Audit Log Settings.
•
Change Audit Log—Displays ANM server logs. See Viewing Change Audit Logs.
•
Auto Sync Settings—Allows you to allow ANM to automatically sync with CLI when it detects out of band changes between itself and the ACE. See Configuring Auto Sync Settings.
Checking the Status of the ANM Server
The ANM server can be configured either as:
•
A non-HA ANM. The non-HA ANM consists of only one host and is referred to as a standalone ANM.
•
An HA (high availability or fault-tolerant) ANM, which consists of two hosts: an active ANM and a standby ANM. An HA ANM has a virtual IP address that is always assigned to the active ANM. Users log into this virtual IP address—they never log into the real IP addresses of the hosts. In addition, an HA ANM has a secondary NIC and IP address on each host over which "heartbeat" messages are used to arbitrate which host is active and which is standby.
Note
Your user role determines whether you can use this option.
Use this option to check if ANM has a backup server and to view the server status.
Procedure
Step 1
Select Admin > ANM Management > ANM.
The ANM Server status screen appears. This screen contains the following information:
Table 15-10 ANM Server Status Information
Field
|
Description
|
HA Replication State
|
Options:
• OK—This is an HA ANM and it is running properly.
• Standalone—This is a non-HA ANM, and therefore the HA attributes and operations are not meaningful.
• Stopped—This is an HA ANM and database replication has stopped. Under normal circumstances this is a transitory state.
• Failed—This is an HA ANM and database replication cannot proceed. Most likely this is because the standby ANM is not alive or is unreachable.
|
Version
|
The version of the ANM software.
|
Build Number and Build Timestamp
|
Build identification information.
|
Time Server Started
|
The date and time the ANM server started.
|
Virtual IP Address
|
Virtual IP address that associates with the active host. This IP address must be on the same subnet as the primary IP addresses of both Node 1 and Node 2.
|
Active Name
|
Name of Node 1, which can be displayed by issuing the uname -n command on the host.
|
Active IP
|
IP address used by Node 1 for normal (non-heartbeat related) communication. This IP address must be on the same subnet as the primary address for Node 2.
|
Active Heartbeat IP
|
IP address associated with the crossover network interface for Node 1. This IP address must be on the same subnet as the Heartbeat IP address for Node 2.
|
Standby Name
|
Name of Node 2, which can be returned by issuing the uname -n command on the host.
|
Standby IP
|
IP address used by Node 2 for normal (non-heartbeat related) communication. This IP address must be on the same subnet as the primary IP address for Node 1.
|
Standby Heartbeat IP
|
IP address associated with the crossover network interface for Node 2. This IP address must be on the same subnet as the Heartbeat IP address for Node 1.
|
License Server State
|
Options:
• OK—There is a valid license on the host.
• Invalid—The host either contains an invalid license or there is no license present.
• Unknown—It is not possible to communicate with the host's license manager, therefore, the license state is unknown.
Note The Unknown and Invalid states will not display for the active (local) ANM. If the standby ANM has an Invalid license state, you should install a valid license. If the standby ANM has an Unknown license state, check that the standby ANM has been installed correctly.
• DEMO—Used for the demonstration purposes. It lasts for 30, 60, or 90 days from the issue day of the license. It allows you to use all features.
|
Standby License Server State
|
|
Related Topics
•
Managing ANM Licenses
•
Viewing ANM Server Statistics
•
Configuring ANM Statistics Collection
Managing ANM Licenses
Cisco Application Networking Manager manages software licenses for the ANM server as well as ACE devices. For information about managing ACE licenses, see Managing ACE Licenses, page 3-27. For a complete list of supported devices, see the Supported Devices Table for the Cisco Application Networking Manager 1.2.
Since ANM is licensed, it requires a software license key to work properly. You may be required to purchase another server license if you are using a backup server. ANM may also need additional software licenses to run large networks with many ACE devices and modules.
Note
ANM uses TCP port 10444 for the ANM License Manager. For other port numbers, see Appendix A, "ANM Ports Reference."
Use this feature to view license state, add license files, and track license compliance information on your ANM.
This topic contains the following tasks:
•
Adding Licenses into License Management
•
Viewing Licenses in License Management
•
Checking on License Compliance
•
Ordering ANM Licenses
•
Removing Licenses Files
For more details on ANM licenses, see Understanding ANM License Information or the Installation Guide for the Cisco Application Networking Manager 1.2.
Related Topics
•
Understanding ANM License Information
•
Preparing Devices for Import, page 2-4
•
Managing ACE Licenses, page 3-27
Understanding ANM License Information
When you install ANM 1.2 for the first time you need to add a license from the command line before you can access ANM. See the Installation Guide for the Cisco Application Networking Manager 1.2 for instructions.
ANM requires licenses to manage virtual devices and to run the ANM server or servers.
Table 15-11 describes the various licenses and their purpose.
Table 15-11 ANM License Descriptions
License Name
|
Description
|
ANM-AD-<count>
ANM-AD-20
|
Where A stands for ACE and D stands for devices. This product ID allows <count> number of ACE devices/modules to be managed by ANM.
If you have purchased two ANM-AD-10, it means that ANM is allowed to manager 20 ACE devices.
The maximum number of ACE devices can be managed by one ANM server is no more than 50.
|
ANM-CD-<count>
ANM-CD-10
|
Where A stands for ACE and C stands for CSS or CSM devices/modules supported.
|
ANM-AV-<supported # of virtual contexts>
ANM-AV-100
|
Where A stands for ACE and V stands for virtual contexts. This license allows ANM to manage one ACE module/device which has an ACE license supporting <number of virtual context>.
If you have three ACE modules with two supporting 50 virtual contexts each (ACE-VIRT-050) and one ACE supporting 250 contexts (ACE-VIRT-250), then you are required to have either two ANM-AV-50 licenses or one ANM-AV-50 licenses with count of two and one ANM-AV-250.
The interpretation of <supported number of virtual contexts> in ANM-AV is different from <count> in ANM-AD.
|
ANM-DEMO or DEMO
|
Used for the demonstration purposes. It lasts for 30, 60, or 90 days from the issue day of the license. It allows you to use all features.
|
ANM-SERVER-XX or
ANM-SERVER-XX-H
|
Used to allow access to the ANM server. Use ANM-SERVER-XX for standalone or primary servers and ANM-SERVER-XX-H for your backup server when running HA.
|
Related Topics
•
Managing ACE Licenses, page 3-27
•
Managing ANM Licenses
•
Viewing Licenses in License Management
•
Adding Licenses into License Management
•
Ordering ANM Licenses
•
Removing Licenses Files
Adding Licenses into License Management
Use this procedure to add new ANM licenses to expand the number of network devices you can manage.
Note
Your user role determines whether you can use this option.
Procedure
Step 1
Select Admin > ANM Management > License Management > Licenses. The Licenses table appears.
Step 2
Click Install. The New License screen appears.
Step 3
Click Browse to locate the new license name. Use the browser to select the license file.
Step 4
Click Upload to copy the license you entered onto the ANM Server or Cancel to exit.
The license file appears in the Licenses table as well as in the License Files table. From the Licenses table you can also filter, add more licenses, or alter table views. See Table 1-3 on page 1-9 for a description of the table buttons.
From the License Files table you can see the Install Status of the license file and if there are any errors. See Viewing Licenses in License Management for details on what steps to do next.
Related Topics
•
Managing ACE Licenses, page 3-27
•
Managing ANM Licenses
•
Viewing Licenses in License Management
•
Understanding ANM License Information
•
Ordering ANM Licenses
•
Removing Licenses Files
Viewing Licenses in License Management
Use this procedure to view ANM licenses that allow you to expand the number of network devices you can manage.
Procedure
Step 1
Select Admin > ANM Management > License Management > Licenses.
The License table appears. If there are license files, the License Files table also appears on the same page. This screen contains the following information (see Table 15-12 and Table 15-13):
Table 15-12 ANM License Information
Field
|
Description
|
Name
|
Contains the license type name information about how many virtual contexts can be allocated on an ACE, as well as ANM license information.
• ANM_DEMO—Temporary 30, 60, or 90 day licenses; three free demos allowed.
• ANM_SERVER—Enables management of one ANM and two ACE devices; neither can have an ACE VIRT license (ACE_VIRT_100). Licenses contained a -H correspond to a standby ANM-SERVER node.
• ANM_AD—Management of devices 5, 10, 20, 50 (ANM-AD-20).
• ANM_CD—Enables management of CSS or CSM devices/modules.
• ANM_AV_xxx—Enables management of 20, 50, 100, or 250 virtual contexts .
For details on how to understand license name acronyms, see Understanding ANM License Information.
|
Installed Server
|
Indicates whether the license is installed on an active or standby ANM server. This field displays only when ANM is in HA mode.
|
File Name
|
The name of the license file you installed on the ACE appliance.
|
Vendor
|
Name of vendor that supplied the license.
|
Expiry Date
|
Date license expires. If no expiration, permanent displays.
|
Maximum Count
|
Number of licenses available (purchased).
|
Table 15-13 License Files
Field
|
Description
|
File Name
|
The name of the license file you installed on the ANM host.
|
Install Status
|
Status of the license file. Any licensing errors display here. If errors display, see Removing Licenses Files for details on how to remove this file and import a working file.
|
From this table you can also filter, add, or alter table views. See Table 1-3 on page 1-9 for a description of the table buttons.
Related Topics
•
Managing ACE Appliance Licenses in Installation Guide for the Cisco Application Networking Manager 1.2
•
Understanding ANM License Information
•
Adding Licenses into License Management
•
Ordering ANM Licenses
•
Managing ANM Licenses
•
Removing Licenses Files
•
Managing ACE Licenses, page 3-27
Checking on License Compliance
Use this procedure to verify that the ANM licenses in your network are compliant with your ACE licenses.
Procedure
Step 1
Select Admin > ANM Management > License Management > Compliance.
The License Compliance table displays (see Table 15-14).
Table 15-14 License Compliance
Field
|
Description
|
License Type
|
Lists types of licenses found. See Understanding ANM License Information.
|
HA
|
Displays Active when in HA mode or non-HA mode. Disregard this column if you are running a standalone server.
|
Total
|
Number of licenses present. Corresponds to maximum count on the Licenses table.
|
Used
|
Number of licenses in use.
|
Remaining
|
Number of licenses available for use. A negative number displays in red if there are not enough licenses for the network devices you are managing. A number displays highlighted in yellow if the number of licenses used is equal to the total licenses you have purchased.
|
Expiration
|
Expiration date (if temporary license).
|
Step 2
Click Refresh to update the licenses in this window.
Related Topics
•
Understanding ANM License Information
•
Adding Licenses into License Management
•
Ordering ANM Licenses
•
Updating ACE Licenses, page 3-31
•
Managing ACE Licenses, page 3-27
Ordering ANM Licenses
If you need to purchase additional ANM licenses in order to be compliant with the number of ACE licenses you are managing, contact your sales team or use Cisco.com to place your order. After you receive your PAK information, you can then access the Cisco Product License Registration web site page at http://www.cisco.com/go/license. The Cisco Product License Registration web site provides you with license key/files that you can upload to ANM and ensure your compliance with software requirements.
If you already have your Product Activation Key (PAK), you can manually use the Cisco web site to obtain licenses or you can use the Cisco License Manager. Cisco License Manager performs license fulfillment for you and also deploys the licenses to network devices using a wizard-based GUI.
Related Topics
•
Managing ANM Licenses
•
Understanding ANM License Information
•
Adding Licenses into License Management
•
Viewing Licenses in License Management
•
Checking on License Compliance
•
Managing ACE Licenses, page 3-27
Removing Licenses Files
If your license files will not work in the ANM due to file errors, you need to remove them from the ANM host and request another license file from Cisco. There is no remove license command. You can remove the license from the operating system by deleting the file.
Procedure
Step 1
Log in as the root user.
Step 2
To remove the license file, enter:
rm /opt/CSCOanm/etc/license/<ANM_LICENSE_FILE>
The license file is removed from the ANM host only. The license on your managed device is still valid.
Step 3
Restart ANM to allow it to update the licenses table data. To restart ANM, see instructions in the Installation Guide for the Cisco Application Networking Manager 1.2.
To request another license from Cisco to replace the one that had errors, open a service request using the TAC Service Request Tool or call the Technical Assistance Center. Then add the license into ANM.
Related Topics
•
Managing ANM Licenses
•
Understanding ANM License Information
•
Adding Licenses into License Management
•
Viewing Licenses in License Management
•
Ordering ANM Licenses
Viewing ANM Server Statistics
Use this procedure to display ANM statistics (for example, CPU, disk, and memory usage on the ACE).
Procedure
Step 1
Select Admin > ANM Management > Statistics. The statistics viewer displays the fields in Table 15-15.
Table 15-15 ACE Server Statistics
Name
|
Description
|
Owner
|
Process where statistics are collected.
|
Statistic
|
Includes the following statistics:
• CPU Usage—Overall ACE CPU busy percentage in the last 5-minute period.
• Disk Usage—Amount of disk space being used by the ANM server or ACE appliance.
• Memory Usage—Amount of memory being used by the ANM server or ACE hardware.
• Process Uptime—Amount of time since this system was last initialized, or the amount of time since the network management portion of the system was last reinitialized.
|
Value
|
Value of the statistic.
|
Description
|
Information the statistic gathered.
|
Related Topics
•
Checking the Status of the ANM Server
•
Configuring ANM Statistics Collection
Use this procedure to enable ACE server statistics polling.
Procedure
Step 1
Select Admin > ANM Management > Statistics Collection. The Primary Attributes configuration screen appears.
Step 2
In the Polling Stats field, select Enable to start background polling or Disable to stop background polling.
Step 3
In the Background Polling Interval field, select the polling interval appropriate for your networking environment.
Step 4
Click Deploy Now to save your entries.
Related Topics
•
Viewing ANM Server Statistics
•
Checking the Status of the ANM Server
Configuring Audit Log Settings
Audit Log Purge Settings allow you to specify the following:
•
How many days the log records in the database will be kept (default is 31).
•
The maximum of log records that will be stored in the ANM database (default 100,000).
Audit Log File Purge Settings allows you to specify the following:
•
The number of days worth of log record files that will be stored in the ANM database (default 31 days).
•
The number of daily rolling files that will be stored in the ANM database (default 10 files each day, allowable file size is 2 Megabytes and is not configurable).
Use this procedure to determine how long audit logs are kept in the database.
Procedure
Step 1
Select Admin > ANM Management > Audit Log Settings. The Audit Log Settings configuration screen appears.
Audit Log Purge Settings fields let you determine whether audit log table entries will be deleted after a certain number of days (default is 31 days) or after the table entries reach a certain size (default is 100 entries).
Step 2
Enter the greatest number of days you would like entries to be retained in the Number of Days field.
Step 3
Enter the maximum amount of log records to be stored in the ANM database in the audit log tables in the Number of Entries (Thousand) field (default 100,000).
Audit Log File Purge Settings fields let you determine whether to retain log files according by age (default is 31 days) or by amount saved in a given day (default is 10 entries).
Step 4
Enter the greatest number of days you would like entries to be retained in Number of Days field.
Step 5
Enter the greatest number of log files you would like retained in Number of Daily Rolling Log Files field.
Step 6
Click:
•
Reset to Default to erase changes and restore the default values.
or
•
Save Now to save your entries.
Related Topics
•
Configuring Audit Log Settings
•
Viewing Change Audit Logs
Any key or change related activities to the ANM server will be logged and viewed according to your role. Use this procedure to display ANM change audit logs for example, user login attempts, create/update/delete objects such as RBAC, Global Resource Class, Credential, device group, and threshold setting.
Procedure
Step 1
Select Admin > ANM Management > ANM Change Audit Log. The audit log displays the fields in Table 15-16.
Table 15-16 Server Audit Log
Name
|
Description
|
Time
|
Server time stamp when user action is complete.
|
Client IP
|
IP address where action originated.
|
User
|
Email address in the following format: username@organization name for example, admin@cisco.com.
|
Message
|
Boilerplate text descriptive of action taken, usually self-explanatory (for example "User authentication succeeded."
|
Related Topics
•
Device Audit Trail Logging, page 14-23
•
Checking the Status of the ANM Server
•
Configuring Audit Log Settings
Configuring Auto Sync Settings
Use this procedure to configure ANM server auto sync settings.
Procedure
Step 1
Select Admin > ANM Management > ANM Auto Sync Settings. The Setup ANM auto-sync settings screen appears.
Step 2
In the ANM Auto sync field, select one of the following:
Enable to have the ANM server automatically sync with ACE CLI when it detects out of band changes.
or
Disable to have the ANM server warn but not take independent action when it detects out of band changes between the server and ACE CLI.
Step 3
In the Polling Interval field, select the polling interval you would like the ANM server to employ.
Step 4
Click OK to save your entries.
Related Topic
Synchronizing Virtual Context Configurations, page 3-66
Lifeline Management
Use the troubleshooting and diagnostics tools provided by the Lifeline feature to report a critical problem to the Cisco support line and generate a diagnostic package. For more information about this feature, see Using Lifeline, page 16-3.