Downloads |
 Feedback Feedback
|
Table Of Contents
Implementing First Hop Security in IPv6
Prerequisites for Implementing First Hop Security in IPv6
Restrictions for Implementing First Hop Security in IPv6
Information About Implementing First Hop Security in IPv6
IPv6 First-Hop Security Binding Table
IPv6 Port-Based Access List Support
Secure Neighbor Discovery in IPv6
IPv6 Neighbor Discovery Trust Models and Threats
How to Implement First Hop Security in IPv6
Configuring the IPv6 Binding Table Content
Configuring IPv6 Device Tracking
Configuring IPv6 ND Inspection
Configuring IPv6 ND Inspection Globally
Applying IPv6 ND Inspection on a Specified Interface
Verifying and Troubleshooting IPv6 ND Inspection
Applying IPv6 RA Guard on a Specified Interface
Verifying and Troubleshooting IPv6 RA Guard
Configuring Certificate Servers to Enable SeND
Configuring a Host to Enable SeND
Configuring a Router to Enable SeND
Configuring PACL Mode and Applying IPv6 PACL on an Interface
Configuration Examples for Implementing First Hop Security in IPv6
Example: IPv6 ND Inspection and RA Guard Configuration
Example: RA Guard Configuration
Example: Configuring PACL Mode and Applying IPv6 PACL on an Interface
Example: SeND Configuration Examples
Example: Configuring Certificate Servers
Example: Configuring a Host to Enable SeND
Example: Configuring a Router to Enable SeND
Example: Configuring a SeND Trustpoint in Router Mode
Example: Configuring SeND Trust Anchors in the Host Mode
Example: Configuring CGA Address Generation on an Interface
Feature Information for Implementing First Hop Security in IPv6
Implementing First Hop Security in IPv6
First Published: February 27, 2009Last Updated: July 20, 2011This document provides information about configuring features that comprise first hop security functionality in IPv6.
A database table of IPv6 neighbors connected to the switch is created from information sources such as Neighbor Discovery (ND) protocol snooping. This database, or binding, table is used by various IPv6 guard features (such as IPv6 ND Inspection, per-port address limit, IPv6 device tracking) to validate the link-layer address (LLA), the IPv4 or IPv6 address, and prefix binding of the neighbors to prevent spoofing and redirect attacks.
IPv6 ND Inspection learns and secures bindings for stateless autoconfiguration addresses in layer 2 neighbor tables. IPv6 ND inspection analyzes neighbor discovery messages in order to build a trusted binding table database, and IPv6 neighbor discovery messages that do not conform are dropped.
Router advertisements (RAs) are used by routers to announce themselves on the link. IPv6 RA Guard analyzes these RAs and can filter out bogus ones sent by unauthorized routers.
The per-port address limit feature enables an operator to specify a maximum number of IPv6 addresses allowed on a port of the switch. This function is achieved by filtering out ND messages sourced with addresses beyond the per-port address limit.
IPv6 Device Tracking provides IPv6 host liveness tracking so that a neighbor table can be immediately updated when an IPv6 host disappears.
The Secure Neighbor Discovery for Cisco IOS Software feature is designed to counter the threats of the ND protocol. Secure neighbor discovery (SeND) defines a set of neighbor discovery options and two neighbor discovery messages. SeND also defines a new autoconfiguration mechanism to establish address ownership. The IPv6 PACL feature adds IPv6 port-based ACL support.
Finding Feature Information
Your software release may not support all the features documented in this module. For the latest feature information and caveats, see the release notes for your platform and software release. To find information about the features documented in this module, and to see a list of the releases in which each feature is supported, see the "Feature Information for Implementing First Hop Security in IPv6" section.
Use Cisco Feature Navigator to find information about platform support and Cisco software image support. To access Cisco Feature Navigator, go to http://www.cisco.com/go/cfn. An account on Cisco.com is not required.
Contents
•
Prerequisites for Implementing First Hop Security in IPv6
•
•
•
•
•
Prerequisites for Implementing First Hop Security in IPv6
•
•
•
Restrictions for Implementing First Hop Security in IPv6
The IPv6 PACL feature is supported only in the ingress direction; it is not supported in the egress direction.
RA Guard in Cisco IOS Release 12.2(33)SXI4
•
•
•
•
•
•
•
•
•
•
Information About Implementing First Hop Security in IPv6
•
•
•
IPv6 First-Hop Security Binding Table
A database table of IPv6 neighbors connected to the switch is created from information sources such as Neighbor Discovery (ND) protocol snooping. This database, or binding, table is used by various IPv6 guard features to validate the link-layer address (LLA), the IPv4 or IPv6 address, and prefix binding of the neighbors to prevent spoofing and redirect attacks.
IPv6 Device Tracking
The IPv6 device tracking feature provides IPv6 host liveness tracking so that a neighbor table can be immediately updated when an IPv6 host disappears. The feature tracks of the liveness of the neighbors connected through the Layer 2 switch on regular basis in order to revoke network access privileges as they become inactive.
IPv6 Port-Based Access List Support
The IPv6 PACL feature provides the ability to provide access control (permit or deny) on L2 switch ports for IPv6 traffic. IPv6 PACLs are similar to IPv4 PACLs, which provide access control on L2 switch ports for IPV4 traffic. They are supported only in ingress direction and in hardware.
PACL can filter ingress traffic on L2 interfaces based on L3 and L4 header information or non-IP L2 information.
IPv6 Global Policies
IPv6 global policies provide policy database services to features with regard to storing and accessing those policies. IPv6 ND inspection and IPv6 RA guard are IPv6 global policies features. Every time an ND inspection or RA guard is configured globally, the attributes of the policy are stored in the software policy database. The policy is then applied to an interface, and the software policy database entry is updated to include this interface to which the policy is applied.
IPv6 RA Guard
IPv6 RA guard provides support for allowing the network administrator to block or reject unwanted or rogue RA guard messages that arrive at the network switch platform. RAs are used by routers to announce themselves on the link. The RA Guard feature analyzes these RAs and filters out bogus RAs sent by unauthorized routers. In host mode, all router advertisement and router redirect messages are disallowed on the port. The RA guard feature compares configuration information on the L2 device with the information found in the received RA frame. Once the L2 device has validated the content of the RA frame and router redirect frame against the configuration, it forwards the RA to its unicast or multicast destination. If the RA frame content is not validated, the RA is dropped.
IPv6 ND Inspection
IPv6 ND inspection learns and secures bindings for stateless autoconfiguration addresses in layer 2 neighbor tables. IPv6 ND inspection analyzes neighbor discovery messages in order to build a trusted binding table database, and IPv6 neighbor discovery messages that do not conform are dropped. SA neighbor discovery message is considered trustworthy if its IPv6-to-Media Access Control (MAC) mapping is verifiable.
This feature mitigates some of the inherent vulnerabilities for the neighbor discovery mechanism, such as attacks on duplicate address detection (DAD), address resolution, router discovery, and the neighbor cache.
Secure Neighbor Discovery in IPv6
•
IPv6 Neighbor Discovery Trust Models and Threats
There are three IPv6 neighbor discovery trust models, which are described as follows:
•
•
•
Nodes on the same link use ND to discover each other's presence and link-layer addresses, to find routers, and to maintain reachability information about the paths to active neighbors. ND is used by both hosts and routers. The original ND specifications used IPsec to protect ND messages. However, not many detailed instructions for using IPsec are available. The number of manually configured security associations needed for protecting ND can be very large, which makes that approach impractical for most purposes. These threats need to be considered and eliminated.
SeND Protocol
The SeND protocol counters ND threats. It defines a set of new ND options, and two new ND messages (Certification Path Solicitation [CPS] and Certification Path Answer [CPA]). It also defines a new autoconfiguration mechanism to be used in conjunction with the new ND options to establish address ownership.
SeND defines the mechanisms defined in the following sections for securing ND:
•
•
Cryptographically Generated Addresses in SeND
Cryptographically generated addresses (CGAs) are IPv6 addresses generated from the cryptographic hash of a public key and auxiliary parameters. This provides a method for securely associating a cryptographic public key with an IPv6 address in the SeND protocol.
The node generating a CGA address must first obtain a Rivest, Shamir, and Adelman (RSA) key pair (SeND uses an RSA public/private key pair). The node then computes the interface identifier part (which is the rightmost 64 bits) and appends the result to the prefix to form the CGA address.
CGA address generation is a one-time event. A valid CGA cannot be spoofed and the CGA parameters received associated to it is reused because the message must be signed with the private key that matches the public key used for CGA generation, which only the address owner will have.
A user cannot replay the complete SeND message (including the CGA address, CGA parameters, and CGA signature) because the signature has only a limited lifetime.
Authorization Delegation Discovery
Authorization delegation discovery is used to certify the authority of routers by using a trust anchor. A trust anchor is a third party that the host trusts and to which the router has a certification path. At a basic level, the router is certified by the trust anchor. In a more complex environment, the router is certified by a user that is certified by the trust anchor. In addition to certifying the router identity (or the right for a node to act as a router), the certification path contains information about prefixes that a router is allowed to advertise in router advertisements. Authorization delegation discovery enables a node to adopt a router as its default router.
SeND Deployment Models
•
•
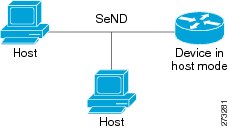
Host-to-Host Deployment Without a Trust Anchor
Deployment for SeND between hosts is straightforward. The hosts can generate a pair of RSA keys locally, autoconfigure their CGA addresses, and use them to validate their sender authority, rather than using a trust anchor to establish sender authority. Figure 1 illustrates this model.
Figure 1 Host-to-Host Deployment Model
Neighbor Solicitation Flow
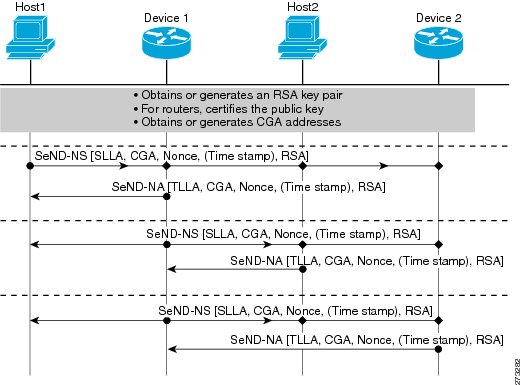
In a neighbor solicitation scenario, hosts and routers in host mode exchange neighbor solicitations and neighbor advertisements. These neighbor solicitations and neighbor advertisements are secured with CGA addresses and CGA options, and have nonce, time stamp, and RSA neighbor discovery options. Figure 2 illustrates this scenario.
Figure 2 Neighbor Solicitation Flow
Host-Router Deployment Model
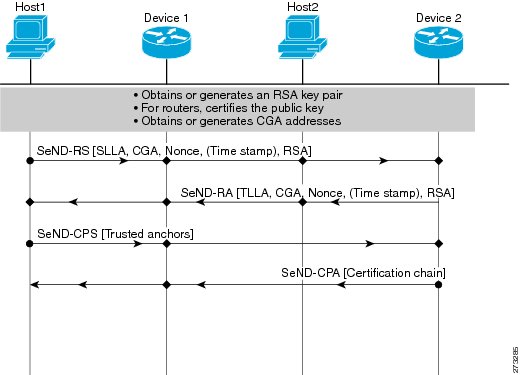
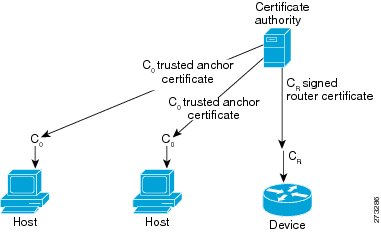
In many cases, hosts will not have access to the infrastructure that will enable them to obtain and announce their certificates. In these situations, hosts will secure their relationship using CGA, and secure their relationship with routers using a trusted anchor. When using RAs, SeND mandates that routers are authenticated through a trust anchor. Figure 3 illustrates this scenario.
Figure 3 Host-Router Deployment Model
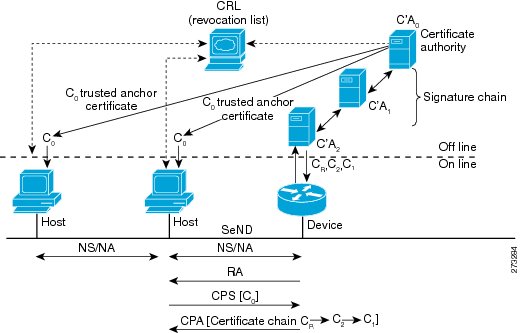
Router Advertisement and Certificate Path Flows
Figure 4 shows the certificate exchange performed using certification path solicitation CPS/CPA SeND messages. In the illustration, Router R is certified (using an X.509 certificate) by its own CA (certificates CR). The CA itself (CA2) is certified by its own CA (certificates C2), and so on, up to a CA (CA0) that the hosts trusts. The certificate CR contains IP extensions per RFC 3779, which describes which prefix ranges the router R is allowed to announce (in RAs). This prefix range, certified by CA2, is a subset of CA2's own range, certified by CA1, and so on. Part of the validation process when a certification chain is received consists of validating the certification chain and the consistency of nested prefix ranges.
Figure 4 Router Advertisement and Certificate Path Flows
Single CA Model
The deployment model shown in Figure 3 can be simplified in an environment where both hosts and routers trust a single CA such as the Cisco certification server (CS). Figure 5 illustrates this model.
Figure 5 Single CA Deployment Model
How to Implement First Hop Security in IPv6
•
•
•
Configuring the IPv6 Binding Table Content
SUMMARY STEPS
1.
2.
3.
4.
5.
6.
7.
DETAILED STEPSConfiguring IPv6 Device Tracking
Perform this task to provide fine grain control over the life cycle of an entry in the binding table for the IPv6 device tracking feature. This feature is available in Cisco IOS Release 12.2(50)SY. In order for IPv6 device tracking to work, the binding table needs to be populated (see the "Configuring the IPv6 Binding Table Content" section).
SUMMARY STEPS
1.
2.
3.
DETAILED STEPSConfiguring IPv6 ND Inspection
•
•
•
Configuring IPv6 ND Inspection Globally
SUMMARY STEPS
1.
2.
3.
4.
5.
6.
7.
8.
DETAILED STEPSApplying IPv6 ND Inspection on a Specified Interface
SUMMARY STEPS
1.
2.
3.
4.
DETAILED STEPSVerifying and Troubleshooting IPv6 ND Inspection
SUMMARY STEPS
1.
2.
3.
4.
5.
6.
DETAILED STEPSConfiguring IPv6 RA Guard
•
•
Applying IPv6 RA Guard on a Specified Interface
SUMMARY STEPS
1.
2.
3.
4.
DETAILED STEPSConfiguring IPv6 RA Guard in Cisco IOS Release 12.2(33)SXI4 and 12.2(54)SG
SUMMARY STEPS
1.
2.
3.
4.
DETAILED STEPSVerifying and Troubleshooting IPv6 RA Guard
SUMMARY STEPS
1.
2.
3.
DETAILED STEPSConfiguring SeND for IPv6
Certificate servers are used to grant certificates after validating or certifying key pairs. A tool for granting certificates is mandatory in any SeND deployment. Many tools are available to grant certificates, for example, Open Secure Sockets Layer (OpenSSL) on Linux. However, very few certificate servers support granting certificates containing IP extensions. Cisco IOS certificate servers support every kind of certificate including the certificates containing the IP extensions.
SeND is available in host mode. The set of available functions on a host will be a subset of SeND functionality. CGA will be fully available and the prefix authorization delegation will be supported on the host side (sending CPS and receiving CPA).
To implement SeND, configure the host with the following parameters:
•
•
•
•
•
SeND is also available in router mode. You can use the ipv6 unicast-routing command to configure a node to a router. To implement SeND, configure routers with the same elements as that of the host. The routers will need to retrieve certificates of their own from a certificate server. The RSA key and subject name of the trustpoint are used to retrieve certificates from a certificate server. Once the certificate has been obtained and uploaded, the router generates a certificate request to the certificate server and installs the certificate.
The following operations need to be completed before SeND is configured on the host or router:
•
•
•
While booting, hosts and routers must either retrieve or generate their CGAs. Typically, routers will autoconfigure their CGAs once and save them (along with the key pair used in the CGA operation) into their permanent storage. At a minimum, link-local addresses on a SeND interface should be CGAs. Additionally, global addresses can be CGAs.
•
•
•
Configuring Certificate Servers to Enable SeND
Hosts and routers must be configured with RSA key pairs and corresponding certificate chains before the SeND parameters are configured. Perform the following task to configure the certificate server to grant certificates. Once the certificate server is configured, other parameters for the certificate server can be configured.
SUMMARY STEPS
1.
2.
3.
4.
5.
6.
7.
8.
9.
10.
11.
DETAILED STEPSConfiguring a Host to Enable SeND
SeND is available in host mode. Before you can configure SeND parameters in host mode, first configure the host using the following commands. Once the host has been configured, SeND parameters can be configured on it.
Summary Steps
1.
2.
3.
4.
5.
6.
7.
8.
9.
10.
11.
12.
13.
14.
15.
16.
17.
DETAILED STEPSConfiguring a Router to Enable SeND
SeND is available in the router mode. Perform this task before you can configure SeND parameters in router mode. Once the router has been configured, the SeND parameters can be configured on it.
Summary Steps
1.
2.
3.
4.
5.
6.
7.
8.
9.
10.
11.
12.
13.
14.
15.
16.
17.
18.
19.
DETAILED STEPSImplementing IPv6 SeND
•
•
•
Creating the RSA Key Pair and CGA Modifier for the Key Pair
SUMMARY STEPS
1.
2.
3.
4.
DETAILED STEPSConfiguring Certificate Enrollment for a PKI
Certificate enrollment, which is the process of obtaining a certificate from a CA, occurs between the end host that requests the certificate and the CA. Each peer that participates in the PKI must enroll with a CA. In IPv6, you can autoenroll or manually enroll the device certificate.
SUMMARY STEPS
1.
2.
3.
4.
5.
6.
7.
8.
9.
10.
11.
12.
13.
14.
15.
16.
17.
DETAILED STEPSConfiguring a Cryptographically Generated Address
•
•
Configuring General CGA Parameters
SUMMARY STEPS
1.
2.
3.
4.
DETAILED STEPSConfiguring CGA Address Generation on an Interface
SUMMARY STEPS
1.
2.
3.
4.
5.
DETAILED STEPSConfiguring SeND Parameters
•
•
•
•
•
Configuring the SeND Trustpoint
In router mode, the key pair used to generate the CGA addresses on an interface must be certified by the CA and the certificate sent on demand over the SeND protocol. One RSA key pair and associated certificate is enough for SeND to operate; however, users may use several keys, identified by different labels. SeND and CGA refer to a key directly by label or indirectly by trustpoint.
Multiple steps are required to bind SeND to a trustpoint. First, a key pair is generated. Then the device refers to it in a trustpoint, and next the SeND interface configuration points to the trustpoint. There are two reasons for the multiple steps:
•
•
A CA certificate must be uploaded for the referred trustpoint. The referred trustpoint is in reality a trusted anchor.
Several trustpoints can be configured, pointing to the same RSA keys, on a given interface. This function is useful if different hosts have different trusted anchors (that is, CAs that they trust). The router can the provide each host with the certificate signed by the CA they trust.
SUMMARY STEPS
1.
2.
3.
4.
5.
6.
7.
8.
9.
10.
11.
12.
13.
14.
15.
DETAILED STEPSConfiguring SeND Trust Anchors on the Interface
This task can be performed only in host mode. The host must be configured with one or more trust anchors. As soon as SeND is bound to a trustpoint on an interface (see "Configuring the SeND Trustpoint" section), this trustpoint is also a trust anchor.
A trust anchor configuration consists of the following items:
•
•
•
•
Because PKI has already been configured, the trust anchor configuration is accomplished by binding SeND to one or several PKI trustpoints. PKI is used to upload the corresponding certificates, which contain the required parameters (such as name and key).
Perform this optional task to configure a trusted anchor on the interface. It allows you to select trust anchors listed in the CPS when requesting for a certificate. If you opt not to configure trust anchors, all the PKI trustpoints configured on the host will be considered.
SUMMARY STEPS
1.
2.
3.
4.
5.
6.
7.
8.
DETAILED STEPSConfiguring Secured and Nonsecured Neighbor Discovery Message Coexistence Mode
During the transition to SeND secured interfaces, network operators may want to run a particular interface with a mixture of nodes accepting secured and unsecured neighbor discovery messages. Perform this task to configure the coexistence mode for secure and nonsecure ND messages on the same interface.
SUMMARY STEPS
1.
2.
3.
4.
5.
DETAILED STEPSConfiguring SeND Parameters Globally
SUMMARY STEPS
1.
2.
3.
4.
DETAILED STEPSConfiguring the SeND Time Stamp
SUMMARY STEPS
1.
2.
3.
4.
DETAILED STEPSConfiguring IPv6 PACL
•
Creating an IPv6 Access List
The first task in configuring IPv6 PACL is to create an IPv6 access list. This task is described in detail in Implementing Traffic Filters and Firewalls for IPv6 Security.
Configuring PACL Mode and Applying IPv6 PACL on an Interface
Once you have configured the IPv6 access list you want to use, you must configure the PACL mode on the specified IPv6 L2 interface.
SUMMARY STEPS
1.
2.
3.
4.
5.
DETAILED STEPSConfiguration Examples for Implementing First Hop Security in IPv6
•
•
•
•
Example: IPv6 ND Inspection and RA Guard Configuration
This example provides information about the Ethernet 0/0 interface, on which the ND inspection and RA Guard features are configured:
Router# show ipv6 snooping capture interface ethernet 0/0Hardware policy registered on Et0/0Protocol Protocol value Message Value Action FeatureICMP 58 RS 85 punt RA Guardpunt ND InspectionICMP 58 RA 86 drop RA guardpunt ND InspectionICMP 58 NS 87 punt ND InspectionICM 58 NA 88 punt ND InspectionICMP 58 REDIR 89 drop RA Guardpunt ND InspectionExample: RA Guard Configuration
This section provides a configuration example for the RA guard feature:
Router(config)# interface fastethernet 3/13
Router(config-if)# ipv6 nd raguard
Router# show run interface fastethernet 3/13Building configuration...Current configuration : 129 bytes!interface FastEthernet3/13switchportswitchport access vlan 222switchport mode accessaccess-group mode prefer portipv6 nd raguardendExample: Configuring PACL Mode and Applying IPv6 PACL on an Interface
Once you have configured the IPv6 access list you want to use, you can configure the PACL mode on a specified IPv6 switchport. This section uses an access list named list1, provides an example of how to configure PACL mode, and applies IPv6 PACL to a GigabitEthernet interface.
Router(config)# interface gigabitethernet 3/24Router(config-if)# access-group mode prefer portRouter(config-if)# ipv6 traffic-filter list1 inExample: SeND Configuration Examples
Example: Configuring Certificate Servers
The following example shows how to configure certificate servers:
crypto pki server CAissuer-name C=FR, ST=fr, L=example, O=cisco, OU=nsstg, CN=CA0 lifetime ca-certificate 700 !crypto pki trustpoint CAip-extension prefix 2001::/16revocation-check crlrsakeypair CAno shutdown
Note
To display the certificate servers with IP extensions, use the show crypto pki certificates verbose command:
Router# show crypto pki certificates verboseCA CertificateStatus: AvailableVersion: 3Certificate Serial Number (hex): 01Certificate Usage: SignatureIssuer:c=FRst=frl=exampleo=ciscoou=nsstgcn=CA0Subject:c=FRst=frl=exampleo=ciscoou=nsstgcn=CA0Validity Date:start date: 09:50:52 GMT Feb 5 2009end date: 09:50:52 GMT Jan 6 2011Subject Key Info:Public Key Algorithm: rsaEncryptionRSA Public Key: (1024 bit)Signature Algorithm: MD5 with RSA EncryptionFingerprint MD5: 87DB764F 29367A65 D05CEE3D C12E0AC3Fingerprint SHA1: 04A06602 86AA72E9 43F2DB33 4A7D40A2 E2ED3325X509v3 extensions:X509v3 Key Usage: 86000000Digital SignatureKey Cert SignCRL SignatureX509v3 Subject Key ID: 75B477C6 B2CA7BBE C7866657 57C84A32 90CEFB5AX509v3 Basic Constraints:CA: TRUEX509v3 Authority Key ID: 75B477C6 B2CA7BBE C7866657 57C84A32 90CEFB5AAuthority Info Access:X509v3 IP Extension:IPv6:2001::/16Associated Trustpoints: CAExample: Configuring a Host to Enable SeND
The following example shows how to configure a host to enable SeND:
enableconfigure terminalcrypto key generate rsa label SEND modulus 1024The name for the keys will be: SEND% The key modulus size is 1024 bits% Generating 1024 bit RSA keys, keys will be non-exportable...[OK]ipv6 cga modifier rsakeypair SEND sec-level 1crypto pki trustpoint SENDenrollment url http://209.165.200.254revocation-check noneexitcrypto pki authenticate SENDCertificate has the following attributes:Fingerprint MD5: FC99580D 0A280EB4 2EB9E72B 941E9BDAFingerprint SHA1: 22B10EF0 9A519177 145EA4F6 73667837 3A154C53% Do you accept this certificate? [yes/no]: yesTrustpoint CA certificate accepted.ipv6 nd secured sec-level minimum 1interface fastethernet 0/0ipv6 cga rsakeypair SENDipv6 address FE80::260:3EFF:FE11:6770 link-local cgaipv6 nd secured trustanchor SENDipv6 nd secured timestamp delta 300exitipv6 nd secured full-secureTo verify the configuration use the show running-config command:
host# show running-configBuilding configuration...[snip]crypto pki trustpoint SENDenrollment url http://209.165.200.225revocation-check none!interface Ethernet1/0ip address 209.165.202.129 255.255.255.0duplex halfipv6 cga rsakeypair SENDipv6 address 2001:100::/64 cgaExample: Configuring a Router to Enable SeND
The following example shows how to configure the router to enable SeND:
enableconfigure terminalcrypto key generate rsa label SEND modulus 1024ipv6 cga modifier rsakeypair SEND sec-level 1crypto pki trustpoint SENDsubject-name C=FR, ST=PACA, L=Example, O=Cisco, OU=NSSTG, CN=routerrsakeypair SENDrevocation-check noneexitcrypto pki authenticate SENDCertificate has the following attributes:Fingerprint MD5: FC99580D 0A280EB4 2EB9E72B 941E9BDAFingerprint SHA1: 22B10EF0 9A519177 145EA4F6 73667837 3A154C53% Do you accept this certificate? [yes/no]: yesTrustpoint CA certificate accepted.crypto pki enroll SEND% Start certificate enrollment ..% Create a challenge password. You will need to verbally provide thispassword to the CA Administrator in order to revoke your certificate.For security reasons your password will not be saved in the configuration.Please make a note of it.Password:Re-enter password:% The subject name in the certificate will include: C=FR, ST=fr, L=example, O=cisco, OU=nsstg, CN=route r % The subject name in the certificate will include: Router % Include the router serial number in the subject name? [yes/no]: no % Include an IP address in the subject name? [no]:Request certificate from CA? [yes/no]: yes % Certificate request sent to CertificateAuthority % The 'show crypto pki certificate SEND verbose' commandwill show the fingerprint.*Feb 5 09:40:37.171: CRYPTO_PKI: Certificate Request Fingerprint MD5:A6892F9F 23561949 4CE96BB8 CBC85 E64*Feb 5 09:40:37.175: CRYPTO_PKI: Certificate Request Fingerprint SHA1:30832A66 E6EB37DF E578911D 383F 96A0 B30152E7*Feb 5 09:40:39.843: %PKI-6-CERTRET: Certificate received from Certificate Authorityinterface fastethernet 0/0ipv6 nd secured sec-level minimum 1ipv6 cga rsakeypair SENDipv6 address fe80::link-local cgaipv6 nd secured trustanchor SENDipv6 nd secured timestamp delta 300exitipv6 nd secured full-secureTo verify that the certificates are generated, use the show crypto pki certificates command:
Router# show crypto pki certificatesCertificateStatus: AvailableCertificate Serial Number: 0x15Certificate Usage: General PurposeIssuer:cn=CASubject:Name: Routerhostname=Routerc=FRst=frl=exampleo=ciscoou=nsstgcn=routerValidity Date:start date: 09:40:38 UTC Feb 5 2009end date: 09:40:38 UTC Feb 5 2010Associated Trustpoints: SENDCA CertificateStatus: AvailableCertificate Serial Number: 0x1Certificate Usage: SignatureIssuer:cn=CASubject:cn=CAValidity Date:start date: 10:54:53 UTC Jun 20 2008end date: 10:54:53 UTC Jun 20 2011Associated Trustpoints: SENDTo verify the configuration, use the show running-config command:
Router# show running-configBuilding configuration...[snip]crypto pki trustpoint SENDenrollment url http://209.165.201.1subject-name C=FR, ST=fr, L=example, O=cisco, OU=nsstg, CN=router revocation-check none rsakeypair SEND !interface Ethernet1/0ip address 209.165.200.225 255.255.255.0duplex halfipv6 cga rsakeypair SENDipv6 address FE80:: link-local cgaipv6 address 2001:100::/64 cgaExample: Configuring a SeND Trustpoint in Router Mode
The following example shows how to configure a SeND trustpoint in router mode:
enableconfigure terminalcrypto key generate rsa label SENDChoose the size of the key modulus in the range of 360 to 2048 for yourGeneral Purpose Keys. Choosing a key modulus greater than 512 may takea few minutes.How many bits in the modulus [512]: 778% Generating 778 bit RSA keys, keys will be non-exportable...[OK]ipv6 cga modifier rsakeypair SEND sec-level 1crypto pki trustpoint trstpt1subject-name C=FR, ST=fr, L=example, O=cisco, OU=nsstg, CN=sa14-72brsakeypair SENDenrollment terminalip-extension unicast prefix 2001:100:1://48exitcrypto pki authenticate trstpt1crypto pki enroll trstpt1crypto pki import trstpt1 certificateinterface Ethernet 0/0ipv6 nd secured trustpoint trstpt1Example: Configuring SeND Trust Anchors in the Host Mode
The following example shows how to configure SeND trust anchors on an interface in the host mode:
enableconfigure terminal! Configure the location of the CS we trust !crypto pki trustpoint B1enrollment terminalcrypto pki authenticate anchor1exit! Only Query a certificate signed by the CS at B2 on this interface !interface Ethernet0/0ip address 204.209.1.54 255.255.255.0ipv6 cga rsakeypair SENDipv6 address 2001:100::/64 cgaipv6 nd secured trustanchor anchor1Example: Configuring CGA Address Generation on an Interface
The following example shows how to configure CGA address generation on an interface:
enableconfigure terminalinterface fastEthernet 0/0ipv6 cga rsakeypair SENDipv6 address 2001:100::/64 cgaexitAdditional References
Related Documents
IPv6 Neighbor Discovery
ICMP in IPv6
IPv6—IPv6 stateless autoconfiguration
IPv6 access lists
Implementing Traffic Filters and Firewalls for IPv6 Security
IPv6 DHCP
Configuring certificate enrollment for a PKI
"Configuring Certificate Enrollment for a PKI" module in the Cisco IOS Security Configuration Guide
IPv6 commands
All Cisco IOS commands
Standards
No new or modified standards are supported, and support for existing standards has not been modified.
—
MIBs
None
To locate and download MIBs for selected platforms, Cisco software releases, and feature sets, use Cisco MIB Locator found at the following URL:
RFCs
Technical Assistance
Feature Information for Implementing First Hop Security in IPv6
Table 1 lists the features in this module and provides links to specific configuration information.
Use Cisco Feature Navigator to find information about platform support and software image support. Cisco Feature Navigator enables you to determine which software images support a specific software release, feature set, or platform. To access Cisco Feature Navigator, go to http://www.cisco.com/go/cfn. An account on Cisco.com is not required.
Note
Table 1 Feature Information for Implementing First Hop Security in IPv6
IPv6 Device Tracking
12.2(50)SY
This feature allows IPv6 host liveness to be tracked so the neighbor binding table can be immediately updated when an IPv6 host disappears.
The following sections provide information about this feature:
The following commands were introduced or modified: ipv6 neighbor binding, ipv6 neighbor binding down-lifetime, ipv6 neighbor binding logging, ipv6 neighbor binding max-entries, ipv6 neighbor binding stale-lifetime, ipv6 neighbor binding vlan, ipv6 neighbor tracking, show ipv6 neighbor binding.
IPv6 ND Inspection
12.2(50)SY
The IPv6 ND Inspection feature learns and secures bindings for stateless autoconfiguration addresses in layer 2 neighbor tables.
The following sections provide information about this feature:
•
•
The following commands were introduced: clear ipv6 snooping counters, debug ipv6 snooping, device-role, drop-unsecure, ipv6 nd inspection, ipv6 nd inspection policy, sec-level minimum, show ipv6 snooping capture-policy, show ipv6 snooping counters, show ipv6 snooping features, show ipv6 snooping policies, tracking, trusted-port.
IPv6 PACL
12.2(54)SG
12.2(33)SXI4
12.2(50)SYThe IPv6 PACL permits or denies the movement of traffic between Layer 3 (L3) subnets and VLANs, or within a VLAN.
The following sections provide information about this feature:
•
The following commands were introduced or modified: access-group mode, ipv6 traffic-filter.
IPv6 RA Guard
12.2(54)SG
12.2(33)SXI4
12.2(50)SYIPv6 RA guard provides support for allowing the network administrator to block or reject unwanted or rogue RA guard messages that arrive at the network switch platform.
The following sections provide information about this feature:
•
•
•
Secure Neighbor Discovery for Cisco IOS Software
12.4(24)T
The Secure Neighbor Discovery (SeND) protocol is designed to counter the threats of the ND protocol. SeND defines a set of neighbor discovery options and two neighbor discovery messages. SeND also defines a new autoconfiguration mechanism to establish address ownership.
The following sections provide information about this feature:
•
•
The following commands were introduced or modified: auto-enroll, crypto key generate rsa, crypto pki authenticate, crypto pki enroll, crypto pki import, enrollment terminal (ca-trustpoint), enrollment url (ca-trustpoint), fingerprint, ip-extension, ip http server, ipv6 address, ipv6 address link-local, ipv6 cga modifier rsakeypair, ipv6 cga modifier rsakeypair (interface), ipv6 nd secured certificate-db, ipv6 nd secured full-secure, ipv6 nd secured full-secure (interface), ipv6 nd secured key-length, ipv6 nd secured sec-level, ipv6 nd secured timestamp, ipv6 nd secured timestamp-db, ipv6 nd secured trustanchor, ipv6 nd secured trustpoint, password (ca-trustpoint), revocation-check, rsakeypair, serial-number (ca-trustpoint), show ipv6 cga address-db, show ipv6 cga modifier-db, show ipv6 nd secured certificates, show ipv6 nd secured counters interface, show ipv6 nd secured nonce-db, show ipv6 nd secured timestamp-db, subject-name.
Glossary
•
•
•
•
•
•
•
•
•
•
•
•
•
•
•
•
•
•
•
•
•
•
•
•
•
Cisco and the Cisco Logo are trademarks of Cisco Systems, Inc. and/or its affiliates in the U.S. and other countries. A listing of Cisco's trademarks can be found at www.cisco.com/go/trademarks. Third party trademarks mentioned are the property of their respective owners. The use of the word partner does not imply a partnership relationship between Cisco and any other company. (1005R)
Any Internet Protocol (IP) addresses and phone numbers used in this document are not intended to be actual addresses. Any examples, command display output, and figures included in the document are shown for illustrative purposes only. Any use of actual IP addresses in illustrative content is unintentional and coincidental.
© 2009-2011 Cisco Systems, Inc. All rights reserved.