Feedback
Table Of Contents
Configuring BGP Neighbor Session Options
Prerequisites for Configuring BGP Neighbor Session Options
Restrictions for Configuring BGP Neighbor Session Options
Information About Configuring BGP Neighbor Session Options
BGP Support for Fast Peering Session Deactivation
BGP Fast Peering Session Deactivation
Selective Address Tracking for BGP Fast Session Deactivation
BGP Neighbor Session Restart After the Max-Prefix Limit is Reached
Prefix Limits and BGP Peering Sessions
BGP Neighbor Session Restart with the Maximum Prefix Limit
BGP Network Autonomous System Migration
Autonomous System Migration for BGP Networks
Dual Autonomous System Support for BGP Network Autonomous System Migration
TTL Security Check for BGP Neighbor Sessions
BGP Support for the TTL Security Check
TTL Security Check for BGP Neighbor Sessions
TTL Security Check Support for Multihop BGP Neighbor Sessions
Benefits of the BGP Support for TTL Security Check
BGP Support for TCP Path MTU Discovery per Session
BGP Neighbor Session TCP PMTUD
How to Configure BGP Neighbor Session Options
Configuring Fast Session Deactivation
Configuring Fast Session Deactivation for a BGP Neighbor
Aggressively Dampen IGP Routes
Configuring Selective Address Tracking for Fast Session Deactivation
Reestablishing Neighbor Sessions
Configuring Dual-AS Peering for Network Migration
Configuring the TTL Security Check for BGP Neighbor Sessions
Configuring BGP Support for TCP Path MTU Discovery per Session
Disabling TCP Path MTU Discovery Globally for All BGP Sessions
Disabling TCP Path MTU Discovery for a Single BGP Neighbor
Enabling TCP Path MTU Discovery Globally for All BGP Sessions
Enabling TCP Path MTU Discovery for a Single BGP Neighbor
Implementing BGP Dynamic Neighbors Using Subnet Ranges
Configuration Examples for Configuring BGP Neighbor Session Options
Configuring Fast Session Deactivation for a BGP Neighbor: Example
Configuring Selective Address Tracking for Fast Session Deactivation: Example
Restart Session After Max-Prefix Limit Configuration: Example
Configuring Dual-AS Peering for Network Migration: Examples
Dual-AS Configuration: Example
Dual-AS Confederation Configuration: Example
Replace-AS Configuration: Example
Configuring the TTL-Security Check: Example
Configuring BGP Support for TCP Path MTU Discovery per Session: Examples
Disabling TCP Path MTU Discovery Globally for All BGP Sessions: Example
Disabling TCP Path MTU Discovery for a Single BGP Neighbor: Example
Enabling TCP Path MTU Discovery Globally for All BGP Sessions: Example
Enabling TCP Path MTU Discovery for a Single BGP Neighbor: Example
Implementing BGP Dynamic Neighbors Using Subnet Ranges: Example
Feature Information for Configuring BGP Neighbor Session Options
Configuring BGP Neighbor Session Options
First Published: October 31, 2005Last Updated: August 21, 2007This module describes configuration tasks to configure various options involving Border Gateway Protocol (BGP) neighbor peer sessions. BGP is an interdomain routing protocol designed to provide loop-free routing between organizations. This module contains tasks that use BGP neighbor session commands to configure fast session deactivation, configure a router to automatically reestablish a BGP neighbor peering session when the peering session has been disabled or brought down, configure options to help an autonomous system migration, and to configure a lightweight security mechanism to protect eBGP peering sessions from CPU utilization-based attacks.
Finding Feature Information in This Module
Your Cisco IOS software release may not support all of the features documented in this module. To reach links to specific feature documentation in this module and to see a list of the releases in which each feature is supported, use the "Feature Information for Configuring BGP Neighbor Session Options" section.
Finding Support Information for Platforms and Cisco IOS Software Images
Use Cisco Feature Navigator to find information about platform support and Cisco IOS software image support. Access Cisco Feature Navigator at http://www.cisco.com/go/fn. You must have an account on Cisco.com. If you do not have an account or have forgotten your username or password, click Cancel at the login dialog box and follow the instructions that appear.
Contents
•
Prerequisites for Configuring BGP Neighbor Session Options
•
•
•
•
•
Prerequisites for Configuring BGP Neighbor Session Options
Before configuring advanced BGP features you should be familiar with the "Cisco BGP Overview" module and the "Configuring a Basic BGP Network" module.
Restrictions for Configuring BGP Neighbor Session Options
A router that runs Cisco IOS software can be configured to run only one BGP routing process and to be a member of only one BGP autonomous system. However, a BGP routing process and autonomous system can support multiple address family configurations.
Information About Configuring BGP Neighbor Session Options
To configure the BGP features in this module you should understand the following concepts:
•
•
•
•
•
BGP Neighbor Sessions
BGP is mainly used to connect a local network to an external network to gain access to the Internet or to connect to other organizations. A BGP-speaking router does not discover another BGP-speaking device automatically. A network administrator usually manually configures the relationships between BGP-speaking routers. A BGP neighbor device is a BGP-speaking router that has an active TCP connection to another BGP-speaking device. This relationship between BGP devices is often referred to as a peer instead of neighbor because a neighbor may imply the idea that the BGP devices are directly connected with no other router in between. Configuring BGP neighbor or peer sessions uses BGP neighbor session commands so this module will prefer the use of the term neighbor over peer.
BGP Support for Fast Peering Session Deactivation
•
•
BGP Hold Timer
By default, the BGP hold timer is set to run every 180 seconds in Cisco IOS software. This timer value is set as default to protect the BGP routing process from instability that can be introduced by peering sessions with other routing protocols. BGP routers typically carry large routing tables, so frequent session resets are not desirable.
BGP Fast Peering Session Deactivation
BGP fast peering session deactivation improves BGP convergence and response time to adjacency changes with BGP neighbors. This feature is event driven and configured on a per-neighbor basis. When this feature is enabled, BGP will monitor the peering session with the specified neighbor. Adjacency changes are detected and terminated peering sessions are deactivated in between the default or configured BGP scanning interval.
Selective Address Tracking for BGP Fast Session Deactivation
In Cisco IOS Release 12.4(4)T, 12.2(31)SB, 12.2(33)SRB, and later releases, the BGP Selective Address Tracking feature introduced the use of a route map with BGP fast session deactivation. The route-map keyword and map-name argument are used with the neighbor fall-over BGP neighbor session command to determine if a peering session with a BGP neighbor should be reset when a route to the BGP peer changes. The route map is evaluated against the new route, and if a deny statement is returned, the peer session is reset. The route map is not used for session establishment.
Note
BGP Neighbor Session Restart After the Max-Prefix Limit is Reached
•
•
Prefix Limits and BGP Peering Sessions
There is a configurable limit on the maximum number of prefixes that a router that is running BGP can receive from a peer router. This limit is configured with the neighbor maximum-prefix command. When the router receives too many prefixes from a peer router and the maximum-prefix limit is exceeded, the peering session is disabled or brought down. The session stays down until the network operator manually brings the session back up by entering the clear ip bgp command. Entering the clear ip bgp command clears stored prefixes.
BGP Neighbor Session Restart with the Maximum Prefix Limit
In Cisco IOS Release 12.0(22)S, 12.2(15)T, 12.2(18)S and later releases the restart keyword was introduced to enhance the capabilities of the neighbor maximum-prefix command. This enhancement allows the network operator to configure a router to automatically reestablish a BGP neighbor peering session when the peering session has been disabled or brought down. There is configurable time interval at which peering can be reestablished automatically. The configurable timer argument for the restart keyword is specified in minutes. The time range is from 1 to 65,535 minutes.
BGP Network Autonomous System Migration
•
•
Autonomous System Migration for BGP Networks
Autonomous-system migration can be necessary when a telecommunications or Internet service provider purchases another network. It is desirable for the provider to be able integrate the second autonomous system without disrupting existing customer peering arrangements. The amount of configuration required in the customer networks can make this a cumbersome task that is difficult to complete without disrupting service.
Dual Autonomous System Support for BGP Network Autonomous System Migration
In Cisco IOS Release 12.0(29)S, 12.3(14)T, and 12.2(33)SXH, and later releases, support was added for dual BGP autonomous system configuration to allow a secondary autonomous system to merge under a primary autonomous system, without disrupting customer peering sessions. The configuration of this feature is transparent to customer networks. Dual BGP autonomous system configuration allows a router to appear, to external peers, as a member of secondary autonomous system during the autonomous system migration. This feature allows the network operator to merge the autonomous systems and then later migrate customers to new configurations during normal service windows without disrupting existing peering arrangements.
The neighbor local-as command is used to customize the AS_PATH attribute by adding and removing autonomous system numbers for routes received from eBGP neighbors. This feature allows a router to appear to external peers as a member of another autonomous system for the purpose of autonomous system number migration. This feature simplifies this process of changing the autonomous-system number in a BGP network by allowing the network operator to merge a secondary autonomous system into a primary autonomous system and then later update the customer configurations during normal service windows without disrupting existing peering arrangements.
BGP Autonomous System Migration Support for Confederations, Individual Peering Sessions and Peer Groupings
This feature supports confederations, individual peering sessions and configurations applied through peer-groups and peer templates. If this feature is applied to a group peers, the individual peers cannot be customized.
Ingress Filtering During BGP Autonomous System Migration
Autonomous system path customization increases the possibility that routing loops can be created if misconfigured. The larger the number of customer peerings, the greater the risk. You can minimize this possibility by applying policies on the ingress interfaces to block the autonomous-system number that is in transition or routes that have no local-as configuration.
Caution
TTL Security Check for BGP Neighbor Sessions
•
•
•
•
BGP Support for the TTL Security Check
When implemented for BGP, the TTL Security Check feature introduces a lightweight security mechanism to protect eBGP neighbor sessions from CPU utilization-based attacks. These types of attacks are typically brute force Denial of Service (DoS) attacks that attempt to disable the network by flooding the network with IP packets that contain forged source and destination IP addresses.
TTL Security Check protects the eBGP neighbor session by comparing the value in the TTL field of received IP packets against a hop count that is configured locally for each eBGP neighbor session. If the value in the TTL field of the incoming IP packet is greater than or equal to the locally configured value, the IP packet is accepted and processed normally. If the TTL value in the IP packet is less than the locally configured value, the packet is silently discarded and no ICMP message is generated. This is designed behavior; a response to a forged packet is unnecessary.
Although it is possible to forge the TTL field in an IP packet header, accurately forging the TTL count to match the TTL count from a trusted peer is impossible unless the network to which the trusted peer belongs has been compromised.
TTL Security Check supports both directly connected neighbor sessions and multihop eBGP neighbor sessions. The BGP neighbor session is not affected by incoming packets that contain invalid TTL values. The BGP neighbor session will remain open, and the router will silently discard the invalid packet. The BGP session, however, can still expire if keepalive packets are not received before the session timer expires.
TTL Security Check for BGP Neighbor Sessions
The BGP Support for TTL Security Check feature is configured with the neighbor ttl-security command in router configuration mode or address family configuration mode. When this feature is enabled, BGP will establish or maintain a session only if the TTL value in the IP packet header is equal to or greater than the TTL value configured for the peering session. Enabling this feature secures the eBGP session in the incoming direction only and has no effect on outgoing IP packets or the remote router. The hop-count argument is used to configure the maximum number of hops that separate the two peers. The TTL value is determined by the router from the configured hop count. The value for this argument is a number from 1 to 254.
TTL Security Check Support for Multihop BGP Neighbor Sessions
The BGP Support for TTL Security Check feature supports both directly connected neighbor sessions and multihop neighbor sessions. When this feature is configured for a multihop neighbor session, the neighbor ebgp-multihop router configuration command cannot be configured and is not needed to establish the neighbor session. These commands are mutually exclusive, and only one command is required to establish a multihop neighbor session. If you attempt to configure both commands for the same peering session, an error message will be displayed in the console.
To configure this feature for an existing multihop session, you must first disable the existing neighbor session with the no neighbor ebgp-multihop command. The multihop neighbor session will be restored when you enable this feature with the neighbor ttl-security command.
This feature should be configured on each participating router. To maximize the effectiveness of this feature, the hop-count argument should be strictly configured to match the number of hops between the local and external network. However, you should also consider path variation when configuring this feature for a multihop neighbor session.
Benefits of the BGP Support for TTL Security Check
The BGP Support for TTL Security Check feature provides an effective and easy-to-deploy solution to protect eBGP neighbor sessions from CPU utilization-based attacks. When this feature is enabled, a host cannot attack a BGP session if the host is not a member of the local or remote BGP network or if the host is not directly connected to a network segment between the local and remote BGP networks. This solution greatly reduces the effectiveness of DoS attacks against a BGP autonomous system.
BGP Support for TCP Path MTU Discovery per Session
•
Path MTU Discovery
The IP protocol family was designed to use a wide variety of transmission links. The maximum IP packet length is 65000 bytes. Most transmission links enforce a smaller maximum packet length limit, called the maximum transmission unit (MTU), which varies with the type of the transmission link. The design of IP accommodates link packet length limits by allowing intermediate routers to fragment IP packets as necessary for their outgoing links. The final destination of an IP packet is responsible for reassembling its fragments as necessary.
All TCP sessions are bounded by a limit on the number of bytes that can be transported in a single packet, and this limit is known as the maximum segment size (MSS). TCP breaks up packets into chunks in a transmit queue before passing packets down to the IP layer. A smaller MSS may not be fragmented at an IP device along the path to the destination device, but smaller packets increase the amount of bandwidth needed to transport the packets. The maximum TCP packet length is determined by both the MTU of the outbound interface on the source device and the MSS announced by the destination device during the TCP setup process.
Path MTU discovery (PMTUD) was developed as a solution to the problem of finding the optimal TCP packet length. PMTUD is an optimization (detailed in RFC 1191) wherein a TCP connection attempts to send the longest packets that will not be fragmented along the path from source to destination. It does this by using a flag, don't fragment (DF), in the IP packet. This flag is supposed to alter the behavior of an intermediate router that cannot send the packet across a link because it is too long. Normally the flag is off, and the router should fragment the packet and send the fragments. If a router tries to forward an IP datagram, with the DF bit set, to a link that has a lower MTU than the size of the packet, the router will drop the packet and return an Internet Control Message Protocol (ICMP) Destination Unreachable message to the source of this IP datagram, with the code indicating "fragmentation needed and DF set." When the source device receives the ICMP message, it will lower the send MSS, and when TCP retransmits the segment, it will use the smaller segment size.
BGP Neighbor Session TCP PMTUD
TCP path MTU discovery is enabled by default for all BGP neighbor sessions, but there are situations when you may want to disable TCP path MTU discovery for one or all BGP neighbor sessions. While PMTUD works well for larger transmission links (for example, Packet over Sonet links), a badly configured TCP implementation or a firewall may slow or stop the TCP connections from forwarding any packets. In this type of situation, you may need to disable TCP path MTU discovery. In Cisco IOS Release 12.2(33)SRA, 12.2(31)SB, and 12.2(33)SXH, and later releases, configuration options were introduced to permit TCP path MTU discovery to be disabled, or subsequently reenabled, either for a single BGP neighbor session or for all BGP sessions. To disable the TCP path MTU discovery globally for all BGP neighbors, use the no bgp transport path-mtu-discovery command under router configuration mode. To disable the TCP path MTU discovery for a single neighbor, use the no neighbor transport path-mtu-discovery command under router or address family configuration modes. For more details, see the "Disabling TCP Path MTU Discovery Globally for All BGP Sessions" section, or the "Disabling TCP Path MTU Discovery for a Single BGP Neighbor" section.
BGP Dynamic Neighbors
Support for BGP Dynamic Neighbors was introduced in Cisco IOS Release 12.2(33)SXH on the Cisco Catalyst 6500 series Switches. BGP dynamic neighbor support allows BGP peering to a group of remote neighbors that are defined by a range of IP addresses. Each range can be configured as a subnet IP address. BGP dynamic neighbors are configured using a range of IP addresses and BGP peer groups. After a subnet range is configured for a BGP peer group and a TCP session is initiated by another router for an IP address in the subnet range, a new BGP neighbor is dynamically created as a member of that group. After the initial configuration of subnet ranges and activation of the peer group (referred to as a listen range group), dynamic BGP neighbor creation does not require any further command-line interface (CLI) configuration on the initial router. Other routers can establish a BGP session with the initial router, but the initial router does not need to establish a BGP session to other routers if the IP address of the remote peer used for the BGP session is not within the configured range.
To support the BGP Dynamic Neighbors feature, the output for three show commands has been updated to display information about dynamic neighbors. The commands are show ip bgp neighbors, show ip bgp peer-group, and the show ip bgp summary command.
A dynamic BGP neighbor will inherit any configuration for the peer group. In larger BGP networks, implementing BGP dynamic neighbors can reduce the amount and complexity of CLI configuration and save CPU and memory usage. Only IPv4 peering is supported.
How to Configure BGP Neighbor Session Options
This section contains the following tasks or task groups:
•
•
•
•
•
Configuring Fast Session Deactivation
The tasks in this section show how configure BGP next-hop address tracking. BGP next-hop address tracking significantly improves the response time of BGP to next-hop changes in the RIB. However, unstable Interior Gateway Protocol (IGP) peers can introduce instability to BGP neighbor sessions. We recommend that you aggressively dampen unstable IGP peering sessions to reduce the possible impact to BGP. For more details about route dampening, see the
•
•
Configuring Fast Session Deactivation for a BGP Neighbor
Perform this task to establish a peering session with a BGP neighbor and then configure the peering session for fast session deactivation to improve the network convergence time if the peering session is deactivated.
Aggressively Dampen IGP Routes
Enabling this feature can significantly improve BGP convergence time. However, unstable Interior Gateway Protocol (IGP) peers can still introduce instability to BGP neighbor sessions. We recommend that you aggressively dampen unstable IGP peering sessions to reduce the possible impact to BGP.
SUMMARY STEPS
1.
2.
3.
4.
5.
6.
7.
DETAILED STEPS
Configuring Selective Address Tracking for Fast Session Deactivation
Perform this task to configure selective address tracking for fast session deactivation. The optional route-map keyword and map-name argument of the neighbor fall-over command are used to determine if a peering session with a BGP neighbor should be deactivated (reset) when a route to the BGP peer changes. The route map is evaluated against the new route, and if a deny statement is returned, the peer session is reset..
Note
SUMMARY STEPS
1.
2.
3.
4.
5.
6.
7.
8.
9.
10.
DETAILED STEPS
Step 1
enable
Example:Router> enable
Enables privileged EXEC mode.
•
Step 2
configure terminal
Example:Router# configure terminal
Enters global configuration mode.
Step 3
router bgp autonomous-system-number
Example:Router(config)# router bgp 45000
Enters router configuration mode for the specified routing process.
Step 4
neighbor {ip-address | peer-group-name} remote-as autonomous-system-number
Example:Router(config-router)# neighbor 192.168.1.2 remote-as 40000
Adds the IP address or peer group name of the neighbor in the specified autonomous system to the IPv4 multiprotocol BGP neighbor table of the local router.
Step 5
neighbor ip-address fall-over [route-map map-name]
Example:Router(config-router)# neighbor 192.168.1.2 fall-over route-map CHECK-NBR
Applies a route map when a route to the BGP changes.
•
Step 6
exit
Example:Router(config-router)# exit
Exits router configuration mode and enters global configuration mode.
Step 7
ip prefix-list list-name [seq seq-value] {deny network/length | permit network/length} [ge ge-value] [le le-value]
Example:Router(config)# ip prefix-list FILTER28 seq 5 permit 0.0.0.0/0 ge 28
Creates a prefix list for BGP next-hop route filtering.
•
•
Step 8
route-map map-name [permit | deny] [sequence-number]
Example:Router(config)# route-map CHECK-NBR permit 10
Configures a route map and enters route map configuration mode.
•
Step 9
match ip address prefix-list prefix-list-name [prefix-list-name...]
Example:Router(config-route-map)# match ip address prefix-list FILTER28
Matches the IP addresses in the specified prefix list.
•
Note
Step 10
end
Example:Router(config-route-map)# end
Exits route map configuration mode and enters privileged EXEC mode.
What to Do Next
The BGP Support for Next-Hop Address Tracking feature improves the response time of BGP to next-hop changes for routes installed in the RIB, which can also improve overall BGP convergence. For information about BGP next-hop address tracking, see the "Configuring Advanced BGP Features" module.
Configuring a Router to Reestablish a Neighbor Session After the Maximum Prefix Limit has Been Exceeded
Perform this task to configure the time interval at which a BGP neighbor session is reestablished by a router when the number of prefixes that have been received from a BGP peer has exceeded the maximum prefix limit.
Reestablishing Neighbor Sessions
The network operator can configure a router that is running BGP to automatically reestablish a neighbor session that has been brought down because the configured maximum-prefix limit has been exceeded. No intervention from the network operator is required when this feature is enabled.
Restrictions
This task attempts to reestablish a disabled BGP neighbor session at the configured time interval that is specified by the network operator. However, the configuration of the restart timer alone cannot change or correct a peer that is sending an excessive number of prefixes. The network operator will need to reconfigure the maximum-prefix limit or reduce the number of prefixes that are sent from the peer. A peer that is configured to send too many prefixes can cause instability in the network, where an excessive number of prefixes are rapidly advertised and withdrawn. In this case, the warning-only keyword can be configured to disable the restart capability, while the network operator corrects the underlying problem.
SUMMARY STEPS
1.
2.
3.
4.
5.
6.
DETAILED STEPS
Step 1
enable
Example:Router> enable
Enables privileged EXEC mode.
•
Step 2
configure terminal
Example:Router# configure terminal
Enters global configuration mode.
Step 3
router bgp autonomous-system-number
Example:Router(config)# router bgp 101
Enters router configuration mode and creates a BGP routing process.
Step 4
neighbor {ip-address | peer-group-name} {maximum-prefix maximum [threshold]} [restart restart-interval] [warning-only]
Example:Router(config-router)# neighbor 10.4.9.5 maximum-prefix 1000 90 restart 60
Configures the maximum-prefix limit on a router that is running BGP.
•
•
Note
Step 5
exit
Example:Router(config-router)# exit
Exits router configuration mode and enters global configuration mode.
Step 6
show ip bgp neighbors ip-address
Example:Router# show ip bgp neighbors 10.4.9.5
(Optional) Displays information about the TCP and BGP connections to neighbors.
•
Note
Examples
The following example output from the show ip bgp neighbors command verifies that a router has been configured to automatically reestablish disabled neighbor sessions. The output shows that the maximum prefix limit for neighbor 10.4.9.5 is set to 1000 prefixes, the restart threshold is set to 90%, and the restart interval is set at 60 minutes.
Router# show ip bgp neighbors 10.4.9.5BGP neighbor is 10.4.9.5, remote AS 101, internal linkBGP version 4, remote router ID 10.4.9.5BGP state = Established, up for 2w2dLast read 00:00:14, hold time is 180, keepalive interval is 60 secondsNeighbor capabilities:Route refresh: advertised and received(new)Address family IPv4 Unicast: advertised and receivedMessage statistics:InQ depth is 0OutQ depth is 0Sent RcvdOpens: 1 1Notifications: 0 0Updates: 0 0Keepalives: 23095 23095Route Refresh: 0 0Total: 23096 23096Default minimum time between advertisement runs is 5 secondsFor address family: IPv4 UnicastBGP table version 1, neighbor versions 1/0 1/0Output queue sizes : 0 self, 0 replicatedIndex 2, Offset 0, Mask 0x4Member of update-group 2Sent RcvdPrefix activity: ---- ----Prefixes Current: 0 0Prefixes Total: 0 0Implicit Withdraw: 0 0Explicit Withdraw: 0 0Used as bestpath: n/a 0Used as multipath: n/a 0Outbound InboundLocal Policy Denied Prefixes: -------- -------Total: 0 0!Configured maximum number of prefixes and restart interval information!Maximum prefixes allowed 1000Threshold for warning message 90%, restart interval 60 minNumber of NLRIs in the update sent: max 0, min 0Connections established 1; dropped 0Last reset neverConnection state is ESTAB, I/O status: 1, unread input bytes: 0Local host: 10.4.9.21, Local port: 179Foreign host: 10.4.9.5, Foreign port: 11871Enqueued packets for retransmit: 0, input: 0 mis-ordered: 0 (0 bytes)Event Timers (current time is 0x5296BD2C):Timer Starts Wakeups NextRetrans 23098 0 0x0TimeWait 0 0 0x0AckHold 23096 22692 0x0SendWnd 0 0 0x0KeepAlive 0 0 0x0GiveUp 0 0 0x0PmtuAger 0 0 0x0DeadWait 0 0 0x0iss: 1900546793 snduna: 1900985663 sndnxt: 1900985663 sndwnd: 14959irs: 2894590641 rcvnxt: 2895029492 rcvwnd: 14978 delrcvwnd: 1406SRTT: 300 ms, RTTO: 607 ms, RTV: 3 ms, KRTT: 0 msminRTT: 0 ms, maxRTT: 316 ms, ACK hold: 200 msFlags: passive open, nagle, gen tcbsDatagrams (max data segment is 1460 bytes):Rcvd: 46021 (out of order: 0), with data: 23096, total data bytes: 438850Sent: 46095 (retransmit: 0, fastretransmit: 0), with data: 23097, total data by9Troubleshooting Tips
Use the clear ip bgp command to resets a BGP connection using BGP soft reconfiguration. This command can be used to clear stored prefixes to prevent a router that is running BGP from exceeding the maximum-prefix limit. For more details about using BGP soft reconfiguration, see the Monitoring and Maintaining Basic BGP task in the "Configuring a Basic BGP Network" module.
Display of the following error messages can indicate an underlying problem that is causing the neighbor session to become disabled. The network operator should check the values that are configured for the maximum-prefix limit and the configuration of any peers that are sending an excessive number of prefixes. The following sample error messages below are similar to the error messages that may be displayed:
00:01:14:%BGP-5-ADJCHANGE:neighbor 10.10.10.2 Up00:01:14:%BGP-4-MAXPFX:No. of unicast prefix received from 10.10.10.2 reaches 5, max 600:01:14:%BGP-3-MAXPFXEXCEED:No.of unicast prefix received from 10.10.10.2:7 exceed limit600:01:14:%BGP-5-ADJCHANGE:neighbor 10.10.10.2 Down - BGP Notification sent00:01:14:%BGP-3-NOTIFICATION:sent to neighbor 10.10.10.2 3/1 (update malformed) 0 byteThe bgp dampening command can be used to configure the dampening of a flapping route or interface when a peer is sending too many prefixes and causing network instability. The use of this command should be necessary only when troubleshooting or tuning a router that is sending an excessive number of prefixes. For more details about BGP route dampening, see the "Configuring Advanced BGP Features" module.
Configuring Dual-AS Peering for Network Migration
Perform this task to configure a BGP peer router to appear to external peers as a member of another autonomous system for the purpose of autonomous system number migration. When the BGP peer is configured with dual autonomous system numbers then the network operator can merge a secondary autonomous system into a primary autonomous system and update the customer configuration during a future service window without disrupting existing peering arrangements.
The show ip bgp and show ip bgp neighbors commands can be used to verify autonomous system number for entries in the routing table and the status of this feature.
Restrictions
•
•
SUMMARY STEPS
1.
2.
3.
4.
5.
6.
7.
8.
9.
DETAILED STEPS
Configuring the TTL Security Check for BGP Neighbor Sessions
Configure this task to allow BGP to establish or maintain a session only if the TTL value in the IP packet header is equal to or greater than the TTL value configured for the BGP neighbor session.
Prerequisites
•
Restrictions
•
•
•
SUMMARY STEPS
1.
2.
3.
4.
5.
6.
7.
8.
DETAILED STEPS
Step 1
enable
Example:Router> enable
Enables privileged EXEC mode.
•
Step 2
trace [protocol] destination
Example:Router# trace ip 10.1.1.1
Discovers the routes of the specified protocol that packets will actually take when traveling to their destination.
•
Step 3
configure terminal
Example:Router# configure terminal
Enters global configuration mode.
Step 4
router bgp autonomous-system-number
Example:Router(config)# router bgp 65000
Enters router configuration mode, and creates a BGP routing process.
Step 5
neighbor ip-address ttl-security hops hop-count
Example:Router(config-router)# neighbor 10.1.1.1 ttl-security hops 2
Configures the maximum number of hops that separate two peers.
•
•
•
Step 6
end
Example:Router(config-router)# exit
Exits router configuration mode and enters privileged EXEC mode.
Step 7
show running-config
Example:Router# show running-config | begin bgp
(Optional) Displays the contents of the currently running configuration file.
•
Note
Step 8
show ip bgp neighbors [ip-address]
Example:Router# show ip bgp neighbors 10.4.9.5
(Optional) Displays information about the TCP and BGP connections to neighbors.
•
Note
Examples
The configuration of the BGP Support for TTL Security Check feature can be verified with the show running-config and show ip bgp neighbors commands. This feature is configured locally on each peer, so there is no remote configuration to verify.
The following is sample output from the show running-config command. The output shows that neighbor 10.1.1.1 is configured to establish or maintain the neighbor session only if the expected TTL count in the incoming IP packet is 253 or 254.
Router# show running-config | begin bgprouter bgp 65000no synchronizationbgp log-neighbor-changesneighbor 10.1.1.1 remote-as 55000neighbor 10.1.1.1 ttl-security hops 2no auto-summary...The following is sample output from the show ip bgp neighbors command. The output shows that the local router will accept packets from the 10.1.1.1 neighbor if it is no more than 2 hops away. The configuration of this feature is displayed in the address family section of the output. The relevant line is shown in bold in the output.
Router# show ip bgp neighbors 10.1.1.1BGP neighbor is 10.1.1.1, remote AS 55000, external linkBGP version 4, remote router ID 10.2.2.22BGP state = Established, up for 00:59:21Last read 00:00:21, hold time is 180, keepalive interval is 60 secondsNeighbor capabilities:Route refresh: advertised and received(new)Address family IPv4 Unicast: advertised and receivedMessage statistics:InQ depth is 0OutQ depth is 0Sent RcvdOpens: 2 2Notifications: 0 0Updates: 0 0Keepalives: 226 227Route Refresh: 0 0Total: 228 229Default minimum time between advertisement runs is 5 secondsFor address family: IPv4 UnicastBGP table version 1, neighbor version 1/0Output queue sizes : 0 self, 0 replicatedIndex 1, Offset 0, Mask 0x2Member of update-group 1Sent RcvdPrefix activity: ---- ----Prefixes Current: 0 0Prefixes Total: 0 0Implicit Withdraw: 0 0Explicit Withdraw: 0 0Used as bestpath: n/a 0Used as multipath: n/a 0Outbound InboundLocal Policy Denied Prefixes: -------- -------Total: 0 0Number of NLRIs in the update sent: max 0, min 0Connections established 2; dropped 1Last reset 00:59:50, due to User resetExternal BGP neighbor may be up to 2 hops away.Connection state is ESTAB, I/O status: 1, unread input bytes: 0Local host: 10.2.2.22, Local port: 179Foreign host: 10.1.1.1, Foreign port: 11001Enqueued packets for retransmit: 0, input: 0 mis-ordered: 0 (0 bytes)Event Timers (current time is 0xCC28EC):Timer Starts Wakeups NextRetrans 63 0 0x0TimeWait 0 0 0x0AckHold 62 50 0x0SendWnd 0 0 0x0KeepAlive 0 0 0x0GiveUp 0 0 0x0PmtuAger 0 0 0x0DeadWait 0 0 0x0iss: 712702676 snduna: 712703881 sndnxt: 712703881 sndwnd: 15180irs: 2255946817 rcvnxt: 2255948041 rcvwnd: 15161 delrcvwnd: 1223SRTT: 300 ms, RTTO: 607 ms, RTV: 3 ms, KRTT: 0 msminRTT: 0 ms, maxRTT: 300 ms, ACK hold: 200 msFlags: passive open, nagle, gen tcbsDatagrams (max data segment is 1460 bytes):Rcvd: 76 (out of order: 0), with data: 63, total data bytes: 1223Sent: 113 (retransmit: 0, fastretransmit: 0), with data: 62, total data bytes: 4Configuring BGP Support for TCP Path MTU Discovery per Session
This section contains the following tasks:
•
•
•
•
Disabling TCP Path MTU Discovery Globally for All BGP Sessions
Perform this task to disable TCP path MTU discovery for all BGP sessions. TCP path MTU discovery is enabled by default when you configure BGP sessions, but we recommend that you enter the show ip bgp neighbors command to ensure that TCP path MTU discovery is enabled.
Prerequisites
This task assumes that you have previously configured BGP neighbors with active TCP connections.
SUMMARY STEPS
1.
2.
3.
4.
5.
6.
7.
DETAILED STEPS
Step 1
enable
Example:Router> enable
Enables privileged EXEC mode.
•
Step 2
show ip bgp neighbors [ip-address]
Example:Router# show ip bgp neighbors
(Optional) Displays information about the TCP and BGP connections to neighbors.
•
Note
Step 3
configure terminal
Example:Router# configure terminal
Enters global configuration mode.
Step 4
router bgp autonomous-system-number
Example:Router(config)# router bgp 50000
Enters router configuration mode to create or configure a BGP routing process.
Step 5
no bgp transport path-mtu-discovery
Example:Router(config-router)# no bgp transport path-mtu-discovery
Disables TCP path MTU discovery for all BGP sessions.
Step 6
end
Example:Router(config-router)# end
Exits router configuration mode and returns to privileged EXEC mode.
Step 7
show ip bgp neighbors
Example:Router# show ip bgp neighbors
(Optional) Displays information about the TCP and BGP connections to neighbors.
•
Note
Examples
The following sample output from the show ip bgp neighbors command shows that TCP path MTU discovery is enabled for BGP neighbors. Two entries in the output—Transport(tcp) path-mtu-discovery is enabled and path mtu capable—show that TCP path MTU discovery is enabled.
Router# show ip bgp neighborsBGP neighbor is 172.16.1.2, remote AS 45000, internal linkBGP version 4, remote router ID 172.16.1.99...For address family: IPv4 UnicastBGP table version 5, neighbor version 5/0...Address tracking is enabled, the RIB does have a route to 172.16.1.2Address tracking requires at least a /24 route to the peerConnections established 3; dropped 2Last reset 00:00:35, due to Router ID changedTransport(tcp) path-mtu-discovery is enabled...SRTT: 146 ms, RTTO: 1283 ms, RTV: 1137 ms, KRTT: 0 msminRTT: 8 ms, maxRTT: 300 ms, ACK hold: 200 msFlags: higher precedence, retransmission timeout, nagle, path mtu capableThe following is sample output from the show ip bgp neighbors command after the no bgp transport path-mtu-discovery command has been entered. Note that the path mtu entries are missing.
Router# show ip bgp neighborsBGP neighbor is 172.16.1.2, remote AS 45000, internal linkBGP version 4, remote router ID 172.16.1.99...For address family: IPv4 UnicastBGP table version 5, neighbor version 5/0...Address tracking is enabled, the RIB does have a route to 172.16.1.2Address tracking requires at least a /24 route to the peerConnections established 3; dropped 2Last reset 00:00:35, due to Router ID changed...SRTT: 146 ms, RTTO: 1283 ms, RTV: 1137 ms, KRTT: 0 msminRTT: 8 ms, maxRTT: 300 ms, ACK hold: 200 msFlags: higher precedence, retransmission timeout, nagleDisabling TCP Path MTU Discovery for a Single BGP Neighbor
Perform this task to establish a peering session with an internal BGP (iBGP) neighbor and then disable TCP path MTU discovery for the BGP neighbor session. The neighbor transport command can be used in router configuration or address family configuration mode.
Prerequisites
This task assumes that you know that TCP path MTU discovery is enabled by default for all your BGP neighbors.
SUMMARY STEPS
1.
2.
3.
4.
5.
6.
7.
8.
9.
DETAILED STEPS
Step 1
enable
Example:Router> enable
Enables privileged EXEC mode.
•
Step 2
configure terminal
Example:Router# configure terminal
Enters global configuration mode.
Step 3
router bgp autonomous-system-number
Example:Router(config)# router bgp 45000
Enters router configuration mode for the specified routing process.
Step 4
address-family {ipv4 [mdt | multicast | unicast [vrf vrf-name] | vrf vrf-name] | vpnv4 [unicast]}
Example:Router(config-router)# address-family ipv4 unicast
Enters address family configuration mode to configure BGP peers to accept address-family-specific configurations.
•
Step 5
neighbor {ip-address | peer-group-name} remote-as autonomous-system-number
Example:Router(config-router-af)# neighbor 192.168.1.1 remote-as 45000
Adds the IP address or peer group name of the neighbor in the specified autonomous system to the IPv4 multiprotocol BGP neighbor table of the local router.
Step 6
neighbor {ip-address | peer-group-name} activate
Example:Router(config-router-af)# neighbor 172.16.1.1 activate
Activates the neighbor under the IPv4 address family.
•
Step 7
no neighbor {ip-address | peer-group-name} transport {connection-mode | path-mtu-discovery}
Example:Router(config-router-af)# no neighbor 172.16.1.1 transport path-mtu-discovery
Disables TCP path MTU discovery for a single BGP neighbor.
•
Step 8
end
Example:Router(config-router-af)# end
Exits address family configuration mode and returns to privileged EXEC mode.
Step 9
show ip bgp neighbors
Example:Router# show ip bgp neighbors
(Optional) Displays information about the TCP and BGP connections to neighbors.
•
Note
Examples
The following sample output shows that TCP path MTU discovery has been disabled for BGP neighbor 172.16.1.1 but that it is still enabled for BGP neighbor 192.168.2.2. Two entries in the output—Transport(tcp) path-mtu-discovery is enabled and path mtu capable—show that TCP path MTU discovery is enabled.
Router# show ip bgp neighborsBGP neighbor is 172.16.1.1, remote AS 45000, internal linkBGP version 4, remote router ID 172.17.1.99...Address tracking is enabled, the RIB does have a route to 172.16.1.1Address tracking requires at least a /24 route to the peerConnections established 1; dropped 0Last reset never...SRTT: 165 ms, RTTO: 1172 ms, RTV: 1007 ms, KRTT: 0 msminRTT: 20 ms, maxRTT: 300 ms, ACK hold: 200 msFlags: higher precedence, retransmission timeout, nagle...BGP neighbor is 192.168.2.2, remote AS 50000, external linkBGP version 4, remote router ID 10.2.2.99...For address family: IPv4 UnicastBGP table version 4, neighbor version 4/0...Address tracking is enabled, the RIB does have a route to 192.168.2.2Address tracking requires at least a /24 route to the peerConnections established 2; dropped 1Last reset 00:05:11, due to User resetTransport(tcp) path-mtu-discovery is enabled...SRTT: 210 ms, RTTO: 904 ms, RTV: 694 ms, KRTT: 0 msminRTT: 20 ms, maxRTT: 300 ms, ACK hold: 200 msFlags: higher precedence, retransmission timeout, nagle, path mtu capableEnabling TCP Path MTU Discovery Globally for All BGP Sessions
Perform this task to enable TCP path MTU discovery for all BGP sessions. TCP path MTU discovery is enabled by default when you configure BGP sessions, but if this feature has been disabled, you can use this task to reenable it. To verify that TCP path MTU discovery is enabled, use the show ip bgp neighbors command.
Prerequisites
This task assumes that you have previously configured BGP neighbors with active TCP connections.
SUMMARY STEPS
1.
2.
3.
4.
5.
6.
DETAILED STEPS
Step 1
enable
Example:Router> enable
Enables privileged EXEC mode.
•
Step 2
configure terminal
Example:Router# configure terminal
Enters global configuration mode.
Step 3
router bgp autonomous-system-number
Example:Router(config)# router bgp 45000
Enters router configuration mode to create or configure a BGP routing process.
Step 4
bgp transport path-mtu-discovery
Example:Router(config-router)# bgp transport path-mtu-discovery
Enables TCP path MTU discovery for all BGP sessions.
Step 5
end
Example:Router(config-router)# end
Exits router configuration mode and returns to privileged EXEC mode.
Step 6
show ip bgp neighbors
Example:Router# show ip bgp neighbors
(Optional) Displays information about the TCP and BGP connections to neighbors.
•
Note
Examples
The following sample output from the show ip bgp neighbors command shows that TCP path MTU discovery is enabled for BGP neighbors. Two entries in the output—Transport(tcp) path-mtu-discovery is enabled and path mtu capable—show that TCP path MTU discovery is enabled.
Router# show ip bgp neighborsBGP neighbor is 172.16.1.2, remote AS 45000, internal linkBGP version 4, remote router ID 172.16.1.99...For address family: IPv4 UnicastBGP table version 5, neighbor version 5/0...Address tracking is enabled, the RIB does have a route to 172.16.1.2Address tracking requires at least a /24 route to the peerConnections established 3; dropped 2Last reset 00:00:35, due to Router ID changedTransport(tcp) path-mtu-discovery is enabled...SRTT: 146 ms, RTTO: 1283 ms, RTV: 1137 ms, KRTT: 0 msminRTT: 8 ms, maxRTT: 300 ms, ACK hold: 200 msFlags: higher precedence, retransmission timeout, nagle, path mtu capableEnabling TCP Path MTU Discovery for a Single BGP Neighbor
Perform this task to establish a peering session with an external BGP (eBGP) neighbor and then enable TCP path MTU discovery for the BGP neighbor session. The neighbor transport command can be used in router configuration or address family configuration mode.
SUMMARY STEPS
1.
2.
3.
4.
5.
6.
7.
8.
9.
DETAILED STEPS
Step 1
enable
Example:Router> enable
Enables privileged EXEC mode.
•
Step 2
configure terminal
Example:Router# configure terminal
Enters global configuration mode.
Step 3
router bgp autonomous-system-number
Example:Router(config)# router bgp 45000
Enters router configuration mode for the specified routing process.
Step 4
address-family {ipv4 [mdt | multicast | unicast [vrf vrf-name] | vrf vrf-name] | vpnv4 [unicast]}
Example:Router(config-router)# address-family ipv4 unicast
Enters address family configuration mode to configure BGP peers to accept address-family-specific configurations.
•
Step 5
neighbor {ip-address | peer-group-name} remote-as autonomous-system-number
Example:Router(config-router-af)# neighbor 192.168.2.2 remote-as 50000
Adds the IP address or peer group name of the neighbor in the specified autonomous system to the IPv4 multiprotocol BGP neighbor table of the local router.
Step 6
neighbor {ip-address | peer-group-name} activate
Example:Router(config-router-af)# neighbor 192.168.2.2 activate
Activates the neighbor under the IPv4 address family.
•
Step 7
neighbor {ip-address | peer-group-name} transport {connection-mode | path-mtu-discovery}
Example:Router(config-router-af)# neighbor 192.168.2.2 transport path-mtu-discovery
Enables TCP path MTU discovery for a single BGP neighbor.
•
Step 8
end
Example:Router(config-router-af)# end
Exits address family configuration mode and returns to privileged EXEC mode.
Step 9
show ip bgp neighbors [ip-address]
Example:Router# show ip bgp neighbors 192.168.2.2
(Optional) Displays information about the TCP and BGP connections to neighbors.
•
Note
Examples
The following sample output from the show ip bgp neighbors command shows that TCP path MTU discovery is enabled for the BGP neighbor at 192.168.2.2. Two entries in the output—Transport(tcp) path-mtu-discovery is enabled and path-mtu capable—show that TCP path MTU discovery is enabled.
Router# show ip bgp neighbors 192.168.2.2BGP neighbor is 192.168.2.2, remote AS 50000, external linkBGP version 4, remote router ID 10.2.2.99...For address family: IPv4 UnicastBGP table version 4, neighbor version 4/0...Address tracking is enabled, the RIB does have a route to 192.168.2.2Address tracking requires at least a /24 route to the peerConnections established 2; dropped 1Last reset 00:05:11, due to User resetTransport(tcp) path-mtu-discovery is enabled...SRTT: 210 ms, RTTO: 904 ms, RTV: 694 ms, KRTT: 0 msminRTT: 20 ms, maxRTT: 300 ms, ACK hold: 200 msFlags: higher precedence, retransmission timeout, nagle, path mtu capableImplementing BGP Dynamic Neighbors Using Subnet Ranges
In Cisco IOS Release 12.2(33)SXH, support for BGP dynamic neighbors was introduced. Perform this task to implement the dynamic creation of BGP neighbors using subnet ranges.
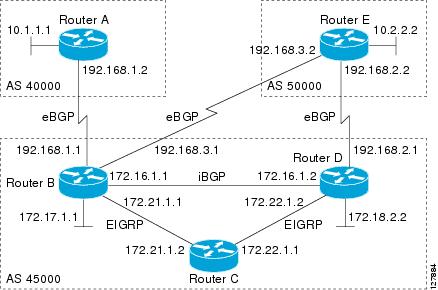
In this task, a BGP peer group is created on Router B in Figure 1, a global limit is set on the number of dynamic BGP neighbors, and a subnet range is associated with a peer group. Configuring the subnet range enables the dynamic BGP neighbor process. The peer group is added to the BGP neighbor table of the local router, and an alternate autonomous system number is also configured. The peer group is activated under the IPv4 address family.
The next step is to move to another router—Router E in Figure 1—where a BGP session is started and the neighbor router, Router B, is configured as a remote BGP peer. The peering configuration opens a TCP session and triggers Router B to create a dynamic BGP neighbor because the IP address that starts the TCP session (192.168.3.2) is within the configured subnet range for dynamic BGP peers. The task moves back to the first router to run three show commands that have been modified to display dynamic BGP peer information.
Figure 1 BGP Dynamic Neighbor Topology
Prerequisites
This task requires Cisco IOS Release 12.2(33)SXH, or later release, to be running.
Restrictions
This task supports only IPv4 BGP peering.
SUMMARY STEPS
1.
2.
3.
4.
5.
6.
7.
8.
9.
10.
11.
12.
13.
14.
15.
16.
17.
18.
19.
20.
DETAILED STEPS
Step 1
enable
Example:Router> enable
Enables privileged EXEC mode.
•
Step 2
configure terminal
Example:Router# configure terminal
Enters global configuration mode.
Step 3
router bgp autonomous-system-number
Example:Router(config)# router bgp 45000
Enters router configuration mode for the specified routing process.
Step 4
bgp log-neighbor-changes
Example:Router(config-router)# bgp log-neighbor-changes
(Optional) Enables logging of BGP neighbor status changes (up or down) and neighbor resets.
•
Step 5
neighbor peer-group-name peer-group
Example:Router(config-router)# neighbor group192 peer-group
Creates a BGP peer group.
•
Step 6
bgp listen [limit max-number]
Example:Router(config-router)# bgp listen limit 200
Sets a global limit of BGP dynamic subnet range neighbors.
•
•
Note
Step 7
bgp listen [limit max-number | range network/length peer-group peer-group-name]
Example:Router(config-router)# bgp listen range 192.168.0.0/16 peer-group group192
Associates a subnet range with a BGP peer group and activates the BGP dynamic neighbors feature.
•
•
•
Step 8
neighbor peer-group-name remote-as autonomous-system-number [alternate-as autonomous-system-number...]
Example:Router(config-router)# neighbor group192 remote-as 40000 alternate-as 50000
Adds the IP address or peer group name of the neighbor in the specified autonomous system to the IPv4 multiprotocol BGP neighbor table of the local router.
•
•
Note
Step 9
address-family ipv4 [mdt | multicast | unicast [vrf vrf-name]]
Example:Router(config-router)# address-family ipv4 unicast
Enters address family configuration mode to configure BGP peers to accept address-family-specific configurations.
•
Step 10
neighbor {ip-address | peer-group-name} activate
Example:Router(config-router-af)# neighbor group192 activate
Activates the neighbor or listen range peer group for the configured address family.
•
Note
Step 11
end
Example:Router(config-router-af)# end
Exits address family configuration mode and returns to privileged EXEC mode.
Step 12
Move to another router that has an interface within the subnet range for the BGP peer group configured in this task.
—
Step 13
enable
Example:Router> enable
Enables privileged EXEC mode.
•
Step 14
configure terminal
Example:Router# configure terminal
Enters global configuration mode.
Step 15
router bgp autonomous-system-number
Example:Router(config)# router bgp 50000
Enters router configuration mode for the specified routing process.
Step 16
neighbor {ip-address | peer-group-name} remote-as autonomous-system-number [alternate-as autonomous-system-number...]
Example:Router(config-router)# neighbor 192.168.3.1 remote-as 45000
Adds the IP address or peer group name of the neighbor in the specified autonomous system to the IPv4 multiprotocol BGP neighbor table of the local router.
•
Step 17
Return to the first router.
—
Step 18
show ip bgp summary
Example:Router# show ip bgp summary
(Optional) Displays the BGP path, prefix, and attribute information for all connections to BGP neighbors.
Step 19
show ip bgp peer-group [peer-group-name] [summary]
Example:Router# show ip bgp peer-group group192
(Optional) Displays information about BGP peer groups.
•
Step 20
show ip bgp neighbors [ip-address]
Example:Router# show ip bgp neighbors 192.168.3.2
(Optional) Displays information about BGP and TCP connections to neighbors.
•
Note
Examples
The output examples shown below were taken from Router B in Figure 1 after the configuration steps in this task were completed.
The following output from the show ip bgp summary command shows that the BGP neighbor 192.168.3.2 was dynamically created and is a member of the listen range group, group192. The output also shows that the IP prefix range of 192.168.0.0/16 is defined for the listen range named group192.
Router# show ip bgp summaryBGP router identifier 192.168.3.1, local AS number 45000BGP table version is 1, main routing table version 1Neighbor V AS MsgRcvd MsgSent TblVer InQ OutQ Up/Down State/PfxRcd*192.168.3.2 4 50000 2 2 0 0 0 00:00:37 0* Dynamically created based on a listen range commandDynamically created neighbors: 1/(200 max), Subnet ranges: 1BGP peergroup group192 listen range group members:192.168.0.0/16The following output from the show ip bgp peer-group command shows information about the listen range group, group192 that was configured in this task.
Router# show ip bgp peer-group group192BGP peer-group is group192, remote AS 40000BGP peergroup group192 listen range group members:192.168.0.0/16BGP version 4Default minimum time between advertisement runs is 30 secondsFor address family: IPv4 UnicastBGP neighbor is group192, peer-group external, members:*192.168.3.2Index 0, Offset 0, Mask 0x0Update messages formatted 0, replicated 0Number of NLRIs in the update sent: max 0, min 0The following sample output from the show ip bgp neighbors command shows that the neighbor 192.168.3.2 is a member of the peer group, group192, and belongs to the subnet range group 192.168.0.0/16 which shows that this peer was dynamically created.
Router# show ip bgp neighbors 192.168.3.2BGP neighbor is *192.168.3.2, remote AS 50000, external linkMember of peer-group group192 for session parametersBelongs to the subnet range group: 192.168.0.0/16BGP version 4, remote router ID 192.168.3.2BGP state = Established, up for 00:06:35Last read 00:00:33, last write 00:00:25, hold time is 180, keepalive intervalsNeighbor capabilities:Route refresh: advertised and received(new)Address family IPv4 Unicast: advertised and receivedMessage statistics:InQ depth is 0OutQ depth is 0Sent RcvdOpens: 1 1Notifications: 0 0Updates: 0 0Keepalives: 7 7Route Refresh: 0 0Total: 8 8Default minimum time between advertisement runs is 30 secondsFor address family: IPv4 UnicastBGP table version 1, neighbor version 1/0Output queue size : 0Index 1, Offset 0, Mask 0x21 update-group membergroup192 peer-group member...Configuration Examples for Configuring BGP Neighbor Session Options
This section contains the following configuration examples:
•
•
•
•
•
•
•
Configuring Fast Session Deactivation for a BGP Neighbor: Example
In the following example, the BGP routing process is configured on Router A and Router B to monitor and use fast peering session deactivation for the neighbor session between the two routers. Although fast peering session deactivation is not required at both routers in the neighbor session, it will help the BGP networks in both autonomous systems to converge faster if the neighbor session is deactivated.
Router A
router bgp 40000neighbor 192.168.1.1 remote-as 45000neighbor 192.168.1.1 fall-overendRouter B
router bgp 45000neighbor 192.168.1.2 remote-as 40000neighbor 192.168.1.2 fall-overendConfiguring Selective Address Tracking for Fast Session Deactivation: Example
The following example shows how to configure the BGP peering session to be reset if a route with a prefix of /28 or a more specific route to a peer destination is no longer available:
router bgp 45000neighbor 192.168.1.2 remote-as 40000neighbor 192.168.1.2 fall-over route-map CHECK-NBRexitip prefix-list FILTER28 seq 5 permit 0.0.0.0/0 ge 28route-map CHECK-NBR permit 10match ip address prefix-list FILTER28endRestart Session After Max-Prefix Limit Configuration: Example
The following example sets the maximum number of prefixes allowed from the neighbor at 192.168.6.6 to 2000 and configures the router to reestablish a peering session after 30 minutes if one has been disabled:
router bgp 101network 172.16.0.0neighbor 192.168.6.6 maximum-prefix 2000 restart 30Configuring Dual-AS Peering for Network Migration: Examples
The following examples show how to configure and verify this feature:
•
•
•
Dual-AS Configuration: Example
The following examples shows how this feature is used to merge two autonomous systems without interrupting peering arrangements with the customer network. The neighbor local-as command is configured to allow Router 1 to maintain peering sessions through autonomous-system 40000 and autonomous-system 45000. Router 2 is a customer router that runs a BGP routing process in autonomous system 50000 and is configured to peer with autonomous-system 45000:
Router 1 in Autonomous System 40000 (provider network):
interface Serial3/0ip address 10.3.3.11 255.255.255.0!router bgp 40000no synchronizationbgp router-id 100.0.0.11neighbor 10.3.3.33 remote-as 50000neighbor 10.3.3.33 local-as 45000 no-prepend replace-as dual-asRouter 1 in Autonomous System 45000 (provider network):
interface Serial3/0ip address 10.3.3.11 255.255.255.0!router bgp 45000bgp router-id 100.0.0.11neighbor 10.3.3.33 remote-as 50000Router 2 in Autonomous System 50000 (customer network):
interface Serial3/0ip address 10.3.3.33 255.255.255.0!router bgp 50000bgp router-id 100.0.0.3neighbor 10.3.3.11 remote-as 45000After the transition is complete, the configuration on router 50000 can be updated to peer with autonomous-system 40000 during a normal maintenance window or during other scheduled downtime.
neighbor 10.3.3.11 remote-as 100Dual-AS Confederation Configuration: Example
The following example can be used in place of the Router 1 configuration in the previous example. The only difference between these configurations is that Router 1 is configured to be part of a confederation.
interface Serial3/0ip address 10.3.3.11 255.255.255.0!router bgp 65534no synchronizationbgp confederation identifier 100bgp router-id 100.0.0.11neighbor 10.3.3.33 remote-as 50000neighbor 10.3.3.33 local-as 45000 no-prepend replace-as dual-asReplace-AS Configuration: Example
The following example strips private autonomous-system 64512 from outbound routing updates for the 10.3.3.33 neighbor and replaces it with autonomous-system 50000:
router bgp 64512neighbor 10.3.3.33 local-as 50000 no-prepend replace-asConfiguring the TTL-Security Check: Example
The example configurations in this section show how to configure the BGP Support for TTL Security Check feature.
The following example uses the trace command to determine the hop count to an eBGP peer. The hop count number is displayed in the output for each networking device that IP packets traverse to reach the specified neighbor. In the example below, the hop count for the 10.1.1.1 neighbor is 1.
Router# trace ip 10.1.1.1Type escape sequence to abort.Tracing the route to 10.1.1.11 10.1.1.1 0 msec * 0 msecThe following example sets the hop count to 2 for the 10.1.1.1 neighbor. Because the hop-count argument is set to 2, BGP will only accept IP packets with a TTL count in the header that is equal to or greater than 253.
Router(config-router)# neighbor 10.1.1.1 ttl-security hops 2
Configuring BGP Support for TCP Path MTU Discovery per Session: Examples
This section contains the following configuration examples:
•
•
•
•
Disabling TCP Path MTU Discovery Globally for All BGP Sessions: Example
The following example shows how to disable TCP path MTU discovery for all BGP neighbor sessions. Use the show ip bgp neighbors command to verify that TCP path MTU discovery has been disabled.
enableconfigure terminalrouter bgp 45000no bgp transport path-mtu-discoveryendshow ip bgp neighborsDisabling TCP Path MTU Discovery for a Single BGP Neighbor: Example
The following example shows how to disable TCP path MTU discovery for an external BGP (eBGP) neighbor at 192.168.2.2:
enableconfigure terminalrouter bgp 45000neighbor 192.168.2.2 remote-as 50000neighbor 192.168.2.2 activateno neighbor 192.168.2.2 transport path-mtu-discoveryendshow ip bgp neighbors 192.168.2.2Enabling TCP Path MTU Discovery Globally for All BGP Sessions: Example
The following example shows how to enable TCP path MTU discovery for all BGP neighbor sessions. Use the show ip bgp neighbors command to verify that TCP path MTU discovery has been enabled.
enableconfigure terminalrouter bgp 45000bgp transport path-mtu-discoveryendshow ip bgp neighborsEnabling TCP Path MTU Discovery for a Single BGP Neighbor: Example
The following example shows how to enable TCP path MTU discovery for an external BGP (eBGP) neighbor at 192.168.2.2. Use the show ip bgp neighbors command to verify that TCP path MTU discovery has been enabled.
enableconfigure terminalrouter bgp 45000neighbor 192.168.2.2 remote-as 50000neighbor 192.168.2.2 activateneighbor 192.168.2.2 transport path-mtu-discoveryendshow ip bgp neighbors 192.168.2.2Implementing BGP Dynamic Neighbors Using Subnet Ranges: Example
In Cisco IOS Release 12.2(33)SXH, support for BGP dynamic neighbors was introduced. The following example configurations show how to implement BGP dynamic neighbors using subnet ranges.
In the following example, two BGP peer groups are created on Router B in Figure 2, a global limit is set on the number of dynamic BGP neighbors, and a subnet range is associated with a peer group. Configuring the subnet range enables the dynamic BGP neighbor process. The peer groups are added to the BGP neighbor table of the local router, and an alternate autonomous system number is also configured for one of the peer groups, group192. The subnet range peer groups and a standard BGP peer are then activated under the IPv4 address family.
The configuration moves to another router—Router A in Figure 2—where a BGP session is started and the neighbor router, Router B, is configured as a remote BGP peer. The peering configuration opens a TCP session and triggers Router B to create a dynamic BGP neighbor because the IP address that starts the TCP session (192.168.1.2) is within the configured subnet range for dynamic BGP peers.
A third router—Router E in Figure 2—also starts a BGP peering session with Router B. Router E is in the autonomous system 50000, which is the configured alternate autonomous system. Router B responds to the resulting TCP session by creating another dynamic BGP peer.
This example concludes with the output of the show ip bgp summary command entered on Router B.
Figure 2 BGP Dynamic Neighbor Topology
Router B
enableconfigure terminalrouter bgp 45000bgp log-neighbor-changesbgp listen limit 200bgp listen range 172.21.0.0/16 peer-group group172bgp listen range 192.168.0.0/16 peer-group group192neighbor group172 peer-groupneighbor group172 remote-as 45000neighbor group192 peer-groupneighbor group192 remote-as 40000 alternate-as 50000neighbor 172.16.1.2 remote-as 45000address-family ipv4 unicastneighbor group172 activateneighbor group192 activateneighbor 172.16.1.2 activateendRouter A
enableconfigure terminalrouter bgp 40000neighbor 192.168.1.1 remote-as 45000exitRouter E
enableconfigure terminalrouter bgp 50000neighbor 192.168.3.1 remote-as 45000exitAfter both Router A and Router E are configured, the show ip bgp summary command is run on Router B. The output displays the regular BGP neighbor, 172.16.1.2 and the two BGP neighbors that were created dynamically when Router A and Router E initiated TCP sessions for BGP peering to Router B. The output also shows information about the configured listen range subnet groups.
BGP router identifier 192.168.3.1, local AS number 45000BGP table version is 1, main routing table version 1Neighbor V AS MsgRcvd MsgSent TblVer InQ OutQ Up/Down State/PfxRcd172.16.1.2 4 45000 15 15 1 0 0 00:12:20 0*192.168.1.2 4 40000 3 3 1 0 0 00:00:37 0*192.168.3.2 4 50000 6 6 1 0 0 00:04:36 0* Dynamically created based on a listen range commandDynamically created neighbors: 2/(200 max), Subnet ranges: 2BGP peergroup group172 listen range group members:172.21.0.0/16BGP peergroup group192 listen range group members:192.168.0.0/16Where to Go Next
•
•
•
Additional References
The following sections provide references related to configuring advanced BGP features.
Related Documents
BGP commands: complete command syntax, command mode, defaults, command history, usage guidelines, and examples
•
•
•
•
Overview of Cisco BGP conceptual information with links to all the individual BGP modules
"Cisco BGP Overview" module
Conceptual and configuration details for basic BGP tasks.
Standards
MIBs
CISCO-BGP4-MIB
To locate and download MIBs for selected platforms, Cisco IOS releases, and feature sets, use Cisco MIB Locator found at the following URL:
RFCs
Technical Assistance
Feature Information for Configuring BGP Neighbor Session Options
Table 1 lists the features in this module and provides links to specific configuration information. Only features that were introduced or modified in Cisco IOS Releases 12.2(1), 12.0(3)S, 12.2(33)SRA, 12.2(31)SB, 12.2(33)SXH, or later releases appear in the table.
Not all commands may be available in your Cisco IOS software release. For details on when support for a specific command was introduced, see the command reference documentation.
For information on a feature in this technology that is not documented here, see the "Cisco BGP Implementation Roadmap"
Cisco IOS software images are specific to a Cisco IOS software release, a feature set, and a platform. Use Cisco Feature Navigator to find information about platform support and Cisco IOS software image support. Access Cisco Feature Navigator at http://www.cisco.com/go/fn. You must have an account on Cisco.com. If you do not have an account or have forgotten your username or password, click Cancel at the login dialog box and follow the instructions that appear.
Note
Table 1 Feature Information for Configuring BGP Neighbor Session Options Features
BGP Dynamic Neighbors
12.2(33)SXH
BGP dynamic neighbor support allows BGP peering to a group of remote neighbors that are defined by a range of IP addresses. Each range can be configured as a subnet IP address. BGP dynamic neighbors are configured using a range of IP addresses and BGP peer groups. After a subnet range is configured for a BGP peer group and a TCP session is initiated for an IP address in the subnet range, a new BGP neighbor is dynamically created as a member of that group. The new BGP neighbor will inherit any configuration for the peer group. The output for three show commands has been updated to display information about dynamic neighbors.
The following sections provide information about this feature:
•
•
The following commands were introduced or modified by this feature: bgp listen, debug ip bgp range. neighbor remote-as, show ip bgp neighbors. show ip bgp peer-group, show ip bgp summary.
BGP Restart Session After Max-Prefix Limit
12.0(22)S
12.2(15)T
12.2(18)SThe BGP Restart Session After Max-Prefix Limit feature enhances the capabilities of the neighbor maximum-prefix command with the introduction of the restart keyword. This enhancement allows the network operator to configure the time interval at which a peering session is reestablished by a router when the number of prefixes that have been received from a peer has exceeded the maximum prefix limit.
The following sections provide information about this feature:
•
•
The following commands were modified neighbor maximum-prefix, show ip bgp neighbors.
BGP Selective Address Tracking
12.4(4)T
12.2(31)SB
12.2(33)SRBThe BGP Selective Address Tracking feature introduced the use of a route map for next-hop route filtering and fast session deactivation. Selective next-hop filtering uses a route map to selectively define routes to help resolve the BGP next hop, or a route map can be used to determine if a peering session with a BGP neighbor should be reset when a route to the BGP peer changes.
The following sections provide information about this feature:
•
•
•
The following commands were modified by this feature: bgp nexthop, neighbor fall-over.
BGP Support for Dual AS Configuration for Network AS Migrations
12.0(27)S
12.2(25)S
12.3(11)T
12.2(33)SRA
12.2(33)SXHThe BGP Support for Dual AS Configuration for Network AS Migrations feature extends the functionality of the BGP Local-AS feature by providing additional autonomous-system path customization configuration options. The configuration of this feature is transparent to customer peering sessions, allowing the provider to merge two autonomous-systems without interrupting customer peering arrangements. Customer peering sessions can later be updated during a maintenance window or during other scheduled downtime.
The following sections provide information about this feature:
•
•
•
The following command was modified by this feature: neighbor local-as.
BGP Support for Fast Peering Session Deactivation
12.0(29)S
12.3(14)T
12.2(33)SRA
12.2(31)SB
12.2(33)SXHThe BGP Support for Fast Peering Session Deactivation feature introduced an event driven notification system that allows a Border Gateway Protocol (BGP) process to monitor BGP peering sessions on a per-neighbor basis. This feature improves the response time of BGP to adjacency changes by allowing BGP to detect an adjacency change and deactivate the terminated session in between standard BGP scanning intervals. Enabling this feature improves overall BGP convergence.
The following sections provide information about this feature:
•
•
•
The following command was modified by this feature: neighbor fall-over
BGP Support for TCP Path MTU Discovery per Session
12.2(33)SRA
12.2(31)SB
12.2(33)SXHBorder Gateway Protocol (BGP) support for Transmission Control Protocol (TCP) path maximum transmission unit (MTU) discovery introduced the ability for BGP to automatically discover the best TCP path MTU for each BGP session. The TCP path MTU is enabled by default for all BGP neighbor sessions, but you can disable, and subsequently enable, the TCP path MTU globally for all BGP sessions or for an individual BGP neighbor session.
The following sections provide information about this feature:
•
•
•
The following commands were introduced or modified by this feature: bgp transport, neighbor transport, show ip bgp neighbors.
BGP Support for TTL Security Check
12.0(27)S
12.3(7)T
12.2(25)S
12.2(18)SXEThe BGP Support for TTL Security Check feature introduced a lightweight security mechanism to protect external Border Gateway Protocol (eBGP) peering sessions from CPU utilization-based attacks using forged IP packets. Enabling this feature prevents attempts to hijack the eBGP peering session by a host on a network segment that is not part of either BGP network or by a host on a network segment that is not between the eBGP peers.
The following sections provide information about this feature:
•
•
•
The following commands were new or modified by this feature: neighbor ttl-security, show ip bgp neighbors.
Any Internet Protocol (IP) addresses used in this document are not intended to be actual addresses. Any examples, command display output, and figures included in the document are shown for illustrative purposes only. Any use of actual IP addresses in illustrative content is unintentional and coincidental.
© 2005-2007 Cisco Systems, Inc. All rights reserved.