Downloads |
 Feedback Feedback
|
Table Of Contents
Consent Feature for Cisco IOS Routers
Prerequisites for Consent Feature for Cisco IOS Routers
Information About Consent Feature for Cisco IOS Routers
An Integrated Consent-Authentication Proxy Webpage
How to Configure Authentication Proxy Consent
Configuring an IP Admission Rule for Authentication Proxy Consent
Defining a Parameter Map for Authentication Proxy Consent
Configuration Examples for Authentication Proxy Consent
Ingress Interface ACL and Intercept ACL Configuration: Example
Consent Page Policy Configuration: Example
Parameter Map Configuration: Example
IP Admission Consent Rule Configuration: Example
Feature Information for Authentication Proxy with Consent Support
Consent Feature for Cisco IOS Routers
First Published: July 19, 2007Last Updated: July 19, 2007The Consent Feature for Cisco IOS Routers enables organizations to provide temporary Internet and corporate access to end users through their wired and wireless networks by presenting a consent webpage. This webpage lists the terms and conditions in which the organization is willing to grant requested access to an end user. Users can connect to the network only after they accept the terms of use on the consent webpage.
Finding Feature Information in This Module
Your Cisco IOS software release may not support all of the features documented in this module. To reach links to specific feature documentation in this module and to see a list of the releases in which each feature is supported, use the "Feature Information for Authentication Proxy with Consent Support" section.
Finding Support Information for Platforms and Cisco IOS and Catalyst OS Software Images
Use Cisco Feature Navigator to find information about platform support and Cisco IOS and Catalyst OS software image support. To access Cisco Feature Navigator, go to http://www.cisco.com/go/cfn. An account on Cisco.com is not required.
Contents
•
Prerequisites for Consent Feature for Cisco IOS Routers
•
•
•
•
Prerequisites for Consent Feature for Cisco IOS Routers
To enable a consent webpage, you must be running an Advanced Enterprise image.
Information About Consent Feature for Cisco IOS Routers
Before enabling the consent feature for Cisco IOS routers, you should understand the following concepts:
•
•
Authentication Proxy Overview
Authentication proxy is an ingress authentication feature that grants access to an end user (out an interface) only if the user submits valid username and password credentials for an ingress traffic that is destined for HTTP, Telnet, or FTP protocols. After the submitted authentication credentials have been checked against the credentials that are configured on an Authentication, Authorization, Accounting (AAA) server, access is granted to the requester (source IP address).
When an end user posts an HTTP(S), FTP, or Telnet request on a router's authentication-proxy-enabled ingress interface, the Network Authenticating Device (NAD) verifies whether or not the same host has already been authenticated. If a session is already present, the ingress request is not authenticated again, and it is subjected to the dynamic (Auth-Proxy) ACEs and the ingress interface ACEs. If an entry is not present, the authentication proxy responds to the ingress connection request by prompting the user for a valid username and password. When authenticated, the Network Access Profiles (NAPs) that are to be applied are either downloaded from the AAA server or taken from the locally configured profiles.
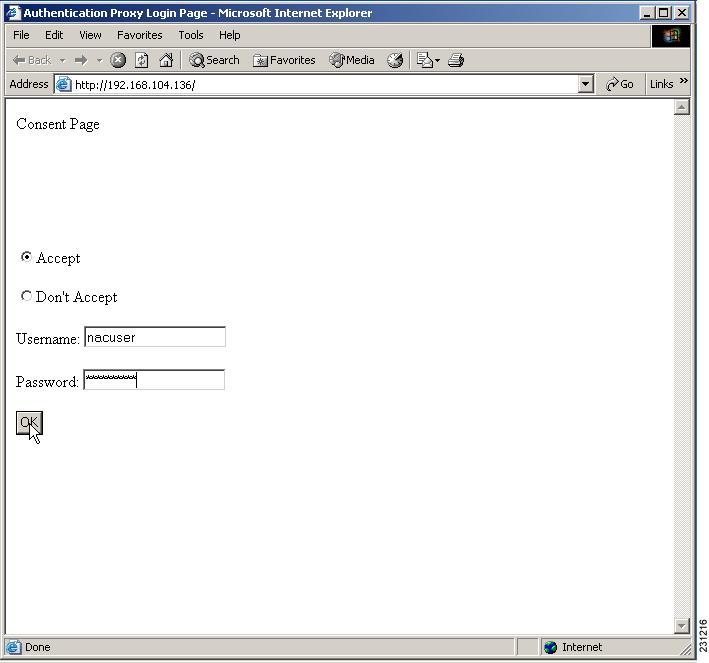
An Integrated Consent-Authentication Proxy Webpage
The HTTP authentication proxy webpage has been extended to support radio buttons—"Accept" and "Don't Accept"—for the consent webpage feature. The consent webpage radio buttons are followed by the authentication proxy input fields for a username and a password. (See Figure 1.)
The following consent scenarios are possible:
•
•
•
–
–
Figure 1
Consent WebPage: Example
How to Configure Authentication Proxy Consent
Use the following tasks to configure a consent webpage and enable a consent webpage that is to be displayed to end users:
•
•
Configuring an IP Admission Rule for Authentication Proxy Consent
Use this task to define the IP admission rule for authentication proxy consent and to associate the rule with an interface.
SUMMARY STEPS
1.
2.
3.
4.
5.
6.
DETAILED STEPS
Troubleshooting Tips
To display authentication proxy consent page information on the router, you can use the debug ip admission consent command.
Router# debug ip admission consent errorsIP Admission Consent Errors debugging is onRouter# debug ip admission consent eventsIP Admission Consent Events debugging is onRouter# debug ip admission consent messagesIP Admission Consent Messages debugging is onRouter#Router# show debuggingIP Admission Consent:IP Admission Consent Errors debugging is onIP Admission Consent Events debugging is onIP Admission Consent Messages debugging is onDefining a Parameter Map for Authentication Proxy Consent
Use this task to define a parameter map that is to be used for authentication proxy consent.
SUMMARY STEPS
1.
2.
3.
4.
5.
6.
7.
8.
9.
10.
DETAILED STEPS
Configuration Examples for Authentication Proxy Consent
This section contains the following configuration examples:
•
•
•
•
Ingress Interface ACL and Intercept ACL Configuration: Example
The following example shows how to define the ingress interface ACL (via the ip access-list extended 102 command) to which the consent page policy ACEs will be dynamically appended. This example also shows how to define an intercept ACL (via the ip access-list extended 103 command) to intercept the ingress interesting traffic by the IP admission consent rule.
ip access-list extended 102permit ip any 192.168.100.0 0.0.0.255permit ip any host 192.168.104.136permit udp any any eq bootpspermit udp any any eq domainpermit tcp any any eq wwwpermit tcp any any eq 443permit udp any any eq 443exit!ip access-list extended 103permit ip any host 192.168.104.136permit udp any host 192.168.104.132 eq domainpermit tcp any host 192.168.104.136 eq wwwpermit udp any host 192.168.104.136 eq 443permit tcp any host 192.168.104.136 eq 443exit!Consent Page Policy Configuration: Example
The following example shows how to configure the consent page policy ACL and the consent page identity policy:
ip access-list extended consent-pg-ip-acc-grouppermit ip any host 192.168.104.128permit ip any host 192.168.104.136exit!identity policy consent_identity_policydescription ### Consent Page Identity Policy ###access-group consent-pg-ip-acc-groupexitParameter Map Configuration: Example
The following example shows how to define the consent-specific parameter map "consent_parameter_map" and a default consent parameter map:
parameter-map type consent consent_parameter_mapcopy tftp://192.168.104.136/consent_page.html flash:consent_page.htmlauthorize accept identity consent_identity_policytimeout file download 35791file flash:consent_page.htmllogging enabledexit!parameter-map type consent defaultcopy tftp://192.168.104.136/consent_page.html flash:consent_page.htmlauthorize accept identity test_identity_policytimeout file download 35791file flash:consent_page.htmllogging enabledexit!IP Admission Consent Rule Configuration: Example
The following example shows how to configure an IP admission consent rule, which includes the consent page parameter map as defined the in the "Parameter Map Configuration: Example" section:
ip admission name consent-rule consent inactivity-time 204 absolute-timer 304 param-mapconsent_parameter_map list 103ip admission consent-banner file flash:consent_page.htmlip admission consent-banner text ^C Consen-Page-Banner-Text ^Cip admission max-login-attempts 5ip admission init-state-timer 15ip admission auth-proxy-auditip admission inactivity-timer 205ip admission absolute-timer 305ip admission ratelimit 100ip http serverip http secure-server!interface FastEthernet 0/0description ### CLIENT-N/W ###ip address 192.168.100.170 255.255.255.0ip access-group 102 inip admission consent-ruleno shutexit!interface FastEthernet 0/1description ### AAA-DHCP-AUDIT-SERVER-N/W ###ip address 192.168.104.170 255.255.255.0no shutexit!line con 0exec-timeout 0 0login authentication noAAAexit!line vty 0 15exec-timeout 0 0login authentication noAAAexit!Additional References
The following sections provide references related to the Consent Feature for Cisco IOS Routers feature.
Related Documents
Additional authentication proxy configuration tasks
The chapter "Configuring Authentication Proxy" in the Cisco IOS Security Configuration Guide
Standards
MIBs
None
To locate and download MIBs for selected platforms, Cisco IOS releases, and feature sets, use Cisco MIB Locator found at the following URL:
RFCs
Technical Assistance
Command Reference
This section documents only commands that are new or modified.
New Commands
Modified Commands
authorize accept identity
To configure an identity policy profile, use the authorize accept identity command in parameter-map-type consent configuration mode. To remove an identity policy profile, use the no form of this command.
authorize accept identity identity-policy-name
no authorize accept identity identity-policy-name
Syntax Description
Command Default
An identity policy does not exist.
Command Modes
Parameter-map-type consent (config-profile)
Command History
Usage Guidelines
If an identity policy is not configured, the interface policy will be used.
Examples
The following example shows how to configure accept policies within the consent-specific parameter maps:
parameter-map type consent consent_parameter_mapcopy tftp://192.168.104.136/consent_page.html flash:consent_page.htmlauthorize accept identity consent_identity_policytimeout file download 35791file flash:consent_page.htmllogging enabledexit!parameter-map type consent defaultcopy tftp://192.168.104.136/consent_page.html flash:consent_page.htmlauthorize accept identity test_identity_policytimeout file download 35791file flash:consent_page.htmllogging enabledexit!copy (consent-parameter-map)
To configure a consent page to be downloaded from a file server, use the copy command in parameter-map type consent configuration mode.
copy src-file-name dst-file-name
Syntax Description
Command Default
The consent page that is specified via the default parameter-map will be used.
Command Modes
Parameter-map-type consent (config-profile)
Command History
Usage Guidelines
Use the copy command to transfer a file (consent web page) from an external server to a local file system on a device. Thus, the file name specified via the copy command is retrieved from the destination file location and displayed to the end user as the consent page.
When a consent webpage is displayed to an end user, the filename specified via the file command is used. If the file command is not configured, the destination location specified via the copy command is used.
Examples
In the following example, both parameter maps are to use the consent file "tftp://192.168.104.136/consent_page.html" and store it in "flash:consent_page.html":
parameter-map type consent consent_parameter_mapcopy tftp://192.168.104.136/consent_page.html flash:consent_page.htmlauthorize accept identity consent_identity_policytimeout file download 35791file flash:consent_page.htmllogging enabledexit!parameter-map type consent defaultcopy tftp://192.168.104.136/consent_page.html flash:consent_page.htmlauthorize accept identity test_identity_policytimeout file download 35791file flash:consent_page.htmllogging enabledexit!Related Commands
file (consent-parameter-map)
Specifies a local filename that is to be used as the consent webpage.
debug ip admission consent
To display authentication proxy consent page information on the router, use the debug ip admission consent command in privileged EXEC mode. To disable debugging output, use the no form of this command.
debug ip admission consent [events | errors | messages]
no debug ip admission consent
Syntax Description
errors
(Optional) Displays only error messages.
events
(Optional) Displays only event-related messages.
messages
(Optional) Displays only packet-related messages.
Command Default
If an option is not selected, all debug messages are displayed.
Command Modes
Privileged EXEC
Command History
Examples
Router# debug ip admission consent errorsIP Admission Consent Errors debugging is onRouter# debug ip admission consent eventsIP Admission Consent Events debugging is onRouter# debug ip admission consent messagesIP Admission Consent Messages debugging is onRouter#Router# show debuggingIP Admission Consent:IP Admission Consent Errors debugging is onIP Admission Consent Events debugging is onIP Admission Consent Messages debugging is on
file (consent-parameter-map)
To specify a local filename that is to be used as the consent webpage, use the file command in parameter-map-type consent configuration mode.
file file-name
Syntax Description
Command Default
The consent page that is specified via the default parameter-map will be used.
Command Modes
Parameter-map-type consent (config-profile)
Command History
Usage Guidelines
If a file is already available on the router or if the file has already been transferred to a local system (via the copy command), use the file command to specify the local filename.
When a consent webpage is displayed to an end user, the filename specified via the file command is used. If the file command is not configured, the destination location specified via the copy command is used.
Examples
In the following example, both parameter maps are to use the consent file "tftp://192.168.104.136/consent_page.html" and store it in "flash:consent_page.html":
parameter-map type consent consent_parameter_mapcopy tftp://192.168.104.136/consent_page.html flash:consent_page.htmlauthorize accept identity consent_identity_policytimeout file download 35791file flash:consent_page.htmllogging enabledexit!parameter-map type consent defaultcopy tftp://192.168.104.136/consent_page.html flash:consent_page.htmlauthorize accept identity test_identity_policytimeout file download 35791file flash:consent_page.htmllogging enabledexitRelated Commands
copy (consent-parameter-map)
Configures a consent page to be downloaded from a file server.
ip admission consent banner
To display a banner on the authentication proxy consent webpage, use the ip admission consent banner command in global configuration mode. To disable a display of the banner, use the no form of this command.
ip admission consent banner {file file-name | text banner-text}
no ip admission consent banner
Syntax Description
Command Default
A banner is not displayed on the authentication proxy consent webpage.
Command Modes
Global configuration
Command History
Usage Guidelines
The ip admission consent-banner command allows users to configure one of two possible scenarios:
•
In this scenario, the administrator supplies the location and name of the file that is to be used for the consent webpage.
•
In this scenario, the administrator can supply multiline text that will be converted to HTML by the auth-proxy parser code. Thus, only the multiline text is displayed on the authentication proxy login page.
Note
Examples
The following example shows how to display the file "consent_page.html" located in flash:
ip admission consent-banner file flash:consent_page.htmlThe following example shows how to specify the custom banner "Consent-Page-Banner-Text" to be displayed in the authentication proxy consent webpage:
ip admission consent-banner text ^C Consent-Page-Banner-Text ^CRelated Commands
ip auth-proxy auth-proxy-banner
Displays a banner, such as the router name, in the authentication proxy login page.
ip admission name
To create an IP network admission control rule, use the ip admission name command in global configuration mode. To remove the network admission control rule, use the no form of this command.
ip admission name admission-name [eapoudp [bypass] | proxy {ftp | http | telnet} | service-policy type tag {service-policy-name}] [list {acl | acl-name}] [event] [timeout aaa] [policy identity {identity-policy-name}]
no ip admission name admission-name [eapoudp [bypass] | proxy {ftp | http | telnet} | service-policy type tag {service-policy-name}] [list {acl | acl-name}] [event] [timeout aaa] [policy identity {identity-policy-name}]
Syntax for Authentication Proxy Consent Webpage
ip admission name admission-name consent [[absolute-timer minutes] [event] [inactivity-time minutes] [list {acl | acl-name}] [parameter-map consent-parameter-map-name]]
no ip admission name admission-name consent [[absolute-timer minutes] [event] [inactivity-time minutes] [list {acl | acl-name}] [parameter-map consent-parameter-map-name]]
Syntax Description
Command Default
An IP network admission control rule is not created.
Command Modes
Global configuration (config)
Command History
Usage Guidelines
The admission rule defines how you apply admission control.
You can associate the named rule with an ACL, providing control over which hosts use the admission control feature. If no standard access list is defined, the named admission rule intercepts IP traffic from all hosts whose connection-initiating packets are received at the configured interface.
The bypass keyword allows an administrator the choice of not having to use the EAPoUDP-based posture validation for the hosts that are trying to connect on the port. The bypass can be used if an administrator knows that the hosts that are connected on the port do not have the Cisco Trust Agent client installed.
The service-policy type tag {service-policy-name} keywords and argument allow you to associate the service policy of the type tag with the IP admission rule. On the network access device (NAD), a set of policies can be associated with an arbitrary tag string, and if the AAA server sends the same tag in response to the posture validation or authentication response, the policies that are associated with the tag can be applied on the host. The service policy keyword is an optional keyword, and if the service policy is not associated with the IP admission name, the policies that are received from the AAA server are applied on the host.
The list keyword option allows you to apply a standard, extended (1 through 199) or named access list to a named admission control rule. IP connections that are initiated by hosts in the access list are intercepted by the admission control feature.
The event keyword option allows you to specify the condition that triggered application of an identity policy.
The timeout aaa keyword option specifies that the AAA server is unreachable, and this condition is triggering the application of an identity policy.
The policy identity keyword and the identity-policy-name argument allow you to configure application of an identity policy and specify the policy type to be applied while the AAA server is unreachable.
The consent keyword and the parameter-map consent-parameter-map-name keyword and argument allow you to associate the authentication proxy consent feature with an IP admission rule. The consent feature enables customers to display a consent webpage to an end user, providing access to wireless services only after the end user accepts the agreement.
Examples
"Tag and Template" Feature Examples
The following example shows that an IP admission control rule is named "greentree" and that it is associated with ACL "101." Any IP traffic that is destined to a previously configured network (using the access-list command) will be subjected to antivirus state validation using EAPoUDP.
Router (config)# ip admission name greentree eapoudp list 101The following example shows that EAPoUDP bypass has been configured:
Router (config)# ip admission name greentree eapoudp bypass list 101In the following service policy example, tags named "healthy" and "non_healthy" can be received from an AAA server, the policy map is defined on the NAD, and the tag policy type is associated with the IP admission name "greentree."
Class Map Definition for the "healthy class" Type Tag
Router (config)# class-map type tag healthy_classRouter(config-cmap)# match tag healthyRouter(config-cmap)# endClass Map Definition for the "non_healthy_class" Type Tag
Router (config)# class-map type tag non_healthy_classRouter (config-cmap)# match tag non_healthyRouter (config-cmap)# endPolicy Map Definition
! The following line will be associated with the IP admission name.Router (config)# policy-map type control tag global_class! The following line refers to the healthy class map that was defined above.Router (config-pmap)# class healthy_classRouter (config-pmap-c)# identity policy healthy_policyRouter(config-pmap-c)# exitThe following line refers to the non_healthy class that was defined above.Router (config-pmap)# class non_healthy_classRouter(config-pmap-c)# identity policy non_healthy_policyRouter (config-pmap-c)# endIdentity Policy Definition
Router (config)# identity policy healthy_policy! The following line is the IP access list for healthy users.Router (config-identity-policy)# access-group healthyRouter (config-identity-policy)# endRouter (config)# identity policy non_healthy_policyRouter (config-identity-policy)# access-group non_healthyRouter (config-identity-policy)# endDefining Access Lists
Router (config)# ip access-list extended healthy_class! The following line can be anything, but as an example, traffic is being allowed.Router (config-ext-nacl)# permit ip any anyRouter (config-ext-nac)# endRouter (config)# ip access-list extended non_healthy_class! The following line is only an example. In practical cases, you could prevent a user from accessing specific networks.Router (config-ext-nacl)# deny ip any anyRouter (config-ext-nac)# endAssociating the Policy Map with the IP Admission Name
Router (config)# ip admission name greentree service-policy type tag global_class! In the next line, the admission name can be associated with the interface.Router (config)# interface fastethernet 1/0Router (config-if)# ip admission greentreeIn the above configuration, if the AAA server sends a tag named "healthy" or "non_healthy" for any host, the policies that are associated with the appropriate identity policy will be applied on the host.
NAC—Auth Fail Open Feature Examples
The following example shows how to define an IP admission control rule named "samplerule" and attach it to a specific interface:
Router (config)# ip admission name samplerule eapoudp list 101 event timeout aaa policy
identity aaa_fail_policy
Router (config)# interface fastethernet 1/1
Router (config-if)# ip admission samplerule
Router (config-if)# end
In the above configuration, if the specified interface is not already authorized when the AAA server becomes unreachable, it will operate under the specified policy until revalidation is possible.
Authentication Proxy Consent Webpage Example
The following example shows how to configure an IP admission consent rule and associate the consent rule with the definitions of the parameter map "consent_parameter_map":
ip admission name consent-rule consent inactivity-time 204 absolute-timer 304
parameter-map consent_parameter_map list 103
ip admission consent-banner file flash:consent_page.htmlip admission consent-banner text ^C Consen-Page-Banner-Text ^Cip admission max-login-attempts 5ip admission init-state-timer 15ip admission auth-proxy-auditip admission inactivity-timer 205ip admission absolute-timer 305ip admission ratelimit 100ip http serverip http secure-server!interface FastEthernet 0/0description ### CLIENT-N/W ###ip address 192.168.100.170 255.255.255.0ip access-group 102 inip admission consent-ruleno shutexit!interface FastEthernet 0/1description ### AAA-DHCP-AUDIT-SERVER-N/W ###ip address 192.168.104.170 255.255.255.0no shutexit!line con 0exec-timeout 0 0login authentication noAAAexit!line vty 0 15exec-timeout 0 0login authentication noAAAexit!
Related Commands
logging enabled
To enable syslog messages, use the logging enabled command in parameter-map-type consent configuration mode.
logging enabled
Syntax Description
This command has no arguments or keywords.
Command Default
Logging messages are not enabled.
Command Modes
Parameter-map-type consent (config-profile)
Command History
Usage Guidelines
After the logging enabled command is entered, a log entry (a syslog), including the client's IP address and the time, is created everytime a response is received for the consent web page.
Examples
The following example shows how to define the consent-specific parameter map "consent_parameter_map" and a default consent parameter map. In both parameter maps, logging is enabled.
parameter-map type consent consent_parameter_mapcopy tftp://192.168.104.136/consent_page.html flash:consent_page.htmlauthorize accept identity consent_identity_policytimeout file download 35791file flash:consent_page.htmllogging enabledexit!parameter-map type consent defaultcopy tftp://192.168.104.136/consent_page.html flash:consent_page.htmlauthorize accept identity test_identity_policytimeout file download 35791file flash:consent_page.htmllogging enabledexitparameter-map type
To create or modify a parameter map, use the parameter-map type command in global configuration mode. To delete a parameter map from the configuration, use the no form of this command.
parameter-map type {inspect | urlfilter | protocol-info | consent} parameter-map-name
no parameter-map type {inspect | urlfilter | protocol-info | consent} parameter-map-name
Syntax Description
Command Default
None
Command Modes
Global configuration (config)
Command History
12.4(6)T
This command was introduced.
12.4(9)T
The protocol-info keyword was added.
12.4(15)T
The consent keyword was added.
Usage Guidelines
A parameter map allows you to specify parameters that control the behavior of actions and match criteria specified under a policy map and a class map, respectively.
There are currently four types of parameter maps:
•
An inspect parameter map is optional. If you do not configure a parameter map, the software uses default parameters. Parameters associated with the inspect action apply to all nested actions (if any). If parameters are specified in both the top and lower levels, those in the lower levels override those in the top levels.
•
A parameter map is required for URL filtering (via the URL filter action in a Layer 3 or Layer 4 policy map and the URL filter parameter map).
•
A parameter map is required for an IM application (Layer 7) policy map.
•
Examples
The following example shows how to configure an IM-based firewall policy. In this example, all Yahoo Messenger and AOL traffic is allowed to pass through, while all MSN Messenger traffic is blocked. Also, parameter maps are defined to control all Yahoo Messenger and AOL traffic on a more granular level.
! Define Layer 7 class-maps.class-map type inspect ymsgr match-any l7-cmap-ymsgrmatch service text-chat!class-map type inspect aol match-any l7-cmap-aolmatch service text-chatmatch service any!! Define Layer 7 policy-maps.policy-map type inspect im l7-pmap-ymsgrclass-type inspect ymsgr l7-cmap-ymsgrallowalarm!!policy-map type inspect im l7-pmap-aolclass-type inspect aol l7-cmap-aolallowalarm!!! Define parameter map.parameter-map type protocol-info ymsgrserver name sdsc.msg.yahoo.comserver ip 10.1.1.1!parameter-map type protocol-info aolserver name sdsc.msg.aol.comserver ip 172.16.1.1.
The following example shows a typical URL filter parameter map configuration:
parameter-map type urlfilter eng-filter-profileserver vendor n2h2 172.16.1.2 port 3128 outside log timeout 10 retrans 6max-request 80max-resp-pak 200cache 200exclusive-domain permit cisco.comexclusive-domain deny gaming.comThe following example shows a sample inspect type parameter map configuration:
parameter-map type inspect eng_network_profileaudit-trail onalert offmax-incomplete low 2000max-incomplete high 3000one-minute low 5000one-minute high 8000udp idle-time 75dns-timeout 25tcp idle-time 90tcp finwait-time 20tcp synwait-time 10tcp block-non-sessiontcp max-incomplete host 2000 block-time 120The following example shows how to define the consent-specific parameter map "consent_parameter_map" and a default consent parameter map:
parameter-map type consent consent_parameter_mapcopy tftp://192.168.104.136/consent_page.html flash:consent_page.htmlauthorize accept identity consent_identity_policytimeout file download 35791file flash:consent_page.htmllogging enabledexit!parameter-map type consent defaultcopy tftp://192.168.104.136/consent_page.html flash:consent_page.htmlauthorize accept identity test_identity_policytimeout file download 35791file flash:consent_page.htmllogging enabledexit!
show ip admission
To display the network admission (NAC) control cache entries or the running network admission control configuration, use the show ip admission command in privileged EXEC mode.
show ip admission {[cache [consent]] [configuration] [eapoudp]}
Syntax Description
Command Modes
Privileged EXEC (#)
Command History
Usage Guidelines
Use show ip admission cache eapoudp to list the host IP addresses, the session timeout, and the posture state. If the posture statue is POSTURE ESTAB, the host validation was successful.
Examples
The following output displays all the IP admission control rules that are configured on the router:
Router# show ip admission configurationAuthentication global cache time is 60 minutesAuthentication global absolute time is 0 minutesAuthentication Proxy Watch-list is disabledAuthentication Proxy Rule ConfigurationAuth-proxy name avruleeapoudp list not specified auth-cache-time 60 minutes
The following output displays the host IP addresses, the session timeout, and the posture states:
Router# show ip admission cache eapoudpPosture Validation Proxy CacheTotal Sessions: 3 Init Sessions: 1Client IP 10.0.0.112, timeout 60, posture state POSTURE ESTABClient IP 10.0.0.142, timeout 60, posture state POSTURE INITClient IP 10.0.0.205, timeout 60, posture state POSTURE ESTABThe following output displays a configuration that includes both a global and a rule-specific NAC Auth Fail Open policy:
Router# show ip admission configurationAuthentication global cache time is 60 minutesAuthentication global absolute time is 0 minutesAuthentication global init state time is 2 minutesAuthentication Proxy Watch-list is enabledWatch-list expiry timeout is 1 minutes! The line below shows the global policy:Authentication global AAA fail identity policy aaa_fail_policyAuthentication Proxy Rule Configuration Auth-proxy name greentreeeapoudp list 101 specified auth-cache-time 60 minutes! The line below shows the rule-specific AAA fail policy; the name changes based on what the user configured.Identity policy name aaa_fail_policy for AAA fail policyThe field descriptions in the display are self-explanatory.
In the following example, a session has been initiated via https://192.168.104.136 from the client 192.168.100.132. After a successful session establishment, the output is as follows:
Router# show ip admission cacheAuthentication Proxy CacheClient Name N/A, Client IP 192.168.100.132, Port 1204, timeout 204, Time Remaining 204, state ESTABRouter# show ip admission cache consentAuthentication Proxy Consent CacheClient Name N/A, Client IP 192.168.100.132, Port 1204, timeout 204, Time Remaining 204, state ESTABRouter# show ip admission cache eapoudpPosture Validation Proxy CacheTotal Sessions: 0 Init Sessions: 0Related Commands
clear ip admission cache
Clears IP admission cache entries from the router.
ip admission name
Creates a Layer 3 network admission control rule.
timeout file download
To specify how often the consent webpage should be downloaded from the file server, use the timeout file download command in parameter-map-type consent configuration mode.
timeout file download minutes
Syntax Description
minutes
Specifies, in minutes, how often the consent webpage should be downloaded from the file server. Available range: 1 to 525600.
Command Default
The consent webpage is not downloaded from the file server.
Command Modes
Parameter-map-type consent (config-profile)
Command History
Usage Guidelines
Using the timeout file download command ensurs that the consent file has the most current parameter map defintions.
Examples
In the following example, the file "consent_page.html" and the default will be downloaded from the file server every 35791 minutes:
parameter-map type consent consent_parameter_mapcopy tftp://192.168.104.136/consent_page.html flash:consent_page.htmlauthorize accept identity consent_identity_policytimeout file download 35791file flash:consent_page.htmllogging enabledexit!parameter-map type consent defaultcopy tftp://192.168.104.136/consent_page.html flash:consent_page.htmlauthorize accept identity test_identity_policytimeout file download 35791file flash:consent_page.htmllogging enabledexit!Feature Information for Authentication Proxy with Consent Support
Table 1 lists the release history for this feature.
Not all commands may be available in your Cisco IOS software release. For release information about a specific command, see the command reference documentation.
Use Cisco Feature Navigator to find information about platform support and software image support. Cisco Feature Navigator enables you to determine which Cisco IOS and Catalyst OS software images support a specific software release, feature set, or platform. To access Cisco Feature Navigator, go to http://www.cisco.com/go/cfn. An account on Cisco.com is not required.
Note
Any Internet Protocol (IP) addresses used in this document are not intended to be actual addresses. Any examples, command display output, and figures included in the document are shown for illustrative purposes only. Any use of actual IP addresses in illustrative content is unintentional and coincidental.
© 2007 Cisco Systems, Inc. All rights reserved.