Downloads |
 Feedback Feedback
|
Table Of Contents
SSL VPN Prerequisites for the Remote User
Restrictions for SSL VPN Remote User Guide
503 Service Unavailable Message
Adding the Current Page to the Personal Bookmark Folder
TCP Port Forwarding and Thin Client
Browser Caching and Security Implications
Thin Client—Recovering from Hosts File Error
How SSL VPN Uses the Hosts File
What Happens If You Stop Thin Client Improperly
Feature Information for SSL VPN for Remote Users
SSL VPN Remote User Guide
First Published: February 27, 2006
Last Updated: March 6, 2008The SSL VPN feature (also known as WebVPN) provides support, in Cisco IOS software, for remote user access to enterprise networks from anywhere on the Internet. Remote access is provided through a Secure Socket Layer- (SSL-) enabled SSL Virtual Private Network (VPN) gateway. The SSL VPN gateway allows remote users to establish a secure VPN tunnel using a web browser. This feature provides a comprehensive solution that allows easy access to a broad range of web resources and web-enabled applications using native HTTP over SSL (HTTPS) browser support.
This document describes how a remote user, whose enterprise network is configured for SSL VPN, can access the network by launching a browser and connecting to the SSL VPN gateway.
For information about SSL VPN from the point of view of a system administrator, see the document SSL VPN.
Note
The Cisco AnyConnect VPN Client is introduced in Cisco IOS Release 12.4(15)T. This feature is the next-generation SSL VPN Client. If you are using Cisco software before Cisco IOS Release 12.4(15)T, you should use SSL VPN Client and see GUI for the SSL VPN Client when you are web browsing. However, if you are using Cisco software Release 12.4(15)T or later, you should use Cisco AnyConnect VPN Client and see GUI for Cisco AnyConnect VPN Client when you are web browsing.
For "What's New" information about SSL VPN features by release, see the "Feature Information for SSL VPN for Remote Users" section.
Finding Feature Information in This Module
Your Cisco IOS software release may not support all of the features documented in this module. To reach links to specific feature documentation in this module and to see a list of the releases in which each feature is supported, use the "Feature Information for SSL VPN for Remote Users" section.
Finding Support Information for Platforms and Cisco IOS and Catalyst OS Software Images
Use Cisco Feature Navigator to find information about platform support and Cisco IOS and Catalyst OS software image support. To access Cisco Feature Navigator, go to http://www.cisco.com/go/cfn. An account on Cisco.com is not required.
Contents:
•
•
•
SSL VPN Prerequisites for the Remote User
The following prerequisites are required to start SSL VPN on a PC or device:
•
–
–
–
–
–
•
Note
–
–
–
•
Note
–
–
–
•
•
If pop-ups are disabled on the browser, SSL VPN does not warn you before disconnecting because of an idle timeout or a maximum connect time.
•
https://address
where address is the IP address or Domain Name System (DNS) hostname of an interface of the SSL VPN gateway, for example https://10.89.192.163 or https://vpn.company.com.
•
Restrictions for SSL VPN Remote User Guide
Cisco AnyConnect VPN Client
CiscoAnyConnect VPN Client does not support the following:
•
•
•
•
•
•
•
•
•
•
Usernames and Passwords
Table 1 lists the type of usernames and passwords that SSL VPN users might have to know.
Remote User Interface
If your enterprise network has been configured for SSL VPN, you can access the network by launching a browser and connecting to the SSL VPN gateway. Present your credentials and authenticate, and then a portal page (home page) of the enterprise site is displayed. The portal page displays SSL VPN features (for example, e-mail and web browsing) to which you have access on the basis of your credentials. If you have access to all features enabled on the SSL VPN gateway, the home page will provide access links.
The following sections explain the remote user interface in more detail:
•
Page Flow
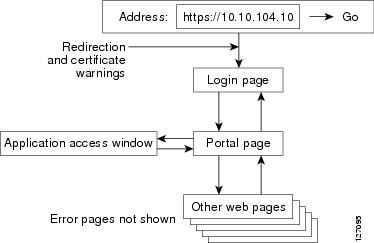
This section describes the page flow process (see Figure 1) for a SSL VPN session. When you enter the HTTPS URL (https://address) into your browser, you are then redirected to https://address/index.html, where the login page is located.
Note
Figure 1 Page Flow
Initial Connection
When you connect for the first time, you might be presented with one of the following scenarios:
•
503 Service Unavailable Message
You might see a "503 Service Unavailable" message if the gateway is experiencing high traffic loads. If you receive this message, try to connect again later.
SSL/TLS Certificate
When the HTTPS connection is established, a warning about the SSL/Transport Layer Security (TLS) certificate may display. If the warning displays, you should install this certificate. If the warning does not display, the system already has a certificate that the browser trusts.
You are then connected to the login page.
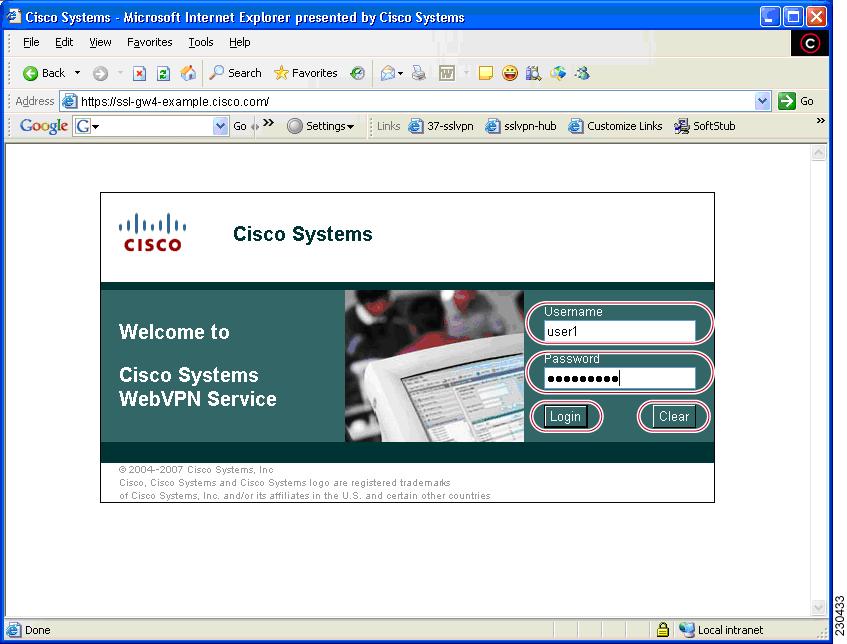
Login Page
The default login page (Figure 2) prompts you to enter your username and password, which are entered into an HTML form. If an authentication failure occurs, the login page displays an error message.
Figure 2 Default Login Page
Certificate Authentication
Client certificate authentication is not supported. Only username and password authentication is supported.
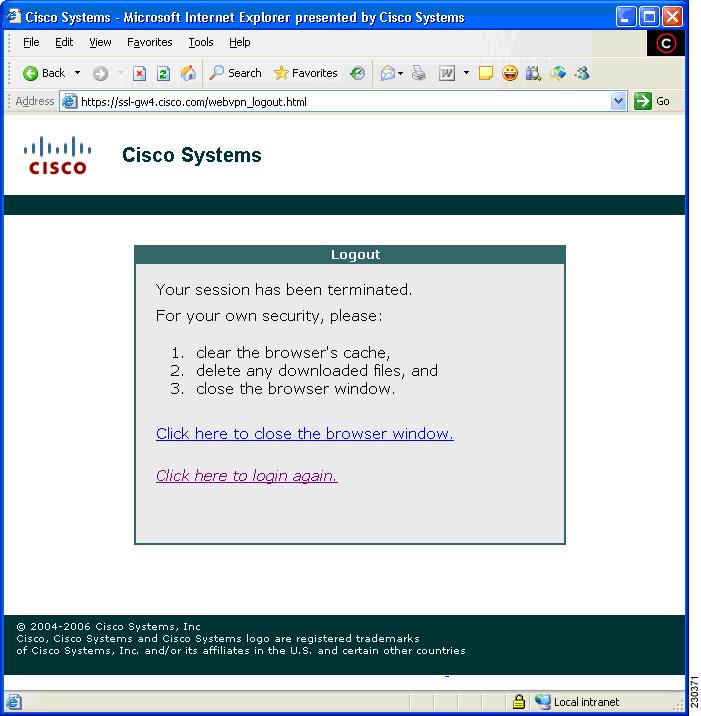
Logout Page
The logout page (Figure 3) displays if you click the logout link or if the session terminates because of an idle timeout or a maximum connection time.
Figure 3 Logout Page
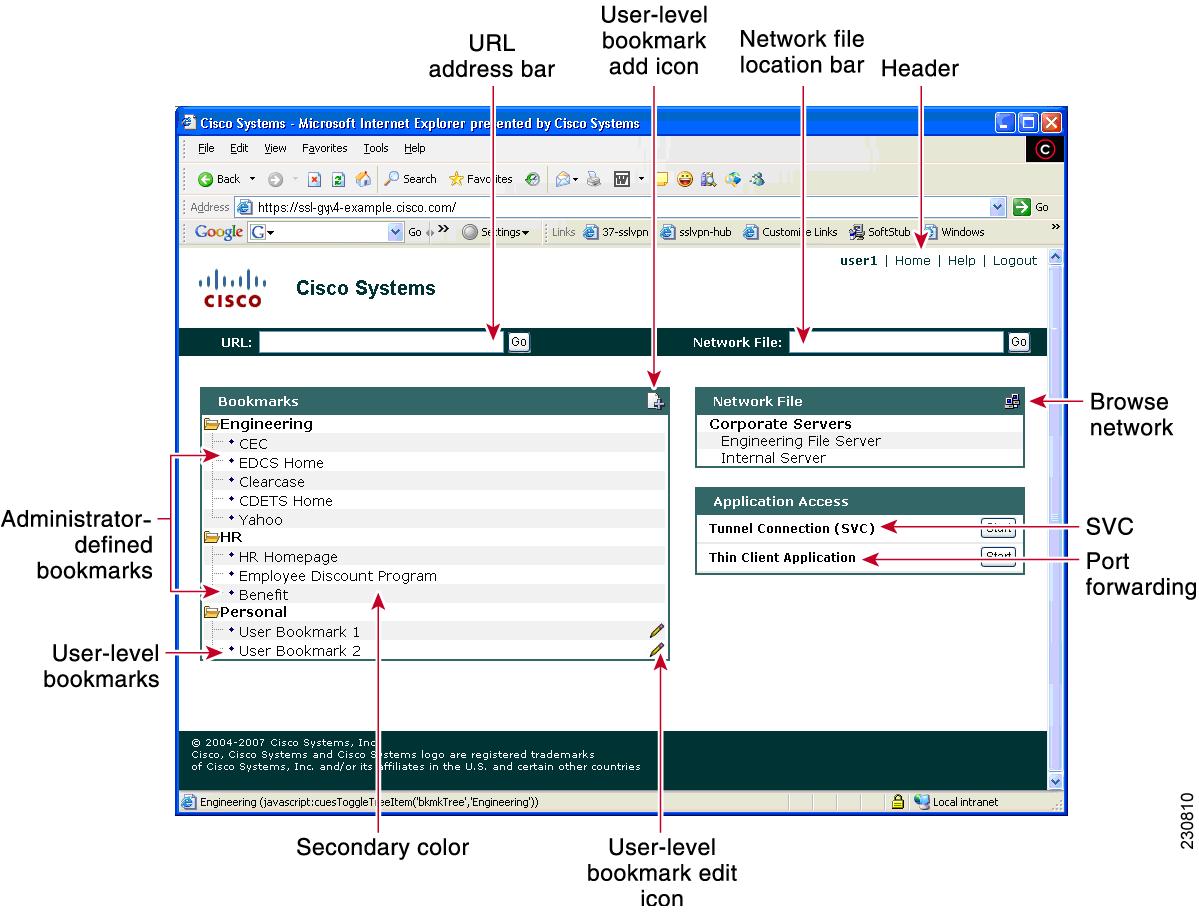
Portal Page
The portal page (Figure 4) is the main page for the SSL VPN functionality. See the callouts for functions that exist for administrators and users.
Figure 4 Portal Page
Table 2 provides information about various fields on the portal page.
Table 2 Information About Fields on the Portal Page
Administrator-defined bookmarks
Administrator-defined URL lists that cannot be edited by the user.
Browse network
Allows you to browse the file network.
Header
Shares the same color value as the "Title." Set by the administrator.
Network File location bar
Allows you to access the network share or folder directly by entering \\server\share\folder.
Port forwarding
Downloads the applet and starts port forwarding.
Tunnel connection
Allows you to download the tunnel client and to install tunnel connect.
URL address bar
A new window is opened when you click Go.
User-level bookmark add icon
Clicking the icon opens a dialog box so you can add a new bookmark to the Personal folder.
User-level bookmark edit icon
Allows you to edit or delete an existing bookmark.
User-level bookmarks
You can add a bookmark by using the plus icon (see below)
on the bookmark panel or toolbar. See the "Toolbar" section for information about the toolbar. A new window is opened when the link is clicked.
Remote Servers
You may enter an address or URL path of a website that you want to visit in the text box on the portal page. Pages from the remote server are displayed in the browser window. You can then browse to other links on the page.
Toolbar
A toolbar has been introduced to help you access the SSL VPN functionalities that are outside the portal page. The toolbar is in the upper right corner of Figure 5 and is outlined in red.
Figure 5 Website with a Toolbar
The toolbar is expanded below in Figure 6. The sections that follow it explain how to use the toolbar icons.
Figure 6 Toolbar
Web Browsing
The web browser is the plus icon (see Figure 7).
Figure 7 Web Browsing Icon
If you click the web browsing icon (see Figure 7), the toolbar expands so that you can enter a URL (see Figure 8).
Figure 8 URL Bar
When a remote user goes to a URL through the URL address bar, the window that is already open is used for display.
Moving the Toolbar
The push-pin icon (see Figure 9) allows you to move the toolbar to the right or left side of the portal page.
Figure 9 Toolbar Repositioning
Returning to the Portal Page
The house icon allows you to return to the portal page (see Figure 10).
Figure 10 Return to the Portal Page
If the portal page is present in the parent window and you click to return to the portal page, your screen jumps back (sets the focus) to that window; otherwise, the current page is loaded with the portal page.
Adding the Current Page to the Personal Bookmark Folder
You can add the current page to your personal bookmark folder by clicking the page-with-a-plus icon (see Figure 11).
Figure 11 Adding Current Page to Personal Bookmark Folder
Displaying the Help Page
You can display the help page by clicking the question mark icon (see Figure 12).
Figure 12 Help Page
Logging Out
The door icon (see Figure 13) allows you to log out.
Figure 13 Log Out
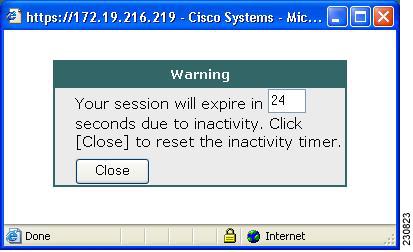
Session Timeout
You receive a warning message approximately 1 minute before the session is set to expire, and you receive another message when the session expires. On the workstation, the local time indicates when the message was displayed.
The first message will be similar to the following:
"Your session will expire in x seconds due to inactivity. Click Close to reset the inactivity timer. (browser time and date)" (See Figure 14 below.)
Figure 14 Session Expiration Message
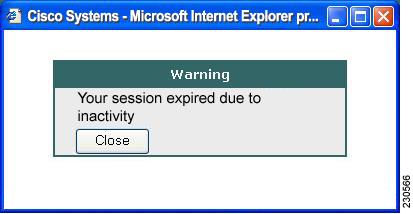
The last message, as shown below in Figure 15, displays when the time runs out (depending on whether the reason of the session termination is known):
Figure 15 Session Inactivity or Timeout Window
TCP Port Forwarding and Thin Client
Note
Note
When you click the Start button of the Thin Client application (under Application Access), a new window is displayed. This window initiates the downloading of a port-forwarding applet. Another window is then displayed. This window asks you to verify the certificate with which this applet is signed. When you accept the certificate, the applet starts running, and port-forwarding entries are displayed (see Figure 16). The number of active connections and bytes that are sent and received is also listed on this window.
Note
The administrator should have configured IP addresses, DNS names, and port numbers for the e-mail servers. If they are configured, you can launch the e-mail client, which is configured to contact these e-mail servers and send and receive e-mails. Point of Presence3 (POP3), Internet Message Access Protocol (IMAP), and Simple Mail Transfer Protocol (SMTP) protocols are supported.
The window attempts to close automatically if you are logged out using JavaScript. If the session terminated and a new port forwarding connection is established, the applet displays an error message.
Figure 16 TCP Port Forwarding Page
Caution
Table 3 lists the requirements for Thin Client (Port Forwarding) on your PC or device.
Table 3 SSL VPN Remote System Thin Client Requirements
Client applications installed
—
Cookies enabled on browser
—
Administrator priviliges
You must be the local administrator on your PC.
Sun Microsystems JRE version 1.4 or later installed
SSL VPN automatically checks for JRE whenever you start Thin Client. If it is necessary to install JRE, a pop-up window displays, directing you to a site where it is available.
Client applications configured, if necessary
Note
To configure the client application, use the locally mapped IP address and port number of the server. To find this information, do the following:
•
•
•
Windows XP SP2 patch
If you are running Windows XP SP2, you must install a patch from Microsoft that is available at the following address:
http://support.microsoft.com/?kbid=884020
This problem is a known Microsoft issue.
Tunnel Connection
In a typical clientless remote access scenario, you establish an SSL tunnel to move data to and from the internal networks at the application layer (for example, web and e-mail). In tunnel mode, you use an SSL tunnel to move data at the network (IP) layer. Therefore, tunnel mode supports most IP-based applications. Tunnel mode supports many popular corporate applications (for example, Microsoft Outlook, Microsoft Exchange, Lotus Notes E-mail, and Telnet).
The tunnel connection is determined by the group policy configuration. The Cisco AnyConnect VPN Client (next-generation SSL VPN Client) is downloaded and installed on your PC, and the tunnel connection is established after the installation.
By default, Cisco AnyConnect VPN Client is removed from your PC after the connection is closed. However, you have the option to keep the Cisco AnyConnect VPN Client installed on your PC.
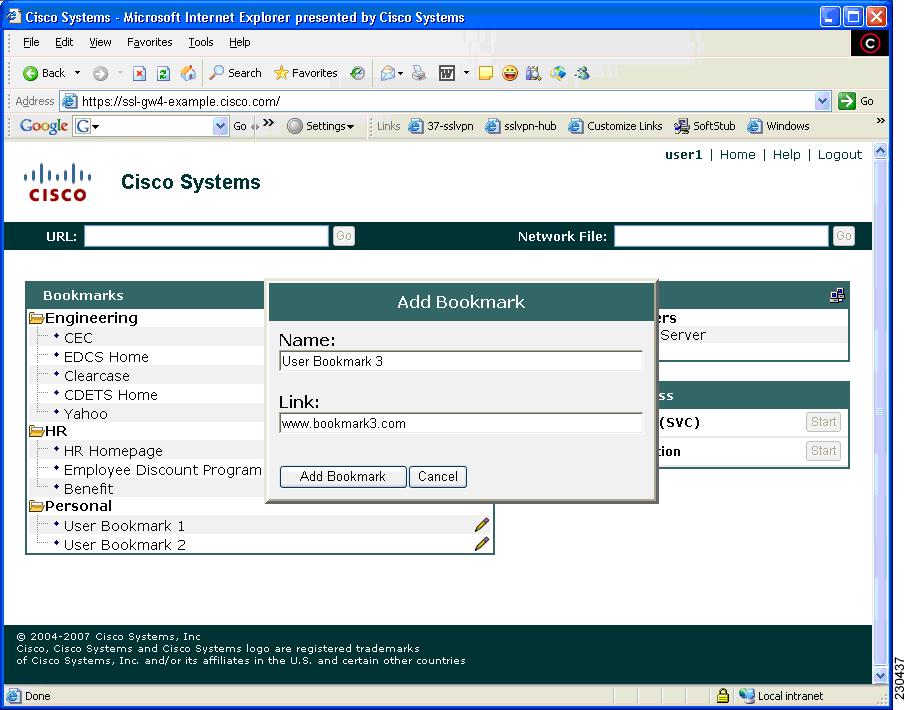
User-Level Bookmarking
Effective with Cisco IOS Release 12.4(15)T, you can bookmark URLs while connected through an SSL VPN tunnel. You can access the bookmarked URLs by clicking the URL.
Adding a Bookmark
Figure 17 shows a typical web page to which a bookmark can be added.
Figure 17 Add Bookmark
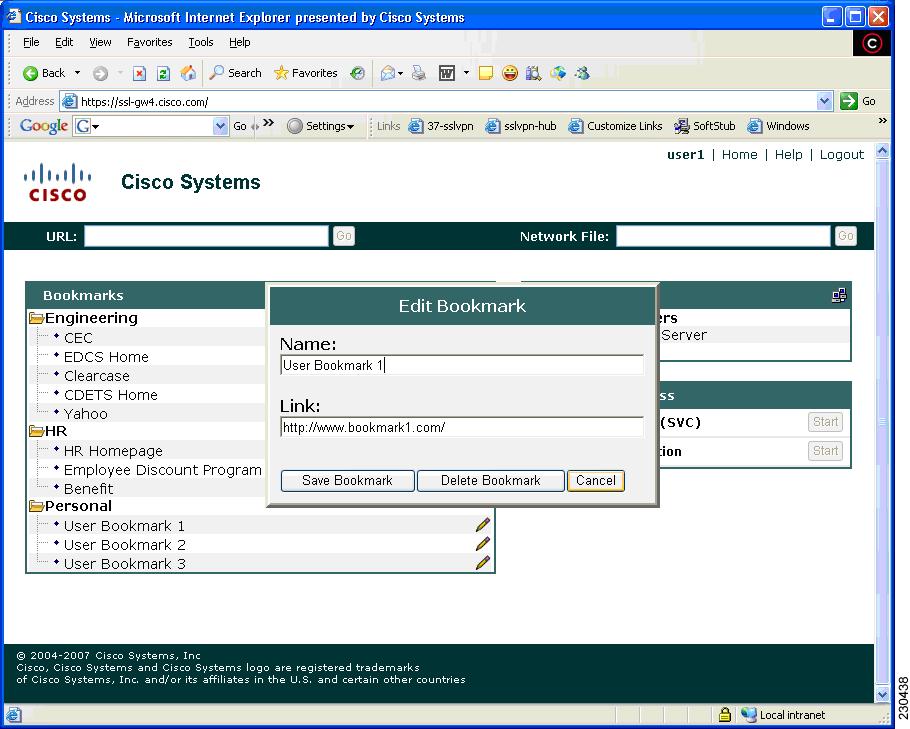
Editing a Bookmark
Figure 18 shows a typical web page to which a bookmark can be edited.
Figure 18 Edit Bookmark
Security Tips
You should always log out from the SSL VPN session when you are finished. (To log out of SSL VPN, click the logout icon on the SSL VPN toolbar or quit the browser.)
Using SSL VPN does not ensure that communication with every site is secure. SSL VPN ensures the security of data transmission between your PC or workstation and the SSL VPN gateway on the corporate network. If you then access a non-HTTPS web resource (located on the Internet or on the internal network), the communication from the corporate SSL VPN gateway to the destination web server is not secured.
Browser Caching and Security Implications
If you access SSL VPN through a public or shared Internet system, such as an Internet cafe or kiosk, to ensure the security of your information after terminating or logging out of the SSL VPN session, you must delete all files that you have saved on the PC during the SSL VPN session. These files are not removed automatically upon disconnect.
Note
Thin Client—Recovering from Hosts File Error
It is important that you close the Thin Client window properly by clicking the close icon. If you do not close the window properly, the following could occur:
•
•
These errors can result if you terminate the Thin Client window in any improper way:
•
•
•
How SSL VPN Uses the Hosts File
The hosts file on your system maps IP addresses to hostnames. When you start Thin Client, SSL VPN modifies the hosts file by adding SSL VPN-specific entries. When you stop Thin Client by properly closing the Thin Client window, SSL VPN returns the hosts file to its original state. The hosts file goes through the following states:
•
•
1.
2.
•
1.
2.
•
What Happens If You Stop Thin Client Improperly
If you improperly terminate Thin Client, the hosts file is left in the SSL VPN-customized state. SSL VPN checks for this possibility the next time you start Thin Client by searching for a hosts.webvpn file. If SSL VPN finds the file, you receive a "Backup HOSTS File Found" error message, and Thin Client is temporarily disabled.
If you improperly shut down Thin Client, you leave the remote access client or server applications in a suspended state. If you start these applications without using SSL VPN, the applications might malfunction. You might find that hosts that you normally connect to are unavailable. This situation could commonly occur if you run applications remotely from home, fail to quit the Thin Client window before shutting down the computer, and then try to run the applications later from the office.
What to Do
To reenable Thin Client or malfunctioning applications, you should do the following:
•
•
Reconfiguring the Hosts File Automatically Using SSL VPN
If you can connect to your remote access server, you should follow these steps to reconfigure the hosts file and reenable both Thin Client and the applications:
Step 1
Step 2
Step 3
•
•
•
Reconfiguring the Hosts File Manually
If you cannot connect to your remote access server from your current location, or if you have customized the hosts file and do not want to lose your edits, you should follow these steps to reconfigure the hosts file and reenable both Thin Client and the applications:
Step 1
Step 2
If any lines contain this string, your hosts file is customized for SSL VPN. If your hosts file is customized, it looks similar to the following example:
10.23.0.3 server1 # added by WebVpnPortForward10.23.0.3 server1.example.com emailxyz.com # added by WebVpnPortForward10.23.0.4 server2 # added by WebVpnPortForward10.23.0.4 server2.example.com.emailxyz.com # added by WebVpnPortForward10.23.0.5 server3 # added by WebVpnPortForward10.23.0.5 server3.example.com emailxyz.com # added by WebVpnPortForward# Copyright (c) 1993-1999 Microsoft Corp.## This is a sample HOSTS file used by Microsoft TCP/IP for Windows.## This file contains the mappings of IP addresses to hostnames. Each# entry should be kept on an individual line. The IP address should# be placed in the first column followed by the corresponding hostname.# The IP address and the hostname should be separated by at least one# space.## Additionally, comments (such as these) may be inserted on individual# lines or following the machine name denoted by a '#' symbol.## For example:## 172.16.102.97 rhino.acme.com # source server# 192.168.63.10 x.acme.com # x client host10.23.0.1 localhostStep 3
Step 4
Step 5
Step 6
Troubleshooting Guidelines
Table 4 provides a list of messages notifying you of various problems, causes, and fixes.
Additional References
The following sections provide references related to SSL VPN.
Related Documents
Security configurations
Cisco IOS Security Configuration Guide, Release 12.4
Security commands
Cisco IOS Security Command Reference, Release 12.4T
Cisco Secure Desktop
Cisco Secure Desktop Home Page
http://www.cisco.com/en/US/partner/products/ps6742/tsd_products_support_series_home.html
Cisco AnyConnect VPN Client
•
SSL VPN (administrator guide)
Standards
No new or modified standards are supported by this feature, and support for existing standards has not been modified by this feature.
—
MIBs
RFCs
No new or modified RFCs are supported by this feature, and support for existing standards has not been modified by this feature.
—
Technical Assistance
Feature Information for SSL VPN for Remote Users
Table 5 lists the release history for this feature.
Use Cisco Feature Navigator to find information about platform support and software image support. Cisco Feature Navigator enables you to determine which Cisco IOS and Catalyst OS software images support a specific software release, feature set, or platform. To access Cisco Feature Navigator, go to http://www.cisco.com/go/cfn. An account on Cisco.com is not required.
Note
Table 5 Feature Information for SSL VPN Remote User Guide
SSL VPN Remote User Guide
12.4(6)T
This section was originally included in the SSL VPN feature document.
Cisco AnyConnect VPN Client
12.4(15)T
This feature is the next-generation SSL VPN Client. The feature provides remote users with secure VPN connections to the router platforms supported by SSL VPN and to the Cisco 5500 Series Adaptive Security Appliances.
Note
Note
GUI Enhancements
12.4(15)T
These enhancements provide updated examples and explanation of the Web VPN GUIs.
The following sections provide information about these updates:
•
Notices
The following notices pertain to this software license.
OpenSSL/Open SSL Project
This product includes software developed by the OpenSSL Project for use in the OpenSSL Toolkit (http://www.openssl.org/).
This product includes cryptographic software written by Eric Young (eay@cryptsoft.com).
This product includes software written by Tim Hudson (tjh@cryptsoft.com).
License Issues
The OpenSSL toolkit stays under a dual license, i.e. both the conditions of the OpenSSL License and the original SSLeay license apply to the toolkit. See below for the actual license texts. Actually both licenses are BSD-style Open Source licenses. In case of any license issues related to OpenSSL please contact openssl-core@openssl.org.
OpenSSL License:
Copyright © 1998-2007 The OpenSSL Project. All rights reserved.
Redistribution and use in source and binary forms, with or without modification, are permitted provided that the following conditions are met:
1.
2.
3.
4.
5.
6.
"This product includes software developed by the OpenSSL Project for use in the OpenSSL Toolkit (http://www.openssl.org/)".
THIS SOFTWARE IS PROVIDED BY THE OpenSSL PROJECT "AS IS"' AND ANY EXPRESSED OR IMPLIED WARRANTIES, INCLUDING, BUT NOT LIMITED TO, THE IMPLIED WARRANTIES OF MERCHANTABILITY AND FITNESS FOR A PARTICULAR PURPOSE ARE DISCLAIMED. IN NO EVENT SHALL THE OpenSSL PROJECT OR ITS CONTRIBUTORS BE LIABLE FOR ANY DIRECT, INDIRECT, INCIDENTAL, SPECIAL, EXEMPLARY, OR CONSEQUENTIAL DAMAGES (INCLUDING, BUT NOT LIMITED TO, PROCUREMENT OF SUBSTITUTE GOODS OR SERVICES; LOSS OF USE, DATA, OR PROFITS; OR BUSINESS INTERRUPTION) HOWEVER CAUSED AND ON ANY THEORY OF LIABILITY, WHETHER IN CONTRACT, STRICT LIABILITY, OR TORT (INCLUDING NEGLIGENCE OR OTHERWISE) ARISING IN ANY WAY OUT OF THE USE OF THIS SOFTWARE, EVEN IF ADVISED OF THE POSSIBILITY OF SUCH DAMAGE.
This product includes cryptographic software written by Eric Young (eay@cryptsoft.com). This product includes software written by Tim Hudson (tjh@cryptsoft.com).
Original SSLeay License:
Copyright © 1995-1998 Eric Young (eay@cryptsoft.com). All rights reserved.
This package is an SSL implementation written by Eric Young (eay@cryptsoft.com).
The implementation was written so as to conform with Netscapes SSL.
This library is free for commercial and non-commercial use as long as the following conditions are adhered to. The following conditions apply to all code found in this distribution, be it the RC4, RSA, lhash, DES, etc., code; not just the SSL code. The SSL documentation included with this distribution is covered by the same copyright terms except that the holder is Tim Hudson (tjh@cryptsoft.com).
Copyright remains Eric Young's, and as such any Copyright notices in the code are not to be removed. If this package is used in a product, Eric Young should be given attribution as the author of the parts of the library used. This can be in the form of a textual message at program startup or in documentation (online or textual) provided with the package.
Redistribution and use in source and binary forms, with or without modification, are permitted provided that the following conditions are met:
1.
2.
3.
"This product includes cryptographic software written by Eric Young (eay@cryptsoft.com)".
The word `cryptographic' can be left out if the routines from the library being used are not cryptography-related.
4.
THIS SOFTWARE IS PROVIDED BY ERIC YOUNG "AS IS" AND ANY EXPRESS OR IMPLIED WARRANTIES, INCLUDING, BUT NOT LIMITED TO, THE IMPLIED WARRANTIES OF MERCHANTABILITY AND FITNESS FOR A PARTICULAR PURPOSE ARE DISCLAIMED. IN NO EVENT SHALL THE AUTHOR OR CONTRIBUTORS BE LIABLE FOR ANY DIRECT, INDIRECT, INCIDENTAL, SPECIAL, EXEMPLARY, OR CONSEQUENTIAL DAMAGES (INCLUDING, BUT NOT LIMITED TO, PROCUREMENT OF SUBSTITUTE GOODS OR SERVICES; LOSS OF USE, DATA, OR PROFITS; OR BUSINESS INTERRUPTION) HOWEVER CAUSED AND ON ANY THEORY OF LIABILITY, WHETHER IN CONTRACT, STRICT LIABILITY, OR TORT (INCLUDING NEGLIGENCE OR OTHERWISE) ARISING IN ANY WAY OUT OF THE USE OF THIS SOFTWARE, EVEN IF ADVISED OF THE POSSIBILITY OF SUCH DAMAGE.
The license and distribution terms for any publicly available version or derivative of this code cannot be changed. i.e. this code cannot simply be copied and put under another distribution license [including the GNU Public License].
CCDE, CCVP, Cisco Eos, Cisco StadiumVision, the Cisco logo, DCE, and Welcome to the Human Network are trademarks; Changing the Way We Work, Live, Play, and Learn is a service mark; and Access Registrar, Aironet, AsyncOS, Bringing the Meeting To You, Catalyst, CCDA, CCDP, CCIE, CCIP, CCNA, CCNP, CCSP, Cisco, the Cisco Certified Internetwork Expert logo, Cisco IOS, Cisco Press, Cisco Systems, Cisco Systems Capital, the Cisco Systems logo, Cisco Unity, Collaboration Without Limitation, Enterprise/Solver, EtherChannel, EtherFast, EtherSwitch, Event Center, Fast Step, Follow Me Browsing, FormShare, GigaDrive, HomeLink, Internet Quotient, IOS, iPhone, IP/TV, iQ Expertise, the iQ logo, iQ Net Readiness Scorecard, iQuick Study, IronPort, the IronPort logo, LightStream, Linksys, MediaTone, MeetingPlace, MGX, Networkers, Networking Academy, Network Registrar, PCNow, PIX, PowerPanels, ProConnect, ScriptShare, SenderBase, SMARTnet, Spectrum Expert, StackWise, The Fastest Way to Increase Your Internet Quotient, TransPath, WebEx, and the WebEx logo are registered trademarks of Cisco Systems, Inc. and/or its affiliates in the United States and certain other countries.
All other trademarks mentioned in this document or Website are the property of their respective owners. The use of the word partner does not imply a partnership relationship between Cisco and any other company. (0801R)
Any Internet Protocol (IP) addresses used in this document are not intended to be actual addresses. Any examples, command display output, and figures included in the document are shown for illustrative purposes only. Any use of actual IP addresses in illustrative content is unintentional and coincidental.
© 2006-2008 Cisco Systems, Inc. All rights reserved.