Feedback
Table Of Contents
Starting Cisco Instant Connect and Logging In to Cisco IPICS
Displaying the Cisco Privacy Policy
Using Cisco Instant Connect
This chapter describes how to use Cisco Instant Connect. It includes these topics:
•
Cisco Instant Connect Screens
•
•
Cisco Instant Connect Screens
You control many of the Cisco Instant Connect operations by using the features on its screens. The following figures describe these screens and provide references to sections in this manual that provide related information.
•
•
•
•
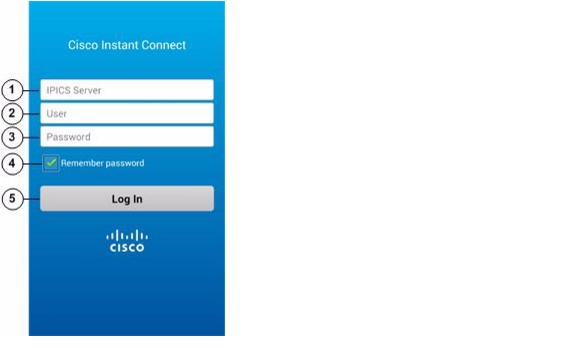
Figure 2-1 Log In Screen
IPICS Server field
See the "Starting Cisco Instant Connect and Logging In to Cisco IPICS" section
User field
Password field
Remember password box
Log In button
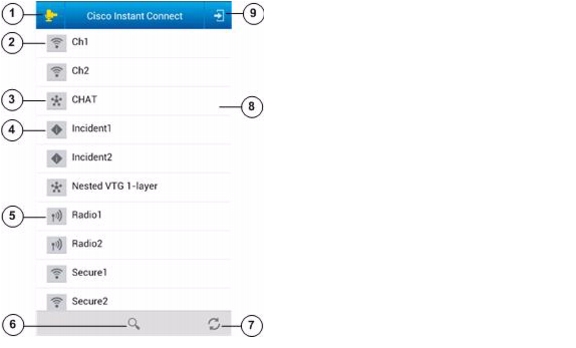
Figure 2-2 Talk Groups Screen
Figure 2-3 PTT Screen
Exit Screen without Disconnect icon
See the "Using the PTT Screen" section
Talk group (incident, VTG, channel, or radio) name
Full Duplex icon
Disconnect and Exit Screen icon
Audio icon
See the "Using the PTT Screen" section and the "Selecting a Speaker" section
PTT button
See the "Using the PTT Screen" section
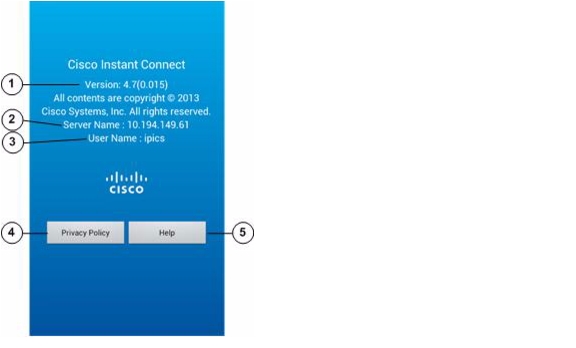
Figure 2-4 About Screen
Cisco Instant Connect version number
—
IP address of the Cisco IPICS server that you are logged in to
See the "Starting Cisco Instant Connect and Logging In to Cisco IPICS" section
Cisco IPICS user name that you are logged in with
Privacy Policy button
Help button
Starting Cisco Instant Connect and Logging In to Cisco IPICS
After you start Cisco Instant Connect, you must log in to the Cisco IPICS server to be able to use Cisco Instant Connect to communicate with other Cisco IPICS users.
To start Cisco Instant Connect and log in to Cisco IPICS from a supported Android device, perform the following steps.
If you logged in to Cisco IPICS from the current device before, the IPICS Server field and the User field are filled in automatically with the information that you entered last time. In addition, the Password field is filled in automatically if you checked the Remember password box.
Procedure
Step 1
.
The Cisco Instant Connect Log In screen appears, as shown in Figure 2-1.Step 2
For example, if the Cisco IPICS server name is ipics1 and you want to log in by using a FQDN, enter the FQDN as ipics1.cisco.com.
Step 3
Step 4
The password is case sensitive.
Step 5
Step 6
The Talk Groups screen appears, as shown in Figure 2-2. For more information about this screen, see the "Using the Talk Groups Screen" section.
Logging Out of Cisco IPICS
You can log out of Cisco Instant Connect from any Cisco Instant Connect screen.
Note
instead of by using the procedure that this section describes.
•
To log out of Cisco IPICS from Cisco Instant Connect, follow these steps:
Procedure
Step 1
Step 2
Step 3
If you do not want to log out, tap Cancel.
After you tap OK, the Cisco Instant Connect Log In screen appears. To exit this screen, tap the Android device Back button.
Using the Talk Groups Screen
The Talk Groups screen, shown in Figure 2-1, appears when you log in to Cisco IPICS or when you choose one of the options to exit the PTT screen.
The Talk Groups screen displays in alphabetical order the names of incidents, VTGs, channels, and radios (collectively called talk groups) with which you are associated. An empty screen appears if no talk groups meet this criterion.
You can communicate on any active talk group that appears on this screen.
On this screen, talk groups are identified as follows:
•
—Indicates an active incident
•
—Indicates an active VTG
•
—Indicates an active channel
•
—Indicates an active radio
When the Talk Groups screen is displayed, you can take any of these actions:
•
•
.
•
, then use the keypad that appears to enter the character or characters. The system automatically displays talk groups that match the search criteria. Search characters are not case sensitive. For example, if you enter a lower case "a," the system finds names that contain "a" and that contain "A."
•
, then tap OK in the confirmation window. You also can log out by using the Android device Back button as described in the "Logging Out of Cisco IPICS" section.
•
. (The display also updates automatically every 60 seconds.)
Using the PTT Screen
You can communicate with other Cisco IPICS users via an active talk group (incident, VTG, channel, or radio) with which you are associated. To do, you use your Android device as a push-to-talk (PTT) device to communicate with other users who have joined the same talk group. The PTT screen provides control for PTT communication.
To communicate with other Cisco IPICS users, follow these steps:
Step 1
For a description of the talk group icons, see the "Using the Talk Groups Screen" section
Alternatively, tap the Quick Connect icon
to reconnect to the last talk group on which you were communicating.
You are connected to the selected talk group, the speaker on your phone enables automatically, and the PTT screen appears, as shown in Figure 2-3. The PTT button appears at the bottom of the PTT screen.
Step 2
•
•
The appearance of the PTT button indicates the PTT state, as described in Table 2-1.
In addition, you can take any of these actions while the PTT screen is displayed:
•
to choose the speaker through which audio plays. For more information, see the "Selecting a Speaker" section.
•
to toggle to half duplex mode. The icon changes to the Half Duplex icon
. Tap the Half Duplex icon to toggle to full duplex mode.
In full duplex mode, you continue to receive audio while you are holding the PTT button. In half duplex mode, you can receive audio only when you are not holding the PTT button.
Step 3
•
.
•
or the Android device Back button.
In this case, you continue to hear audio from the talk group. To talk on the talk group, go back to the PTT screen by tapping the icon or name of the talk group or by tapping the Quick Connect icon
. To disconnect from the talk group, go back to the PTT screen by tapping the icon or name of the talk group or by tapping the Quick Connect icon
, then tap the Exit Screen without Disconnect icon
or the Android device Back button. To talk on another talk group, tap the icon or name of new talk group to disconnect from the current talk group, connect to the new talk group, and display the PTT screen for the new talk group.
•
Table 2-1 PTT Button States
Idle (neither transmitting nor receiving audio)
Receiving audio
Transmitting audio
Latched
Unable to PTT
Selecting a Speaker
The Cisco Instant Connect audio controls let you designate the speaker to which audio is sent. You access these controls from the PTT screen.
You can control the volume of audio that you receive through the Cisco IPICS application by using the volume controls on the Android device.
To select the desired speaker, follow these steps:
Procedure
Step 1
.
The Audio Control panel appears:
Step 2
Step 3
To exit the panel without saving your changes, tap the Cancel button.
Displaying the Cisco Privacy Policy
You can display the Cisco Privacy policy from any Cisco Instant Connect screen.
To display the Cisco privacy policy, follow these steps:
Procedure
Step 1
Step 2
The About screen appears (see Figure 2-4).
Step 3
Step 4
Displaying On Line Help
You can display on line help, which is an on line version of this user guide, from any Cisco Instant Connect screen.
To display on line help, follow these steps:
Procedure
Step 1
Step 2
The About screen appears (see Figure 2-4).
Step 3
Step 4
Viewing Version Information
You can see the version of Cisco Instant Connect that is running on your Android device on the About screen. The version number appears near the top of the screen. See Figure 2-4.