Feedback Feedback
|
Table Of Contents
Cisco StadiumVision Director Server Redundancy
Prerequisites for Cisco StadiumVision Director Server Redundancy
Restrictions for Cisco StadiumVision Director Server Redundancy
Information About Cisco StadiumVision Director Server Redundancy
How to Configure Failover to the Secondary Server and Failback to the Primary Server
Promoting a Standby Secondary Server to the Active Server
Starting and Configuring the Services on the Secondary Server
Restoring the Secondary Server with System Data From a Backup File
Stopping Services on and Shutting Down the Primary Server
Shutting Down Services on the Secondary Server and Changing the IP Address
Clearing the ARP Cache on the Switch
Restarting Services on the Secondary Server
Verifying the Cisco StadiumVision Director Configuration on the Secondary Server
Failing Back to the Primary Server
Shutting Down Services on the Secondary Server and Changing the IP Address
Starting Services on the Original Primary Server
Restoring the Original Primary Server with System Data From a Backup File
Restarting the Local Control Service
Verifying the Cisco StadiumVision Director Configuration on the Original Primary Server
Feature Information for Cisco StadiumVision Director Server Redundancy
Cisco StadiumVision Director Server Redundancy
First Published: November 4, 2011Revised: July 19, 2012Cisco StadiumVision Director supports an environment of two servers that run the Cisco StadiumVision Director software, where one of the servers operates as the primary active server, and the other server operates as a secondary backup server. If a failure occurs, you can configure the backup server to become the active server, but the failover process is not automatic.
Contents
•
Prerequisites for Cisco StadiumVision Director Server Redundancy
•
•
•
•
Prerequisites for Cisco StadiumVision Director Server Redundancy
Before you promote a secondary server to become the primary active server, be sure that the following requirements are met:
•
•
•
•
•
Restrictions for Cisco StadiumVision Director Server Redundancy
The Cisco StadiumVision Director server redundancy architecture has the following restrictions:
•
•
•
Information About Cisco StadiumVision Director Server Redundancy
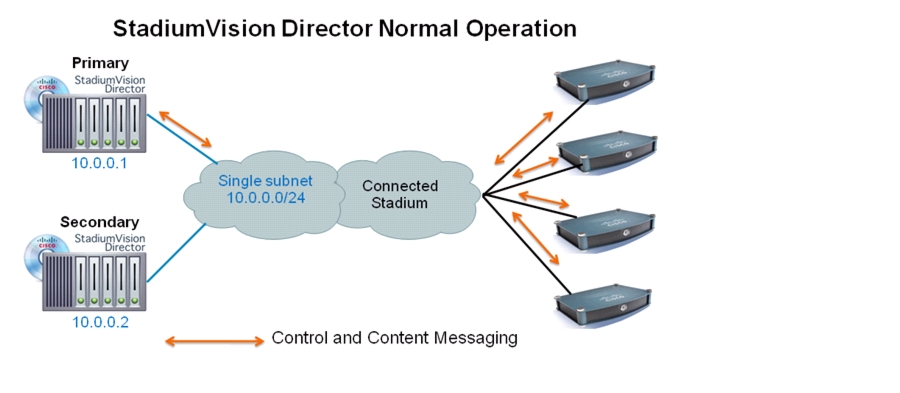
Figure 1 shows the architecture of Cisco StadiumVision Director server redundancy under normal network conditions and operation. The primary and secondary servers are addressed as independent hosts with two different IP addresses on the same subnet in the Cisco Connected Stadium network.
While the secondary server is still connected to the network, notice that communication and control only occurs between the primary Cisco StadiumVision Director server and the rest of the network, including the Digital Media Players (DMPs).
The secondary server is only connected to the network to be made available as a backup to the primary should a failure occur. In addition, the secondary server can (and should) be configured to be backed up with data from the primary server on a scheduled basis.
Figure 1 Cisco StadiumVision Director Server Redundancy Under Normal Operation
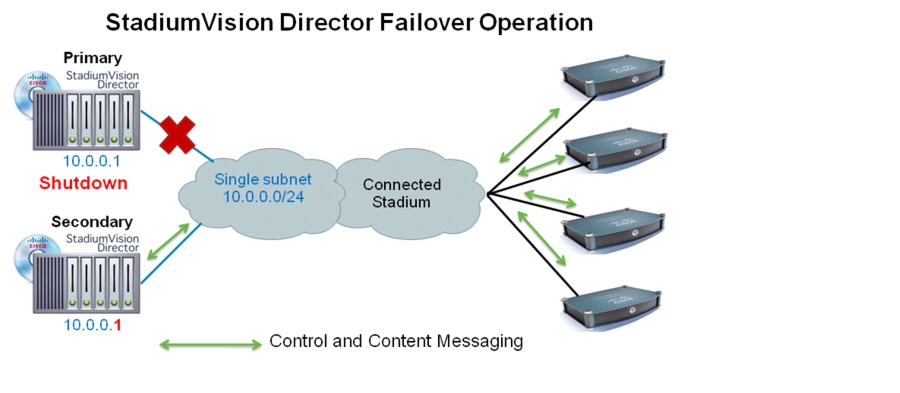
Figure 2 shows the redundancy environment when connectivity from the primary Cisco StadiumVision Director server fails. When the primary server fails, a manual process must take place to restore the secondary server from a backup, shut down the primary server, and activate the secondary server as the primary.
Notice that the secondary server must be reconfigured to use the same IP address the original primary server. In this example, the secondary server IP address is changed to 10.0.0.1 (from 10.0.0.2) to match the primary server address. When the process is complete, communication and control only occurs between the newly activated secondary server and the rest of the network.
Note
Figure 2 Cisco StadiumVision Director Server Redundancy Under Failover Operation
How to Configure Failover to the Secondary Server and Failback to the Primary Server
This section describes the related tasks to perform when a primary Cisco StadiumVision Director server fails in a redundant server environment. It includes tasks to activate the secondary server to replace the functionality of the primary server for Cisco StadiumVision operation, followed by the tasks to fail back to the original primary server.
This section includes the following tasks:
•
•
Note
Promoting a Standby Secondary Server to the Active Server
This section includes the following tasks:
•
•
•
•
•
•
•
Prerequisites
Before you promote the standby secondary server to become the new active server, be sure that there is a successful backup on the secondary server. For more information, see the Backing Up and Restoring Cisco StadiumVision Director module.
Starting and Configuring the Services on the Secondary Server
To start and configure the services on the secondary server, complete the following steps:
Step 1
Step 2
sudo service mysql startsudo service liferay startsudo service svd startsudo service httpd startStep 3
sudo /sbin/chkconfig httpd onsudo /sbin/chkconfig liferay onsudo /sbin/chkconfig mysql onsudo /sbin/chkconfig svd-aim onsudo /sbin/chkconfig svd-config onsudo /sbin/chkconfig svd-control onsudo /sbin/chkconfig svd-hornetq onsudo /sbin/chkconfig svd-monitor on
Restoring the Secondary Server with System Data From a Backup File
To restore the secondary server with system data from a backup file, complete the following steps:
Step 1
Step 2
Step 3
Step 4
Step 5
The restore begins. A dialog box appears notifying you when the restore process has successfully completed.
Stopping Services on and Shutting Down the Primary Server
Note
To stop services on and shut down the primary server, complete the following steps:
Step 1
Step 2
sudo /sbin/chkconfig httpd offsudo /sbin/chkconfig liferay offsudo /sbin/chkconfig mysql offsudo /sbin/chkconfig svd-aim offsudo /sbin/chkconfig svd-config offsudo /sbin/chkconfig svd-control offsudo /sbin/chkconfig svd-hornetq offsudo /sbin/chkconfig svd-monitor offStep 3
sudo shutdown -h now
Shutting Down Services on the Secondary Server and Changing the IP Address
Note
To shut down services on the secondary server and change the IP address, complete the following steps:
Step 1
Step 2
sudo service httpd stopsudo service svd stopsudo service liferay stopsudo service mysql stopStep 3
cat /etc/hostsLook for the localhost and secondary server hostname entries in the display from the /etc/hosts file, and confirm the IP address of the secondary server.
In the following sample entries, notice that the IP address of the secondary server hostname reflects the address as shown in our example in Figure 1:
127.0.0.1 localhost10.0.0.2 secondary-hostname
Note
Step 4
sudo vi /etc/hostsStep 5
10.0.0.1 secondary-hostnameStep 6
sudo system-config-networkStep 7
sudo service network restartStep 8
ping 10.0.0.1If you cannot reach the secondary server, go to the "Clearing the ARP Cache on the Switch" section.
Clearing the ARP Cache on the Switch
This task is optional, as the ARP cache on the switch will refresh in 5-10 minutes. However, if you cannot access the secondary server after changing its IP address, you can clear the ARP cache for that IP address on the switch using the clear ip arp privileged EXEC command.
To clear the ARP cache on the switch, complete the following steps:
Step 1
telnet ip-addressStep 2
Username: yournamePassword: yourpassswitch>Step 3
switch> enablePassword: enablepasswordswitch#Step 4
clear ip arp 10.0.0.1
Restarting Services on the Secondary Server
To restart services on the secondary server, complete the following steps:
Step 1
Step 2
sudo service mysql startsudo service liferay startsudo service svd startsudo service httpd start
Verifying the Cisco StadiumVision Director Configuration on the Secondary Server
To verify the Cisco StadiumVision Director configuration on the secondary server, complete the following steps:
Step 1
Step 2
Step 3
Confirm that you have successful communication between the DMPs and Cisco StadiumVision Director.
Step 4
Step 5
Note
Failing Back to the Primary Server
Note
At a scheduled downtime, you should fail back to the primary server to re-establish your normal operating environment and clean up the original primary server from the failure, make IP addressing changes, and have regularly scheduled backups again between the two servers.
This section includes the following tasks:
•
•
•
•
•
Prerequisites
If you have made any administrative changes on the active secondary server, be sure that a successful backup has been run.
Shutting Down Services on the Secondary Server and Changing the IP Address
To shut down services on the secondary server and change the IP address, complete the following steps:
Step 1
Step 2
sudo service mysql stopsudo service liferay stopsudo service svd stopsudo service httpd stopStep 3
sudo /sbin/chkconfig httpd offsudo /sbin/chkconfig liferay offsudo /sbin/chkconfig mysql offsudo /sbin/chkconfig svd-aim offsudo /sbin/chkconfig svd-config offsudo /sbin/chkconfig svd-control offsudo /sbin/chkconfig svd-hornetq offsudo /sbin/chkconfig svd-monitor offStep 4
cat /etc/hostsLook for the localhost and secondary server hostname entries in the display from the /etc/hosts file, and confirm the IP address of the secondary server.
In the following sample entries, notice that the IP address of the secondary server hostname reflects the address as shown in the example in Figure 2:
127.0.0.1 localhost10.0.0.1 secondary-hostname
Note
Step 5
sudo vi /etc/hostsStep 6
10.0.0.2 secondary-hostnameStep 7
sudo system-config-networkStep 8
sudo service network restartStep 9
ping 10.0.0.2If you cannot reach the secondary server, go to the "Clearing the ARP Cache on the Switch" section and clear the ARP cache entry for IP address 10.0.0.2.
Starting Services on the Original Primary Server
To start services on the original primary server, complete the following steps:
Step 1
Step 2
Note
Step 3
sudo /sbin/chkconfig httpd onsudo /sbin/chkconfig liferay onsudo /sbin/chkconfig mysql onsudo /sbin/chkconfig svd-aim onsudo /sbin/chkconfig svd-config onsudo /sbin/chkconfig svd-control onsudo /sbin/chkconfig svd-hornetq onsudo /sbin/chkconfig svd-monitor onStep 4
sudo service httpd startsudo service svd startsudo service liferay startsudo service mysql startStep 5
Restoring the Original Primary Server with System Data From a Backup File
If any administrative changes were made to the system while in failover to the other server, you should restore the backup from the secondary.
Prerequisites
Before you restore the backup from the secondary server, you will need to manually copy the backup file from the secondary server. For more information, see the Backing Up and Restoring Cisco StadiumVision Director module.
To restore the original primary server with system data from a backup file, complete the following steps:
Step 1
Step 2
Step 3
Step 4
Step 5
The restore begins.
Restarting the Local Control Service
After you perform a restore, you must stop and start the local control service (svd-localctl) to resume normal operation of the local control application programming interface (API).
To restart the local control service, complete the following steps:
Step 1
Step 2
Step 3
Step 4
Step 5
Step 6
Verifying the Cisco StadiumVision Director Configuration on the Original Primary Server
To verify the Cisco StadiumVision Director configuration on the original primary server, complete the following steps:
Step 1
Step 2
Step 3
Confirm that you have successful communication between the DMPs and Cisco StadiumVision Director.
Step 4
Step 5
Feature Information for Cisco StadiumVision Director Server Redundancy
Table 1 lists the release history for this feature.
Cisco and the Cisco logo are trademarks or registered trademarks of Cisco and/or its affiliates in the U.S. and other countries. To view a list of Cisco trademarks, go to this URL: www.cisco.com/go/trademarks. Third-party trademarks mentioned are the property of their respective owners. The use of the word partner does not imply a partnership relationship between Cisco and any other company. (1110R)
Any Internet Protocol (IP) addresses and phone numbers used in this document are not intended to be actual addresses and phone numbers. Any examples, command display output, network topology diagrams, and other figures included in the document are shown for illustrative purposes only. Any use of actual IP addresses or phone numbers in illustrative content is unintentional and coincidental.
© 2011-2012 Cisco Systems, Inc. All rights reserved.