-
Cisco CDA Visual Quality Experience Application User Guide Release 3.7
-
Preface
-
Introduction to Cisco CDA-VQE Application
-
Inital VQE Configuration
-
Using the VQE Channel Provisioning Tool
-
Using the VQE-S AMT
-
Using the VCDS AMT
-
Troubleshooting VQE Software Components
-
Configuring VQE Server and VQE Tools
-
VQE System and Network Parameters
-
SNMP MIBs
-
VQE System Messages
-
Manual Initial VQE System Configuration
-
Configuring DHCP and DNS Servers for VCDS
-
Using the vcds_send_file Command
-
Changing the Boot Sequence to start from CD/DVD Drive
-
VQE Server Performance and Scaling Limits
-
VCPT Configuration Files
-
Using IPMI on Cisco CDE 250
-
 Feedback
Table Of Contents
Manual Initial VQE System Configuration
Setting Up a Cisco CDE That Hosts VQE-S
Prerequisites for a Cisco CDE That Hosts the VQE-S
Connecting Cables for the VQE-S
Setting Up SSL Certificates for the VQE-S
Configuring the Linux Operating System for the VQE-S
Configuring a Static Route for a Management Network (VQE-S Host)
Configuring Static Routes for VQE-S Traffic or VQE-S Services Traffic (VQE-S Host)
Enabling OSPF Routing for VQE-S Traffic or VQE-S Services Traffic
Configuring Interfaces for VQE-S Traffic (Ingest and Services) and VQE-S Services Traffic
Configuring Dedicated Interfaces for VQE-S Ingest Traffic and for VQE-S Services Traffic
Configuring Shared Interfaces for All VQE-S Traffic
Synchronizing the Time and Configuring Network Time Protocol
VQE STUN Server Is Enabled By Default
Ensuring That Only Trusted HTTPS Clients Can Communicate Using HTTPS
Configuring Remote Syslog Servers
Starting VQE-S System Services and Verifying Status
Starting the VQE-S Processes and Verifying Status
Restarting the System and Verifying System and VQE-S Status
Setting Up a Cisco CDE That Hosts VQE Tools
Prerequisites for a Cisco CDE That Hosts VQE Tools
Setting Up SSL Certificates for VCPT
Configuring the Linux Operating System for VQE Tools
Configuring a Static Route for a Management Network (VQE Tools Host)
Synchronizing the Time and Configuring Network Time Protocol
Ensuring That Only Trusted HTTPS Clients Can Communicate Using HTTPS
Configuring Remote Syslog Servers
Starting VQE Tools System Services and Verifying Status
Starting the VCDS Service and Verifying VCDS, VCDS AMT and VCPT Status
Restarting the System and Verifying System, VCPT, VCDS AMT, and VCDS Status
Manual Initial VQE System Configuration
This appendix explains how to perform manual initial configuration on the two categories of CDE servers running the VQE software:
•
VQE server (VQE-S)—CDE hosting the VQE-S
•
In a VQE deployment, use of a VQE Tools server and VCPT is optional.
The alternative to manual configuration is to use the Cisco vqe_cfgtool. For information on using the utility, see the "VQE-S and VQE-Tools Server: Routing and Interface Configuration Overview" section.
Note
For information on installing or upgrading VQE software, see Release Notes for Cisco CDA Visual Quality Experience Application.
The manual initial configuration procedures are explained in these sections:
•
•
Setting Up a Cisco CDE That Hosts VQE-S
This section explains how to perform the initial configuration tasks for a Cisco CDE hosting the VQE-S.
When performed manually, the initial configuration tasks involve editing the /etc/opt/vqes/vcdb.conf file to configure the essential VCDB parameters. The use of the vcdb.conf file simplifies the configuration tasks. Because the VQE Configuration Tool automatically applies the VCDB values to the /etc configuration files on system reboot, mistakes in configuration file syntax are unlikely.
For information on manually editing the vcdb.conf file, see the "Manually Editing the VCDB File" section.
Perform these initial configuration tasks in the order shown:
1.
2.
3.
4.
5.
6.
7.
8.
9.
10.
11.
12.
13.
14.
15.
Note
For information on upgrading an already configured Cisco CDE, see the Release Notes for Cisco CDA Visual Quality Experience, Release 3.7.
For information on configuring the VQE-S RTCP Exporter, see the "Configuring the VQE-S RTCP Exporter" section.
Prerequisites for a Cisco CDE That Hosts the VQE-S
This section explains tasks that should be performed before setting up a Cisco CDE that hosts the VQE-S.
Connecting Cables for the VQE-S
For information on connecting cables on the VQE-S, see the "Connecting Cables to the CDE" section.
For the location of connectors on the Cisco CDE front and back panels, see the Cisco Content Delivery Engine 110 Hardware Installation Guide.
Setting Up SSL Certificates for the VQE-S
It is recommended that you deploy your own Secure Sockets Layer (SSL) certificates or commercial SSL certificates before beginning the tasks for setting up a Cisco CDE that hosts the VQE-S. For information on setting up the certificates, see the "Setting Up SSL Certificates" section.
Configuring the Linux Operating System for the VQE-S
This section explains the initial Linux configuration tasks needed for a Cisco CDE appliance that runs the VQE-S software. The explanation assumes that the needed software for Linux and the VQE-S has been preinstalled on the Cisco CDE appliance. For Red Hat Enterprise Linux 5.1 documentation, go to the following website:
http://www.redhat.com/docs/manuals/enterprise/
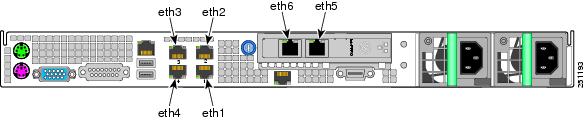
For software configuration, the RJ-45 NIC (Ethernet) ports on the Cisco CDE back panel are specified as eth1 to eth6 as shown in Figure D-1.
Note
Figure D-1 NIC Port Numbering for Software Configuration
For the configuration examples in this section, Figure D-2 shows the IP addresses for interfaces eth1, eth2, bond1 (with eth3 and eth4 as its members), and the corresponding interfaces on the edge router.
Figure D-2 IP Addresses for VQE-S Configuration Examples
To configure the Linux operating system and other software for the VQE-S, follow these steps:
Step 1
Step 2
[root@system]# passwd vqeEnter a password that follows the password guidelines:
A valid password should be a mix of upper and lower case letters,digits, and other characters. You can use an 8 character longpassword with characters from at least 3 of these 4 classes, ora 7 character long password containing characters from all theclasses. An upper case letter that begins the password and adigit that ends it do not count towards the number of characterclasses used.A passphrase should be of at least 3 words, 12 to 40 characterslong and contain enough different characters.This username and password can be used to log in to Linux directly using SSH. The vqe username and password can also be used log in to the VQE-S AMT.
Step 3
network.eth1.addr="10.2.9.2/24"network.eth2.addr="10.2.10.2/24"Step 4
system.global.hostname="starfire-iptv"Step 5
•
•
For example:
system.dns.server="192.0.20.53."system.dns.search_domain="domain.com"Step 6
Configuring Bond Interfaces
This section provides information on configuring bond interfaces on the CDE that hosts the VQE-S. Bond interfaces may be used for the VQE-S traffic (ingest and services), VQE-S ingest traffic, or VQE-S service traffic, depending on whether shared or dedicated interfaces are configured. Bond interfaces may also be used for VQE-S management traffic.
Note
To configure a bond interface with one or more CDE Ethernet interfaces as members, follow these steps:
Step 1
Step 2
network.bond1.addr="10.2.11.2/24"Step 3
network.bond1.member="eth3,eth4"
Note
Step 4
Note
Alternatively, to avoid a reboot of the system, you can use the vqe_cfgtool command with the -apply option to restart only the required services. For more information on the -apply option, see the "Using the VQE Configuration Tool Command-Line Options" section.
After the VQE-S host is rebooted or the configuration has been applied, you can verify that the Ethernet interfaces and bond interfaces are configured correctly and up and running by issuing the following commands:
•
[root@system]# ifconfig eth1eth1 Link encap:Ethernet HWaddr 00:0E:0C:C1:F4:0Finet addr:10.7.10.2 Bcast:10.7.10.255 Mask:255.255.255.0inet6 addr: fe90::20e:cff:fec7:f30f/64 Scope:LinkUP BROADCAST RUNNING MULTICAST MTU:1500 Metric:1RX packets:3 errors:0 dropped:0 overruns:0 frame:0TX packets:36 errors:0 dropped:0 overruns:0 carrier:0collisions:0 txqueuelen:1000RX bytes:192 (192.0 b) TX bytes:2700 (2.6 KiB)Base address:0x3000 Memory:b8800000-b8820000The following example is for bond1:
[root@system]# ifconfig bond1bond1 Link encap:Ethernet HWaddr 00:0E:0C:C6:D4:2Einet addr:8.5.28.2 Bcast:8.5.28.255 Mask:255.255.255.0inet6 addr: fe90::20e:cff:fec5:d42e/64 Scope:LinkUP BROADCAST RUNNING MASTER MULTICAST MTU:1500 Metric:1RX packets:1198174 errors:0 dropped:0 overruns:0 frame:0TX packets:866284 errors:0 dropped:0 overruns:0 carrier:0collisions:0 txqueuelen:0RX bytes:124912504 (119.1 MiB) TX bytes:105570108•
[root@system]# ip link show eth1eth1: <BROADCAST,MULTICAST,UP,LOWER_UP> mtu 1500 qdisc pfifo_fast qlen 1000link/ether 00:0e:0c:c6:e4:fe brd ff:ff:ff:ff:ff:ffThe following is an example for bond1:
[root@system]# ip link show bond1bond1: <BROADCAST,MULTICAST,MASTER,UP,LOWER_UP> mtu 1500 qdisc noqueuelink/ether 00:0e:0c:c6:d4:2e brd ff:ff:ff:ff:ff:ff•
[root@system]# ping 10.2.9.1Configuring a Static Route for a Management Network (VQE-S Host)
If your deployment makes use of a management network, a static route for the management network can be configured using the VCDB parameter network.route.static_route. The configuration example in this section configures CDE Ethernet interface eth1 as the interface to the management network.
When the VQE-S uses dedicated interfaces for ingest traffic for multicast streams, the network.route.static_route parameter can be used to define a static route to the distribution network where video sources reside. For information, see the "Routing Configuration for Dedicated Interfaces and Shared Interfaces" section.
Note
To configure a static route for a management network, follow these steps:
Step 1
Step 2
For this example, assume CDE Ethernet interface eth1(10.2.9.2) on the VQE-S host is designated for management traffic.
The line in the vcdb.conf file is as follows:
network.network.mgmt_interfaces="eth1"Step 3
network.route.static_route="target-network-subnet-addr/prefix-length via
gateway-addr:outbound-interface"
The target-network-subnet-addr/prefix-length is the IP address and prefix length for the management network. The gateway-addr is the IP address of the router Ethernet interface or bond interface that is directly attached to the CDE Ethernet port or bond interface that is used for management network traffic. The outbound-interface is the interface used on the VQE-S for this static route.
For this example, assume the following:
•
•
The line in the vcdb.conf file is as follows:
network.route.static_route="192.0.0.0/8 via 10.2.9.1"In the preceding example, 10.2.9.1 is the gateway-addr—the router interface that is directly attached to eth1 on the VQE-S host. Figure D-2 shows the IP addresses used in this example for the eth1 interface and the directly attached router.
Step 4
Note
Alternatively, to avoid a reboot of the system, you can use the vqe_cfgtool command with the -apply option to restart only the required services. For more information on the -apply option, see the "Using the VQE Configuration Tool Command-Line Options" section.
After the VQE-S host is rebooted or the configuration has been applied, you can verify that the static route for the management network is present in the routing table by issuing the following command:
[root@system]# ip route showThe output is similar to the following:
192.0.0.0/8 via 10.2.9.1 dev eth1defaultnexthop via 10.2.10.1 dev eth2 weight 1nexthop via 10.2.10.1 dev bond1 weight 1Configuring Static Routes for VQE-S Traffic or VQE-S Services Traffic (VQE-S Host)
This section provides information on configuring static routes for VQE-S traffic to the access network on the CDE that hosts VQE-S. The configuration is similar regardless of whether dedicated interfaces or shared interfaces are used.
Note
For the configuration examples in this section, Figure D-3 shows the IP addresses for interfaces eth1, eth2, eth3, and eth4 and the corresponding interfaces on the edge router.
Figure D-3 IP Addresses for VQE-S Configuration Examples
On the Cisco CDE that hosts the VQE-S, multiple Ethernet interfaces or multiple bond interfaces can be used for the VQE-S traffic, including incoming multicast streams, outgoing Unicast Retransmissions and RCC unicast transmissions, and other VQE-S traffic. In addition, some VQE deployments may use one of the Ethernet or one of the bond interfaces as the interfaces to a management network.
If a default (next hop) route is configured for each CDE Ethernet interface or bond interface that is available for VQE-S traffic, Equal Cost Multipath (ECMP) is used to load-balance VQE-S output traffic across the CDE interfaces that are directly attached to the gateway router interfaces specified in the network.route.static_route parameter.
Note
To configure a static route for one or more CDE Ethernet interfaces or one or more bond interfaces, follow these steps:
Step 1
Step 2
network.route.type="static"Step 3
network.route.static_route="target-network-subnet-addr/prefix-length via gateway-addr:outbound-interface"For the target-network-subnet-addr/prefix-length, specify 0.0.0.0/0.
The gateway-addr is the IP address of the router Ethernet interface or bond interface that is directly attached to the CDE Ethernet port or bond interface that is used for access network traffic. The outbound-interface is the interface used on the VQE-S for this static route and is optional.
Note
The following example shows two vcdb.conf lines that add default gateways for the Ethernet interfaces displayed in Figure D-3.
network.route.static_route="0.0.0.0/0 via 10.2.11.1"network.route.static_route="0.0.0.0/0 via 10.2.12.1"In the preceding example, 10.2.11.1 and 10.2.12.1 are the gateway (next hop) addresses on the router that is directly attached to the VQE-S host.
Note
Step 4
Note
Alternatively, to avoid a reboot of the system, you can use the vqe_cfgtool command with the -apply option to restart only the required services. For more information on the -apply option, see the "Using the VQE Configuration Tool Command-Line Options" section.
After the VQE-S host is rebooted or the configuration has been applied, you can verify that the default gateway routes are present in the routing table of the CDE by issuing the following command:
[root@system]# ip route showThe output is similar to the following:
defaultnexthop via 10.2.11.1 dev bond1 weight 1Enabling OSPF Routing for VQE-S Traffic or VQE-S Services Traffic
This section provides information on enabling and configuring OSPF routing for VQE-S traffic (ingest and services) or VQE-S services traffic to the access network on the CDE that hosts the VQE-S. The configuration is similar regardless of whether dedicated interfaces or shared interfaces are used.
Note
To configure OSPF routing for the CDE Ethernet interfaces or bond interfaces that are used for VQE-S traffic or VQE-S services traffic, follow these steps:
Step 1
Step 2
network.route.type="ospf"Step 3
Note
•
•
•
•
•
•
•
•
For information on each of the preceding parameters and default values, see Table A-8.
Step 4
Note
Alternatively, to avoid a reboot of the system, you can use the vqe_cfgtool command with the -apply option to restart only the required services. For more information on the -apply option, see the "Using the VQE Configuration Tool Command-Line Options" section.
On the VQE-S
After the VQE-S host is rebooted or the configuration has been applied, you can verify that the OSPF configuration is present on the CDE by issuing the following commands where:
•
•
•
•
[root@system]# show ip ospfvqe-s# show ip ospfOSPF Routing Process, Router ID: 8.31.200.1Supports only single TOS (TOS0) routesThis implementation conforms to RFC2328RFC1583Compatibility flag is disabledOpaqueCapability flag is disabledInitial SPF scheduling delay 200 millisec(s)Minimum hold time between consecutive SPFs 1000 millisec(s)Maximum hold time between consecutive SPFs 10000 millisec(s)Hold time multiplier is currently 1SPF algorithm last executed 1m00s agoSPF timer is inactiveRefresh timer 10 secsThis router is an ASBR (injecting external routing information)Number of external LSA 1. Checksum Sum 0x0000efb2Number of opaque AS LSA 0. Checksum Sum 0x00000000Number of areas attached to this router: 1Area ID: 0.0.0.1 (NSSA)Shortcutting mode: Default, S-bit consensus: noNumber of interfaces in this area: Total: 3, Active: 3It is an NSSA configuration.Elected NSSA/ABR performs type-7/type-5 LSA translation.It is not ABR, therefore not Translator.Number of fully adjacent neighbors in this area: 2Area has no authenticationNumber of full virtual adjacencies going through this area: 0SPF algorithm executed 4 timesNumber of LSA 6Number of router LSA 2. Checksum Sum 0x0000a03dNumber of network LSA 2. Checksum Sum 0x00010556Number of summary LSA 1. Checksum Sum 0x0000519eNumber of ASBR summary LSA 0. Checksum Sum 0x00000000Number of NSSA LSA 1. Checksum Sum 0x0000693eNumber of opaque link LSA 0. Checksum Sum 0x00000000Number of opaque area LSA 0. Checksum Sum 0x00000000[root@system]# show ip ospf databaseOSPF Router with ID (8.31.200.1)Router Link States (Area 0.0.0.1 [NSSA])Link ID ADV Router Age Seq# CkSum Link count8.31.20.1 8.31.20.1 1120 0x80000012 0x1707 28.31.200.1 8.31.200.1 1120 0x8000001b 0x8936 3Net Link States (Area 0.0.0.1 [NSSA])Link ID ADV Router Age Seq# CkSum25.1.1.1 8.31.20.1 1125 0x80000001 0x08a625.1.2.1 8.31.20.1 1120 0x80000001 0xfcb0Summary Link States (Area 0.0.0.1 [NSSA])Link ID ADV Router Age Seq# CkSum Route0.0.0.0 8.31.20.1 159 0x8000000c 0x4f9f 0.0.0.0/0NSSA-external Link States (Area 0.0.0.1 [NSSA])Link ID ADV Router Age Seq# CkSum Route8.31.1.1 8.31.200.1 1125 0x80000003 0x693e E2 8.31.1.1/32 [0x0]AS External Link StatesLink ID ADV Router Age Seq# CkSum Route8.31.1.1 8.31.200.1 1125 0x80000003 0xefb2 E2 8.31.1.1/32 [0x0][root@system]# show ip ospf route============ OSPF network routing table ============N IA 0.0.0.0/0 [2] area: 0.0.0.1via 25.1.1.1, eth2via 25.1.2.1, eth3N 8.31.200.1/32 [10] area: 0.0.0.1directly attached to loN 25.1.1.0/24 [1] area: 0.0.0.1directly attached to eth2N 25.1.2.0/24 [1] area: 0.0.0.1directly attached to eth3============ OSPF router routing table =============R 8.31.20.1 [1] area: 0.0.0.1, ABR, ASBRvia 25.1.1.1, eth2via 25.1.2.1, eth3============ OSPF external routing table ===========[root@system]# show ip routeCodes: K - kernel route, C - connected, S - static, R - RIP, O - OSPF,I - ISIS, B - BGP, > - selected route, * - FIB routeO>* 0.0.0.0/0 [110/2] via 25.1.1.1, eth2, 00:01:40via 25.1.2.1, eth3, 00:01:40C>* 8.31.1.1/32 is directly connected, loO 8.31.200.1/32 [110/10] is directly connected, lo, 00:01:49C>* 8.31.200.1/32 is directly connected, loO 25.1.1.0/24 [110/1] is directly connected, eth2, 00:01:45C>* 25.1.1.0/24 is directly connected, eth2O 25.1.2.0/24 [110/1] is directly connected, eth3, 00:01:44C>* 25.1.2.0/24 is directly connected, eth3C>* 127.0.0.0/8 is directly connected, loK>* 224.0.0.0/4 is directly connected, eth1On the Cisco 7600 Edge Router
After the VQE-S host is rebooted, you can verify that the OSPF configuration is present on the Cisco 7600 edge router by issuing the following commands where:
•
•
•
router ospf 100router-id 8.31.20.1log-adjacency-changesarea 1 nssa no-summarytraffic-share min across-interfacesnetwork 25.1.1.0 0.0.0.255 area 1network 25.1.2.0 0.0.0.255 area 1network 26.1.1.0 0.0.0.255 area 0maximum-paths 8c7600> show ip ospfRouting Process "ospf 100" with ID 8.31.20.1Start time: 00:00:04.540, Time elapsed: 06:07:33.660Supports only single TOS(TOS0) routesSupports opaque LSASupports Link-local Signaling (LLS)Supports area transit capabilityIt is an area border and autonomous system boundary routerRedistributing External Routes from,Router is not originating router-LSAs with maximum metricInitial SPF schedule delay 5000 msecsMinimum hold time between two consecutive SPFs 10000 msecsMaximum wait time between two consecutive SPFs 10000 msecsIncremental-SPF disabledMinimum LSA interval 5 secsMinimum LSA arrival 1000 msecsLSA group pacing timer 240 secsInterface flood pacing timer 33 msecsRetransmission pacing timer 66 msecsNumber of external LSA 1. Checksum Sum 0x002F1BNumber of opaque AS LSA 0. Checksum Sum 0x000000Number of DCbitless external and opaque AS LSA 0Number of DoNotAge external and opaque AS LSA 0Number of areas in this router is 2. 1 normal 0 stub 1 nssaNumber of areas transit capable is 0External flood list length 0IETF NSF helper support enabledCisco NSF helper support enabledReference bandwidth unit is 100 mbpsArea BACKBONE(0) (Inactive)Number of interfaces in this area is 1Area has no authenticationSPF algorithm last executed 06:07:24.744 agoSPF algorithm executed 4 timesArea ranges areNumber of LSA 4. Checksum Sum 0x012D0CNumber of opaque link LSA 0. Checksum Sum 0x000000Number of DCbitless LSA 0Number of indication LSA 0Number of DoNotAge LSA 0Flood list length 0Area 1Number of interfaces in this area is 2It is a NSSA areaPerform type-7/type-5 LSA translationArea has no authenticationSPF algorithm last executed 00:18:18.804 agoSPF algorithm executed 10 timesArea ranges areNumber of LSA 6. Checksum Sum 0x025E70Number of opaque link LSA 0. Checksum Sum 0x000000Number of DCbitless LSA 2Number of indication LSA 0Number of DoNotAge LSA 0Flood list length 0c7600> show ip ospf databaseOSPF Router with ID (8.31.20.1) (Process ID 100)Router Link States (Area 0)Link ID ADV Router Age Seq# Checksum Link count8.31.20.1 8.31.20.1 288 0x8000000D 0x001B73 1Summary Net Link States (Area 0)Link ID ADV Router Age Seq# Checksum8.31.200.1 8.31.20.1 1239 0x80000001 0x009B6925.1.1.0 8.31.20.1 1244 0x80000011 0x00429225.1.2.0 8.31.20.1 1234 0x80000013 0x00339ERouter Link States (Area 1)Link ID ADV Router Age Seq# Checksum Link count8.31.20.1 8.31.20.1 1249 0x80000012 0x001707 28.31.200.1 8.31.200.1 1250 0x8000001B 0x008936 3Net Link States (Area 1)Link ID ADV Router Age Seq# Checksum25.1.1.1 8.31.20.1 1254 0x80000001 0x0008A625.1.2.1 8.31.20.1 1250 0x80000001 0x00FCB0Summary Net Link States (Area 1)Link ID ADV Router Age Seq# Checksum0.0.0.0 8.31.20.1 289 0x8000000C 0x004F9FType-7 AS External Link States (Area 1)Link ID ADV Router Age Seq# Checksum Tag8.31.1.1 8.31.200.1 1256 0x80000003 0x00693E 0Type-5 AS External Link StatesLink ID ADV Router Age Seq# Checksum Tag8.31.1.1 8.31.20.1 1240 0x80000001 0x002F1B 0c7600> show ip routeCodes: C - connected, S - static, R - RIP, M - mobile, B - BGPD - EIGRP, EX - EIGRP external, O - OSPF, IA - OSPF inter areaN1 - OSPF NSSA external type 1, N2 - OSPF NSSA external type 2E1 - OSPF external type 1, E2 - OSPF external type 2i - IS-IS, su - IS-IS summary, L1 - IS-IS level-1, L2 - IS-IS level-2ia - IS-IS inter area, * - candidate default, U - per-user static routeo - ODR, P - periodic downloaded static route8.0.0.0/32 is subnetted, 2 subnetsO N2 8.31.1.1 [110/20] via 10.1.2.2, 00:20:45, GigabitEthernet0/2[110/20] via 10.1.1.2, 00:20:45, GigabitEthernet0/1O 8.31.200.1 [110/11] via 10.1.2.2, 00:20:45, GigabitEthernet0/2[110/11] via 10.1.1.2, 00:20:45, GigabitEthernet0/110.0.0.0/24 is subnetted, 2 subnetsC 10.1.1.0 is directly connected, GigabitEthernet0/1C 10.1.2.0 is directly connected, GigabitEthernet0/226.0.0.0/24 is subnetted, 1 subnetsC 26.1.1.0 is directly connected, GigabitEthernet0/3Configuring Interfaces for VQE-S Traffic (Ingest and Services) and VQE-S Services Traffic
The service provider can choose one of the following approaches when configuring the CDE interfaces:
•
–
–
See the Configuring Dedicated Interfaces for VQE-S Ingest Traffic and for VQE-S Services Traffic section.
•
Configuring Dedicated Interfaces for VQE-S Ingest Traffic and for VQE-S Services Traffic
On the VQE-S host, the vqe.vqes.vqe_ingest_interfaces and vqe.vqes.vqe_services_interfaces parameters in the /etc/vqes/vcdb.conf file allow you to specify the Ethernet interfaces or bond interfaces that are available, respectively, for VQE-S ingest traffic (incoming multicast streams) and for VQE-S services (Unicast Retransmission and RCC traffic). You manually edit the vcdb.conf file and specify the Ethernet interfaces or bond interfaces that are used.
Note
For the configuration examples in this section, Figure D-4 shows the IP addresses for interfaces eth1, eth2, bond1 (with eth3 and eth4 as its members), and the corresponding interfaces on the edge router.
Figure D-4 IP Addresses for VQE-S Configuration Examples
On the Cisco CDE that hosts VQE-S, to configure dedicated interfaces that are used for VQE-S ingest traffic and for VQE-S services traffic, follow these steps:
Step 1
Note
For this example, assume that the implementation uses eth1 for management network traffic only. Therefore, eth1 is not included in the set of interfaces that are available for VQE-S ingest or services traffic.
Step 2
vqe.vqes.vqe_ingest_interfaces="ethernet-interface-name, ethernet-interface-name" or
vqe.vqes.vqe_ingest_interfaces="bond-interface-name, bond-interface-name"
For example:
vqe.vqes.vqe_ingest_interfaces="eth2"
Note
For information on manually editing the vcdb.conf file, see the "Manually Editing the VCDB File" section.
Step 3
vqe.vqes.vqe_ingest_interfaces="ethernet-interface-name, ethernet-interface-name" or
vqe.vqes.vqe_ingest_interfaces="bond-interface-name, bond-interface-name"
For example:
vqe.vqes.vqe_services_interfaces="bond1"Step 4
Step 5
Note
Alternatively, to avoid a reboot of the system, you can use the vqe_cfgtool command with the -apply option to restart only the required services. For more information on the -apply option, see the "Using the VQE Configuration Tool Command-Line Options" section.
Configuring Shared Interfaces for All VQE-S Traffic
On the VQE-S host, the vqe.vqes.vqe_interfaces parameter in the /etc/vqes/vcdb.conf file allows you to specify the Ethernet interfaces or bond interfaces that are available for VQE-S traffic (ingest and services). You manually edit the vcdb.conf file and specify the Ethernet interfaces or bond interfaces that are used.
For the configuration examples in this section, Figure D-5 shows the IP addresses for interfaces eth1, eth2, eth3, and eth4 and the corresponding interfaces on the edge router.
Figure D-5 IP Addresses for VQE-S Configuration Examples
On the Cisco CDE that hosts VQE-S, to configure shared interfaces to handle both VQE-S ingest traffic and VQE-S services traffic, follow these steps:
Step 1
Note
For this example, assume that the implementation uses eth1 for management network traffic. Therefore, eth1 is not included in the set of interfaces that are available for VQE-S ingest and services traffic.
Step 2
vqe.vqes.vqe_ingest_interfaces="ethernet-interface-name, ethernet-interface-name" or
vqe.vqes.vqe_ingest_interfaces="bond-interface-name, bond-interface-name"
For example:
vqe.vqes.vqe_interfaces="eth2,eth3,eth4"
Note
For information on manually editing the vcdb.conf file, see the "Manually Editing the VCDB File" section.
Step 3
Step 4
Note
Alternatively, to avoid a reboot of the system, you can use the vqe_cfgtool command with the -apply option to restart only the required services. For more information on the -apply option, see the "Using the VQE Configuration Tool Command-Line Options" section.
Synchronizing the Time and Configuring Network Time Protocol
To keep system time correct and synchronized, we recommend that you use Network Time Protocol (NTP) on the VQE-S host. To synchronize the time and configure NTP, follow these steps:
Step 1
Step 2
[root@system]# /usr/bin/tzselect To set the date and time, issue the date command as
follows:
date -s "date_time_string"
For example:
[root@system]# date -s "16:55:30 July 7, 2008"Step 3
system.ntp.server="10.2.26.2"In the preceding example, the IP address of the external NTP server is 10.2.26.2.
Step 4
Note
Alternatively, to avoid a reboot of the system, you can use the vqe_cfgtool command with the -apply option to restart only the required services. For more information on the -apply option, see the "Using the VQE Configuration Tool Command-Line Options" section.
For information on starting the NTP service (ntpd daemon), see the "Starting VQE-S System Services and Verifying Status" section.
VQE STUN Server Is Enabled By Default
Starting with Cisco VQE Release 3.0, the VQE STUN Server is enabled by default. The STUN Server allows STBs behind NAT devices to be supported by VQE-S. Unless you are sure that no STBs being serviced by VQE-S are behind NAT devices, we recommend that you leave the STUN Server enabled.
Configuring SNMP
The CDE that hosts the VQE-S uses Net-SNMP, a third-party product, for SNMP support for some basic, non-VQE system services. Net-SNMP offers a set of built-in MIBs for Linux platforms.
The VQE-S also provides a VQE-specific MIB and a system messages (Syslog) MIB. System messages that meet a specified severity level can be converted to SNMP traps and sent to a Network Management System (NMS). SNMP traps for indicating changes in a channel's state may also be generated. A channel up trap can be generated when a channel's state changes from inactive to active, and a channel down trap can be generated when a channel's state changes from active to inactive. Generating syslog and channel traps is optional. For more information on the SNMP MIBs on the VQE-S, see "SNMP MIBs".
To configure SNMP on the Cisco CDE that hosts the VQE-S, follow these steps:
Step 1
Step 2
•
•
•
•
•
•
•
For more information on these SNMP-related VCDB parameters, see Table A-6.
The following example shows the four vcdb.conf lines that specify the SNMP parameters:
system.snmp.ro_community_string="XXYYZZ"system.snmp.location="Building 6 San Francisco"system.snmp.contact="Helen_Lee@company.com"system_snmp_trap_listener="192.0.2.25"system.snmp.syslog_trap_enable="true"system.snmp.syslog_trap_priority="4"system.snmp.channel_trap_enable="true"Step 3
Note
Alternatively, to avoid a reboot of the system, you can use the vqe_cfgtool command with the -apply option to restart only the required services. For more information on the -apply option, see the "Using the VQE Configuration Tool Command-Line Options" section.
Ensuring That Only Trusted HTTPS Clients Can Communicate Using HTTPS
In your IPTV deployment, VCPT (VCPT) or another channel-provisioning server sends channel information to the VQE-Ss. You must configure each CDE that hosts the VQE-S so that only trusted HTTPS clients (the channel-provisioning servers) can send the channel information to the CDE. If VCPT is the channel-provisioning server, the IP addresses of all Ethernet interfaces (that have been assigned IP addresses) on the VCPT host must be configured as trusted HTTPS clients on the VQE-S host. For more information on VCPT and how it sends channel information, see the "VCPT and Channel Information" section.
The system.iptables.trusted_provisioner parameter is for enhanced communications security beyond HTTPS. The VQE-S is configured so that only trusted HTTPS clients (as specified in system.iptables.trusted_provisioner) can send it information using HTTPS.
To allow only traffic from trusted HTTPS clients on the CDE port used for HTTPS, follow these steps:
Step 1
Step 2
system.iptables.trusted_provisioner="10.86.17.200"In the preceding example, 10.86.17.200 is the IP address of a trusted channel-provisioning server.
Step 3
Note
Alternatively, to avoid a reboot of the system, you can use the vqe_cfgtool command with the -apply option to restart only the required services. For more information on the -apply option, see the "Using the VQE Configuration Tool Command-Line Options" section.
Configuring Remote Syslog Servers
VQE system messages can be sent by means of UDP to remote servers for centralized logging. The use of remote syslog servers is optional. For more information on configuring remote syslog servers, see the "Remote Syslog Hosts" section.
To configure remote syslog servers on the Cisco CDE that hosts the VQE-S, follow these steps:
Step 1
Step 2
•
For more information on the remote logging VCDB parameters, see Table A-6.
The following example shows the two vcdb.conf lines that specifies the remote logging parameter:
system.syslog.remote_server="192.0.7.25"system.syslog.remote_server="192.0.7.26"Step 3
Note
Alternatively, to avoid a reboot of the system, you can use the vqe_cfgtool command with the -apply option to restart only the required services. For more information on the -apply option, see the "Using the VQE Configuration Tool Command-Line Options" section.
Starting VQE-S System Services and Verifying Status
Table D-1 lists the system services that you configure and start for the CDE that hosts the VQE-S. Use of the SNMP and NTP services are optional depending on your deployment requirements.
To start the VQE-S system services and verify their status, follow these steps:
Note
Step 1
Step 2
[root@system]# chkconfig --add sshd[root@system]# chkconfig sshd on[root@system]# service sshd start[root@system]# chkconfig --add httpd[root@system]# chkconfig httpd on[root@system]# service httpd start[root@system]# chkconfig --add tomcat5[root@system]# chkconfig tomcat5 on[root@system]# service tomcat5 startThe following commands for the Quagga routing package and OSPF are optional depending on whether these services for Quagga and OSPF are used in your deployment:
[root@system]# chkconfig --add ospfd[root@system]# chkconfig ospfd on[root@system]# service ospfd start[root@system]# chkconfig --add zebra[root@system]# chkconfig zebra on[root@system]# service zebra start[root@system]# chkconfig --add watchquagga[root@system]# chkconfig watchquagga on[root@system]# service watchquagga startThe following commands for SNMP, SNMP subagents, and NTP are optional depending on whether these services are used in your deployment:
[root@system]# chkconfig --add snmpd[root@system]# chkconfig snmpd on[root@system]# service snmpd start[root@system]# chkconfig --add snmpsa[root@system]# chkconfig snmpsa on[root@system]# service snmpsa start[root@system]# chkconfig --add vqes_snmpsa[root@system]# chkconfig vqes_snmpsa on[root@system]# service vqes_snmpsa start[root@system]# chkconfig --add syslog_snmpsa[root@system]# chkconfig syslog_snmpsa on[root@system]# service syslog_snmpsa start[root@system]# chkconfig --add ntpd[root@system]# chkconfig ntpd on[root@system]# service ntpd startStep 3
[root@system]# /usr/bin/check_daemons >> /var/spool/cron/rootStep 4
[root@system]# chkconfig --list | grep sshdsshd 0:off 1:off 2:on 3:on 4:on 5:on 6:off[root@system]# service sshd statussshd (pid 2772) is running...[root@system]# ps -ef | grep sshdroot 2772 1 0 Jul23 ? 00:00:00 /usr/sbin/sshdStep 5
[root@system]# chkconfig --list | grep httpdhttpd 0:off 1:off 2:on 3:on 4:on 5:on 6:off[root@system]# service httpd statushttpd (2894) is running...[root@system]# ps -ef | grep httpdapache 447 2894 0 Jul23 ? 00:00:00 /usr/sbin/httpdroot 2894 1 0 Jul02 ? 00:00:00 /usr/sbin/httpdapache 30078 2894 0 Jul19 ? 00:00:00 /usr/sbin/httpdapache 30079 2894 0 Jul19 ? 00:00:00 /usr/sbin/httpdapache 30080 2894 0 Jul19 ? 00:00:00 /usr/sbin/httpdapache 30082 2894 0 Jul19 ? 00:00:00 /usr/sbin/httpdapache 30083 2894 0 Jul19 ? 00:00:00 /usr/sbin/httpdapache 30084 2894 0 Jul19 ? 00:00:00 /usr/sbin/httpdapache 30085 2894 0 Jul19 ? 00:00:00 /usr/sbin/httpdapache 30087 2894 0 Jul19 ? 00:00:00 /usr/sbin/httpdStep 6
[root@system]# chkconfig --list | grep tomcat5tomcat5 0:off 1:off 2:on 3:on 4:on 5:on 6:off[root@system]# service tomcat5 statusTomcat is running...[root@system]# ps -ef | grep tomcat5root 19800 1 0 Jul23 ? 00:00:08 /usr/java/default/bin/java -Djava.util.logging.manager=org.apache.juli.ClassLoaderLogManager -Djava.util.logging.config.file=/usr/share/tomcat5/conf/logging.properties -Djava.endorsed.dirs=/usr/share/tomcat5/common/endorsed -classpath :/usr/share/tomcat5/bin/bootstrap.jar:/usr/share/tomcat5/bin/commons-logging-api.jar -Dcatalina.base=/usr/share/tomcat5 -Dcatalina.home=/usr/share/tomcat5 -Djava.io.tmpdir=/usr/share/tomcat5/temp org.apache.catalina.startup.Bootstrap startStep 7
[root@system]# chkconfig --list | grep ospfdospfd 0:off 1:off 2:on 3:on 4:on 5:on 6:off[root@system]# service ospfd statusospfd (pid 6173) is running...[root@system]# ps -ef | grep ospfdquagga 6173 1 0 Sep22 ? 00:00:07 /usr/sbin/ospfd -d -A 127.0.0.1 -f /etc/quagga/ospfd.confStep 8
[root@system]# chkconfig --list | grep zebrazebra 0:off 1:off 2:on 3:on 4:on 5:on 6:off[root@system]# service zebra statuszebra (pid 6139) is running...[root@system]# ps -ef | grep zebraquagga 6139 1 0 Sep22 ? 00:00:00 /usr/sbin/zebra -d -A 127.0.0.1 -f/etc/quagga/zebra.confStep 9
[root@system]# chkconfig --list | grep watchquaggawatchquagga 0:off 1:off 2:on 3:on 4:on 5:on 6:off[root@system]# service watchquagga statuswatchquagga (pid 2513) is running...[root@system]# ps -ef | grep watchquaggaroot 2513 1 0 Sep15 ? 00:00:00 /usr/sbin/watchquagga -Az -d -b_ -r/sbin/service_%s_restart -s/sbin/service_%s_start -k/sbin/service_%s_stop zebra ospfdStep 10
[root@system]# chkconfig --list | grep snmpdsnmpd 0:off 1:off 2:on 3:on 4:on 5:on 6:off[root@system]# service snmpd statussnmpd (pid 17654) is running...[root@system]# ps -ef | grep snmpdroot 17654 1 0 Jul25 ? 00:09:24 /usr/sbin/snmpd -Lsd -Lf /dev/null -p /var/run/snmpd.pid -aStep 11
[root@system]# chkconfig --list | grep snmpsasnmpsa 0:off 1:off 2:on 3:on 4:on 5:on 6:off[root@system]# service snmpsa statusThe SNMP subagent is running.[root@system]# ps -ef | grep snmpsaroot 17678 1 0 Jul25 ttyS1 00:09:14 /usr/local/snmpsa/bin/smSubagentStep 12
[root@system]# chkconfig --list | grep vqes_snmpsavqes_snmpsa 0:off 1:off 2:on 3:on 4:on 5:on 6:off[root@system]# service vqes_snmpsa statusvqes_subagent (pid 28603) is running...[root@system]# ps -ef | grep vqes_snmpsaroot 17878 17956 0 09:16 pts/3 00:00:00 grep vqes_snmpsaStep 13
[root@system]# chkconfig --list | grep syslog_snmpsasyslog_snmpsa 0:off 1:off 2:on 3:on 4:on 5:on 6:off[root@system]# service syslog_snmpsa statussyslog_subagent (pid 9886) is running...[root@system]# ps -ef | grep syslog_snmpsaroot 17984 17946 0 09:16 pts/2 00:00:00 grep syslog_snmpsaStep 14
[root@system]# chkconfig --list | grep ntpdntpd 0:off 1:off 2:on 3:on 4:on 5:on 6:off[root@system]# service ntpd statusntpd (pid 17219) is running...[root@system]# ps -ef | grep ntpdntp 17219 1 0 Jul25 ? 00:00:06 ntpd -u ntp:ntp -p /var/run/ntpd.pid -g
Starting the VQE-S Processes and Verifying Status
To start the VQE-S service and processes and verify status, follow these steps:
Step 1
Step 2
[root@system]# chkconfig --add vqes[root@system]# chkconfig vqes on[root@system]# service vqes start
Note
Step 3
[root@system]# service vqes statusprocess_monitor (pid 15189) is running...Step 4
[root@system]# ps -ef | grep vqeroot 2965 1 0 09:17 pts/0 00:00:00 /opt/vqes/bin/process_monitorvqes 2978 2965 0 09:17 pts/0 00:00:00 stun_server --ss-uid 499 --ss-gid 499 --xmlrpc-port 8054 --dscp -1 --log-level 6root 3007 2965 99 09:17 pts/0 09:25:31 vqes_dp --group vqes --max-channels 500 --max-outstanding-rpcs 100 --max-pkts 1000000 --log-level 6 --rtp-inactivity-tmo 300 --max-core-bw 1100000000 --reserved-core-rcv-bw 300000000 --reserved-core-er-bw 200000000 --reserved-er-bw 543200000 --max-rai-gap 15vqes 3061 2965 7 09:17 pts/0 00:13:56 vqes_cp --cp-uid 499 --cp-gid 499 --xmlrpc-port 8051 --cfg /etc/opt/vqes/vqe_channels.cfg --er-cache-time 3000 --rtp-hold-time 20 --max-channels 500 --max-outstanding-rpcs 100 --max-queued-rpcs 1000 --max-reserved-rpcs 32000 --max-clients 32000 --exporter-enable --vqm-host 10.86.21.4 --vqm-port 8192 --reserved-er-bw 543200000 --er-pkt-tb-rate 50000 --er-pkt-tb-depth 100 --er-blp-tb-rate 10000 --er-blp-tb-depth 100 --client-er-policing --client-er-tb-rate-ratio 5 --client-er-tb-depth 10000 --log-level 6 --rcc-mode conservative --igmp-join-variability 100 --max-client-bw 0 --max-idr-penalty 0 --rap-interval 2000 --excess-bw-fraction 20 --buff-size-preroll-max 1500 --rcc-burst-delay-to-send 10 --rtp-dscp 0 --rtp-rcc-dscp -1 --rtcp-dscp 24 --overlap-loss 0 --intf-output-allocation 90 --max-rpr-stream-burst-msecs 30 --max-rpr-stream-burst-pkts 2 --unity-e-factor-interval 5 --min-client-excess-bw-fraction 0 --max-client-excess-bw-fraction[root@system]# ps -ef | grep mlbroot 2989 2965 0 09:17 pts/0 00:00:03 mlb --interface eth2,eth3,eth4 --xmlrpc-port 8052 --unicast-reservation 20 --poll-interval 1 --ssm --log-level 6In the preceding output, the VQE-S processes to check for are as follows:
•
•
•
•
•
Step 5
https://ip_address_of_VQES_hostLog in using the vqe username and password. (Any valid Linux username and password can be used to log in to the VQE-S AMT.)
If you click System in the left pane, the VQE-S AMT displays information on the VQE-S processes. Figure 4-2 shows an example.
Restarting the System and Verifying System and VQE-S Status
To restart the Cisco CDE and verify system and the VQE-S status, follow these steps:
Note
Step 1
Step 2
[root@system]# rebootThe operating system boots.
Note
Step 3
Step 4
[root@system]# ifconfig -a... Output omittedStep 5
[root@system]# service vqes status... Output omittedStep 6
[root@system]# ps -ef | grep stun... Output omittedStep 7
[root@system]# service sshd status... Output omittedStep 8
[root@system]# service httpd status... Output omittedStep 9
[root@system]# service tomcat5 status... Output omittedStep 10
[root@system]# service ospfd status... Output omittedStep 11
[root@system]# service zebra status... Output omittedStep 12
[root@system]# service watchquagga status... Output omittedStep 13
[root@system]# service snmpd status... Output omittedStep 14
[root@system]# service snmpsa status... Output omittedStep 15
[root@system]# service vqes_snmpsa status... Output omittedStep 16
[root@system]# service syslog_snmpsa status... Output omittedStep 17
[root@system]# service ntpd status... Output omittedStep 18
•
•
Setting Up a Cisco CDE That Hosts VQE Tools
This section explains how to perform the initial configuration tasks for a Cisco CDE hosting VQE Tools (VCPT, VCDS, and VCDS AMT).
When performed manually, the initial configuration tasks involve editing the /etc/opt/vqes/vcdb.conf file to configure the essential VCDB parameters. The use of the vcdb.conf file simplifies the configuration tasks. Because the VQE Configuration Tool automatically applies the VCDB values to the /etc configuration files on system reboot, mistakes in configuration file syntax are unlikely.
For information on manually editing the vcdb.conf file, see the "Manually Editing the VCDB File" section.
Perform these initial configuration tasks in the order shown:
1.
2.
3.
4.
6.
7.
8.
9.
10.
On the VQE Tools server, proper route configuration is needed for external access to the VQE Tools server. You can use the static route explained in the "Configuring a Static Route for a Management Network (VQE Tools Host)" section to configure this access.
Note
For information on upgrading an already configured Cisco CDE, see the Release Notes for Cisco CDA Visual Quality Experience, Release 3.7.
Prerequisites for a Cisco CDE That Hosts VQE Tools
This section explains tasks that should be performed before setting up a Cisco CDE that hosts VQE Tools.
Connecting Cables
For information on connecting cables on the VQE Tools server, see the "Connecting Cables to the CDE" section.
For the location of connectors on the Cisco CDE front and back panels, see the Cisco Content Delivery Engine 110 Hardware Installation Guide.
Setting Up SSL Certificates for VCPT
It is recommended that you deploy your own or commercial Secure Sockets Layer (SSL) certificates before beginning the tasks for setting up a Cisco CDE that hosts VCPT. For information on setting up the certificates, see the "Setting Up SSL Certificates" section.
Configuring the Linux Operating System for VQE Tools
This section explains the initial Linux configuration tasks needed for a Cisco CDE appliance that runs the VQE Tools (VCPT and VCDS) software. The explanation assumes that the needed software for Linux, VCPT, and VCDS have been preinstalled on the Cisco CDE appliance. For Red Hat Linux 5.1 documentation, go to the following :
http://www.redhat.com/docs/manuals/enterprise/
For software configuration, the RJ-45 NIC (Ethernet) ports on the Cisco CDE back panel are specified as eth1 to eth6 as shown in Figure D-6.
Note
Figure D-6 NIC Port Numbering for Software Configuration
For the configuration examples in this section, Figure D-7 shows the IP addresses for interface eth1 and the corresponding interface on the edge router.
Figure D-7 IP Addresses for VQE Tools Configuration Examples
Note
To configure the Linux operating system and other software for the VQE Tools (VCPT and VCDS), follow these steps:
Step 1
Step 2
[root@system]# passwd vqeEnter a password that follows the password guidelines:
A valid password should be a mix of upper and lower case letters,digits, and other characters. You can use an 8 character longpassword with characters from at least 3 of these 4 classes, ora 7 character long password containing characters from all theclasses. An upper case letter that begins the password and adigit that ends it do not count towards the number of characterclasses used.A passphrase should be of at least 3 words, 12 to 40 characterslong and contain enough different characters.This username and password can be used to log in to Linux directly using SSH. The vqe username and password can also be used log in to the VCPT.
Step 3
network.eth1.addr="10.2.15.2/24"Step 4
system.global.hostname="starfire1-iptv"Step 5
•
•
For example:
system.dns.server="192.0.20.53."system.dns.search_domain="domain.com"Step 6
Note
Alternatively, to avoid a reboot of the system, you can use the vqe_cfgtool command with the -apply option to restart only the required services. For more information on the -apply option, see the "Using the VQE Configuration Tool Command-Line Options" section.
After the VQE Tools host is rebooted, you can verify that the eth1 interface is configured correctly and up and running.
•
[root@system]# ifconfig eth1eth1 Link encap:Ethernet HWaddr 00:0E:0C:C6:F3:0Finet addr:10.2.15.2 Bcast:10.2.15.255 Mask:255.255.255.0inet6 addr: fe80::20e:cff:fec6:f30f/64 Scope:LinkUP BROADCAST RUNNING MULTICAST MTU:1500 Metric:1RX packets:3 errors:0 dropped:0 overruns:0 frame:0TX packets:36 errors:0 dropped:0 overruns:0 carrier:0collisions:0 txqueuelen:1000RX bytes:192 (192.0 b) TX bytes:2700 (2.6 KiB)Base address:0x3000 Memory:b8800000-b8820000•
[root@system]# ip link show eth1eth1: <BROADCAST,MULTICAST,UP,LOWER_UP> mtu 1500 qdisc pfifo_fast qlen 1000link/ether 00:0e:0c:c6:e4:fe brd ff:ff:ff:ff:ff:ff•
[root@system]# ping 10.2.15.1Configuring a Static Route for a Management Network (VQE Tools Host)
If your deployment makes use of a management network, a static route for the management network can be configured using the VCDB parameter network.route.static_route. The configuration example in this section assumes that one CDE Ethernet interface (eth1) is used to connect to the VQE network.
On the VQE Tools server, proper route configuration is needed for external access to the VQE Tools server. You can use the static route parameter to configure this access.
To configure a static route for a management network, follow these steps:
Step 1
Step 2
network.network.interface.mgmt_interfaces="ethernet-interface-name, ethernet-interface-name"
The ethernet-interface-name arguments are names of the interfaces designated for management traffic. One or more CDE Ethernet interfaces may be designated for management traffic. For this example, assume CDE Ethernet interface eth1(10.2.9.2) on the VQE Tools host is designated for management traffic.
The line in the vcdb.conf file is as follows:
network.network.mgmt_interfaces="eth1"Step 3
network.route.static_route="target-network-subnet-addr/prefix-length via gateway-addr:outbound-interface"
The target-network-subnet-addr/prefix-length is the IP address and prefix length for the management network. The gateway-addr is the IP address of the router interface that is directly attached to the CDE Ethernet port that is used for management network traffic. The outbound-interface is the interface used on the VQE Tools server for this static route
For this example, assume the following:
•
•
The line in the vcdb.conf file is as follows:
network.route.static_route="192.0.0.0/8 via 10.2.15.1"In the preceding example, 10.2.15.1 is the gateway-addr—the router interface that is directly attached to eth1. Figure D-7 shows the IP addresses used in this example for the eth1 interface and the directly attached router.
Step 4
Note
Alternatively, to avoid a reboot of the system, you can use the vqe_cfgtool command with the -apply option to restart only the required services. For more information on the -apply option, see the "Using the VQE Configuration Tool Command-Line Options" section.
After the VQE Tools host is rebooted, you can verify that the static route for the management network is present in the routing table by issuing the following command:
[root@system]# ip route showThe output is similar to the following:
192.0.0.0/8 via 10.2.9.1 dev eth1Synchronizing the Time and Configuring Network Time Protocol
To keep system time correct and synchronized, we recommend that you use Network Time Protocol (NTP) on the VQE Tools host. To synchronize the time and configure NTP, follow these steps:
Step 1
Step 2
[root@system]# /usr/bin/tzselectStep 3
date -s "date_time_string"
For example:
[root@system]# date -s "16:55:30 July 7, 2008"Step 4
system.ntp.server="10.2.26.2"In the preceding example, the IP address of the external NTP server is 10.2.26.2.
Step 5
Note
Alternatively, to avoid a reboot of the system, you can use the vqe_cfgtool command with the -apply option to restart only the required services. For more information on the -apply option, see the "Using the VQE Configuration Tool Command-Line Options" section.
For information on starting the NTP service (ntpd daemon), see the Starting VQE Tools System Services and Verifying Status section.
Configuring SNMP
The CDE that hosts the VQE Tools sever uses Net-SNMP, a third-party product, for SNMP support for some basic, non-VQE system services. Net-SNMP offers a set of built-in MIBs for Linux platforms.
The VQE Tools server also provides a VQE-specific MIB and a system messages (Syslog) MIB. System messages that meet a specified severity level can be sent as SNMP traps to a NMS. Sending syslog traps is optional. For more information on the SNMP MIBs, see "SNMP MIBs".
To configure SNMP on the Cisco CDE that hosts VQE Tools, follow these steps:
Step 1
Step 2
•
•
•
•
•
•
For more information on these SNMP-related VCDB parameters, see Table A-6.
The following example shows the four vcdb.conf lines that specify the SNMP parameters:
system.snmp.ro_community_string="XXYYZZ"system.snmp.location="Building 6 San Francisco"system.snmp.contact="Helen_Lee@company.com"system_snmp_trap_listener="192.0.2.25"system.snmp.syslog_trap_enable="true"system.snmp.syslog_trap_priority="4"Step 3
Note
Alternatively, to avoid a reboot of the system, you can use the vqe_cfgtool command with the -apply option to restart only the required services. For more information on the -apply option, see the "Using the VQE Configuration Tool Command-Line Options" section.
Ensuring That Only Trusted HTTPS Clients Can Communicate Using HTTPS
The system.iptables.trusted_provisioner parameter must be configured for both of the following:
•
•
The system.iptables.trusted_provisioner parameter is for HTTPS communications security. The VQE Tools server is configured so that only trusted HTTPS clients (as specified in system.iptables.trusted_provisioner) can send it information using HTTPS.
To allow only traffic from trusted HTTPS clients on the CDE port used for HTTPS, follow these steps:
Step 1
Step 2
system.iptables.trusted_provisioner="10.2.15.2"In the preceding example, 10.2.15.2 is the IP address of the only Ethernet interface that has been assigned an IP address on the VQE Tools host.
Step 3
Note
Alternatively, to avoid a reboot of the system, you can use the vqe_cfgtool command with the -apply option to restart only the required services. For more information on the -apply option, see the "Using the VQE Configuration Tool Command-Line Options" section.
Configuring Remote Syslog Servers
VQE system messages can be sent by means of UDP to remote servers for centralized logging. The use of remote syslog servers is optional. For more information on configuring remote syslog servers, see the"Remote Syslog Hosts" section.
To configure remote syslog servers on the Cisco CDE that hosts VQE Tools, follow these steps:
Step 1
Step 2
•
For more information on the remote logging VCDB parameters, see Table A-6.
The following example shows the two vcdb.conf lines that specifies the remote logging parameter:
system.syslog.remote_server="192.0.7.25"system.syslog.remote_server="192.0.7.26"Step 3
Note
Alternatively, to avoid a reboot of the system, you can use the vqe_cfgtool command with the -apply option to restart only the required services. For more information on the -apply option, see the "Using the VQE Configuration Tool Command-Line Options" section.
Starting VQE Tools System Services and Verifying Status
Table D-2 lists the system services that you configure and start, for the CDE that hosts VQE Tools. Use of the SNMP and NTP services are optional depending on your deployment's requirements.
To start the VQE Tools system services and verify their status, follow these steps:
Note
Step 1
Step 2
[root@system]# chkconfig --add sshd[root@system]# chkconfig sshd on[root@system]# service sshd start[root@system]# chkconfig --add httpd[root@system]# chkconfig httpd on[root@system]# service httpd start[root@system]# chkconfig --add tomcat5[root@system]# chkconfig tomcat5 on[root@system]# service tomcat5 startThe following commands for SNMP and NTP are optional depending on whether these services are used in your deployment:
[root@system]# chkconfig --add snmpd[root@system]# chkconfig snmpd on[root@system]# service snmpd start[root@system]# chkconfig --add snmpsa[root@system]# chkconfig snmpsa on[root@system]# service snmpsa start[root@system]# chkconfig --add vcds_snmpsa[root@system]# chkconfig vcds_snmpsa on[root@system]# service vcds_snmpsa start[root@system]# chkconfig --add syslog_snmpsa[root@system]# chkconfig syslog_snmpsa on[root@system]# service syslog_snmpsa start[root@system]# chkconfig --add ntpd[root@system]# chkconfig ntpd on[root@system]# service ntpd startStep 3
[root@system]# /usr/bin/check_daemons >> /var/spool/cron/rootStep 4
[root@system]# chkconfig --list | grep sshdsshd 0:off 1:off 2:on 3:on 4:on 5:on 6:off[root@system]# service sshd statussshd (pid 2772) is running...[root@system]# ps -ef | grep sshdroot 2772 1 0 Jul23 ? 00:00:00 /usr/sbin/sshdStep 5
[root@system]# chkconfig --list | grep httpdhttpd 0:off 1:off 2:on 3:on 4:on 5:on 6:off[root@system]# service httpd statushttpd (2894) is running...[root@system]# ps -ef | grep httpdapache 447 2894 0 Jul23 ? 00:00:00 /usr/sbin/httpdroot 2894 1 0 Jul02 ? 00:00:00 /usr/sbin/httpdapache 30078 2894 0 Jul19 ? 00:00:00 /usr/sbin/httpdapache 30079 2894 0 Jul19 ? 00:00:00 /usr/sbin/httpdapache 30080 2894 0 Jul19 ? 00:00:00 /usr/sbin/httpdapache 30082 2894 0 Jul19 ? 00:00:00 /usr/sbin/httpdapache 30083 2894 0 Jul19 ? 00:00:00 /usr/sbin/httpdapache 30084 2894 0 Jul19 ? 00:00:00 /usr/sbin/httpdapache 30085 2894 0 Jul19 ? 00:00:00 /usr/sbin/httpdapache 30087 2894 0 Jul19 ? 00:00:00 /usr/sbin/httpdStep 6
[root@system]# chkconfig --list | grep tomcat5tomcat5 0:off 1:off 2:on 3:on 4:on 5:on 6:off[root@system]# service tomcat5 statusTomcat is running...[root@system]# ps -ef | grep tomcat5root 19800 1 0 Jul23 ? 00:00:08 /usr/java/default/bin/java -Djava.util.logging.manager=org.apache.juli.ClassLoaderLogManager -Djava.util.logging.config.file=/usr/share/tomcat5/conf/logging.properties -Djava.endorsed.dirs=/usr/share/tomcat5/common/endorsed -classpath :/usr/share/tomcat5/bin/bootstrap.jar:/usr/share/tomcat5/bin/commons-logging-api.jar -Dcatalina.base=/usr/share/tomcat5 -Dcatalina.home=/usr/share/tomcat5 -Djava.io.tmpdir=/usr/share/tomcat5/temp org.apache.catalina.startup.Bootstrap startStep 7
[root@system]# chkconfig --list | grep snmpdsnmpd 0:off 1:off 2:on 3:on 4:on 5:on 6:off[root@system]# service snmpd statussnmpd (pid 17654) is running...[root@system]# ps -ef | grep snmpdroot 17654 1 0 Jul25 ? 00:09:24 /usr/sbin/snmpd -Lsd -Lf /dev/null -p /var/run/snmpd.pid -aStep 8
[root@system]# chkconfig --list | grep snmpsasnmpsa 0:off 1:off 2:on 3:on 4:on 5:on 6:off[root@system]# service snmpsa statusThe SNMP subagent is running.[root@system]# ps -ef | grep snmpsaroot 17678 1 0 Jul25 ttyS1 00:09:14 /usr/local/snmpsa/bin/smSubagentStep 9
[root@system]# chkconfig --list | grep vcds_snmpsavcds_snmpsa 0:off 1:off 2:on 3:on 4:on 5:on 6:off[root@system]# service vcds_snmpsa statusvcds_subagent (pid 10088) is running...[root@system]# ps -ef | grep vcds_snmpsaroot 17273 17182 0 08:54 pts/2 00:00:00 grep vcds_snmpsaStep 10
[root@system]# chkconfig --list | grep syslog_snmpsasyslog_snmpsa 0:off 1:off 2:on 3:on 4:on 5:on 6:off[root@system]# service syslog_snmpsa statussyslog_subagent (pid 9886) is running...[root@system]# ps -ef | grep syslog_snmpsaroot 17984 17946 0 09:16 pts/2 00:00:00 grep syslog_snmpsaStep 11
[root@system]# chkconfig --list | grep ntpdntpd 0:off 1:off 2:on 3:on 4:on 5:on 6:off[root@system]# service ntpd statusntpd (pid 17219) is running...[root@system]# ps -ef | grep ntpdntp 17219 1 0 Jul25 ? 00:00:06 ntpd -u ntp:ntp -p /var/run/ntpd.pid -g
Starting the VCDS Service and Verifying VCDS, VCDS AMT and VCPT Status
This section explains how to start the VCDS service and verify that the process is running and that VCPT and the VCDS AMT are available.
Note
To start the VCDS service and verify VCDS, VCDS AMT, and VCPT status, follow these steps:
Step 1
Step 2
[root@system]# chkconfig --add vcds[root@system]# chkconfig vcds on[root@system]# service vcds startStep 3
[root@system]# service vcds statusVCDServer (pid 29860) is running...Step 4
[root@system]# ps -ef | grep VQECCfgroot 29860 1 0 Jul25 ? 00:00:00 /opt/vqes/bin/VCDServerStep 5
https://ip_address_of_VCPT_hostLog in using the vqe username and password. (Any valid Linux username and password can be used to log in to VCPT.)
If you are able to log in successfully, VCPT is running correctly.
Step 6
https://ip_address_of_VQE_Tools_host/vcds-amtLog in using the vqe username and password. (Any valid Linux username and password can be used to log in to the VCDS AMT.)
If you are able to log in successfully, VCDS AMT is running correctly.
Restarting the System and Verifying System, VCPT, VCDS AMT, and VCDS Status
To restart the Cisco CDE and verify system, VCPT, VCDS (VCDS), and VCDS AMT status, follow these steps:
Note
Step 1
Step 2
[root@system]# rebootThe operating system boots.
Step 3
[root@system]# ifconfig -a... Output omittedStep 4
[root@system]# service sshd status... Output omittedStep 5
[root@system]# service httpd status... Output omittedStep 6
[root@system]# service tomcat5 status... Output omittedStep 7
[root@system]# service snmpd status... Output omittedStep 8
[root@system]# service snmpsa status... Output omittedStep 9
[root@system]# service vcds_snmpsa status... Output omittedStep 10
[root@system]# service syslog_snmpsa status... Output omittedStep 11
[root@system]# service ntpd status... Output omittedStep 12
[root@system]# service vcds status... Output omittedStep 13
https://ip_address_of_VQE_Tools_hostLog in with a Linux username and password.
If you are able to log in successfully, VCPT is running correctly.
Step 14
https://ip_address_of_VQE_Tools_host/vcds-amtLog in using the vqe username and password. (Any valid Linux username and password can be used to log in to the VCDS AMT.)
If you are able to log in successfully, VCDS AMT is running correctly.
Step 15
•
•