-
Cisco CDA Visual Quality Experience Application User Guide Release 3.6
-
Index
-
Preface
-
Introduction to Cisco CDA Visual Quality Experience Application
-
Getting Started with the VQE Startup Configuration Utility
-
Using the VQE Channel Provisioning Tool
-
Using the VQE-S AMT
-
Using the VCDS AMT
-
Troubleshooting VQE Software Components
-
Configuring VQE Sercer and VQE Tools
-
VQE, System and Network Parameters
-
SNMP MIBs
-
VQE System Messages
-
Manual Initial VQE System Configuration
-
Configuring DHCP and DNS Sercers for VCDS
-
Using the vcds_send_file Command
-
Changing the Boot Sequence to Start from the CD/DVD Drive
-
VQE Server Performance and Scaling Limits
-
VCPT Configuration Files
-
 Feedback
Table Of Contents
Using the VQE Channel Provisioning Tool
Working with VCPT Configuration Files
Performing Configuration-File Operations
Sending or Pushing Channel Information to Servers
Sending Channel Information to a Subset of Servers
Viewing or Updating Channel Information
Defining VQE-Ss, VCDSs, or Remote Servers
Viewing or Updating Server Information
Defining Channel Associations for a Server
Copying Channel Associations from Another Server
Setting-up a SSH Certificate on a Remote Server
Using the VQE Channel Provisioning Tool
This chapter describes how to use Cisco VQE Channel Provisioning Tool (VCPT). Table 3-1 lists the tasks you perform with the VCPT. When you use VCPT for the first time, the required tasks are performed in the order shown in the table.
Logging into VCPT
Before logging into the VCPT, you need a valid UNIX username and password on the Cisco CDE hosting the VCPT. The username does not have to belong to any special group. Creation of the username is the responsibility of the Cisco CDE system administrator.
The VCPT supports two web browsers: Microsoft Internet Explorer version 6.0 or later, and Mozilla Firefox version 2.0 or later. The VCPT uses secure HTTPS. The minimum screen resolution required for VCPT is 1024 x 768 pixels.
To log in to a VCPT, follow these steps:
Step 1
Point your web browser to the Cisco CDE that hosts the VCPT using an IP address or fully qualified domain name:
https://ip_addressorhttps://fully_qualified_domain_nameThe VQE login dialog box is displayed.
Step 2
Step 3
If the username and password are valid, the VCPT main window is displayed.
If you log in to the VCPT when another person is using the same VCPT, the message shown in Figure 3-1 is displayed and your access to the VCPT is a read-only view. To get read-write access, wait and try to open a VCPT session at a later time when no one else is using the tool.
Figure 3-1 Read-only View Message
With certain versions of Microsoft Internet Explorer 6, if you close a read-write session and try to open it again immediately, you get a read-only view. In this case, wait a minute and open another session to get read-write access.
When you are finished using the VCPT, click the Logout button on the right side of the banner so that another user can get read-write access to the tool.
VCPT sessions are timed out after 25 minutes of inactivity. If VCPT detects a network failure or server failure, the session is timed out after one minute.
Working with VCPT Configuration Files
The VCPT channel, server, and association provisioning information is stored in a persistent local database on the Cisco CDE server. When the Cisco CDE or the VCPT is restarted, channel, server, and association data are read from the local database. The VCPT configuration file can be saved at any time and should be saved frequently to store your work.
Caution
File management tasks for the VCPT are the responsibility of the VCPT user. The directories that the VCPT uses for its data files are as follows:
•
•
If the /etc/opt/vcpt/data or /etc/opt/vcpt/data/sdp directory is deleted accidentally and does not exist at startup, VCPT fails to initialize. The missing directory must be recreated. For information on the remedy procedure, see the "VCPT Fails to Initialize" section.
Caution
When the user completes channel and server configuration, and initiates the VCPT send operation, the VCPT sends the channel information in Session Description Protocol (SDP) format to the set of VQE-Ss and VCDSs. As an alternative to the VCDS, the channel information may be sent in SDP format to one or more user-specified remote servers using a password-less secure copy (SCP) mechanism.
Figure 3-2 shows the buttons that you use for working with VCPT configuration files and for sending channel information.
Figure 3-2 VCPT Configuration File Operations
The following sections explain the configuration file and channel information operations:
•
•
•
Performing Configuration-File Operations
The VCPT configuration file buttons used for non-push operations are:
•
•
•
•
•
•
•
When the current VCPT configuration is changed but the changes have not been saved, an asterisk is displayed beside the configuration filename (for example, bellini.xml*).
Names for VCPT Configuration Files
The name for a VCPT configuration file can be up to 60 characters long and use lowercase a to z, uppercase A to Z, numeric characters 0 to 9, and the underscore (_), hyphen (-), and period (.) characters. No spaces are allowed in the name.
Importing a Configuration
To create a VQE channel configuration in the VCPT without manually entering the data, you can import the required information from an external file. The file can be located in any directory on the VQE Tools server as long as the file has the correct permissions. However, the file must be in a valid format. For information on VCPT configuration file formats, see "VCPT Configuration Files."
To import a configuration, do the following:
Step 1
Step 2
Figure 3-3 Import dialog
Step 3
The VCPT clears the current configuration (if any) and displays the contents of the imported file. If the file is in XML format, the VCPT validates the file against the XML schema, vcpt_doc.xsd, prior to importing.
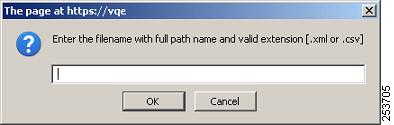
Exporting a Configuration
A VQE channel configuration can be exported to an external file you specify. The file can be in any directory on the VQE Tools server as long as the file has the correct permissions. Currently only two formats are supported by the VCPT; XML and CSV format. For information on the VCPT configuration file formats, see "VCPT Configuration Files."
To export a VCPT configuration, do the following:
Step 1
The Export dialog box, shown in Figure 3-4, is displayed.
Figure 3-4 Export dialog
Step 2
The VCPT exports the VCPT configuration to this file.
Sending or Pushing Channel Information to Servers
The VCPT buttons used to send or push channel information to VQE-Ss , VCDSs, or remote servers are the Send and Force Update buttons.
Send Button
Use the Send button to send channel information in the current configuration file to the VQE-Ss, VCDSs, or remote servers that have been defined.
Note
Note
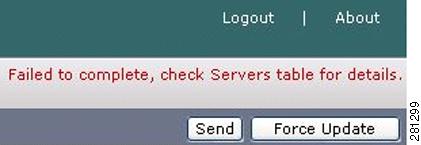
The channel information to send is based on the channel associations that have been defined for the VQE-Ss, VCDSs, or remote servers. When channel information is sent to a set of servers, VCPT saves the current configuration file. The send operation does not succeed if any channel has misconfiguration issues. When channel information is sent to servers, the VCPT displays the following:
•
Last update was sent to 1 out of 2 servers at: 5/11/2007 14:47:20).•
•
You can get more details on a send failure by examining the VCPT log file, which is located in /usr/share/tomcat5/logs/vcpt.log.
Figure 3-5 Status Message for Failed Send Operation
Force Update Button
Note
For the following types of configuration file changes, use the Force Update button to send the channel information to the VQE-Ss and VCDSs.
•
•
•
If configuration information is sent to the servers and the changes to channel information are not present on the servers after the send, you can use the Force Update button to force the channel information changes to be accomplished on the servers.
Sending Channel Information to a Subset of Servers
To send a channel information file to a subset of servers, follow these steps:
Step 1
Step 2
Step 3
Step 4
Step 5
Provisioning VQE Channels
In the Cisco VCPT, use the Channels tab to add a new channel, clone an existing channel, delete an existing channel, and get detailed information on an existing channel. The number of channels supported by single VQE-S is determined by the ingest capacity of the CDE server. For VQE-S performance information, see "VQE Server Performance and Scaling Limits"
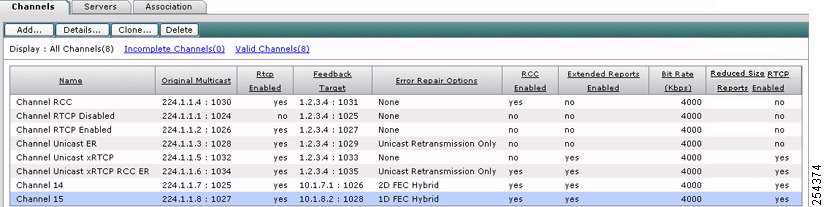
When you click the Channels tab, VCPT displays summary information on all channels that have been created. An incomplete channel is displayed in red. The Reduced Size RTCP Reports Enabled column show in Figure 3-6 is available starting with Cisco VQE Release 3.5.5.
Figure 3-6 Channels Summary
From the Channels tab, you can do the following:
•
•
•
•
•
–
–
–
On the Channels summary, the Error Repair Options column indicates the types of repair that have been configured for the channel. Table 3-2 shows the Error Repair Options column.
The sections that follow provide more information on the tasks that can be performed from the Channels tab.
Adding a Channel
In the VCPT channel definition, each channel is associated with a unique feedback target (FBT) IP address. The feedback target address is a unique IP anycast address that VQE-S configures on its host Cisco CDE based on the channel information that is sent to it by the VCPT. An anycast address is a unicast address that is assigned to multiple interfaces. With the appropriate routing topology, packets addressed to an anycast address are delivered to a single interface (in this case, the nearest VQE-S's CDE interface that is identified by the address). The use of anycast addresses to identify feedback targets is useful for VQE-S redundancy.
Note
For information on configuring the FBT IP addresses on the router that is attached to the CDE hosting VQE-S, see the "Enabling OSPF Routing for VQE-S Traffic or VQE-S Services Traffic" section.
To add a channel, follow these steps:
Step 1
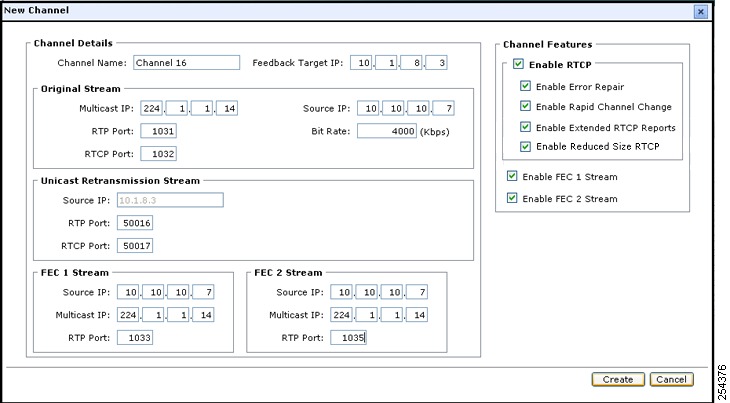
The New Channel dialog box, shown in Figure 3-7, is displayed.
Figure 3-7 New Channel Dialog Box
Step 2
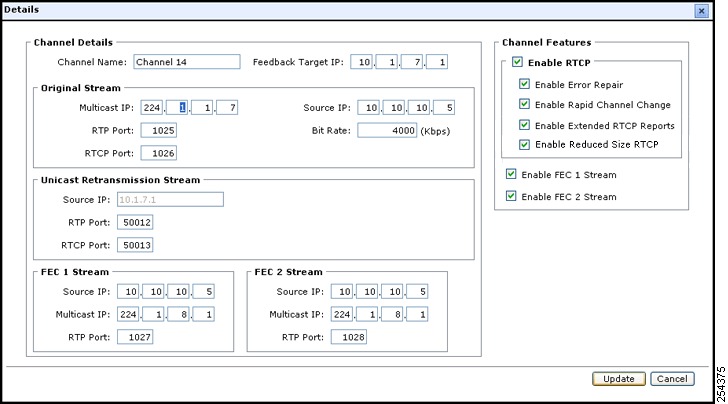
Table 3-3 VQE Channel Details
Channel Name
String having 1 to 40 alphanumeric characters.
Feedback Target IP
Unique anycast IP address on the VQE-Ss that provide services for this channel. Using the Feedback Target IP address that is sent to it by the VCPT in the channel information, the VQE-S automatically configures the specified address on one of its Cisco CDE interfaces.
Channel Features
Enable RTCP
RTCP must be enabled to use Error Repair (Unicast Retransmission), RCC, Video-Quality Monitoring (RTCP Exporter and RTCP Extended Reports), or to have VQE-S display video-monitoring statistics.
If Enable RTCP is not checked, the Enable Error Repair, Enable RCC, and Enable RTCP Extended Reports check boxes are grayed out.
Enable Error Repair
Check to enable Error Repair (Unicast Retransmission). You also need to complete the Unicast Retransmission Stream fields.
Enable Rapid Channel Change
Check to enable RCC.
Enable Extended RTCP Reports
Check to enable RTCP Extended Reports.
Enable Reduced Size RTCP
Check to enable sending RTCP NACK compound packets to the VQE-S without Receiver Reports (RRs).
Enable FEC 1 Stream
Check to enable 1-dimension FEC. You also need to complete the FEC 1 Stream fields.
Enable FEC 2 Stream
Check to enable 2-dimension FEC. You also need to complete the FEC 2 Stream fields.
Original Stream
Multicast IP
Multicast IP address for the original source stream of the channel. The first octet must be within the range of a valid multicast address. The multicast address must be unique for each channel.
RTP Port
RTP port number of the original source stream of the channel.
RTCP Port
The RTCP port number of the original source stream of the channel. By default, RTCP Port is the (RTP/UDP) port number plus one.
Source IP
IP address of the original source stream of the channel.
Note
Bit Rate
Bit rate of the original source stream of the channel in kilobits per second. This parameter defines how many packets the VQE-S accepts and sends for this multicast stream.
Note
Unicast Retransmission Stream
Source IP
IP address of the Unicast Retransmission stream. The IP address must be the same as is defined for Feedback Target IP.
RTP Port
RTP port number of the unicast retransmission stream. By default, RTP Port is a valid port number.
RTCP Port
RTCP port number of the unicast retransmission stream. By default, RTCP Port is a valid port number.
FEC 1 Stream and FEC 2 Stream
Source IP
IP address of the source stream of the channel. By default, this is the IP address of the Source IP specified for the Original Stream.
Note
Multicast IP
IP address of the multicast stream of the channel. By default, this is the IP address of the Multicast IP specified for the Original Stream.
RTP Port
RTP port number of the FEC stream. The port number specified cannot be the same as the port number used for the RTP or RTCP port for the Original Stream.
1 SSM = source specific multicast.
Rules When Adding a Channel. The following rules apply when adding a channel:
•
•
•
•
•
•
•
•
•
•
Port Usage Recommendations. When the STUN Server is enabled on a VQE-S (the default and recommended mode), one set of four unique port numbers can be used for all channels for the following:
•
•
•
•
Note
Step 3
Viewing or Updating Channel Information
To view or update channel information, follow these steps:
Step 1
Step 2
The Details dialog box, shown in Figure 3-8, is displayed. The Reduced Size RTCP Reports Enabled column show in Figure 3-8 is available starting with Cisco VQE Release 3.5.5.
Figure 3-8 Details Dialog Box
Step 3
Step 4
•
•
Cloning a Channel
To clone a channel, follow these steps:
Step 1
Step 2
The Clone dialog box is displayed. Only appropriate information from the existing channel is cloned.
Step 3
Step 4
•
•
Deleting a Channel
To delete a channel, follow these steps:
Step 1
Step 2
A dialog box asking if you want to delete the channel is displayed.
Step 3
•
•
Step 4
Defining VQE-Ss, VCDSs, or Remote Servers
The Cisco VCPT requires that you provide information on each VQE-S, each VCDS, and each remote server that receives channel configuration information from the VCPT.
If you choose to send channel information to a remote server, you must install a SSH public key in .ssh directory of the authorized user on the remote server. For more information on generating the SSH public key, see the "Setting-up a SSH Certificate on a Remote Server" section.
Note
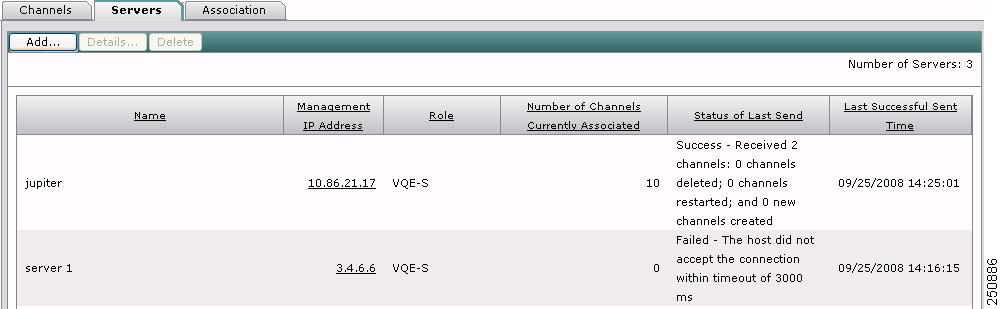
In the VCPT, use the Servers tab to add a new server, delete an existing server, and get information on an existing server. When you click the Servers tab, the VCPT displays summary information, shown in Figure 3-9, on all servers that have been created.
Figure 3-9 Servers Summary
From the Servers tab, you can do the following:
•
•
•
•
–
–
On the Servers tab, the following columns provide useful information on the servers.
•
•
Success - Received 4 channels: 0 channels deleted; 1 channels restarted; and 0 new
channels created
The preceding Success status indicates the send operation succeeded: A VQE-S received four channel definitions; zero channels were deleted; one channel definition was modified and the channel was restarted; zero new channels were created.
Failed - 0 out of 4 channels failed to validate; 1 channels having the old version;
and 0 channels having the same version but contents being changed
The preceding Failed status indicates the send operation failed: all channel definitions have valid SDP format; one channel definition is an older version of the channel; zero channels have the same version (when compared to the VQE-S or the current version of the VCPT server) but with a changed channel definition.
Note
Table 3-4 Status of Last Send Messages
Success - additional_information
Send operation succeeded. The additional_information provides details on the send operation.
Failed - additional_information
Send operation failed. The additional_information provides details on the reasons for the failure.
Failed - Network Error
VCPT did not receive any error message back from the VQE-S, the VCDS, or the remote server.
Failed - Connection refused
Failed - Unable to find valid certification path to requested target
Failed - Unable to connect with Server
See the "Unable to Connect Error When VCPT Tries to Send Channel Information" section.
Failed - Security Exception
Exception occurred while VCPT was authenticating the server SSL certificate.
Failed - Invalid EMS Address
Incorrect server URL format
Failed - VCPT Server Error
Generic internal VCPT coding error has occurred. This may be because of a coding bug or because VCPT failed to read a file.
Failed - Channel config file is not writable
Channel configuration file could not be written to disk on the VQE-S, the VCDS or the remote server host.
Failed - File failed to open
VQE-S, the VCDS or the remote server could not open the channel configuration file.
Failed - Tomcat Service Unavailable
Tomcat application server has failed on the VCPT host.
Failed - Unable to store the SDP data on VCPT Server
SDP data could not be generated or saved on the VCPT host.
Failed - VCPT:AMT IO Exception: Connection Refused
VCPT was not able to deliver the channel configuration information. One possible cause of the failure is that VQE services were not running on the server to which the information was sent.
•
–
–
The sections that follow provide more information on the tasks that can be performed from the Servers tab.
Adding a Server
To add a server, follow these steps:
Step 1
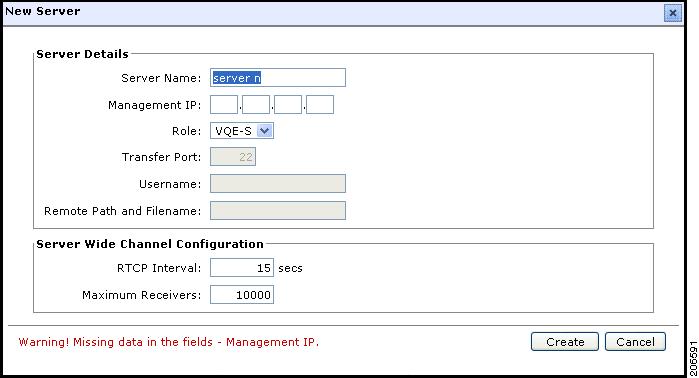
The New Server dialog box, shown in Figure 3-10, is displayed.
Figure 3-10 New Server Dialog Box
Step 2
Step 3
•
•
Viewing or Updating Server Information
To view or update server information, follow these steps:
Step 1
Step 2
The Details dialog box is displayed.
Step 3
Step 4
•
•
Deleting a Server
To delete a server, follow these steps:
Step 1
Step 2
A dialog box asking if you want to delete the server is displayed.
Step 3
•
•
Step 4
Defining Channel Associations
After VQE channels and the VQE-Ss, VCDSs, and Remote Servers have been defined, you associate a set of channels with the servers. When the channel information file is sent to the VQE-Ss, VCDSs or Remote Servers, only the channels associated with the server are included in the file.
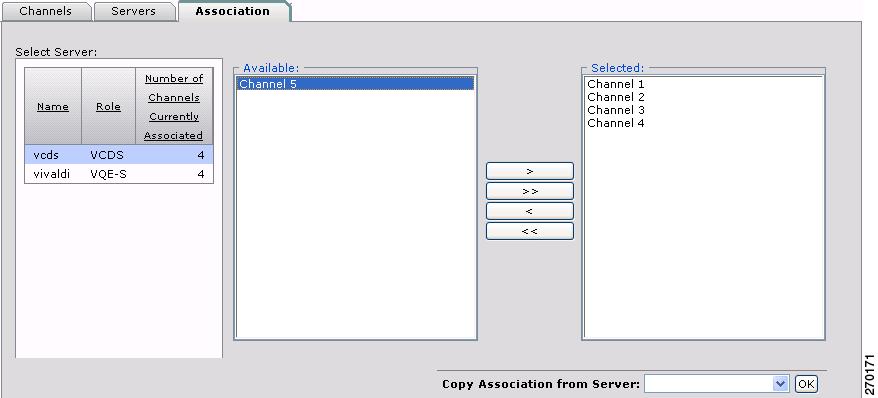
In the VCPT, use the Association tab, shown in Figure 3-11, to associate servers with channels or copy an existing channel association.
Figure 3-11 Association Tab
The following sections explain how to associate channels with servers:
•
•
Defining Channel Associations for a Server
To define channel associations for a server, follow these steps:
Step 1
The VCPT displays the IP address and role for the server.
Step 2
•
•
The associations for the channel are updated.
Copying Channel Associations from Another Server
To copy channel associations for a server, follow these steps:
Step 1
The VCPT displays the IP address and role for the server.
Step 2
Step 3
The associations for the channel are updated.
Setting-up a SSH Certificate on a Remote Server
If you choose to export channel configuration data to a remote provisioning server, a secure shell (SSH) certificate should be generated on the VQE Tools server and it's public key deployed on the remote server to allow VCPT to securely send encrypted channel configuration files to the remote server. The scpkey command is available on the VQE Tools server to assist in generating the SSH public key file. The command also uses a secure copy mechanism to deliver the public key of SSH certificate to the remote server. The system integrator must supply a password for the authorized user when generating the certificates so that VCPT can later send data to the remote server without being prompted to supply a password.
On the VQE Tools server, the scpkey executable is located at /opt/vqes/bin/scpkey. To have the operating system find the scpkey executable, you must set the PATH environment variable to include the location of the /opt/vqes/bin directory, or use the full path to scpkey when executing the command.
Note
To generate a SSH public key, follow these steps:
Step 1
[root@system ~]# scpkeyWelcome to the SCP key generation and transfer utility.Checking for existing SCP key data...Generating new keys via Linux ssh-keygen tool...spawn ssh-keygen -t dsaGenerating public/private dsa key pairEnter file in which to save the key (/root/.ssh/id_dsa):Enter passphrase (empty for no passphrase):Enter same passphrase again:Your identification has been saved in /root/.ssh/id_dsa.Your public key has been saved in /root/.ssh/id_dsa.pub.The key fingerprint is:f9:2c:89:5a:bf:22:1c:20:b8:08:05:3c:fc:d1:a9:9f root@systemSCP key generation successfully completed.The scpkey command creates a new SSH public key. The key file is named id_dsa.pub and is located in /root/.ssh/.
Step 2
a.
Do you wish to SCP transfer the key file to a remote system (y/n)? yGathering info for SCP transfer...b.
Enter IP address of remote system: 10.22.21.101c.
Enter remote system username: dmurpd.
Enter remote system username password:e.
By default, key file will be copied to .ssh/authorized_keys file relative toremote users home directory, however you may specify a different fullyqualified path/filename here if desired.Enter optional remote path/file (<ENTER> for default file):Transferring file, no further user input required...spawn scp /root/.ssh/id_dsa.pub test@10.86.21.101:.ssh/authorized_keysStep 3