Table Of Contents
Managing Southbound and Northbound Interfaces
12.1 How Do I Manage Southbound Interfaces?
12.1.1 Southbound Port Details
12.1.2 Using a Static CORBA Listener Port on the Prime Optical Server
12.1.3 Client-Server Communication Protocols
12.1.4 Changing the Prime Optical Server Port
12.1.5 Changing the HTTP Server Port
12.2 How Do I Manage Northbound Interfaces?
12.2.1 Managing Prime Optical GateWay/SNMP
12.2.2 Managing Prime Optical GateWay/CORBA
Managing Southbound and Northbound Interfaces
Cisco Prime Optical uses protocols such as CORBA, SNMP, and HTTP to provide southbound and northbound interfaces to communicate with NEs and operations support systems (OSSs).
This chapter contains the following information:
•
How Do I Manage Southbound Interfaces?
•
How Do I Manage Northbound Interfaces?
12.1 How Do I Manage Southbound Interfaces?
The Prime Optical server communicates with NEs through the data communications network (DCN) by using several protocols (CORBA, SNMP, HTTP, and so on).
You can access NEs in Prime Optical through:
•
NE Explorer—Provides detailed rack, shelf, and card-level views of an NE. Detailed NE attributes and parameters are viewable and configurable.
•
Craft Interface—Depending on the NE model, Prime Optical provides access to NE craft interfaces such as CTC, Cisco Edge Craft, web browsers, and the command line interface (CLI). Table 2-4 lists the available craft interfaces by NE model.
Note
A CLI session might not have a scroll bar, depending on the operating system you are using. To enable the scroll bar on Solaris, hold down the Ctrl key, click the middle button of your mouse, and choose enable scroll bar.
12.1.1 Southbound Port Details
This section explains the ports that Prime Optical uses to communicate with NEs.
•
Inbound ports are for operations initiated by the node and then directed to the Prime Optical server.
•
Outbound ports are for operations initiated by the Prime Optical server and then directed to the node.
The following table lists the ports that Prime Optical uses to communicate with ONS 15216 NEs.
Table 12-1 Port Information for the ONS 15216
Port
|
ONS 15216
|
Inbound or Outbound?
|
TL1 Telnet
|
3083
|
Outbound
|
CLI
|
23, 8023
|
Outbound
|
Prime Optical GateWay/SNMP set/trap
Note Prime Optical GateWay/SNMP uses port 162 as an internal port.
|
161, 162
|
Outbound
|
TFTP
|
69
|
Inbound
|
The following table lists the ports that Prime Optical uses to communicate with ONS 15305 NEs.
Table 12-2 Port Information for the ONS 15305
Port
|
ONS 15305
|
CLI
|
23
|
Prime Optical GateWay/SNMP
Note Prime Optical GateWay/SNMP uses port 162 as an internal port.
|
161
|
The following table lists the ports that Prime Optical and CTC use to communicate with CTC-based NEs.
Table 12-3 Port Information for CTC-Based NEs
Port
|
NE
|
CORBA listener port on the Timing Communications and Control Card (TCC+/TCC2) (NE)
|
Configurable with:
• TCC+/TCC2 fixed (57790, outbound).
• Standard Internet Inter-ORB Protocol (IIOP) port (683, outbound).
• User-defined constant.
Note Configure the port in the NE Explorer (Network > Address subtab). For more information, see Viewing and Changing the Network Address—CTC-Based NEs.
|
CORBA listener port on Prime Optical server (callback)
|
Dynamic (current functionality).
Note To make the port static, see CTC IIOP Port Configuration.
|
HTTP
|
From any CTC or Prime Optical port to HTTP port 80 (outbound) on the NE.
|
HTTPS
|
Port 443, active if configured on the NE. This port is only available in NE release 6.0 and later. Prime Optical tries to communicate on this port regardless of whether the NE supports HTTPS. If this port is blocked, it could cause long NE initialization times.
|
TL1 port on TCC+/TCC2 (NE)
|
From any CTC or Prime Optical port to TCP port 3082, 2361 (outbound), or port 4083 (secure).
|
CTC launched from Prime Optical Domain Explorer
|
• From any CTC port to the IIOP port on the NE.
• From any NE port to the IIOP port on CTC.
• From any CTC port to HTTP port 80 (outbound) on the NE.
• Either port is configurable in the CTC.INI (Windows) or .ctcrc (UNIX):
– Dynamic (default).
– Standard IIOP port (683, outbound).
– User-defined constant.
|
L2 Service Resync and IOS CLI ports
|
From any port on Prime Optical to ports 20xx and 40xx on the NE, where xx is the ML-series card slot number.
Note Ports 40xx are required only if shell access is set to Secure.
|
Prime Optical GateWay/SNMP
Note Prime Optical GateWay/SNMP uses port 162 as an internal port.
|
From any NE port to SNMP trap port 162 (inbound) on the Prime Optical server.
|
The following table lists the ports that Prime Optical uses to communicate with ONS 155xx NEs.
Table 12-4 Port Information for the ONS 155xx
Port
|
ONS 155xx
|
Inbound or Outbound?
|
HTTP
|
80/81
|
Outbound
|
TL1
|
TCP 3082, 3083
|
Outbound
|
IOS CLI
|
TCP 23 (Telnet)
|
Outbound
|
Software download, backup, restore
|
69 (TFTP server)
|
Inbound
|
Prime Optical GateWay/SNMP requests
Note Prime Optical GateWay/SNMP uses port 162 as an internal port.
|
UDP 161
|
Outbound
|
SNMP traps
|
UDP 162
|
Inbound
|
12.1.2 Using a Static CORBA Listener Port on the Prime Optical Server
See CTC IIOP Port Configuration.
12.1.3 Client-Server Communication Protocols
Prime Optical uses the following protocols for client-server communication:
•
Common Object Request Broker Architecture (CORBA)—Object Management Group's open, vendor-independent architecture and infrastructure that computer applications use to work together over networks.
•
Java Management Object and Configuration Object (JMOCO)—Cisco proprietary TCP/IP-based request/response protocol.
•
Telnet—A standard internet protocol that provides terminal emulation using the TCP/IP protocols.
•
Java Database Connectivity (JDBC)—The industry standard for database-independent connectivity between Java programming languages and databases. The Prime Optical client uses JDBC to communicate directly with the Prime Optical database, independently from the Prime Optical server.
Note
All ports from 1024 through 65536 must be open to ensure communication between the Prime Optical server and client. The use of firewalls between the Prime Optical server and client is not supported. Your Prime Optical client will not work correctly if you place a firewall between the Prime Optical server and client (blocking ports from 1024 through 65536).
•
Inbound ports are for operations initiated by the Prime Optical client and then directed to the Prime Optical server.
•
Outbound ports are for operations initiated by the Prime Optical server and then directed to the Prime Optical client.
The following table lists the ports used for communication between the Prime Optical server host and the Prime Optical client host.
Table 12-5 Prime Optical Server-to-Prime Optical Client Ports
Port
|
Inbound or Outbound
|
Protocol
|
Application Protocol
|
Service
|
Notes
|
8051 (configurable)
|
Inbound
|
TCP
|
HTTP
|
Web server
|
Apache HTTP port
|
27613 (configurable)
|
Inbound
|
TCP
|
Proprietary
|
Prime Optical server
|
JMOCO port
|
20000 (configurable)
|
Inbound
|
TCP
|
CORBA
|
CORBA ImR
|
CORBA Implementation Repository port
|
30000
|
Inbound
|
TCP
|
CORBA
|
SM service
|
Service Manager port
|
CORBA IIOP listener port
|
Inbound
|
TCP
|
CORBA
|
CTC-based network services
|
Dynamic: Ports are selected randomly
|
22
|
Inbound
|
TCP
|
SSH
|
Prime Optical server host
|
Standard SSH port for secure login
|
1521
|
Inbound
|
TCP
|
JDBC
|
Oracle listener
|
Database listener port
|
10023-10086
|
Inbound
|
TCP
|
Telnet
|
Telnet relay ports
|
Telnet port
|
3000-3200
|
Outbound
|
UDP
|
SNMP
|
ONS 1530x
|
ONS 1530x SNMP trap forwarding to CEC
|
The following table lists the ports used for communication between the Prime Optical server workstation and the OSS CORBA client workstation.
Table 12-6 Prime Optical Server-to-OSS CORBA Client Ports
Port
|
Inbound or Outbound
|
Protocol
|
Application Protocol
|
Service
|
Notes
|
Dynamic
|
Inbound/outbound
|
TCP
|
CORBA
|
Prime Optical GateWay/CORBA
|
CORBA notification: Ports are assigned randomly by the operating system; however, the notification service can be configured to specify a pool of ports
|
14005
|
Inbound
|
TCP
|
CORBA
|
Prime Optical GateWay/CORBA
|
CORBA naming service
|
The following table lists the ports used for communication between the Prime Optical server workstation and the NEs.
Table 12-7 Prime Optical Server-to-NE Ports
Port
|
Inbound or Outbound
|
Protocol
|
Application Protocol
|
Service
|
Notes
|
161
|
Outbound
|
UDP
|
SNMP
|
Base service
|
—
|
162
|
Inbound
|
UDP
|
SNMP
|
Base service
|
—
|
4500-4510
|
Inbound
|
TCP
|
Proprietary
|
ONS 15305 R3.0 (CTC-based)
|
—
|
12345
|
Outbound
|
TCP
|
Proprietary
|
ONS 15305 R3.0 (CTC-based)
|
—
|
17476
|
Inbound
|
TCP
|
Proprietary
|
ONS 15305 R3.0 (CTC-based)
|
—
|
80
|
Outbound
|
TCP
|
HTTP
|
ONS 15305 R3.0 (CTC-based)
|
—
|
23
|
Outbound
|
TCP
|
Telnet
|
ONS 15305
|
—
|
4500-4510
|
Inbound
|
TCP
|
Proprietary
|
ONS 15305
|
—
|
23
|
Outbound
|
TCP
|
Telnet
|
ONS 15305
|
—
|
161
|
Outbound
|
UDP
|
SNMP
|
ONS 15305 R3.0 (CTC-based)
|
—
|
161
|
Outbound
|
UDP
|
SNMP
|
ONS 15305
|
—
|
3083
|
Outbound
|
TCP
|
TL1
|
ONS 15216
|
—
|
23
|
Outbound
|
TCP
|
Telnet
|
ONS 15216
|
—
|
8023
|
Outbound
|
TCP
|
Telnet
|
ONS 15216
|
—
|
69
|
Inbound
|
TCP
|
TFTP
|
ONS 15216
|
—
|
161
|
Outbound
|
UDP
|
SNMP
|
ONS 15216
|
—
|
161
|
Outbound
|
UDP
|
SNMP
|
CTC-based
|
ML cards.
|
7200
|
Inbound
|
UDP
|
SNMP
|
CTC-based
|
ML cards.
|
7209
|
Outbound
|
UDP
|
SNMP
|
CTC-based
|
ML cards.
|
7210
|
Inbound
|
UDP
|
SNMP
|
CTC-based
|
ML cards.
|
CORBA listener port on the TCC+/TCC2 card (NE)
|
Outbound
|
TCP
|
CORBA
|
CTC-based
|
The port is configurable with:
• TCC+/TCC2 fixed (57790, outbound).
• Standard Internet Inter-ORB Protocol (IIOP) port (683, outbound).
• User-defined constant.
|
CORBA listener port on the Prime Optical server (callback)
|
Inbound
|
TCP
|
CORBA
|
CTC-based
|
Dynamic.
|
80
|
Outbound
|
TCP
|
HTTP
|
CTC-based
|
—
|
3082
|
Outbound
|
TCP
|
TL1
|
CTC-based
|
TL1 port on TCC+/TCC2 (NE).
|
2361
|
Outbound
|
TCP
|
TL1
|
CTC-based
|
TL1 port on TCC+/TCC2 (NE).
|
4083
|
Outbound
|
TCP
|
TL1
|
CTC-based
|
TL1 port on TCC+/TCC2 (NE), secure.
|
20xx
|
Outbound
|
TCP
|
Telnet
|
CTC-based
|
ML cards: L2 Service Resync port. From any port on Prime Optical to port 20xx on the NE, where xx is the ML card slot number.
|
40xx
|
Outbound
|
TCP
|
Telnet
|
CTC-based
|
ML cards: L2 Service Resync port when the shell access is set to secure. From any port on Prime Optical to port 40xx on the NE, where xx is the ML card slot number.
|
3082, 3083
|
Outbound
|
TCP
|
TL1
|
ONS 155xx
|
—
|
161
|
Outbound
|
UDP
|
SNMP
|
ONS 155xx
|
—
|
80, 81
|
Outbound
|
TCP
|
HTTP
|
ONS 155xx
|
—
|
23
|
Outbound
|
TCP
|
Telnet
|
ONS 155xx
|
—
|
69
|
Inbound
|
TCP
|
TFTP
|
ONS 155xx
|
—
|
The following table lists the ports used for communication between the Prime Optical client workstation and the NEs.
Table 12-8 Prime Optical Client-to-NE Ports
Port
|
Inbound or Outbound
|
Protocol
|
Application Protocol
|
Cross-Launched Application
|
Notes
|
161
|
Outbound
|
UDP
|
SNMP
|
CEC
|
—
|
4500-4510
|
Inbound
|
TCP
|
Proprietary
|
CEC
|
—
|
161
|
Outbound
|
UDP
|
SNMP
|
CTC
|
—
|
4500-4510
|
Inbound
|
TCP
|
Proprietary
|
CTC
|
—
|
12345
|
Outbound
|
TCP
|
Proprietary
|
CTC
|
—
|
17476
|
Inbound
|
TCP
|
Proprietary
|
CTC
|
—
|
69
|
Inbound
|
UDP
|
TFTP
|
CTC
|
—
|
23
|
Outbound
|
TCP
|
Telnet
|
CTC
|
—
|
80
|
Outbound
|
TCP
|
HTTP
|
CTC
|
—
|
CORBA listener port on the TCC+/TCC2 card (NE)
|
Outbound
|
TCP
|
CORBA
|
CTC
|
The port is configurable with:
• TCC+/TCC2 fixed (57790, outbound)
• Standard Internet Inter-ORB Protocol (IIOP) port (683, outbound)
• User-defined constant
|
CORBA listener port on the Prime Optical server (callback)
|
Inbound
|
TCP
|
CORBA
|
CTC
|
Dynamic: The port range can be configured
|
80
|
Outbound
|
TCP
|
HTTP
|
CTC
|
—
|
The following table lists the TCP ports to use in a SOCKS proxy server configuration. This information is helpful when setting up a firewall routing table.
Table 12-9 TCP Ports to Open in a SOCKS Proxy Server Configuration
Port
|
Inbound or Outbound
|
Protocol
|
Application Protocol
|
Notes
|
1080
|
Inbound on firewall/SOCKS proxy host
|
TCP
|
SOCKS v5
|
The port is configurable and is used for the connection between the Prime Optical client host and the firewall host.
|
10023-10086
|
Inbound (Prime Optical server host)
|
TCP
|
Telnet
|
Used for the connection between the Prime Optical client host and the Prime Optical server host.
|
8051
|
Inbound (Prime Optical server host)
|
TCP
|
HTTP
|
Used for the connection between the Prime Optical client host and the Prime Optical server host.
|
All CTC ports, for CTC cross-launch
|
Inbound on the NE that CTC is connected to
|
TCP
|
—
|
Used for the connection between the Prime Optical client host and the subnetwork that contains the NE that CTC wants to reach.
|
12.1.4 Changing the Prime Optical Server Port
Normally, users do not change the Prime Optical server port. In cases where the Prime Optical server port is used for other applications, use the NE Service pane to change the TCP port number of the Prime Optical server. All Prime Optical clients use the JMOCO port to connect to the Prime Optical server. See Table 12-5 for information about the JMOCO port.
Step 1
In the Domain Explorer window, choose Administration > Control Panel.
Step 2
In the Control Panel window, click NE Service to open the NE Service pane. Click the NE Poller tab.
Step 3
In the Prime Optical Server Port field, change the server port. The server port in the Active column displays the current port. The server port in the After Restart column displays the port that is active after the server is restarted.
Step 4
Click Save. Changes to this parameter take effect only after the server is restarted.
12.1.5 Changing the HTTP Server Port
If other applications use the HTTP server port, you can change the default port. Complete the following steps:
Step 1
Open a shell on the Prime Optical server workstation and enter the following command to shut down the Prime Optical server:
Step 2
Enter the following commands to change directories to the HTTP server directory and create a copy of the configuration file:
cp httpd.conf httpd.conf.ori
Step 3
Locate the following lines in the httpd.conf file:
ServerName IP-address:8051
In each of these lines, replace the default port 8051 with the new HTTP server port.
Step 4
Enter the following command to start the Prime Optical server:
Step 5
On each Prime Optical client, locate the following line in the
Prime Optical-client-installation-directory/config/ems_client.cfg:
Replace 8051 with the new HTTP server port.
Caution 
Be sure to repeat this change on each Prime Optical client.
Step 6
Launch the Prime Optical client. To verify that the HTTP services are working, choose Help > Current Window in the Domain Explorer.
12.2 How Do I Manage Northbound Interfaces?
Prime Optical GateWay is an architectural component that provides northbound EMS-to-NMS interface mediation. Prime Optical GateWay allows service providers to integrate Prime Optical with their OSSs by using open, standard interfaces.
Prime Optical supports three gateway modules that provide northbound EMS-to-NMS interface mediation. Not all NE types are supported by each module. Table 2-2 shows the NE types supported by each gateway module. This section contains the following information:
•
Managing Prime Optical GateWay/SNMP
•
Managing Prime Optical GateWay/CORBA
12.2.1 Managing Prime Optical GateWay/SNMP
SNMP is a network management protocol used almost exclusively in TCP/IP networks. SNMP allows you to monitor and control network devices, manage configurations, collect statistics, check performance, and monitor security.
Prime Optical's GateWay/SNMP feature provides an SNMP trap forwarding service, where any trap generated or received by the server workstation will be forwarded to the set of defined trap destinations. Traps are autonomous notifications sent by an SNMP agent to an SNMP manager, such as HP Open View. Prime Optical GateWay/SNMP does not support southbound SNMP relaying (SNMP SET, GET, and GETNEXT).
The primary advantage of Prime Optical GateWay/SNMP is to limit the amount of traffic on the wide-area DCN. Imagine NEs deployed over a wide geographic area and a centralized network operations center where the management systems are located. If there are five OSs required to receive NE traps, instead of having each NE send five traps over the wide area to each OS, send a single trap to Prime Optical, which can then relay the trap locally in the NOC to the other OSs. NE configuration is also simpler because only one trap destination needs to be configured on each NE.
Prime Optical GateWay/SNMP supports SNMPv1, SNMPv2c, and SNMPv3 traps. SNMPv2c traps contain the Prime Optical host IP address in the source address of the IP packet.
SNMPv3 traps contain the OSS username, authentication protocol, authentication password, privacy protocol, and privacy password.
To enable the OS to determine which NE sent the trap, the trap must be defined with a variable binding that indicates the source NE.
Prime Optical GateWay/SNMP applies to any NE with an SNMP interface.
Note
Table 2-2 shows the NEs that support Prime Optical GateWay/SNMP.
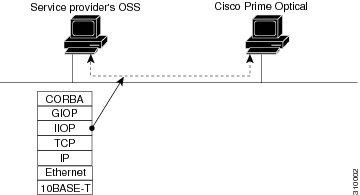
The following figure shows the Prime Optical GateWay/SNMP communications architecture within a service provider's OSS environment.
Figure 12-1 Prime Optical GateWay/SNMP Communications Architecture
12.2.1.1 Starting and Stopping the Prime Optical GateWay/SNMP Service
Prime Optical GateWay/SNMP is a Prime Optical process that can be separately started and stopped through the Control Panel. NEs must be configured with the Prime Optical server IP address as a trap destination for traps to be sent from the NEs to Prime Optical.
Step 1
In the Domain Explorer window, choose Administration > Control Panel.
Step 2
In the Control Panel window, click GateWay/SNMP Service. Table 12-10 provides descriptions.
Step 3
In the Status area, click the Start button to start Prime Optical GateWay/SNMP. Notice that the service status toggles to Active.
Step 4
Click Stop to stop the service. The service status toggles to Not Active.
Note
The Prime Optical GateWay/SNMP Service can take up to 60 seconds to initialize after the GUI status has changed to indicate that the service is up. The status is an indication of the successful initiation of the service startup, not successful initialization. To avoid problems with the service hanging, wait at least 60 seconds after starting or stopping the service before restarting it.
12.2.1.2 Adding and Removing a Prime Optical GateWay/SNMPv1 or Prime Optical GateWay/SNMPv2 Host
You can configure up to 16 SNMP trap destination hosts for Prime Optical GateWay/SNMP. Prime Optical enforces a duplication check error to ensure that you do not enter duplicate OSS IP addresses.
Step 1
In the Domain Explorer window, choose Administration > Control Panel.
Step 2
In the Control Panel window, click GateWay/SNMP Service. The following table provides descriptions.
Step 3
In the SNMP Hosts field, enter a valid IP address or hostname for the SNMP forwarding host; then, click Add. To remove an SNMP host, select the IP address or hostname of the host and click Remove.
Step 4
Repeat for each host to be added or removed; then, click Save.
Table 12-10 Field Descriptions for the GateWay/SNMP Service Pane
Field
|
Description
|
Service Status
|
Displays the current status of the service: Active or Not Active.
|
Service Action
|
Allows you to stop or start the Prime Optical GateWay/SNMP service. Notice that the Service Action button toggles between Stop or Start and the Service Status field changes accordingly.
|
Engine ID
|
Displays the unique identifier for the given Prime Optical GateWay/SNMP application that Prime Optical is communicating with. The engine ID is used to configure the OSS application to receive traps from Prime Optical GateWay/SNMP. The engine ID is generated the first time you install the Prime Optical server.
|
SNMP Hosts
|
Displays the IP address or hostname of the host where each SNMP trap will be forwarded. You can enter up to 16 valid IP addresses or hostnames. Use the Add and Remove buttons to add or remove IP addresses or hostnames.
|
12.2.1.3 Configuring Northbound OSS SNMPv3 Users—Optical NEs
You can use the OSS SNMPv3 Users table to add, modify, or delete OSS SNMPv3 users.
This section contains the following procedures:
•
Viewing the OSS SNMPv3 Users Table
•
Adding an OSS SNMPv3 User
•
Modifying an OSS SNMPv3 User
•
Deleting an OSS SNMPv3 User
12.2.1.3.1 Viewing the OSS SNMPv3 Users Table
To view the OSS SNMPv3 Users table, choose Administration > GateWay/SNMP Users in the Domain Explorer window. The following table provides descriptions.
Table 12-11 Field Descriptions for the OSS SNMPv3 Users Table
Column Name
|
Description
|
Username
|
Name of the user who authenticates the SNMPv3 trap. The name must contain from 6 to 53 alphanumeric characters. The name cannot contain spaces or special characters.
|
Authentication Protocol
|
Type of encryption used to authenticate the SNMPv3 user.
|
IP Address
|
IP address to which to forward the SNMPv3 trap.
|
Privacy Protocol
|
Privacy protocol set for the SNMPv3 user.
|
SNMP Port
|
OSS destination port number. The default port number is 162.
|
SNMP Version
|
SNMP version number.
|
Engine ID
|
Unique identifier for the given Prime Optical GateWay/SNMP application that Prime Optical is communicating with. The engine ID is used to configure the OSS application to receive traps from Prime Optical GateWay/SNMP. The engine ID is generated the first time you install the Prime Optical server.
|
12.2.1.3.2 Adding an OSS SNMPv3 User
SNMPv3 user profiles are stored in the OSS SNMPv3 Users table.
Step 1
In the Domain Explorer window, choose Administration > GateWay/SNMP Users. The OSS SNMPv3 Users table opens.
Step 2
Choose Edit > Add (or click the Create a New User tool). The Add OSS SNMPv3 User dialog box opens. The following table provides descriptions.
Step 3
After providing the required information, click OK.
Table 12-12 Field Descriptions for the Add/Modify OSS SNMPv3 User Dialog Box
Field
|
Description
|
OSS IP Address
|
Enter the IP address to which to forward the SNMPv3 trap.
|
Username
|
Enter a unique name for the new user. The name must contain from 6 to 53 alphanumeric characters. The name cannot contain spaces or special characters.
|
SNMP Port
|
Enter the OSS destination port number.
|
Authentication Protocol
|
Authentication protocol for the OSS SNMPv3 user. Choose the authentication protocol to use for authenticating the user. Values are No Auth, MD5 (the default), or SHA.
|
Authentication Password
|
Enter the password used to authenticate the SNMPv3 user. The password must contain:
• From 1 to 12 characters
• At least one special character other than an apostrophe (')
• At least two letters (A-Z, a-z), including at least one uppercase letter
• At least one number (0-9)
Note Regardless of the actual length of the password, the Password and Confirm Password fields display only a fixed-length string of 15 asterisks (*).
|
Confirm Authentication Password
|
Re-enter the password to confirm it.
|
Privacy Protocol
|
Select the privacy protocol set for the SNMPv3 user. You can choose one of the following:
• NoPriv—No privacy protocol for the user.
Note The Privacy Protocol can be set to No Priv only when the Authentication Protocol is set to No Auth.
• DES—Use Data Encryption Standard (DES) for encryption.
|
Privacy Password
|
Enter the password used to decrypt the message payload.
|
Confirm Privacy Password
|
Re-enter the privacy password to confirm it.
|
12.2.1.3.3 Modifying an OSS SNMPv3 User
Step 1
In the Domain Explorer window, choose Administration > GateWay/SNMP Users. The OSS SNMPv3 Users table opens.
Step 2
Select the SNMPv3 user to modify; then, choose Edit > View/Modify (or click the Modify User Properties tool). The Modify OSS SNMPv3 User dialog box opens. Table 12-12 provides descriptions.
Step 3
Modify the fields described in Table 12-12.
Note
The IP Address and Username fields are read-only.
Step 4
Click OK. The updated user profile is listed in the OSS SNMPv3 Users table.
12.2.1.3.4 Deleting an OSS SNMPv3 User
Step 1
In the Domain Explorer window, choose Administration > GateWay/SNMP Users. The OSS SNMPv3 Users table opens.
Step 2
Select the SNMPv3 user to delete; then, choose Edit > Delete (or click the Delete User tool).
Step 3
Click OK in the confirmation dialog box.
12.2.1.4 Configuring SNMP on Optical NEs
SNMP must be configured for each NE that uses Prime Optical GateWay/SNMP. This section contains the following procedures:
•
Configuring SNMP for the ONS 15216 EDFA2 and EDFA3
•
Configuring SNMP for the ONS 15305
•
Configuring SNMP for CTC-Based NEs
•
Configuring SNMP for the ONS 15530 and ONS 15540
For additional information, refer to the NE user documentation.
Note
•
When configuring SNMP on NEs, make sure that no other SNMP daemon is running on the designated Prime Optical server host.
•
If you enter the opticalctl status command after configuring SNMP, Prime Optical GateWay/SNMP is not shown. This is because the opticalctl status command shows all of the Prime Optical processes and Prime Optical GateWay/SNMP is not a separate process. Use the Service Monitor table to view the status of Prime Optical GateWay/SNMP.
12.2.1.4.1 Configuring SNMP for the ONS 15216 EDFA2 and EDFA3
For the ONS 15216 EDFA2 and EDFA3, SNMP trap entries are added automatically when the NE is added to Prime Optical. See Using SNMP for more information.
12.2.1.4.2 Configuring SNMP for the ONS 15305
For information on how to configure SNMP for the ONS 15305, see the Cisco ONS 15305 Installation and Operations Guide.
12.2.1.4.3 Configuring SNMP for CTC-Based NEs
Note
This section details how to configure SNMP v1/v2 from the NE to the server. For information on configuring SNMPv3 for CTC-based NEs, see SNMPv3 NE Trap Destinations Table.
Step 1
Select a CTC-based NE in the Domain Explorer tree and choose Configuration > NE Explorer (or click the Open NE Explorer tool).
Step 2
In the node properties pane, click the Network tab; then, click the SNMP subtab.
Step 3
(Not applicable to the ONS 15600) To allow SNMP proxy, check the Allow SNMP Proxy check box.
Step 4
(Not applicable to the ONS 15600) To use the SNMP management software with the NE, check the Allow SNMP Set check box.
Step 5
(Not applicable to the ONS 15600) Click Apply.
Step 6
Click Create. The Create SNMP Trap Destination dialog box opens. The following table provides descriptions.
Step 7
After making your selections, click OK.
Step 8
Click Apply.
Table 12-13 Field Descriptions for the Create SNMP Trap Destination Dialog Box
Field
|
Description
|
IP Address
|
Enter the IP address of your NMS.
|
Community Name
|
Enter the SNMP community name. For a description of SNMP community names, refer to the SNMP information in the NE reference guide.
Note The community name is a form of authentication and access control. The community name assigned to the ONS 15600 is case-sensitive and must match the community name of the NMS.
|
UDP Port
|
Set the UDP port for SNMP. The default port is 162. Allowed UDP port values are 162, 391, and values between 1024 and 65535.
|
Trap Version
|
Set the Trap Version field for either SNMPv1 or SNMPv2. See your NMS documentation to determine whether to use SNMPv1 or SNMPv2.
|
Max Traps per Second (not applicable to the ONS 15600)
|
Enter the maximum number of traps per second that will be sent to the SNMP manager. A zero value indicates that there is no maximum and all traps are sent to the SNMP manager.
|
12.2.1.4.4 Configuring SNMP for the ONS 15530 and ONS 15540
Configuring SNMP on ONS 15530 and ONS 15540 NEs is a prerequisite for adding an NE to Prime Optical. If SNMP is not configured on the NE, refer to the instructions in the relevant hardware configuration guide.
12.2.2 Managing Prime Optical GateWay/CORBA
Note
This section provides a high-level overview of Prime Optical GateWay/CORBA. For detailed information about Prime Optical GateWay/CORBA, including how to enable username and password encryption, set the heartbeat event, and create OSS clients, refer to the Cisco Prime Optical 9.6 GateWay/CORBA User Guide and Programmer Manual.
The Common Object Request Broker Architecture (CORBA) is a middleware platform defined by the Object Management Group (OMG). The Prime Optical GateWay/CORBA option is a CORBA-based interface that provides higher-layer management systems with fault, inventory, performance, configuration, Layer 1 circuit provisioning, and Layer 2 VLAN management information for NEs. The Prime Optical GateWay/CORBA option is based on the TeleManagement Forum (TMF) standards for the NMS-to-EMS interface.
Because it is CORBA-based, Prime Optical GateWay/CORBA is independent of the hardware that the integrated OSS is running. This independence allows service providers to easily add Prime Optical as a building block of their management environment.
Note
Table 2-2 shows the NEs that support Prime Optical GateWay/CORBA.
The following figure shows the Prime Optical GateWay/CORBA communications architecture within a service provider's OSS environment.
Figure 12-2 Prime Optical GateWay/CORBA Communications Architecture
Prime Optical GateWay/CORBA is based on the following TMF standards:
•
TMF513 v3.0: Multi-Technology Network Management Business Agreement
•
TMF608 v3.0: Multi-Technology Network Management Information Agreement
•
TMF814 v3.0: Multi-Technology Network Management Solution Set
12.2.2.1 Configuring the CORBA Timeout
The CORBA timeout determines the number of seconds that the Prime Optical server has to process a CORBA call and return it to the Prime Optical client. If the Prime Optical server does not return a response in time, CORBA automatically times out.
Step 1
Open the ems-client.cfg file.
By default, the ems-client.cfg file is located in the following directory:
•
Windows: C:\Cisco\TransportManagerClient\config
•
Sun Solaris: /opt/CiscoTransportManagerClient/config
Step 2
Set the CORBA_Call_Timeout_Seconds parameter to the desired value. The default timeout is 120 seconds; the recommended range is from 120 to 300 seconds.
Note
If the NE is busy or if the Prime Optical server is processing many requests, you might need to increase the CORBA timeout parameter accordingly.
Step 3
Save and close the ems-client.cfg file.
12.2.2.2 Starting or Stopping Prime Optical GateWay/CORBA
Step 1
In the Domain Explorer window, choose Administration > Control Panel.
Step 2
Click GateWay/CORBA Service to open the GateWay/CORBA Service pane.
Step 3
In the Global tab > Status area, click the Start button to start GateWay/CORBA or the Stop button to stop the service.
Note
The Prime Optical GateWay/CORBA Service can take up to 60 seconds to initialize after the GUI status has changed to indicate that the service is up. The status is an indication of the successful initiation of the service startup, not successful initialization. To avoid problems with the service hanging, wait at least 60 seconds after starting or stopping the service before restarting it.
12.2.2.3 Viewing the Prime Optical GateWay/CORBA Service Pane
Use the Prime Optical GateWay/CORBA Service pane to start and stop the Prime Optical GateWay/CORBA service and configure CORBA ports and parameters. The following table provides descriptions.
Note
In CTM R9.2, Prime Optical server ports can be configured from the Ports Configuration tab. Unless otherwise noted, all port configuration changes require a Prime Optical GateWay/CORBA restart.
Table 12-14 Field Descriptions for GateWay/CORBA Service Pane
Field
|
Description
|
Global Tab
|
Service Status
|
Displays the current status of the service: Active, Not Active, or Not Installed.
|
Service Action
|
Allows you to stop or start a process. Notice that the Service Action button toggles between Stop and Start, and the Service Status field changes accordingly. This field is not available if the Service Status is Not Installed.
|
Enable Encryption for Username and Password
|
When checked, usernames and passwords are transmitted between the EMS server and the OSS in encrypted format. The maximum encryption length is 53 bytes. If this check box is unchecked, Prime Optical GateWay/CORBA usernames and passwords are transmitted without encryption. By default, encryption is disabled at installation.
|
Heartbeat for Notification Channel
|
Notifies the OSS if a failure in the notification service has occurred. The heartbeat is measured in minutes; the range is 0 to 999 minutes. A zero value implies that the heartbeat is disabled.
|
Maximum Number of Simultaneous Sessions
|
Specifies the number of Prime Optical GateWay/CORBA sessions that can be active at the same time. The range is from 4 to 25; the default is 4.
|
Maximum Events per Consumer
|
Sets the MaxEventsPerConsumer administrative quality of service (QoS) parameter on the notification channel. The notification server uses this property to bound the maximum number of events in a given channel allowed to queue at any one time. The default value is 0, meaning that the notification server does not limit the maximum number of events that can be queued. If no limits are imposed on the queue, the notification server might run out of memory, because the server must keep all events in memory until they are consumed by all registered consumers.
Caution  Any change to this value should be done with extreme caution. If you set the value too low, the NMS cannot receive all notifications. If you set the value too high, the Prime Optical notification server runs out of memory. The current value can handle alarm bursts of 10,000 events per minute.
|
Notification Service Name
|
Defines the service name used by the resolve_initial_reference function to get a reference to the notification service.
The Prime Optical GateWay/CORBA installation installs the notification service. However, if you want to use your own notification service, you can modify this parameter.
Note You do not need to modify this parameter if you plan to use the notification service that is bundled with Prime Optical GateWay/CORBA.
|
Notification Service Naming Context
|
Defines the naming context of the notification service. This property is used when the resolve_initial_reference function fails to resolve the notification service. Prime Optical GateWay/CORBA contacts the naming service to resolve the name context defined in this property. The value of this property must match the value published by your notification server.
Note You do not need to modify this parameter if you plan to use the notification service that is bundled with Prime Optical GateWay/CORBA.
|
Notification Service Factory IOR Filename
|
Enter the notification service factory Information Object Repository (IOR) filename located in the /opt/CiscoTransportManagerServer/openfusion/domains/OpenFusion/localhost/NotificationService/NotificationSingleton/NotificationService.ior directory.
The FactoryIORFile property defines the path to a text file that contains the IOR of the notification service. This property is used only after the resolve_initial_reference function and the naming service both fail. Prime Optical GateWay/CORBA opens the file as defined by the URL format in this property and retrieves the IOR. This parameter allows you to run your notification service on a different host to improve performance.
Note You do not need to modify this parameter if you plan to use the notification service that is bundled with Prime Optical GateWay/CORBA.
|
Name Service Server List
|
Defines where the name servers are running. Accepts a comma-separated list of hostnames.
|
Name Service Root IOR
|
Defines the path to find the naming service's IOR on each host defined on the server list. The complete path is constructed as <http://<item>_of_ServerList><RootIORLoc>.
|
Error Level
|
Defines the error level of messages to log. Error levels are:
• Critical
• Major
• Minor
• Informational
• Debug
• Trace
|
Port Configuration Tab
|
Enable IMR checkbox
|
IMR is always disabled. This allows you to configure Prime Optical GateWay/CORBA to use static ports. This is a read-only option.
|
Name Service
|
Enter the port that the name service uses to listen for incoming requests. The default value is 14005.
Note This option requires a server restart.
|
Notification Service
|
Enter the port that the notification service uses to listen for incoming requests. The default value is 20001.
|
EMS Session
|
Enter the EMS session port value. The default value is 20100.
|
Event Notification (min)
|
Enter the minimum Event Notification port value. The default value is 20001.
|
Event Notification (max)
|
Enter the maximum Event Notification port value. The default value is 20099.
|
Server-to-Client (min)
|
Enter the minimum Server-to-Client port value. The default value is 20101.
|
Server-to-Client (max)
|
Enter the maximum Server-to-Client port value. The default value is 20199.
|
Debug Tab
|
Dump Cache button
|
Exports the cache (memory) information of the selected Prime Optical GateWay/CORBA service instance to a log file.
|
Overall Logging
|
Click the Enable radio button to enable overall debugging and to select debug modules for the PM service. Click the Disable radio button to disable overall debugging.
|
Debug Modules
|
If overall logging is enabled, lists the modules that can be used for debugging. Select a module from the Available list; then, click the Add button to add the module to the Selected list. Use the Remove button to return the module to the Available list. Debug logging will be performed on the modules in the Selected list.
|
12.2.2.4 Viewing the Prime Optical GateWay/CORBA Users Table
The Prime Optical GateWay/CORBA Users table displays information about OSS CORBA client properties. To launch the table, choose Administration > GateWay/CORBA Users in the Domain Explorer window. The following table provides descriptions. Use the toolbar icons to create, modify, or delete OSS client users.
Tip
You can also launch the GateWay/CORBA Users table from the Control Panel. In the Domain Explorer window, choose Administration > Control Panel. In the Control Panel window, choose Administration > GateWay/CORBA Users.
Table 12-15 Field Descriptions for the GateWay/CORBA Users Table
Column Name
|
Description
|
OSS Profile Name
|
Displays the name of the selected OSS client.
|
12.2.2.5 Adding a Prime Optical GateWay/CORBA User
OSS client profiles are stored in the GateWay/CORBA Users table.
Step 1
In the Domain Explorer window, choose Administration > GateWay/CORBA Users. The GateWay/CORBA Users table opens.
Step 2
Choose Edit > Add (or click the Create a New User tool). The Add GateWay/CORBA User dialog box opens. The following table provides descriptions.
Step 3
After making your selections, click OK. The new profile is visible when the GateWay/CORBA Users table is refreshed.
Table 12-16 Field Descriptions for Add/Modify GateWay/CORBA User Dialog Box
Field
|
Description
|
OSS Profile Name
|
Enter a unique name for the new OSS profile. The name must contain from 6 to 53 alphanumeric characters. The name cannot contain spaces or special characters.
|
Password
|
Enter the password that the OSS client uses to log into the Prime Optical server. The password must contain:
• From 1 to 12 characters
• At least one special character other than an apostrophe (')
• At least two letters (A-Z, a-z), including at least one uppercase letter
• At least one number (0-9)
Note Regardless of the actual length of the password, the Password and Confirm Password fields display only a fixed-length string of 15 asterisks (*).
|
Confirm Password
|
Re-enter the password to confirm it.
|
12.2.2.6 Modifying a Prime Optical GateWay/CORBA User's Properties
Step 1
In the Domain Explorer window, choose Administration > GateWay/CORBA Users. The GateWay/CORBA Users table opens.
Step 2
Select the CORBA user profile to modify; then, choose Edit > View/Modify (or click the Modify User Properties tool). The Modify GateWay/CORBA User dialog box opens. Table 12-16 provides descriptions.
Step 3
After making any necessary modifications, click OK. The updated profile is visible when the GateWay/CORBA Users table is refreshed.
12.2.2.7 Deleting a Prime Optical GateWay/CORBA User
Step 1
In the Domain Explorer window, choose Administration > GateWay/CORBA Users. The GateWay/CORBA Users table opens.
Step 2
Select the CORBA user profile to delete; then, choose Edit > Delete (or click the Delete User tool).
Step 3
Click OK in the confirmation dialog box.
Note
Prime Optical GateWay/CORBA does not allow an OSS profile to be deleted if there are active users logged in using that OSS profile.
12.2.2.8 Viewing Logged-In Prime Optical GateWay/CORBA Users
Step 1
In the Domain Explorer window, choose Administration > GateWay/CORBA Users. The GateWay/CORBA Users table opens.
Step 2
Choose Administration > Logged In GateWay CORBA Users (or click the Show Logged In GateWay CORBA Users tool). The Active GateWay/CORBA Users table opens. The following table provides descriptions.
Table 12-17 Field Descriptions for Active GateWay/CORBA Users Table
Field
|
Description
|
OSS Profile Name
|
Name of the OSS profile. Each client has a unique alphanumeric name.
|
OSS IP Address
|
IP address of the OSS client that is authenticated by Prime Optical GateWay/CORBA during the initial connection request made by the OSS.
|
Login Time (time zone)
|
Time stamp when the CORBA user logged in.
|
12.2.2.9 Ending an Active GateWay/CORBA User Session
Step 1
In the Domain Explorer window, choose Administration > GateWay/CORBA Users. The GateWay/CORBA Users opens.
Step 2
Choose Administration > Logged In GateWay CORBA Users (or click the Show Logged In GateWay CORBA Users tool). The Active GateWay/CORBA Users table opens.
Step 3
In the Active GateWay/CORBA Users table, select the user whose session will be ended and choose Administration > Log Out GateWay CORBA User (or click the Log Out GateWay CORBA User tool).
12.2.2.10 Changing the Default Settings of Prime Optical Server and OSS CORBA Client Ports
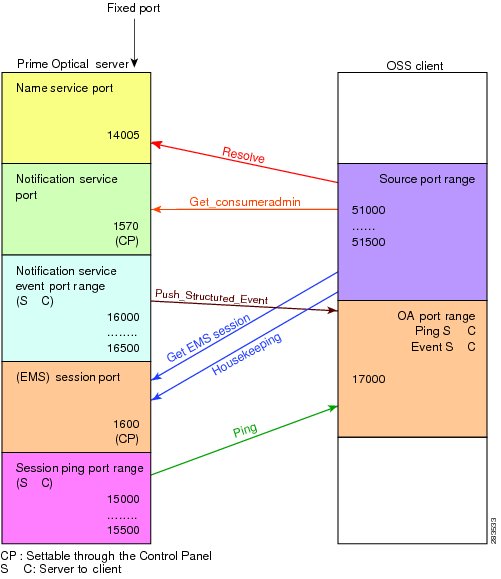
For each connected OSS, JacORB uses several ports that have the following functions, as illustrated in Figure 12-3:
•
Session port—The main channel used for handshakes between the OSS and the CORBA gateway. The CORBA gateway assigns this port to a random value between free ports in the system.
•
Notification service port—The channel used to receive notifications from the CORBA gateway.
•
Name service port—The port used to request a new session. The value is always fixed; the default port number is 14005.
•
Session ping port—The channel used to establish a keep-alive handshake between the gateway and the OSS. The CORBA gateway assigns this port to a random value between free ports in the system.
•
Notification service event port—A second port range used to push alarms or events from the CORBA gateway to the OSS. This port is a keep-alive channel like the previous association to the notification channel.
Figure 12-3 Sample CORBA Gateway Static Port Settings
Caution 
Errors resulting from changing the Prime Optical server ports or the OSS CORBA client ports can cause unpredictable system behavior.
Note
•
It is recommended that you back up the current configuration files before changing the default settings.
•
You can change the default settings only for OSS CORBA client ports that use JacORB.
You can change the default values of the following ports:
•
OSS CORBA client ports:
–
Object Adapter Port
–
Source Port Range
–
NAT Between the Prime Optical Server and OSS CORBA Client
•
Prime Optical server ports:
–
NameService Port
–
NotificationService Port
–
EMSSession Port
–
Ping Server-to-Client Port Range
–
Notification Event Port Range
Note
You can also set Prime Optical server port values from the Prime Optical GateWay/CORBA Service pane > Port Configuration tab. For more information, see Viewing the Prime Optical GateWay/CORBA Service Pane.
To set static values for CORBA gateway ports, it is strongly recommended that you follow these steps:
Step 1
With the Prime Optical server running, use the Control Panel to set the notification service port and the session port. See NotificationService Port and EMSSession Port.
Step 2
Enter the following command to stop the Prime Optical server:
Step 3
Disable IMR. See Disabling IMR.
Step 4
Set the session ping port range. See Ping Server-to-Client Port Range.
Step 5
Set the name service port. See NameService Port.
Step 6
Set the notification service event port range. See Notification Event Port Range.
Step 7
Enter the following command to start the Prime Optical server:
Step 8
Whenever you establish a new CORBA gateway session, use the netstat command to verify the actual ports in use and compare them to the newly added session.
12.2.2.10.1 Object Adapter Port
If you want to use a fixed port for the OSS CORBA client, change the value of the -DOAPort property. The -DOAPort property should be added to the file that launches the OSS CORBA client application. If there are two client instances running on the same machine, there should be two different port settings.
12.2.2.10.2 Source Port Range
Step 1
Open the jacorb.properties file from the OSS CORBA client directory.
Step 2
Change the value of the following properties:
jacorb.net.socket_factory=org.jacorb.orb.factory.PortRangeSocketFactory
jacorb.net.socket_factory.port.min=xxx
jacorb.net.socket_factory.port.max=yyy
12.2.2.10.3 NAT Between the Prime Optical Server and OSS CORBA Client
If Network Address Translation (NAT) exists between the Prime Optical server and OSS CORBA client, configure the jacorb.ior_proxy_host=xxx.xx.xx.xxx property from the jacorb.properties file to receive Prime Optical server callback messages and server-to-client pings. The xxx.xx.xx.xxx variable is the IP address of NAT inside global address.
12.2.2.10.4 NameService Port
Note
You can also set the Name Service port value from the Prime Optical GateWay/CORBA Service pane > Port Configuration tab. For more information, see Viewing the Prime Optical GateWay/CORBA Service Pane.
Step 1
Enter the following command to stop the Prime Optical server:
Step 2
Open the NameService.xml file from the
/opt/Prime Optical-server-directory/openfusion/domains/localhost/NameService directory.
Step 3
Change the value of the Port property to the desired value. The default value is 14005.
Step 4
Enter the following command to stop the Prime Optical server:
Step 5
Complete the following substeps to verify the new value of the port:
a.
Enter the following command in the /opt/CiscoTransportManagerServer/openfusion/bin directory:
b.
Choose Domains > OpenFusion > localhost > NameService in the Object Hierarchy tree.
c.
Click the CORBA tab in the right pane. The Server Port property displays the new port value.
12.2.2.10.5 NotificationService Port
Note
You can also set the Notification Service port value from the Prime Optical GateWay/CORBA Service pane > Port Configuration tab. For more information, see Viewing the Prime Optical GateWay/CORBA Service Pane.
Step 1
Stop the Prime Optical GateWay/CORBA service. See Starting or Stopping Prime Optical GateWay/CORBA for instructions.
Step 2
Change the value of Notification Service Listening Port Number to the desired value.
Step 3
Restart the Prime Optical GateWay/CORBA service. See Starting or Stopping Prime Optical GateWay/CORBA for instructions.
Step 4
Complete the following substeps to verify the new value of the port:
a.
Enter the following command in the /opt/CiscoTransportManagerServer/openfusion/bin directory:
b.
Choose Domains > OpenFusion > localhost > NotificationService in the Object Hierarchy tree.
c.
Click the CORBA tab in the right pane. The Server Port property displays the new port value.
12.2.2.10.6 EMSSession Port
Note
You can also set the EMS Session port value from the Prime Optical GateWay/CORBA Service pane > Port Configuration tab. For more information, see Viewing the Prime Optical GateWay/CORBA Service Pane.
Step 1
Stop the Prime Optical GateWay/CORBA service. See Starting or Stopping Prime Optical GateWay/CORBA for instructions.
Step 2
Change the value of Session Port Number to the desired value.
Step 3
Restart the Prime Optical GateWay/CORBA service. See Starting or Stopping Prime Optical GateWay/CORBA for instructions.
12.2.2.10.7 Ping Server-to-Client Port Range
Note
You can also set the Server-to-Client port values from the Prime Optical GateWay/CORBA Service pane > Port Configuration tab. For more information, see Viewing the Prime Optical GateWay/CORBA Service Pane.
Step 1
Stop the Prime Optical GateWay/CORBA service. See Starting or Stopping Prime Optical GateWay/CORBA for instructions.
Step 2
Open the jacorb.properties file from the /opt/Prime Optical-server-directory/openfusion/classes directory.
Step 3
Do the following in the Socket Factories section:
a.
Uncomment the .jacorb.net.socket_factory=org.jacorb.orb.factory.PortRangeSocketFactory row.
b.
Change the .jacorb.net.socket_factory.port.min value to the desired minimum range value.
c.
Change the .jacorb.net.socket_factory.port.max value to the desired maximum range value.
Step 4
Restart the Prime Optical GateWay/CORBA service. See Starting or Stopping Prime Optical GateWay/CORBA for instructions.
12.2.2.10.8 Notification Event Port Range
Note
You can also set the Notification Event port range from the Prime Optical GateWay/CORBA Service pane > Port Configuration tab. For more information, see Viewing the Prime Optical GateWay/CORBA Service Pane.
Step 1
Stop the Prime Optical GateWay/CORBA service. See Starting or Stopping Prime Optical GateWay/CORBA for instructions.
Step 2
Open the NotificationService.xml file from the
/opt/Prime Optical-server-directory/openfusion/domains/localhost/NotificationService directory.
Step 3
Change the value of the JVMFlags property to the following:
<PropertyValue>-Dosgi.parentClassloader=ext
-Djacorb.net.socket_factory=org.jacorb.orb.factory.PortRangeSocketFactory
-Djacorb.net.socket_factory.port.min=xxx
-Djacorb.net.socket_factory.port.max=yyy</PropertyValue>
Note
Do not use carriage returns when entering the new value of the JVMFlags property. The new value must be entered on the existing row.
Step 4
Restart the Prime Optical GateWay/CORBA service. See Starting or Stopping Prime Optical GateWay/CORBA for instructions.
12.2.2.10.9 Disabling IMR
By default, IMR is disabled. To enable IMR, you must manually edit the jacorb.properties file.
Step 1
Make a backup copy of the jacorb.properties file located in the
Prime Optical-server-installation-directory/openfusion/classes directory.
Step 2
In the jacorb.properties file, configure the following properties to "off":
jacorb.use_imr_endpoint=off
12.2.2.11 Changing the Prime Optical GateWay/CORBA Client Ports
In CTM R9.0 and earlier releases, Prime Optical GateWay/CORBA was installed and configured to use random ports and did not support a firewall between the OSS client and the Prime Optical server. Starting from CTM R9.1, you can install and configure Prime Optical GateWay/CORBA to use static ports, which facilitates the use of a firewall between the OSS client and the Prime Optical server.
12.2.2.11.1 Installation
When you install Prime Optical GateWay/CORBA, all of the ports are configured with default fixed values. See Table 12-18 for the list of default fixed values.
Note
To configure Prime Optical GateWay/CORBA to use static ports, you must disable IMR. See Configuration.
Table 12-18 List of Parameters and Fixed Values
Parameters
|
Default Fixed Values
|
EMS Session Port
|
20100
|
Name Service Port
|
14005
|
Notification Service Port
|
20001
|
Session Ping Port range
|
20101-20199
|
Event Notification Port range
|
20002-20099
|
IMR
|
Off
|
Proxy Host Address
|
Not set
|
Note
It is recommended that you change the default fixed values after the Prime Optical GateWay/CORBA installation is complete. If you change the values while installing Prime Optical GateWay/CORBA, the installation might fail.
12.2.2.11.2 Configuration
Note
•
You can also configure Prime Optical server ports from the Prime Optical GateWay/CORBA Service pane > Port Configuration tab. For more information, see Viewing the Prime Optical GateWay/CORBA Service Pane.
•
Prime Optical GateWay/CORBA must be stopped in order to configure ports.
Step 1
Log into the Prime Optical server as the root user.
Step 2
Invoke the manageCTMCorbaPorts.sh file from the Prime Optical-server-installation-directory/bin directory.
Note
If Prime Optical GateWay/CORBA is running, you only have the option to read port configuration settings.
The following appears:
--------------------------------------------------
Manage CTM GateWay/CORBA Ports Utility
--------------------------------------------------
1. Read Configuration Set
2. Read Configuration Running
3. Restore All Default Values
5. Change Name Service Port
6. Change Proxy Host Address
7. Change Notification Service Port
8. Change EMS Session Port
9. Change S->C Ping Port Range
10. Change Notification Event Port Range
0. Exit
-------------------------------------------------
Step 3
Select an item from the menu.
For example, enter 1 to select Read Configuration Set.
For more information on these menu items, see the Cisco Prime Optical 9.6 GateWay/CORBA User Guide and Programmer Manual.
Note
If you select a menu item that changes the configuration, you will be prompted to restart either Prime Optical GateWay/CORBA or the Prime Optical server. See Starting or Stopping Prime Optical GateWay/CORBA for instructions.