Feedback
Table Of Contents
Cisco WebEx Social Administration Overview
Browser Support and Compatibility With Other Components
Overview of Cisco WebEx Social Nodes
Assigning Yourself the Role of Administrator or Level 1 Administrator
Using the Settings Drawer for System Administrators
Configuring Items in the Help Window
Adding Users to Cisco WebEx Social
Introduction to the Cisco WebEx Social User Interface
Installation and Configuration for Cisco Web Communicator
Adding Cisco Web Communicator to Cisco Unified Communications Manager
Using BAT to Add Devices for Cisco Web Communicator
Enabling Cisco Unified Presence
Considerations If You Use Multiple Device Pools
Configuring Cisco Unified Communications Manager for CTI
Call Routing for Cisco Web Communicator
Network Security Configuration for Cisco Web Communicator
Obtaining the Plugin for Cisco Web Communicator
Configuring a Group Policy for the Video Plugin
Introduction to Users, Collections of Users, and Roles
Basic Verification Steps for the User Interface
Using the New Post Application
Enabling or Disabling Cisco WebEx Social Components
Downloading Images and Attachments to Mobile Clients
Cisco WebEx Social Administration Overview
Cisco WebEx Social is a collaboration platform that allows you to work with your colleagues in a single environment. With Cisco WebEx Social, you can easily share information such as documents, videos, and presentations, conduct meetings, click-to-dial a contact, post information, join communities, participate in discussion forums, create blogs, and much more. This administration guide is intended for the system administrator of the Cisco WebEx Social platform.
This chapter includes these topics:
•
Browser Support and Compatibility With Other Components
•
•
•
•
•
•
•
•
•
•
•
•
Administrator Roles
Cisco WebEx Social Administration Guide picks up where Cisco WebEx Social Installation and Upgrade Guide leaves off, meaning that you should now have Cisco WebEx Social completely installed. This administration guide begins with instructions for setting yourself up as the system administrator so that you can deploy Cisco WebEx Social to your users and perform system administrator duties.
Cisco WebEx Social supports two administrator roles:
•
•
Major responsibilities of the system administrator include:
•
•
•
•
•
•
•
•
•
Note
Browser Support and Compatibility With Other Components
For a list of browsers and other components that are compatible with Cisco WebEx Social, see Cisco WebEx Social Compatibility Matrix.
Overview of Cisco WebEx Social Nodes
Table 1-1 provides a brief description of the service that each node in a Cisco WebEx Social environment performs. The service a node performs is often referred to as a role in Cisco WebEx Social. Some roles can run on multiple nodes in a Cisco WebEx Social deployment.
Assigning Yourself the Role of Administrator or Level 1 Administrator
Cisco WebEx Social provides a default Administrator that is preconfigured in the system. Cisco recommends that you log in as this default user and add yourself as an Administrator.
This procedure that this section describes requires that you already be set up as a user in the LDAP directory. In this procedure, you perform an LDAP synchronization, then you can choose yourself and assign the desired role
Before You Begin
Perform the LDAP synchronization procedure as described in the "LDAP Directory Sync" section.
To add yourself as a Administrator, follow these steps:
Procedure
Step 1
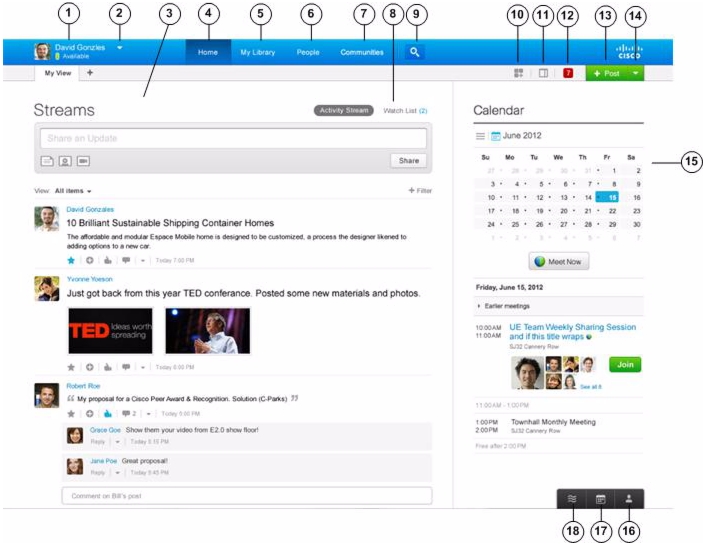
The Cisco WebEx Social window appears. The top area of this window contains the Global Navigation bar, as shown in Figure 1-1.
Figure 1-1 Global Navigation Bar
Step 2
to the right of your name in the Global Navigation bar, then select Account Settings from the drop-down menu.
Step 3
next to Portal to expand the Portal drawer, then select Users.
The Users window shows a list of users who were imported from the LDAP directory.
Step 4
You can use the search fields to locate a user.
Step 5
Step 6
Step 7
Step 8
The user now has the role that you assigned.
You can now begin configuring Cisco WebEx Social. You can perform most configuration tasks by using the Cisco WebEx Social control panel, described in "Using the Settings Drawer for System Administrators" section.
Using the Settings Drawer for System Administrators
Many functions that you need to maintain Cisco WebEx Social are available from the Settings drawers. To access these drawers, click the down-arrow
to the right of your name in the Global Navigation bar, then select Account Settings from the drop-down menu.
Cisco WebEx Social includes the following drawers. To expand a drawer so that you can see its options, click the right-arrow
next to the name of the drawer.
•
–
–
•
–
•
Configuration Reference Table
Cisco WebEx Social contains many features that require configuration through the Settings drawers or the Director before they can be used. Table 1-2 describes these features. In this table, features that are noted with "configuration required" must be configured before they are operational. Other features can be configured as needed, but are operational with the default settings.
Table 1-2 Configuration References
Application Plugin Installation Permissions
Sets which groups of users can add specific Cisco WebEx Social applications to their pages.
Application Plugin Active/Inactive Status
Sets which Cisco WebEx Social applications are available or unavailable to all users.
Calendar Server
(configuration required)Allows users to access Calendar applications.
Chat
(configuration required)Allows users to click the Chat icon in the Cisco WebEx Social bar to start an instant messaging chat with a colleague.
Cisco Web Communicator
Allows users to use Cisco Web Communicator within Cisco WebEx Social.
Communities
Allows you to add, remove, assign roles, assign members, and so on, for Cisco WebEx Social communities.
Community Manager
Allows you to create categories that users can use when they create new communities.
Compliance Officer role (configuration required)
Has the role of deciding what to do with content that Cisco WebEx Social users have reported as inappropriate or incorrect.
Email linked to message board posts (configuration required)
Allows subscribers of message board topics to receive and reply to posts by using an email client application.
Help Links
You can configure various items that are used in the Help window.
Feature disablement and enablement
Allows you to disable and reenable a number of Cisco WebEx Social features.
Kerberos
Allows you to configure the Kerberos authentication protocol, which enables devices to communicate securely over a non-secure network.
Keystore Generation
Allows you to generate SSL certificates that are used to complete WebEx Site, WebEx IM, and VoiceMail configuration.
LDAP Authentication (configuration required)
Performs user authentication.
LDAP Directory Synchronization (configuration required)
Synchronizes Cisco WebEx Social server with LDAP directory.
LDAPS Authentication and Directory Synchronization (configuration required if choosing this over LDAP)
Authenticates and synchronizes Cisco WebEx Social with LDAP directory using SSL.
Log Properties
Lets you configure various log levels for troubleshooting purposes.
Notification service (configuration required)
Allows the Cisco WebEx Social administrator to send notifications to users.
Password Policies (configuration required)
Sets password policies for your users.
Plugin configuration
Allows you to make various applications active or inactive, and to set which portal roles have permissions to add specific Cisco WebEx Social application plugin to one of their pages.
Plugin installation
Allows you to add applications that are not part of the default set of applications shown in Table 1-4.
Presence (configuration required)
Allows Cisco WebEx Social users to set their availability state (either Available, Away, or Do Not Disturb) from the drop-down menu that appears near their name in Cisco WebEx Social. When users sets their availability state, this state is visible to their contacts in many areas of Cisco WebEx Social.
Resource Monitoring
Allows you to monitor and free memory, clear the cluster cache, generate thread dumps, and so on.
Roles
Allows you to create a wide variety of specific functions and assign them to various users, user groups, and communities.
SharePoint—Using as Cisco Repository
Allows you to use Microsoft SharePoint as the Cisco WebEx Social repository for documents in the Cisco WebEx Social library, and attachments to Cisco WebEx Social posts and discussion boards.
Show and Share (configuration required)
Allows users to upload and share video.
SiteMinder authentication
Allows you to configure SiteMinder single sign-on authentication.
Twitter (configuration required)
Allows users to tweet to and from Cisco WebEx Social.
User Associations—Changing Defaults
Can designate communities, roles, and user groups that should, by default, be assigned to all new users.
If you make no changes, all new users have the role of User and Power User. For definitions of role, see the "Roles" section.
User Groups
Allows you to bring groups of users together that may not share common or communities.
Users
Allows you to add, remove, edit information, set permissions, and so on for Cisco WebEx Social users.
Voice Messages (configuration required)
Lets you configure visual voice mail so that users can retrieve voice messages, send replies, send new messages, forward messages, and delete voice messages by communicating with the Cisco Unity Connection server that controls their voice mail system.
Web Dialer (configuration required)
Allows users to place click-to-dial calls.
WebEx (configuration required)
Allows users to use Webex for creating meetings and sending instant messages.
WSRP Configuration and Replication Across Cisco WebEx Social Nodes (configuration required)
WSRP defines a web-service interface for accessing and interfacing with interactive, presentation-oriented web services.
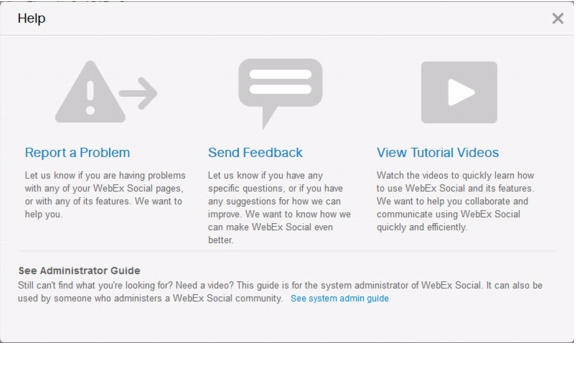
Configuring Items in the Help Window
When you click the Help button at the bottom of the Cisco WebEx Social window, the Cisco WebEx Social Help window appears, as shown in Figure 1-2.
Figure 1-2 Help Window
Table 1-3 describes the Help window items that you can configure, explains how to configure these items, and provides references for related information.
Table 1-3 Configuring Items in the Cisco WebEx Social Help Window
Email address or email alias to which an email message is sent when users use the Report a Problem link in the Help Window.
In the Director, select Application > Portal, and in the Advanced Portal Properties area, enter the desired email address or email alias in the Value field for the report.problem.email.to.address property. Then click Save in the Advanced Portal Properties area and click Apply Config.
See the "Advanced Portal Properties" section.
Text that appears in the To field of the message that is sent when users use the Report a Problem link in the Help Window.
In the Director, select Application > Portal, and in the Advanced Portal Properties area, enter the desired string in the Value field for the report.problem.email.to.name property. Then click Save in the Advanced Portal Properties area and click Apply Config.
Page that appears when users click the Send Feedback link in the Help Window.
In the Director, select Application > Portal, and in the Error Reporting area, enter the desired link in the Send Feedback Link field. Then click Save in this area.
See the "Error Reporting" section.
Page that appears when users click the View Tutorial Videos link in the Help Window.
In the Director, select Application > Portal, and in the Error Reporting area, enter the desired link in the Tutorial Videos Link field. Then click Save in this area.
Page that appears when users click the See system admin guide link in the Help Window.
In the Director, select Application > Portal, and in the Error Reporting area, enter the desired link in the System Admin Guide Link field. Then click Save in this area.
Adding Users to Cisco WebEx Social
In general, you do not need to actively add users to Cisco WebEx Social. Users who are in LDAP Active Directory are authenticated and added to the Cisco WebEx Social database when they sign in. The Cisco WebEx Social password for such a user is the same as the LDAP password of that user.
However, if a user is not in LDAP and you manually add this user to Cisco WebEx Social, you need to create the same user on the Notifier node. For instructions, see the "Adding a User to Notifier" section.
Introduction to the Cisco WebEx Social User Interface
Cisco WebEx Social is a portal server—a single environment in which all applications that a user needs can run. These applications are integrated in a consistent and systematic way within a single interface.
This section contains the following topics:
Global Navigation Options
When you sign in to Cisco WebEx Social, the Main window appears. Figure 1-3 shows a typical Main window.
Figure 1-3 Cisco WebEx Social Main Window
Applications
All the application functionality within Cisco WebEx Social is divided into fragments of web applications that run in a portion of a web page. In this way, one or many applications can reside on a page, and users can (at the description of the system administrator) arrange these applications however they want.
Note
Some Cisco WebEx Social applications appear on certain pages by default. Those that do not appear by default can be added. Applications can be added to the Home page and the community pages. For more information about which applications can be added to which of these pages, see Table 1-4.
To add an application, or to see what applications are available, click the Add Application icon
the Home page, the Featured Content tab on the Profile page, or any community page for a community of which you are the owner or administrator. Cisco WebEx Social displays only the applications that you can add to the page that you opened.
Note
Application Configuration
After you have added an application to a page, you can move your cursor over the application and click the gear con
that appears. From the drop-down menu that then appears, you can select Edit Setting for most applications. When you select Edit Setting, you are then allowed to edit Permissions for most applications. Some applications have additional options under Edit Setting, such as various Setup items. You should make sure to check what Edit Setting options are available for the applications you add, and configure these settings as you wish.
Note
Application Descriptions
Table 1-4 provides an alphabetical listing and descriptions of all applications provided by Cisco WebEx Social. You can add an application to your page in these ways:
•
•
Table 1-4 Applications Supported by Cisco WebEx Social From the Add Application Icon
Streams
Activities allows you to display your recent activities as well as perform a number of actions.
By default, already displays in Home.
Watchlist allows you to display posts you have authored, posts you have made favorites, posts you have commented on or added something to, and posts that you have interacted with and that others have commented on, added something to, or made a favorite.
By default, already displays in Home.
Note
Alerts
Allows you to see system alert messages.
Available only to Cisco WebEx Social system administrators.
Announcements
Allows you to see system announcements.
Available only to Cisco WebEx Social system administrators.
Content Publisher
Allows you to display web content on your page.
Documents
Allows you to access your document library and upload documents and create folders.
By default, displays in Communities > Library.
External Document Repository
Allows you to access an external SharePoint or Documentum repository. (For supported SharePoint and Documentum versions, see Cisco WebEx Social Compatibility Guide.)
Note
To modify this property for SharePoint 2007, in SharePoint Central Administration, click SharedServices1 under Shared Services Administration, click Search Settings under Search, click Metadata properties under Queries and Results, and then click ContentType.
To modify this property for SharePoint 2010, in SharePoint Central Administration, select Application Management > Manage service applications > Search Service Application > Metadata Properties > ContentType.
After you modify this property run a full crawl to cause the update to take effect.
For SharePoint 2007, in SharePoint Central Administration, click SharedServices1 under Shared Services Administration, click Search Settings under Search, click Content sources under Crawling, click Local Office SharePoint Server sites, and select Start Full Crawl from the drop-down menu.
For SharePoint 2010, in SharePoint Central Administration, select Application > Content Sources > Local SharePoint sites > Start Full Crawl.IFrame
Allows you to imbed another web page within a frame.
Note
Images
Allows you to access to your image library and upload documents and folders.
By default, displays in Communities > Library.
Links
Allows you to create links to content for quick retrieval.
Calendar
Allows you to place your Outlook or Lotus Domino calendar on the page.
My Communities
Allows you access your communities.
By default, already displays in Communities > My Communities.
OpenSocial App
Allows you to add an OpenSocial gadget to your page.
Configuration Notes:
After you add the OpenSocial gadget application to your page, a small window is provided for you to paste in the URL to a gadget that you wish to add to your Cisco WebEx Social page. After you paste in the URL, click Submit, and the gadget appears on your page.
Post Library
Allows you to display the posts of a community library.
Recently Viewed Documents
Allows you to display the documents most recently accessed from the Document Library.
Reported Content
Allows you to view content that users have reported as inappropriate or incorrect.
Note
RSS
Allows you to set up and display RSS feeds.
Suggestions
Allows you to receive suggestions for people to follow, posts to view, and communities to join.
Tag Cloud
Allows you to navigate using tags.
Voice Messages
Allows you to see, listen, and reply to voice messages left on your phone.
Wiki
Allows you to add a wiki.
Installation and Configuration for Cisco Web Communicator
Cisco Web Communicator is a plug-in for Cisco WebEx Social. It is a softphone in your web browser. It also allows you to remotely control a physical telephone on your desk by using Computer Telephony Integration (CTI).
To use the Cisco Web Communicator softphone in Cisco WebEx Social, you must first configure the device in Cisco Unified Communications Manager. To remotely control a desk phone, that phone must be configured to allow CTI in Cisco Unified Communications Manager.
This section contains the following topics:
•
•
•
•
•
•
•
•
Adding Cisco Web Communicator to Cisco Unified Communications Manager
This section describes how to add Cisco Web Communicator to Cisco Unified Communications Manager.
If a user will use Cisco Web Communicator in Computer Telephony Integration (CTI) mode only, you can skip this section and proceed to the "Configuring Cisco Unified Communications Manager for CTI" section.
Before You Begin:
•
•
To add a new Cisco Web Communicator device to Cisco Unified Communications Manager, perform the following steps. You must have administrative privileges on Cisco Unified Communications Manager or request that someone with these privileges perform the following procedure.
Procedure
Step 1
Step 2
The Find and List Phones window opens.
Step 3
The Add a New Phone window opens.
Step 4
Step 5
The Phone Configuration window opens.
Step 6
•
–
–
–
There may be some name clashes because names that are only unique in the 13th character and beyond become the same name when ECP is prepended and the total length is truncated to 15. Also, the names Joe.Bloggs and JoeBloggs both map to the same device name—ECPJoeBloggs. These ambiguities must be handled on a case-by-case basis, and may require that the user names be changed to make them unique.
Similarly, the user Frédéric will have a device name of ECPFrdric. Dropping the non-Latin characters can lead to further name clashes.
•
•
•
Step 7
•
•
Step 8
Step 9
Note
Step 10
The Directory Number Configuration window opens.
Step 11
Step 12
•
•
Step 13
Step 14
Step 15
The Find and List Users window opens.
Step 16
The Directory Number Configuration window should now show that the user is associated with the line. This information appears near the bottom of the window in the section called "User Associated With Line."
Step 17
The End User Configuration window opens.
Step 18
Step 19
The Find and List User Groups window opens.
Step 20
Step 21
The Standard CCM End Users group should now appear in the Permissions Information section at the bottom of the End User Configuration window.
Step 22
The Cisco Web Communicator device is now configured in Cisco Unified Communications Manager.
Using BAT to Add Devices for Cisco Web Communicator
This section describes how to use the BAT to enable Cisco Web Communicator for multiple users. BAT allows you to add Cisco Unified Client Services Framework-based phone devices, and then associate these devices with a list of users.
This process requires two files—one file that lists the devices, and another file that lists the users to associate with these devices.
This section contains the following topics:
•
•
Required Input Files
You need a user-list input file and a device-list input file. These files should always be stored in comma separated file (csv) format. The easiest way to edit the files is by using Excel, and it is recommended to always save each file as a .csv file and not as a .xls or .xlsx file.
User List
This .csv user-list file contains two columns:
•
•
Table 1-5 shows an example of the information to include in the user-list input file.
Table 1-5 User-List File Example
jjones
ECPjjones
jmurphy
ECPjmurphy
jsmith
ECPjsmith
The list of usernames may be gathered from LDAP or a database, or by generating a report from Cisco Unified Communications Manager.
In Cisco Unified Communications Manager Administration, the Bulk Administration > Users > Export Users option can generate a list of names. The telephone number is also present when generating the list using this BAT option. Depending on the local convention, the telephone number may be only the telephone extension (typically four digits), but the number listed in the DIRECTORY NUMBER 1 column must be a complete directory number (which often has an office-code prefix).
The device name is created by placing the prefix ECP in front of the username and then removing any characters that are not permitted. Symbols such as dots, hyphens, underscores must be stripped, as well as any accented characters or characters not in the Latin (English) alphabet. (See Step 6 above for more details.)
If the list of usernames is generated in Cisco Unified Communications Manager Administration, then remove any columns other than USER ID and CONTROLLED DEVICE 1.
Note
Device File
The list of devices must correspond, line for line, with the list of users. An example portion of the file is shown in Table 1-6.
The DEVICE NAME and DIRECTORY NUMBER 1 entries are required. Other fields are optional. For example, if DISPLAY 1 and LINE TEXT LABEL 1 are populated, they appear in the device configuration in the Line 1 section of the Directory Number Configuration for that device. DIRECTORY NUMBER 1 may not be the same as the telephone number listed in LDAP, depending on local dialing rules.
Uploading Files
To upload the user name and device name files, perform the following steps:
Procedure
Step 1
The Find and List Files window opens.
Step 2
The File Upload Configuration window opens.
Step 3
a.
b.
c.
d.
e.
Step 4
a.
b.
c.
d.
e.
Create Device Template
To create a device template for fields that are not set by the input file, perform the following steps:.
Procedure
Step 1
The Find and List Phone Templates window opens.
Step 2
The Add a New Phone Template window opens.
Step 3
Step 4
The Phone Template Configuration window opens.
Step 5
•
•
•
Step 6
•
•
Depending on your local requirements, you may wish to update other fields. For example, if you need a specific Calling Search Space applied to all Cisco Web Communicator devices, update that field.
Step 7
Step 8
The Line Template Configuration window opens.
Step 9
Step 10
•
•
Step 11
Step 12
The template now exists, so the next step is to add devices that will use this template.
Adding the Devices
To add devices to the template you created, follow these steps:
Procedure
Step 1
The Insert Phones Configuration window opens.
Step 2
Step 3
Step 4
The job is now in progress.
Step 5
Note
Updating the Users
After you have added the devices, you need to associate users to the devices:
Procedure
Step 1
The Update Users Configuration window opens.
Step 2
Step 3
Step 4
Enabling Cisco Unified Presence
To make presence information available with Cisco Web Communicator, each line must be associated with a user. You can create a .csv file that contains this association. For an example of the type of information this file must contain, see Table 1-7.
If you are using route partitions, the PARTITION column must match the route partition that you applied to the line when you created the line template in Cisco Unified Communications Manager Administration.
To import the line-association file into Cisco Unified Communications Manager, follow these steps:
Procedure
Step 1
The Find and List Files window opens.
Step 2
The File Upload Configuration window opens.
Step 3
Step 4
Step 5
Step 6
The Update Line Appearance Configuration window opens.
Step 7
Step 8
Considerations If You Use Multiple Device Pools
If your users belong to different device pools, you must create a separate template for each device pool. The procedure for adding the devices must be run one time for each device pool, using the matching list and template.
Removing Devices
If you want to remove devices, you must create a .csv file that contains only the DEVICE NAME column. The, go to Bulk Administration > Phones > Delete Phones > Custom Files, and use the fields in that window to define the phones to delete.
File Format Issues
If you receive file-format error messages, examine the applicable file in Notepad to make sure no commas are missing. Sometimes, errors can occur during file-import with Excel.
References
For more information about using BAT, see the following sources:
•
•
http://www.cisco.com/univercd/cc/td/doc/product/voice/c_callmg/admin/bulk_adm/index.htmConfiguring Cisco Unified Communications Manager for CTI
Before configuring Cisco Web Communicator, you must configure WebDialer (if you have not already done so) to communicate properly with Cisco Unified Communications Manager. For instructions on how to configure WebDialer, see the "WebDialer" section.
Note
To control a device using CTI, the user must belong to the proper user group and the device must be CTI-enabled. If both these items are properly configured, no configuration changes are required.
However, if either one of these items is not configured properly or if the device has been turned off, follow these steps:
Procedure
Step 1
Step 2
The Find and List Phones window opens.
Step 3
Step 4
The End User Configuration window opens.
Step 5
The Find and List User Group window opens.
Step 6
All user groups are listed. Check the box to the left of each of the following groups:
•
•
•
•
Step 7
The window closes and the End User Configuration window reopens.
Step 8
The user is now enabled for CTI.
Note
You must also enable the phone that is associated with the user, so you must know the correct device name. Then, follow these steps:
Procedure
Step 1
Step 2
The Find and List Phones window opens.
Step 3
Step 4
The Phone Configuration Window appears.
Step 5
Step 6
Step 7
Note
You have now enabled both the end user and the device. The device should now be accessible from Cisco Web Communicator.
Additional Cisco Unified Communications Manager Configuration for Video Calls
To allow users to make video calls, make the following additional configuration settings in Cisco Unified Communications Manager:
•
•
Call Routing for Cisco Web Communicator
Cisco Web Communicator uses contact numbers from the Cisco WebEx Social directory. These are typically E.164 numbers, which are fully qualified international number starting with +. Also on Cisco Web Communicator, or any other softphone client, users may copy and paste numbers in from other sources on the internet. Therefore, it is recommended that Cisco Unified Communications Manager be configured to support E.164 numbers. How this is configured depends on you Cisco Unified Communications Manager version and your local numbering scheme.
Network Security Configuration for Cisco Web Communicator
If there are firewalls in your network, you may need to open the following ports on the client PC from which you access Cisco WebEx Social. These ports are used by Cisco Web Communicator:
•
•
•
•
•
If any of the ports listed above are blocked, or if the service they offer is not accessible, Cisco Web Communicator fails to start.
If the Windows Firewall is running, you must add Mozilla Firefox and Internet Explorer to the list of allowed programs so that they can receive incoming network connections. Use the Exceptions tab in the firewall configuration dialog to perform this configuration.
Obtaining the Plugin for Cisco Web Communicator
All users must download the appropriate plugin for their operating systems to use Cisco Web Communicator. As the Cisco WebEx Social administrator, you can provide the following instructions to your users for installing the plugin from a supported browser:
Note
Procedure
Step 1
Step 2
to the right of your name in the Global Navigation bar.
Step 3
Step 4
Using Cisco Web Communicator
To use Cisco Web Communicator to place a call, follow these steps:
Procedure:
Step 1
A hover card for the user appears.
Step 2
.
Configuring a Group Policy for the Video Plugin
Current versions of the video plugin require authorization to allow Cisco WebEx Social to control the camera and microphone of a user. A user can provide this authorization via a security dialog box when authorization is needed.
Alternatively, a domain administrator can apply a registry key in a group policy in the appropriate domain so that users do not receive the call plugin-in security dialog box. To do so, follow these steps:
Procedure
Step 1
Step 2
Step 3
Step 4
Step 5
•
•
Step 6
Step 7
Step 8
a.
b.
\Software\Policies\Cisco Systems, Inc.\Web Communicator\AlwaysAllow.c.
d.
e.
f.
Introduction to Users, Collections of Users, and Roles
This section introduces some basic concepts used in the organization of a portal and its resources. The following concepts are used frequently in this guide:
•
•
•
•
One way to conceptualize portal architecture is that you have users and various ways those users can be grouped together.
Other groupings may be done administratively by role assignments for other functions that may cut across the portal. An example is a Message Boards Administrator role made up of users from multiple communities, where these users can have system-administrator-type rights over any message board in the portal.
This section contains these topics:
Users
Users can be collected in several ways. They can be collected into arbitrary user groups, such as Bloggers, which would enable them to create blog entries in their personal space. They can be members of organizational hierarchies. They can be members of communities that draw together common interests. They can also have roles that describe their functions in the system, and these roles can be scoped by portal or community.
For information about adding and administering users, see the "Users" section.
User Groups
User groups are simple, arbitrary collections of users, created by administrators. User groups can be members of communities or users that share a common role. They also can be used to assign users to communities. Permissions cannot be assigned to user groups. Though user groups do not have their own pages, user groups have page templates that can be used to customize users' personal sets of pages. For information about adding and administering user groups, see "User Groups" section.
Communities
Communities are collections of users who have a common interest. There are three types of communities:
•
•
•
Communities are ideal workspaces for teams to collaborate on common projects. They provide an isolated area where a group of people can place all of their data pertaining to a particular topic. For example, within a community, you might use some Cisco WebEx Social applications as follows:
•
•
Note
For information about adding and administering communities, see the "Communities" section.
Roles
A role is of a set of permissions that is defined for a particular breadth of the portal (such as for a community or for the entire portal, and for some or all applications). One of your most important duties as a system administrator is to create and define new roles, redefine existing roles, and assign these roles to users, user groups, and communities in Cisco WebEx Social.
This section contains the following topics:
Default Roles You Can Assign
Table 1-8 describes the set of default roles that you, as system administrator, can assign to any Cisco WebEx Social user.
Table 1-8 Roles and Definitions
Administrator
A person (a super user) who has can access and control all areas of Cisco WebEx Social.
Level 1 Administrator
A person who has limited access and control to Cisco WebEx Social. Can access these portal drawers and features: Users, Communities, User Groups, Roles, Community Manager, and WebEx Social Metrics. Cannot access Server drawers. Cannot change settings of the Administrator role
Community Owner
A person who created a community, and is therefore automatically a super user of that community. They can assign community roles to other users.
Community Administrator
A person who is a super user of their community but cannot assign the role of Community Administrator to any other users.
Community Member
A person who belongs to a community.
Compliance Officer
A person who monitors and can act on content that users have reported as inappropriate or incorrect. For more information, see the "Compliance Officer Role" section.
Guest
A person who does not log in with a username and password, but can view content if permitted.
Owner
This is an implied role with respect to objects the user creates. Objects include blog entries, wikis, documents, and more.
Power User
A person who can create their own public and private pages.
By default, all users are assigned the Power User and the User roles.
User
A person who can browse other pages but not create public or private pages.
By default, all users are assigned the User and the Power User roles.
Scopes of Roles
There are two kinds of roles:
•
•
These are called role scopes. Roles are used to define permissions across their scope: across the portal or across a community. Roles exist as a bucket for granting permissions to the users who are members of them.
Portal permissions cover portal-wide activities that are in several categories, such as community, location, or password policy. In this way, you can create a role that, for example, can create new communities in the portal. With portal permissions, you can grant users a particular permission without making them overall system administrators. Cisco WebEx Social, by default, has been set up so that users can create communities.
Roles can also be granted permissions to various functions within Cisco WebEx Social applications. For example, consider a role that grants access to create a message board category. A portal role would grant that access across the portal, wherever there was a message board application. A community role would grant that access only within a single community.
Because roles are used strictly for portal security, they also do not have their own pages.
Note
For information about creating new roles, and defining and assigning roles, see the "Roles" section.
Compliance Officer Role
A compliance officer can be any Cisco WebEx Social user who is assigned this role by a Cisco WebEx Social system administrator. There can be any number of compliance officers on your Cisco WebEx Social platform.
Note
The job of a compliance officer is to examine content that users report as inappropriate or missing and decide what to do with this content. The compliance officer can request that the author change the content in question or the compliance officer can decide to make a decision without contacting the author.
Threshold Set by System Administrator
One setting that affects reported content that only a system administrator can configure is the threshold for how many times the same content can be reported by Cisco WebEx Social users before Cisco WebEx Social automatically hides this content.
For information about where to set this threshold, see the "Reported Content" section.
Compliance Officer email Setting
Another setting that only a system administrator can configure is the email address and "from" name that are associated with emails that are sent to users from the compliance officer.
For information about where to configure this setting, see the "Compliance Officer Email" section.
Adding Reported Content Application to Home Page
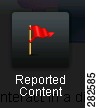
If you are assigned the role of compliance officer, you must first add the application called "Reported Content" to your Home page. To do so, follow these steps:
Procedure
Step 1
to add an application.
Step 2
Step 3
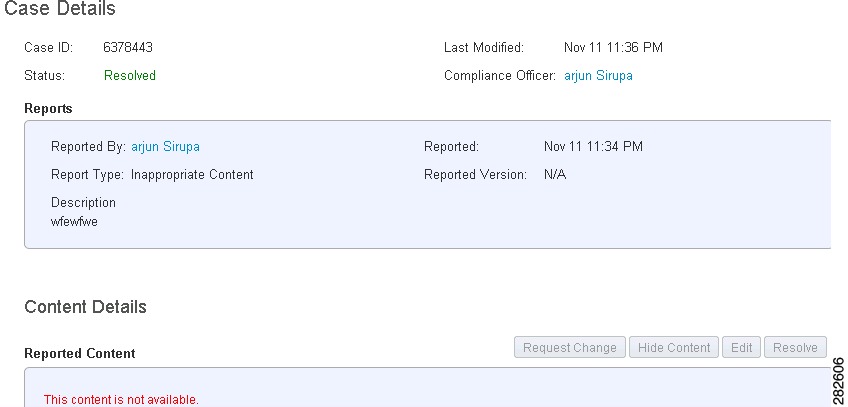
Figure 1-4 Reported Content Application
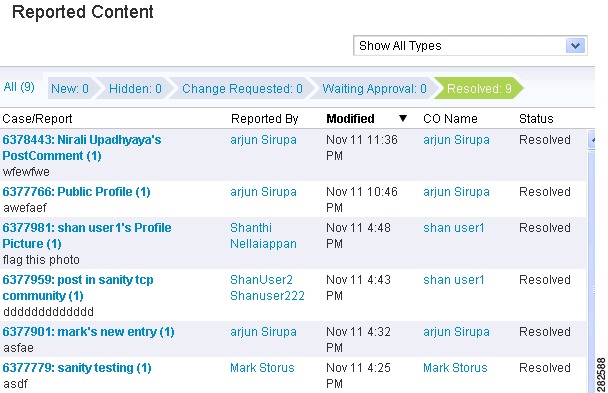
After the application loads, the Reported Content window opens (see Figure 1-5). This window shows all cases of reported content and the status of each case, including cases that have already been resolved. To see case details, click on a case, and a window such as the example shown in Figure 1-6 opens.
Figure 1-5 Reported Content Window
Figure 1-6 Example of a Case Details Window
Duties of Compliance Officer
To handle a case, you click on one of the cases in the "New" column in the Reported Content window (Figure 1-5), and take an action, whether it be to resolve the case right away, or to hide it and request a change of content from the author.
Notes About Reported Content Cases:
•
•
•
•
•
Basic Verification Steps for the User Interface
Before announcing to your users that Cisco WebEx Social is running and ready for them to use, you may want to perform some simple tasks to make sure you obtain the expected behavior. This section covers a few simple scenarios that you may want to try:
•
Editing Your Profile
Follow these steps to edit your Home page, and check that the steps work as described:
Procedure
Step 1
Expected behavior: Your Profile page appears.
Step 2
Expected behavior: A popup window appears that allows you to browse for a picture to upload.
Step 3
Expected behavior: The picture appears in the photo box.
Step 4
The page opens in edit mode.
Step 5
Expected behavior: The page exits edit mode and returns to the regular Profile view. All changes you made while the page was in edit mode should have taken effect.
Using the New Post Application
Follow these steps to create a post and share it with a community, and check that the steps work as described:
Procedure
Step 1
Expected behavior: The New Post dialog box opens.
Step 2
Step 3
.
Expected behavior: The Share With dialog box opens.
Step 4
Expected behavior: You should see a message that your post was successful and that it can be accessed in your Library, which is referring to the Library page that you access from the Library tab in the global navigation bar.
Step 5
•
•
Adding an Application
Follow these steps to add an application to your Home page:
Procedure
Step 1
Step 2
.
Step 3
The application appears in your Home page.
Enabling or Disabling Cisco WebEx Social Components
Cisco WebEx Social components can be enabled and disabled by using the System > Topology page in the Director. For complete information, see the "System: Topology" section.
Serviceability
Cisco WebEx Social administrators can access a variety of serviceability features that allow monitoring Cisco WebEx Social operations and assist with diagnosing issues.
Table 1-9 provides an overview of the Serviceability features and provides references for more detailed information. For additional related information, see Cisco WebEx Social Troubleshooting Guide.
Table 1-9 Cisco WebEx Social Serviceability Features
Configuration options
Use the System > Configuration window in the Director to set up email recipients for alert notifications and to configure an SNMP community stream.
See the "System: Configuration" section
Health information
The System > Health window in the Director displays the health status of various services that run on each Cisco WebEx Social node
See the "System: Health" section
Statistics
Displays metrics of various Cisco WebEx Social components
See the "Stats Page" section
Logs
Logs collect a variety of information about the operation of Cisco WebEx Social.
See the "Log Properties" section
Synthetic Monitoring
The synthetic monitor runs periodically to verify basic Cisco WebEx Social features. It does not perform a comprehensive check of the system.
To use synthetic monitoring, the portal property quadapi.auth.quad-oauth-path-header must be set to the default value of true and the quadapi.oauth.token-access-expire-ms portal property must be set to at least 900000 (the default value is 3600000). For more information, see the "Advanced Portal Properties" section.
Synthetic monitoring covers:
•
•
•
•
•
•
•
•
•
•
The synthetic monitor is a script that runs on each App Server node. It uses API calls to perform basic actions and then writes a "passed" or "failed" result to the messages log file on the corresponding App Server.
The log is monitored by monit. When a failed status is detected, an alert is triggered on the Director System > Health page under the service name Synthetic Monitor.
All actions are performed using the dedicated ciscosyntheticmonitoruser user.
The test content that is created by the synthetic monitor, as well as the ciscosyntheticmonitoruser, are treated differently when compared to other users and content they generate:
•
•
When synthetic monitor completes a run, it attempts to delete any post that it creates. If a post cannot be deleted then, it is deleted within 24 hours.
Backup and Restore
For information about backing up Cisco WebEx Social, see Cisco WebEx Social Backup and Restore Guide, Release 3.3.
Proxy Server Authentication
Cisco WebEx Social supports the use of basic authentication for proxies. If you are using features require access to the Internet (such as chat, RSS integration, or Twitter integration) and your proxy requires authentication, ensure sure that your proxy server supports one of these authentication types.
Downloading Images and Attachments to Mobile Clients
The Cisco WebEx Social portal redirects to HTTPS all HTTP requests for images or attachments that the portal receives from mobile clients, if the HTTPS option is enabled in Cisco WebEx Social.
If this option is enabled, the Cisco WebEx Social administrator should inform mobile client users to take either of actions to ensure that images and attachments appear on a mobile client:
•
•